


本来想使用ZBar去做扫描的,但是我没有找到64位的ZBar。有的说是64,一添加进去发现还是32的,所以后来还是决定用苹果自己的。下面是苹果原生扫描的坑:
使用苹果原生扫描的坑:
1、判断设备是否开启相机授权。(下面是代码)
NSString *mediaType = AVMediaTypeVideo;
AVAuthorizationStatus authStatus = [AVCaptureDevice authorizationStatusForMediaType:mediaType];
if(authStatus == AVAuthorizationStatusRestricted || authStatus == AVAuthorizationStatusDenied){
UIAlertView *alert =[[UIAlertView alloc]initWithTitle:@"提示" message:@"请在iPhone的“设置”-“隐私”-“相机”功能中,找到XXX打开相机访问权限" delegate:nil cancelButtonTitle:@"确定" otherButtonTitles: nil];
[alert show];
return;
}
2、添加输入输出设备前要判断该手机(设备)能否添加输入输出设备。
self.session = [[AVCaptureSession alloc]init];
if ([self.session canAddInput:self.input])
{
[self.session addInput:self.input];
}
if ([self.session canAddOutput:self.output])
{
[self.session addOutput:self.output];
}
3、数据type数组中条形码+二维码默认扫描二维码。(可能我表达不正确,或者我自己理解错了,请指正)
//1、这种,扫描二维码
self.output.metadataObjectTypes = @[AVMetadataObjectTypeEAN13Code,
AVMetadataObjectTypeEAN8Code,
AVMetadataObjectTypeCode128Code,
AVMetadataObjectTypeQRCode];
//2、这种,扫描条形码
self.output.metadataObjectTypes = @[AVMetadataObjectTypeEAN13Code,
AVMetadataObjectTypeEAN8Code,
AVMetadataObjectTypeCode128Code];
//3、这种,还是二维码
self.output.metadataObjectTypes = @[AVMetadataObjectTypeQRCode];
坑:如果用第一种扫描二维码会非常快,基本一扫就中。但是扫描条形码则会非常的慢。而且经常扫描不上。度娘告诉的原因是啥CPU啥,计算啥的,太复杂,我个人认为就是:手机没有辨别出二维码还是条形码,所以它不知道该用啥数据类型。
如果你想用原生的进行二维码+条形码都扫描,我不知道如何做。如果你有好的想法请留言。
下面附上代码:
1、导入AVFoundation.framework
2、代理事件:AVCaptureMetadataOutputObjectsDelegate
#import "JJScanBarCodeController.h"
@interface JJScanBarCodeController ()<AVCaptureMetadataOutputObjectsDelegate>
{
NSTimer *_timer;
UIImageView *_imageView;
UIImageView *_lineImageView;
}
@property (strong,nonatomic) AVCaptureDevice *device;
@property (strong,nonatomic) AVCaptureMetadataOutput *output;
@property (strong,nonatomic) AVCaptureDeviceInput *input;
@property (strong, nonatomic) AVCaptureSession *session;
@property (strong, nonatomic) AVCaptureVideoPreviewLayer *preview;
@end
@implementation JJScanBarCodeController
- (void)viewDidLoad {
[super viewDidLoad];
// Do any additional setup after loading the view.
self.title = @"扫描";
self.view.autoresizingMask = YES;
[self initUiOfCamera];
}
- (void)initUIDeviceWithFrame:(CGRect)previewFrame
{
self.device = [AVCaptureDevice defaultDeviceWithMediaType:AVMediaTypeVideo];
NSError *error = nil;
self.input = [AVCaptureDeviceInput deviceInputWithDevice:self.device error:&error];
NSString *mediaType = AVMediaTypeVideo;
AVAuthorizationStatus authStatus = [AVCaptureDevice authorizationStatusForMediaType:mediaType];
if(authStatus == AVAuthorizationStatusRestricted || authStatus == AVAuthorizationStatusDenied){
UIAlertView *alert =[[UIAlertView alloc]initWithTitle:@"提示" message:@"请在iPhone的“设置”-“隐私”-“相机”功能中,找到XXX打开相机访问权限" delegate:nil cancelButtonTitle:@"确定" otherButtonTitles: nil];
[alert show];
return;
}
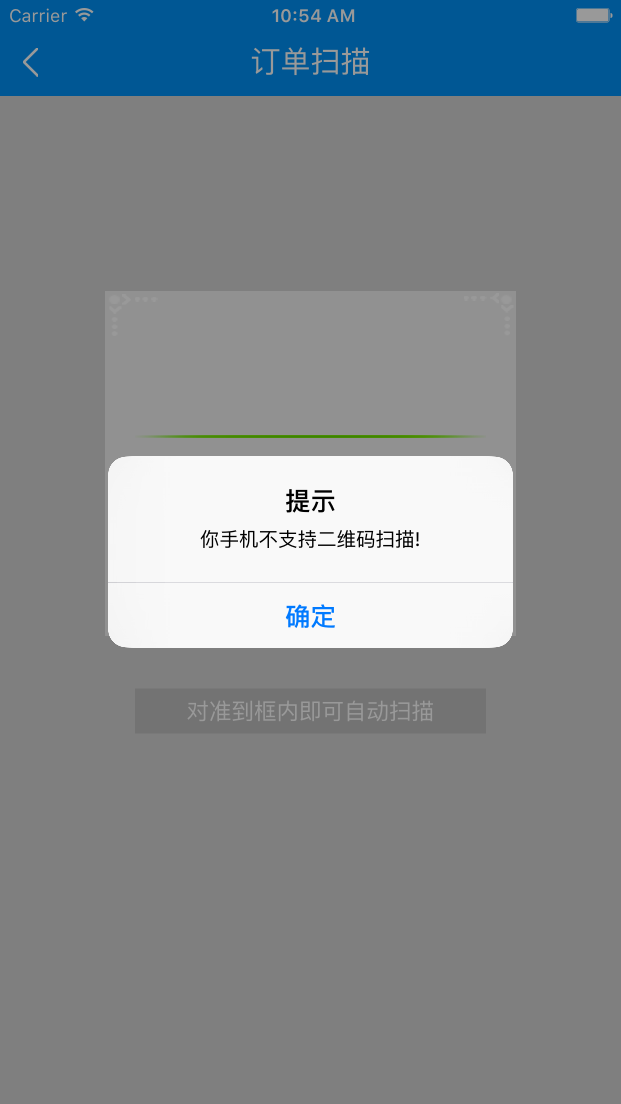
if (error) {
NSLog(@"你手机不支持二维码扫描!");
UIAlertView *alert =[[UIAlertView alloc]initWithTitle:@"提示" message:@"你手机不支持二维码扫描!" delegate:nil cancelButtonTitle:@"确定" otherButtonTitles: nil];
[alert show];
return;
}
self.output = [[AVCaptureMetadataOutput alloc]init];
[self.output setMetadataObjectsDelegate:self queue:dispatch_get_main_queue()];
self.session = [[AVCaptureSession alloc]init];
if ([self.session canAddInput:self.input])
{
[self.session addInput:self.input];
}
if ([self.session canAddOutput:self.output])
{
[self.session addOutput:self.output];
}
self.output.metadataObjectTypes = @[AVMetadataObjectTypeEAN13Code,
AVMetadataObjectTypeEAN8Code,
AVMetadataObjectTypeCode128Code,
AVMetadataObjectTypeQRCode];
self.output.metadataObjectTypes = @[AVMetadataObjectTypeEAN13Code,
AVMetadataObjectTypeEAN8Code,
AVMetadataObjectTypeCode128Code];
//AVMetadataObjectTypeQRCode 二维码
self.preview = [AVCaptureVideoPreviewLayer layerWithSession:self.session];
self.preview.videoGravity = AVLayerVideoGravityResizeAspectFill;
self.preview.frame = previewFrame;
[self.view.layer addSublayer:self.preview];
if ([UIScreen mainScreen].bounds.size.height == 480)
{
[self.session setSessionPreset:AVCaptureSessionPreset640x480];
}
else
{
[self.session setSessionPreset:AVCaptureSessionPresetHigh];
}
[self.session startRunning];
}
//代理的实现
- (void)captureOutput:(AVCaptureOutput *)captureOutput didOutputMetadataObjects:(NSArray *)metadataObjects fromConnection:(AVCaptureConnection *)connection
{
[self.session stopRunning];
self.session = nil;
[self.preview removeFromSuperlayer];
NSString *val = nil;
if (metadataObjects.count > 0)
{
AVMetadataMachineReadableCodeObject *obj = metadataObjects[0];
val = obj.stringValue;
//打印出扫描的信息
DLog(@"%@", val);
}
}
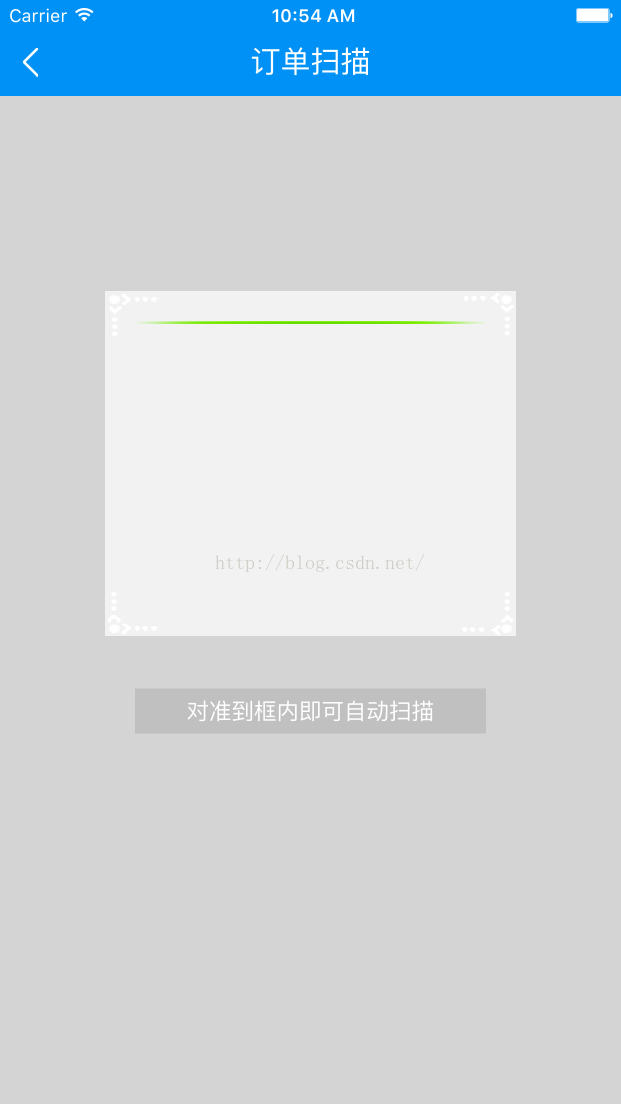
- (void)initUiOfCamera
{
[self initUIDeviceWithFrame:CGRectMake(0, 0, SCREEN_WIDTH, SCREEN_CONTENT_HEIGHT)];
_imageView = [[UIImageView alloc] initWithImage:[UIImage imageNamed:@"pick_bg.png"]];
CGFloat y = (130.0f / 414.0f) * SCREEN_WIDTH;
CGFloat h = (230.0f / 736.0f) * SCREEN_HEIGHT;
CGFloat x = (70.0f / 414.0f) * SCREEN_WIDTH;
_imageView.frame = CGRectMake(x, y, SCREEN_WIDTH - 2 * x, h);
[self.view addSubview:_imageView];
_lineImageView = [[UIImageView alloc] initWithFrame:CGRectMake(20, 10, _imageView.width - 40, 2)];
_lineImageView.image = [UIImage imageNamed:@"line.png"];
[_imageView addSubview:_lineImageView];
//灰色区域
UIColor *needColor = RGBA(212, 212, 212, 1);
//顶部
UIView *topCover = [[UIView alloc] initWithFrame:CGRectMake(0, 0, SCREEN_WIDTH, _imageView.originY)];
topCover.backgroundColor = needColor;
[self.view addSubview:topCover];
//左边
UIView *leftCover = [[UIView alloc] initWithFrame:CGRectMake(0, topCover.bottomY, _imageView.originX, _imageView.height)];
leftCover.backgroundColor = needColor;
[self.view addSubview:leftCover];
//右边
UIView *rightCover = [[UIView alloc] initWithFrame:CGRectMake(_imageView.rightX, topCover.bottomY, SCREEN_WIDTH - _imageView.rightX, _imageView.height)];
rightCover.backgroundColor = needColor;
[self.view addSubview:rightCover];
//底部
UIView *footCover = [[UIView alloc] initWithFrame:CGRectMake(0, _imageView.bottomY, SCREEN_WIDTH, self.view.height - _imageView.bottomY)];
footCover.backgroundColor = needColor;
[self.view addSubview:footCover];
UILabel *prompt = [ChineseHelper createLabelWithFrame:CGRectMake(_imageView.originX + 20, 35, _imageView.width - 40, 30) alignment:NSTextAlignmentCenter font:[UIFont fontWithHiraKakuProNW3:15] textColor:[UIColor whiteColor] text:@"对准到框内即可自动扫描"];
prompt.numberOfLines = 0;
prompt.backgroundColor = RGB(192, 192, 192);
[footCover addSubview:prompt];
_timer = [NSTimer scheduledTimerWithTimeInterval:2.5 target:self selector:@selector(animation) userInfo:nil repeats:YES];
}
- (void)animation
{
[UIView animateWithDuration:2.0 delay:0 options:UIViewAnimationOptionCurveLinear animations:^{
//这个地方改变扫描线的起始y值
_lineImageView.originY = _imageView.height - 20;
} completion:^(BOOL finished) {
//这个地方改变扫描线的起始y值
_lineImageView.originY = 10;
}];
}
//模拟器效果


 1199
1199


 被折叠的 条评论
为什么被折叠?
被折叠的 条评论
为什么被折叠?
 到【灌水乐园】发言


