 本片文章记录我对view 测绘事件的理解,便于我对以后知识的回顾。
 (谢谢艺术探索这本书籍让我对android理解更深。)
目录:
—————————————————我是分割线——————————————————————
1.大体view 测绘流程。
——— SpecMode
2.MeasureSpec 使用和理解。
——— SpecSize
3 MeasureSpec ——- LayoutParams 对应关系。
4 measure layout draw 具体的流程。
—————————————————我是分割线——————————————————————
1.举个例子来开个头吧。
我小时候看过木工装修房屋,第一步应该是对整体房子有一个测量,第二步然后在根据房屋的宽高对一些家具体位置进行测量,第三步再进行按实物安装。
对于android view的测绘 就可以分为 measure——>layout———>draw 这三个过程就可以绘制一个View出来。
其中 measure 就是用来测绘宽高, layout 就是用来确定View在父容器的放置位置, draw就是负责绘制到屏幕上面 。
仔细想一想实际场景和android测绘有木有惊人的相识之处。 那么其实编码赶脚就是模仿生活中的一些情景。
那么出现了一个问题,那么什么手机中什么对应着房子的宽高,或者说是最外层的宽高啦?
在ViewRootImpl 这个类中有一段代码是这样的
childWidthMeasureSpec = getRootMeasureSpec(baseSize, lp.width);
                childHeightMeasureSpec = getRootMeasureSpec(desiredWindowHeight, lp.height);
                performMeasure(childWidthMeasureSpec, childHeightMeasureSpec);
其中 desiredWindowWidth和 desiredWindowHeight是 屏幕的宽高.
2
MeasureSpec 到底是干什么的?
MeasureSpec很大部分是决定一个view的尺寸规格,至于是为什么是大部分这个过 程还受父容器的影响。(思考一下房子,沉思一下)
在测量的过程中系统会将view的LayoutParams根据父容器所施加的规则转换对应的MeasureSpec,然后再根据MeasureSpec来测量出view的测量宽高(不一定等于实际宽高)。
这里看下 源码 怎么写的
  public static class MeasureSpec {
        private static final int MODE_SHIFT = 30;
        private static final int MODE_MASK  = 0x3 << MODE_SHIFT;

        public static final int UNSPECIFIED = 0 << MODE_SHIFT;

        public static final int EXACTLY     = 1 << MODE_SHIFT;

        public static final int AT_MOST     = 2 << MODE_SHIFT;

        public static int makeMeasureSpec(int size, int mode) {
            if (sUseBrokenMakeMeasureSpec) {
                return size + mode;
            } else {
                return (size & ~MODE_MASK) | (mode & MODE_MASK);
            }
        }

这里解释一下MeasureSpec的含义
  MeasureSpec代表一个32位int值 高2位代表SpecMode,低30位代表SpecSize
  SpecMode是指测量的模式
  SpecSize是指测量模式的规格大小。

  SpecMode有三种含义,可以通过以下代码看出来
  /**
     * Extracts the mode from the supplied measure specification.
     *
     * @param measureSpec the measure specification to extract the mode from
     * @return {@link android.view.View.MeasureSpec#UNSPECIFIED},
     *         {@link android.view.View.MeasureSpec#AT_MOST} or
     *         {@link android.view.View.MeasureSpec#EXACTLY}
     */
    public static int getMode(int measureSpec) {
        return (measureSpec & MODE_MASK);
    }
就来介绍常用的两种模式
AT_MOST
父容器指定一个可用的SpecSize,View大小最终不能大于SpecSize,它对应于 LayoutParams中的wrap_content和具体的数值这两种模式。
EXACTLY
父容器已经检测出view所需要的精确大小,这个时候view的最终大小就是SpecSize所指定的值,
它对应于LayoutParams中的match_parent和具体的数值这两种模式。
3.
MeasureSpec ——- LayoutParams 对应的关系
说到这里一定需要从ViewGroup开始说起了,因为大家可能都知道DecorFView是Framelayout,FrameLayout也是继承ViewGroup
public class FrameLayout extends ViewGroup {这里首先先告诉大家
子类的MeasureSpec的创建和子类的layoutParams和父容器的MeasureSpec有关。
来看一下代码
    protected void measureChildWithMargins(View child,
            int parentWidthMeasureSpec, int widthUsed,
            int parentHeightMeasureSpec, int heightUsed) {
        final MarginLayoutParams lp = (MarginLayoutParams) child.getLayoutParams();
        final int childWidthMeasureSpec = getChildMeasureSpec(parentWidthMeasureSpec,
                mPaddingLeft + mPaddingRight + lp.leftMargin + lp.rightMargin
                        + widthUsed, lp.width);
        final int childHeightMeasureSpec = getChildMeasureSpec(parentHeightMeasureSpec,
                mPaddingTop + mPaddingBottom + lp.topMargin + lp.bottomMargin
                        + heightUsed, lp.height);

        child.measure(childWidthMeasureSpec, childHeightMeasureSpec);
    }
先对参数解释一下:
child: ViewGroup中的子view(并对子view进行测绘)
parentWidthMeasureSpec:父容器的宽度规格。
parentHeightMeasureSpec :父容器的高度规格
widthUsed: Extra space that has been used up by the parent horizontally (possibly by other children of the parent)
heightUsed:Extra space that has been used up by the parent vertically (possibly by other children of the parent)
然后获取到childView的LayoutParams 在通过 getChildMeasureSpec来测量子View的规格。
那我们在来看看getChildMeasureSpec这个方法的传参数吧
public static int getChildMeasureSpec(int spec, int padding, int childDimension) {大家可能有疑问说
 final int childWidthMeasureSpec = getChildMeasureSpec(parentWidthMeasureSpec,
                mPaddingLeft + mPaddingRight + lp.leftMargin + lp.rightMargin
                        + widthUsed, lp.width);
        final int childHeightMeasureSpec = getChildMeasureSpec(parentHeightMeasureSpec,
                mPaddingTop + mPaddingBottom + lp.topMargin + lp.bottomMargin
                        + heightUsed, lp.height);
这两个方法怎么传入这么多属性。
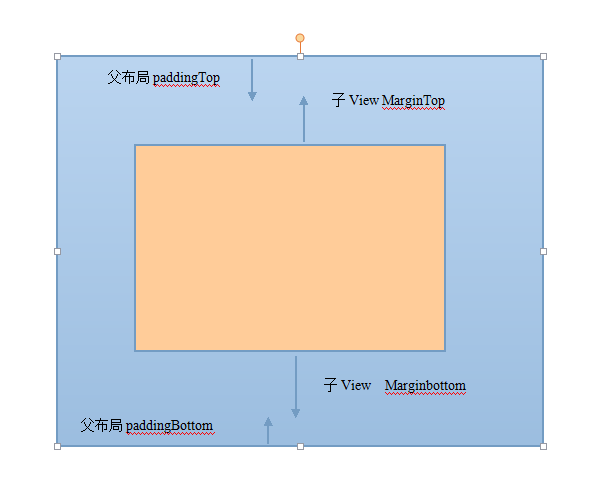
这是因为子view的measureSpec是根据父容器的padding,以及子viewmargin还有宽度来确定的(我是这样认为的)
给出一个图便于大家理解。

然后就可以理解为中间的就是子view 宽高了。(当然并不一定都在中间,举个列子)
我们再看getChildMeasureSpec具体是怎么写的?
public static int getChildMeasureSpec(int spec, int padding, int childDimension) {
        int specMode = MeasureSpec.getMode(spec);
        int specSize = MeasureSpec.getSize(spec);

        int size = Math.max(0, specSize - padding);

        int resultSize = 0;
        int resultMode = 0;

        switch (specMode) {
        // Parent has imposed an exact size on us
        case MeasureSpec.EXACTLY:
            if (childDimension >= 0) {
                resultSize = childDimension;
                resultMode = MeasureSpec.EXACTLY;
            } else if (childDimension == LayoutParams.MATCH_PARENT) {
                // Child wants to be our size. So be it.
                resultSize = size;
                resultMode = MeasureSpec.EXACTLY;
            } else if (childDimension == LayoutParams.WRAP_CONTENT) {
                // Child wants to determine its own size. It can't be
                // bigger than us.
                resultSize = size;
                resultMode = MeasureSpec.AT_MOST;
            }
            break;

        // Parent has imposed a maximum size on us
        case MeasureSpec.AT_MOST:
            if (childDimension >= 0) {
                // Child wants a specific size... so be it
                resultSize = childDimension;
                resultMode = MeasureSpec.EXACTLY;
            } else if (childDimension == LayoutParams.MATCH_PARENT) {
                // Child wants to be our size, but our size is not fixed.
                // Constrain child to not be bigger than us.
                resultSize = size;
                resultMode = MeasureSpec.AT_MOST;
            } else if (childDimension == LayoutParams.WRAP_CONTENT) {
                // Child wants to determine its own size. It can't be
                // bigger than us.
                resultSize = size;
                resultMode = MeasureSpec.AT_MOST;
            }
            break;

        // Parent asked to see how big we want to be
          .................其他的case
        }
        return MeasureSpec.makeMeasureSpec(resultSize, resultMode);
    }
在看到这一段代码
 int specMode = MeasureSpec.getMode(spec);
        int specSize = MeasureSpec.getSize(spec);
        int size = Math.max(0, specSize - padding);
也就证明了我上面所说 的中间的就是子view 宽高了。
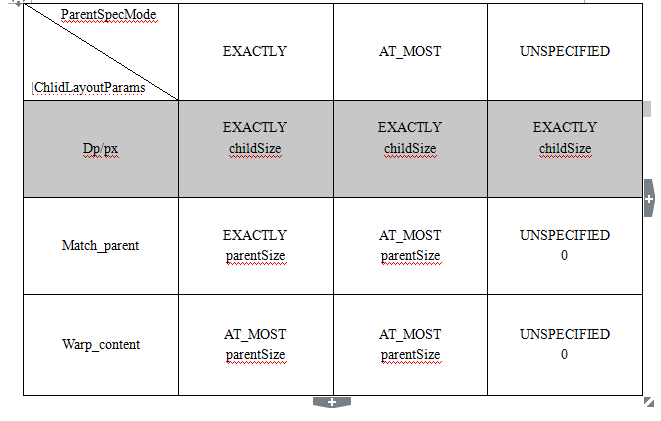
这里引用任玉刚群主的一个图片:
这里抛出来一个问题:
自己写的view并且继承了View,并且在布局中layout_width=”wrap_content”,android:layout_height=”wrap_content”高度也是,并且不重写onMeasure这个方法,父布局是宽高是match_parent 那么应该怎么显示?1.显示全屏?
疑问2. 如果重写我们应该怎样控制?
4 measure layout draw 具体的流程。
既 测量,布局,绘制
其中measure确定view的测量宽/高, layout确定View的最终宽/高和四个顶点的位置,而draw则将View直接测绘到屏幕上。
1.measure过程
measure过程要分情况来看的,如果只是一个View那么直接measure就直接测量宽高了,如果是一个ViewGroup,除了完成自己的测量过程外,还需要遍历去调用所有子元素measure方法,各个子元素在递归去执行这个流程。
那么先看到View measure方法。
protected void onMeasure(int widthMeasureSpec, int heightMeasureSpec) {
        setMeasuredDimension(getDefaultSize(getSuggestedMinimumWidth(), widthMeasureSpec),
                getDefaultSize(getSuggestedMinimumHeight(), heightMeasureSpec));
    }
在看到
  public static int getDefaultSize(int size, int measureSpec) {
        int result = size;
        int specMode = MeasureSpec.getMode(measureSpec);
        int specSize = MeasureSpec.getSize(measureSpec);

        switch (specMode) {
        case MeasureSpec.UNSPECIFIED:
            result = size;
            break;
        case MeasureSpec.AT_MOST:
        case MeasureSpec.EXACTLY:
            result = specSize;
            break;
        }
        return result;
    }
从getDefaultSize这个方法的实现来看,View的宽/高由specSize决定,
那么直接继承View的自定义控件需要重写onMeasure方法并且设置wrap_content时自身的大小,要不然的话使用wrap_content就相当于match_parant。
现在就解决上面 我们提出的问题:
大家肯定记住了 warp_content—>AT_MOST
 @Override
    protected void onMeasure(int widthMeasureSpec, int heightMeasureSpec) {
        super.onMeasure(widthMeasureSpec, heightMeasureSpec);
        int widthSpaceSize = MeasureSpec.getSize(widthMeasureSpec);
        int widthSpachMode = MeasureSpec.getMode(widthMeasureSpec);
        int heightSpaceSize = MeasureSpec.getSize(heightMeasureSpec);
        int heightSpachMode = MeasureSpec.getMode(heightMeasureSpec);
        if (widthSpachMode == MeasureSpec.AT_MOST && heightSpachMode == MeasureSpec.AT_MOST) {
            setMeasuredDimension(default_width, default_height);
        } else if (widthSpachMode == MeasureSpec.AT_MOST) {
            setMeasuredDimension(default_width, heightSpaceSize);
          //  mBackRectF.set(0, 0, default_width, heightSpaceSize);
        } else if (heightSpachMode == MeasureSpec.AT_MOST) {
            setMeasuredDimension(widthSpaceSize, default_height);
          //  mBackRectF.set(0, 0, widthSpaceSize, default_height);
        }
    }
从上面可以看出来了,如果他在AT_MOST的时候我是给了一个默认值了。不给的话可能就是父布局大小了(自己可以尝试一下)
2.看到ViewGrop的measure
对于ViewGrop来说,除了完成自己的measure过程以为,还会遍历所有的子View的measure(这是final方法)方法,一次递归,但是和View不同的是,他并没有onMeasure。而是提供measureChildren方法
    protected void measureChildren(int widthMeasureSpec, int heightMeasureSpec) {
        final int size = mChildrenCount;
        final View[] children = mChildren;
        for (int i = 0; i < size; ++i) {
            final View child = children[i];
            if ((child.mViewFlags & VISIBILITY_MASK) != GONE) {
                measureChild(child, widthMeasureSpec, heightMeasureSpec);
            }
        }
    }
在看到 measureChild
     */
    protected void measureChild(View child, int parentWidthMeasureSpec,
            int parentHeightMeasureSpec) {
        final LayoutParams lp = child.getLayoutParams();

        final int childWidthMeasureSpec = getChildMeasureSpec(parentWidthMeasureSpec,
                mPaddingLeft + mPaddingRight, lp.width);
        final int childHeightMeasureSpec = getChildMeasureSpec(parentHeightMeasureSpec,
                mPaddingTop + mPaddingBottom, lp.height);

        child.measure(childWidthMeasureSpec, childHeightMeasureSpec);
    }
这里突然又有一丝的顿悟。
GroupView-之前先Measure
同时会调用measureChildren—–>循环调用子view的measure
然后子类在调用OnMeasure 向下传递
由于GroupView的子类布局特性各部相同,这时候就有子类重写
onMeasure方法,对View的宽高进行各自的计算。
其他的需要自己分析了(想了半天才理清思路)
Layout过程。
执行顺序
layout—onlayout–layout
layout作用是ViewGroup用来确定子元素的位置,在onlayou中会遍历所有的子元素并且调用其layout方法。在layout中onlayout又会被调用
layout方法确定View本身的位置,而onlayout则会确定所以子元素位置
先看下
View layout方法
 public void layout(int l, int t, int r, int b) {
        if ((mPrivateFlags3 & PFLAG3_MEASURE_NEEDED_BEFORE_LAYOUT) != 0) {
            onMeasure(mOldWidthMeasureSpec, mOldHeightMeasureSpec);
            mPrivateFlags3 &= ~PFLAG3_MEASURE_NEEDED_BEFORE_LAYOUT;
        }

        int oldL = mLeft;
        int oldT = mTop;
        int oldB = mBottom;
        int oldR = mRight;

        boolean changed = isLayoutModeOptical(mParent) ?
                setOpticalFrame(l, t, r, b) : setFrame(l, t, r, b);

        if (changed || (mPrivateFlags & PFLAG_LAYOUT_REQUIRED) == PFLAG_LAYOUT_REQUIRED) {
            onLayout(changed, l, t, r, b);
            mPrivateFlags &= ~PFLAG_LAYOUT_REQUIRED;

            ListenerInfo li = mListenerInfo;
            if (li != null && li.mOnLayoutChangeListeners != null) {
                ArrayList<OnLayoutChangeListener> listenersCopy =
                        (ArrayList<OnLayoutChangeListener>)li.mOnLayoutChangeListeners.clone();
                int numListeners = listenersCopy.size();
                for (int i = 0; i < numListeners; ++i) {
                    listenersCopy.get(i).onLayoutChange(this, l, t, r, b, oldL, oldT, oldR, oldB);
                }
            }
        }

        mPrivateFlags &= ~PFLAG_FORCE_LAYOUT;
        mPrivateFlags3 |= PFLAG3_IS_LAID_OUT;
    }
先通过SetFrame的方法来设定View的四个顶点的位置,顶点确定了就知道位置所在了,然后再调用onLayout确定子元素的位置和OnMeasure类似。因为每个布局不一样所以onlayout就不同。
这里就不再分析,可以自己看一下代码。
3.draw过程。
流程:
draw—–ondraw—draw
下面看到 draw
  public void draw(Canvas canvas) {
        final int privateFlags = mPrivateFlags;
        final boolean dirtyOpaque = (privateFlags & PFLAG_DIRTY_MASK) == PFLAG_DIRTY_OPAQUE &&
                (mAttachInfo == null || !mAttachInfo.mIgnoreDirtyState);
        mPrivateFlags = (privateFlags & ~PFLAG_DIRTY_MASK) | PFLAG_DRAWN;

        /*
         * Draw traversal performs several drawing steps which must be executed
         * in the appropriate order:
         *
         *      1. Draw the background
         *      2. If necessary, save the canvas' layers to prepare for fading
         *      3. Draw view's content
         *      4. Draw children
         *      5. If necessary, draw the fading edges and restore layers
         *      6. Draw decorations (scrollbars for instance)
         */

        // Step 1, draw the background, if needed
        int saveCount;

        if (!dirtyOpaque) {
            drawBackground(canvas);
        }

        // skip step 2 & 5 if possible (common case)
        final int viewFlags = mViewFlags;
        boolean horizontalEdges = (viewFlags & FADING_EDGE_HORIZONTAL) != 0;
        boolean verticalEdges = (viewFlags & FADING_EDGE_VERTICAL) != 0;
        if (!verticalEdges && !horizontalEdges) {
            // Step 3, draw the content
            if (!dirtyOpaque) onDraw(canvas);

            // Step 4, draw the children
            dispatchDraw(canvas);

            // Overlay is part of the content and draws beneath Foreground
            if (mOverlay != null && !mOverlay.isEmpty()) {
                mOverlay.getOverlayView().dispatchDraw(canvas);
            }

            // Step 6, draw decorations (foreground, scrollbars)
            onDrawForeground(canvas);

            // we're done...
            return;
        }
解释一下:
1.绘制背景(canvas)
2绘制自己(onDraw)
3绘制child(dispatchDraw)
4绘制装饰 (onDrawScrollBars)


 1万+
1万+

 被折叠的 条评论
为什么被折叠?


