


看到郭霖大神仿微信主界面的博客,在佩服大神文笔犀利、讲解详尽、代码风骚之余,也想在上班无所事事时,找点有意思的东西玩玩,蘑菇街作为中国最大女性购物社区,其APP的设计水平也毋庸置疑的,最近博客将连续来仿造一个蘑菇街的APP的界面设计。
(1)准备工作
在阅读郭霖大神的博客时有人问里面使用的美工素材怎么得到的,其实很简单,下载一个APP,把APK格式修改成rar后解压,你会在目录下看到所有的素材。
随后,看看APP的界面:


第一个是启动界面,第二个是主界面,先来看第一个界面。
(1)启动界面(Splash)。
启动界面也叫Splash界面,是APP启动时的第一画面,主要用于介绍应用、宣传或者加载数据,或者兼而有之。这里之所以要单独拿出来是因为这个应用有个独特的,它的LOGO是透明渐变出现的,也就是淡入效果,我们知道ANDROID主要有四种动画:透明动画、缩放、位移、旋转,分别使用的AlphaAnimation、ScaleAnimation、TranslateAnimation、RotateAnimation,这里我们使用AlphaAnimation。
界面布局很简单,如activity_loading.xml:
<?xml version="1.0" encoding="utf-8"?>
<LinearLayout xmlns:android="http://schemas.android.com/apk/res/android"
    android:layout_width="match_parent"
    android:layout_height="match_parent"
    android:orientation="vertical"
    android:gravity="center"
    android:background="@drawable/init_bg">
	<ImageView
	    android:id="@+id/logo"
	    android:layout_width="wrap_content"
	    android:layout_height="wrap_content"
	    android:src="@drawable/init_logo"/>
</LinearLayout>
新建一个LoadingActivity类:如下代码:
public class LoadingActivity extends Activity{

	@Override
	protected void onCreate(Bundle savedInstanceState) {
		 super.onCreate(savedInstanceState);
		 //设置全屏
		 this.requestWindowFeature(Window.FEATURE_NO_TITLE);
		 this.getWindow().setFlags(WindowManager.LayoutParams.FLAG_FULLSCREEN, WindowManager.LayoutParams.FLAG_FULLSCREEN);
		 setContentView(R.layout.activity_loading);
		 ImageView view =(ImageView) findViewById(R.id.logo);
         AlphaAnimation aa = new AlphaAnimation(0.01f,1.0f);//透明度变化
         aa.setDuration(1500);//设置渐变时间
         view.startAnimation(aa);//设置渐变的view
         aa.setAnimationListener(new AnimationListener(){
        	 //动画结束后自动执行
            @Override
            public void onAnimationEnd(Animation arg0) {
                redirectTo();
            }
            @Override
            public void onAnimationRepeat(Animation animation) {

            }
            @Override
            public void onAnimationStart(Animation animation) {

            }

         });
	}

	/**
     * 跳转到登陆界面
     */
    private void redirectTo(){
        Intent intent = new Intent(this, MainActivity.class);
        startActivity(intent);
        finish();
    }


}
注意2个地方:a. AlphaAnimation aa = new AlphaAnimation(0.01f,1.0f); 构造方法:AlphaAnimation(float fromAlpha, float toAlpha),表示从透明度0.01到1.0的渐变,我们知道0.0表示全透明,1.0表示完全不透明.
b. onAnimationEnd方法,顾名思义,表示:在动画结束后自动执行这个方法,这里当然是跳转到主界面了。运行后其效果如下:
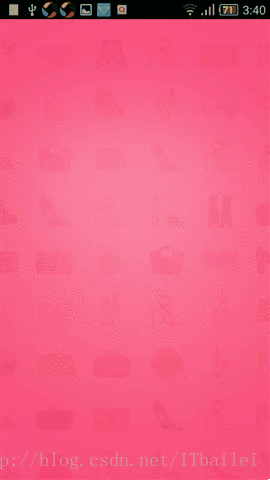
是不是很简单,以后做启动画面都可以采用类似的方法。
总结要点:AlphaAnimation类
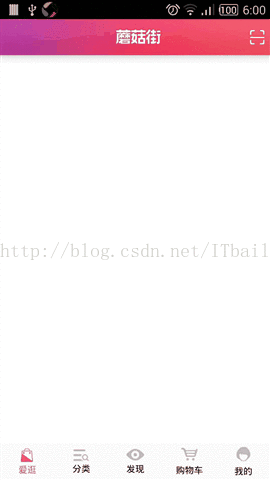
(1)主界面。
看看原图,如下:

中间的内容先不管,我们看ActionBar和底部菜单,上面是一个自定义的ActionBar,下面是一个切换菜单,而且下面菜单在改变的时候上面的ActionBar也在变。我们这里采用的设计方法是fragment+activity混合使用,底部菜单使用RadioButton,中间留出一个活动的fragment
先来看ActionBar,观察发现ActionBar分为2类,第一个是图片标题,另外一个是文字标题。
所以自定义的actionBar需要2个xml布局文件,分别命名为:actionbar_index.xml和actionbar_usu.xml其XML布局分别为:actionbar_index.xml
<?xml version="1.0" encoding="utf-8"?>
<FrameLayout xmlns:android="http://schemas.android.com/apk/res/android"
    android:layout_width="match_parent"
    android:layout_height="fill_parent"
    android:id="@+id/index_action_layout"
    android:background="@drawable/title_bg">

  <ImageButton
    android:id="@+id/btn_slideMenu"
    android:layout_width="wrap_content"
    android:layout_height="match_parent"
    android:layout_gravity="center"
    android:background="@android:color/transparent"
    android:clickable="true"
    android:paddingLeft="8dip"
    android:src="@drawable/index_logo" />

   <ImageButton android:id="@+id/btn_main_qrcode"
           android:layout_width="wrap_content"
           android:layout_height="match_parent"
           android:background="@android:color/transparent"
           android:src="@drawable/icon_qc"
           android:paddingRight="8dip"
           android:clickable="true"
           android:layout_gravity="right|center_vertical"/>
</FrameLayout>
<?xml version="1.0" encoding="utf-8"?>
<FrameLayout xmlns:android="http://schemas.android.com/apk/res/android"
    android:layout_width="match_parent"
    android:layout_height="fill_parent"
    android:id="@+id/index_action_layout"
    android:background="@drawable/title_bg">
    <TextView
        android:id="@+id/tv_title"
	    android:layout_width="wrap_content"
	    android:layout_height="match_parent"
	    android:layout_gravity="center"
	    android:gravity="center"
	    android:textColor="@color/white1"
	    android:textSize="@dimen/actionbar_title"
	    android:background="@android:color/transparent"
	    android:clickable="true"
	    android:paddingLeft="8dip"
	   />

</FrameLayout>
新建一个ActionBarTool工具类,主要用来设置每个界面的ActionBar,代码如下:
public class ActionBarTool {
	Activity activity;
	public ActionBarTool(Activity activity){
		this.activity=activity;
	}
	/**
	 * 设置主界面的Index
	 */
	public void setIndexActionBar(){
		ActionBar actionBar=activity.getActionBar();
        ActionBar.LayoutParams params=new ActionBar.LayoutParams(LayoutParams.MATCH_PARENT,LayoutParams.MATCH_PARENT,Gravity.CENTER );
        View view=LayoutInflater.from(activity).inflate(R.layout.actionbar_index, null);
        actionBar.setCustomView(view,params);
        actionBar.setDisplayOptions(ActionBar.DISPLAY_SHOW_CUSTOM);
        actionBar.setDisplayShowCustomEnabled(true);
	}

	/**
	 * 设置其他界面的ActionBar
	 * @param title 标题
	 */
	public void setUsuActionBar(String title){
		ActionBar actionBar=activity.getActionBar();
        ActionBar.LayoutParams params=new ActionBar.LayoutParams(LayoutParams.MATCH_PARENT,LayoutParams.MATCH_PARENT,Gravity.CENTER );
        View view=LayoutInflater.from(activity).inflate(R.layout.actionbar_usu, null);
        actionBar.setCustomView(view,params);
        actionBar.setDisplayOptions(ActionBar.DISPLAY_SHOW_CUSTOM);
        actionBar.setDisplayShowCustomEnabled(true);
        TextView tv_title=(TextView)activity.findViewById(R.id.tv_title);
        tv_title.setText(title);
	}
}
再来看看底部菜单:main.XML文件如下
<?xml version="1.0" encoding="utf-8"?><LinearLayout xmlns:android="http://schemas.android.com/apk/res/android"
    xmlns:tools="http://schemas.android.com/tools"
    android:layout_width="match_parent"
    android:layout_height="match_parent"
    android:background="#fff"
    android:orientation="vertical" >
    <FrameLayout
        android:id="@+id/content"
        android:layout_width="match_parent"
	    android:layout_height="match_parent"
	    android:layout_weight="1"
	    android:background="#fff"/>
   <RadioGroup
	    android:layout_width="match_parent"
	    android:layout_height="match_parent"
	    android:background="@color/gray"
	    android:layout_marginTop="2dp"
	    android:layout_weight="10"
	    android:gravity="center"
	    android:orientation="horizontal" >
    <RadioButton
        android:id="@+id/fragment_index"
        android:layout_width="match_parent"
        android:layout_height="wrap_content"
        android:layout_weight="1"
        android:button="@null"
        android:drawableTop="@drawable/index_indicator"
        android:gravity="center"
        android:text="@string/index"
        android:textColor="@color/white"
        android:textSize="12sp" />

    <RadioButton
        android:id="@+id/fragment_category"
        android:layout_width="match_parent"
         android:layout_height="wrap_content"
        android:layout_weight="1"
        android:button="@null"
        android:drawableTop="@drawable/category_indicator"
        android:gravity="center"
        android:text="@string/category"
        android:textColor="@color/white"
        android:textSize="12sp" />
    <RadioButton
        android:id="@+id/fragment_discovery"
        android:layout_width="match_parent"
        android:layout_height="wrap_content"
        android:layout_weight="1"
        android:button="@null"
        android:drawableTop="@drawable/discovery"
        android:gravity="center"
        android:text="@string/discovery"
        android:textColor="@color/white"
        android:textSize="12sp" />

    <RadioButton
        android:id="@+id/fragment_cart"
        android:layout_width="match_parent"
         android:layout_height="wrap_content"
        android:layout_weight="1"
        android:button="@null"
        android:drawablePadding="3dip"
        android:drawableTop="@drawable/cart_tab_icon_dark"
        android:gravity="center"
        android:text="@string/cart"
        android:textColor="@color/white"
        android:textSize="12sp" />

    <RadioButton
        android:id="@+id/fragment_my"
        android:layout_width="match_parent"
          android:layout_height="wrap_content"
        android:layout_weight="1"
        android:button="@null"
        android:drawablePadding="3dip"
        android:drawableTop="@drawable/my_indicator"
        android:gravity="center"
        android:text="@string/my"
        android:textColor="@color/white"
        android:textSize="12sp" />
</RadioGroup>
</LinearLayout>接下来是mian 页面的切换代码,MainActivity.java
public class MainActivity extends FragmentActivity {

	RadioButton btn_index, btn_category, btn_discovery, btn_cart, btn_my;
	private Fragment fragment;
	FragmentManager fragmentManager;
	ActionBarTool actionbarTool;
	@Override
	protected void onCreate(Bundle savedInstanceState) {
		super.onCreate(savedInstanceState);
		setContentView(R.layout.main);
		InitUI();
	}

	/**
	 * 初始化UI界面
	 */
	private void InitUI() {
		actionbarTool=new ActionBarTool(this);
		btn_index = (RadioButton) findViewById(R.id.fragment_index);
		btn_category = (RadioButton) findViewById(R.id.fragment_category);
		btn_discovery = (RadioButton) findViewById(R.id.fragment_discovery);
		btn_cart = (RadioButton) findViewById(R.id.fragment_cart);
		btn_my = (RadioButton) findViewById(R.id.fragment_my);
		btn_my.setOnClickListener(new switchFragment());
		btn_cart.setOnClickListener(new switchFragment());
		btn_discovery.setOnClickListener(new switchFragment());
		btn_category.setOnClickListener(new switchFragment());
		btn_index.setOnClickListener(new switchFragment());
		fragment = new IndexFragment();
		actionbarTool.setIndexActionBar();
		btn_index.setTextColor(getResources().getColor(R.color.red));
		btn_index.setCompoundDrawablesWithIntrinsicBounds(null,
				getResources().getDrawable(R.drawable.index_indicator_s), null, null);
		fragmentManager =getSupportFragmentManager();
		if (fragment != null) {
			fragmentManager.beginTransaction()
					.replace(R.id.content, fragment).commit();
		} else {
			Log.e("MainActivity", "Error in creating fragment");
		}
	}

	/**
	 * 切换fragment
	 * @author zw.yan
	 *
	 */
	class switchFragment implements View.OnClickListener {
		@Override
		public void onClick(View arg0) {
			InitBg();//每一次都初始化按钮样式
			switch (arg0.getId()) {
			case R.id.fragment_index:
				fragment = new IndexFragment();
				actionbarTool.setIndexActionBar();
				btn_index.setTextColor(getResources().getColor(R.color.red));
				btn_index.setCompoundDrawablesWithIntrinsicBounds(null,
						getResources().getDrawable(R.drawable.index_indicator_s), null, null);
				break;
			case R.id.fragment_category:
				fragment = new CategoryFragment();
				actionbarTool.setUsuActionBar("分类");
				btn_category.setTextColor(getResources().getColor(R.color.red));
				btn_category.setCompoundDrawablesWithIntrinsicBounds(null,
						getResources().getDrawable(R.drawable.category_indicator_s), null, null);
				break;
			case R.id.fragment_discovery:
				fragment = new DiscoveryFragment();
				actionbarTool.setUsuActionBar("发现");
				btn_discovery.setTextColor(getResources().getColor(R.color.red));
				btn_discovery.setCompoundDrawablesWithIntrinsicBounds(null,
						getResources().getDrawable(R.drawable.discovery_s), null, null);
				break;
			case R.id.fragment_cart:
				fragment = new CartFragment();
				actionbarTool.setUsuActionBar("我的购物车");
				btn_cart.setTextColor(getResources().getColor(R.color.red));
				btn_cart.setCompoundDrawablesWithIntrinsicBounds(null,
						getResources().getDrawable(R.drawable.cart_tab_icon_red), null, null);
				break;
			case R.id.fragment_my:
				fragment = new MyFragment();
				//actionbarTool.setUsuActionBar("我的");
				btn_my.setTextColor(getResources().getColor(R.color.red));
				btn_my.setCompoundDrawablesWithIntrinsicBounds(null,
						getResources().getDrawable(R.drawable.my_indicator_s), null, null);
				break;
			}
			if (fragment != null) {
				fragmentManager.beginTransaction()
						.replace(R.id.content, fragment).commit();
			} else {
				Log.e("MainActivity", "Error in creating fragment");
			}

		}

	}

	/**
	 * 初始化按钮样式
	 *
	 */
	private void InitBg(){
		btn_index.setTextColor(getResources().getColor(R.color.white));
		btn_index.setCompoundDrawablesWithIntrinsicBounds(null,
				getResources().getDrawable(R.drawable.index_indicator), null, null);
		btn_category.setTextColor(getResources().getColor(R.color.white));
		btn_category.setCompoundDrawablesWithIntrinsicBounds(null,
				getResources().getDrawable(R.drawable.category_indicator), null, null);
		btn_cart.setTextColor(getResources().getColor(R.color.white));
		btn_cart.setCompoundDrawablesWithIntrinsicBounds(null,
				getResources().getDrawable(R.drawable.cart_tab_icon_dark), null, null);
		btn_discovery.setTextColor(getResources().getColor(R.color.white));
		btn_discovery.setCompoundDrawablesWithIntrinsicBounds(null,
				getResources().getDrawable(R.drawable.discovery), null, null);
		btn_my.setTextColor(getResources().getColor(R.color.white));
		btn_my.setCompoundDrawablesWithIntrinsicBounds(null,
				getResources().getDrawable(R.drawable.my_indicator), null, null);
	}

	@Override
	public boolean onCreateOptionsMenu(Menu menu) {
		return true;
	}

}
其他页面的fragment.类似,布局文件是空布局:
public class IndexFragment extends Fragment{

	@Override
	public void onActivityCreated(Bundle savedInstanceState) {
		// TODO Auto-generated method stub
		super.onActivityCreated(savedInstanceState);
	}

	@Override
	public View onCreateView(LayoutInflater inflater, ViewGroup container,
			Bundle savedInstanceState) {
		return inflater.inflate(R.layout.fragment_index, container, false);
	}


}
下班了,今天 就到这儿吧。明天继续。


 196
196

 被折叠的 条评论
为什么被折叠?
被折叠的 条评论
为什么被折叠?
 到【灌水乐园】发言


