


学习了,一定要总结,学习贵在永恒贵在用心。
学习内容:
1.绑定sim卡
2.检查手机是否更换sim卡
3.读取手机联系人
4.手机防盗原理
5.短信指令的广播
6。播放报警音乐
7.三种获取手机位置的方式
8.代码实现获取手机位置的位置
9.获取手机位置的细节
10.代码获取手机位置
11.一键锁屏
1)绑定sim卡
UI效果如下
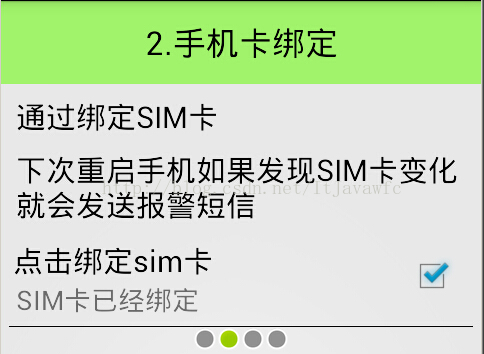
怎么通过单击事件实现呢?代码如下
		// TODO Auto-generated method stub
		super.onCreate(savedInstanceState);
		setContentView(R.layout.activity_setup2);
		siv_setup2_sim=(SettingItemView) findViewById(R.id.siv_setup2_sim);

		tm=(TelephonyManager) getSystemService(TELEPHONY_SERVICE);
		String sim=sp.getString("sim",null);
		if(TextUtils.isEmpty(sim)){
			//没有绑定
			siv_setup2_sim.setChecked(false);
		}else{
			//已经绑定
			siv_setup2_sim.setChecked(true);

		}
		siv_setup2_sim.setOnClickListener(new OnClickListener() {

			@Override
			public void onClick(View v) {
				Editor editor=sp.edit();
				if(siv_setup2_sim.isChecked()){
					siv_setup2_sim.setChecked(false);
					editor.putString("sim", null);
				}
				else{
					// 保存sim卡的序列号
					siv_setup2_sim.setChecked(true);
					String sim=tm.getSimSerialNumber();
					editor.putString("sim", sim);
				}
				editor.commit();
			}
		});
通过TelephonyManager类来绑定sim卡的序列号,String sim=tm.getSimSerialNumber();
看看这个TelephonyManager类,这个类是获得设备电话服务的相关信息,API,如下:
Class Overview
Provides access to information about the telephony services on the device. Applications can use the methods in this class to determine telephony services and states, as well as to access some types of subscriber information. Applications can also register a listener to receive notification of telephony state changes.

You do not instantiate this class directly; instead, you retrieve a reference to an instance through Context.getSystemService(Context.TELEPHONY_SERVICE).

Note that access to some telephony information is permission-protected. Your application cannot access the protected information unless it has the appropriate permissions declared in its manifest file. Where permissions apply, they are noted in the the methods through which you access the protected information.
对于TelephonyManager类需要的权限:
<uses-permission android:name="android.permission.READ_PHONE_STATE"/>2)检查SIM卡是否更新
怎么检查呢?通过广播可以,通过服务也行,这里通过广播实现:代码实现如下
public class BootCompleteReceiver extends BroadcastReceiver {
	private SharedPreferences sp;
	private TelephonyManager tm;
	@Override
	public void onReceive(Context context, Intent intent) {
		sp = context.getSharedPreferences("config", Context.MODE_PRIVATE);
		boolean protecting = sp.getBoolean("protecting", false);
		if(protecting){
			//开启防盗保护才执行这个地方
			tm = (TelephonyManager) context.getSystemService(Context.TELEPHONY_SERVICE);
			// 读取之前保存的SiM信息;
			String saveSim = sp.getString("sim", "")+"afu";
			//读取当前的sim卡信息
			String realSim = tm.getSimSerialNumber();
			//比较是否一样
			if(saveSim.equals(realSim)){
				//sim没有变更,还是同一个哥们
			}else{
				// sim 已经变更 发一个短信给安全号码
				System.out.println("sim 已经变更");
				Toast.makeText(context, "sim 已经变更", 1).show();
				SmsManager.getDefault().sendTextMessage(sp.getString("safenumber", ""), null, "sim changing....", null, null);
			}
		}
	}
}
这里是模拟一个SIM卡的序列号不同,主要比较的就是每个SIM卡的序列号【唯一的】是否相同
然后设置开机启动的广播就行了:
<receiver android:name="com.example.mobilesafe.receiver.BootCompleteReceiver">
           <intent-filter >
               <action android:name="android.intent.action.BOOT_COMPLETED"/>
            </intent-filter>
</receiver>
对于开机启动的权限:
权限
  <uses-permission android:name="android.permission.RECEIVE_BOOT_COMPLETED"/>
3)读取手机联系人
可以将手机里面的表导出来,看看联系人
authorities :当局
----1、到开发环境data/data/目录下 com.android.providers.contacts/databases/导出到左面contacts2.db
----2、用工具打开数据库关心三张表:raw_contacts、data、mimetypes
----3、创建一个新的工程去读取联系人SelectContact
----4、创建一个得到所有联系人的方法 getContactInfos();----表的路径
看看UI实现效果 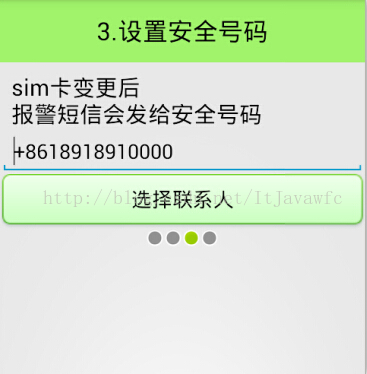

获取联系的方法:
	/*
	 * 读取手机里面的联系人
	 */
	private List<Map<String, String>> getContactInfo() {
		//把所有的联系人放在这个集合里面
       List<Map<String,String>> list=new ArrayList<Map<String,String>>();
		//得到一个内容解析器
		ContentResolver resolver=getContentResolver();
		//raw_contacts uri
		Uri uri=Uri.parse("content://com.android.contacts/raw_contacts");
		Uri uriData=Uri.parse("content://com.android.contacts/data");
		Cursor cursor=resolver.query(uri, new String[]{"contact_id"},
				null, null, null);
		//resolver.query(uri, projection, selection, selectionArgs, sortOrder)
		while(cursor.moveToNext()){
			String contact_id=cursor.getString(0);
			if(contact_id!=null){
				//具体的某一个联系人
				Map<String,String> map=new HashMap<String, String>();
				Cursor dataCursor=resolver.query(uriData, new String[]{
						"data1","mimetype"},
						"contact_id=?",new String[]{contact_id},
						null);
				while(dataCursor.moveToNext()){
					String data1=dataCursor.getString(0);
					String minetype=dataCursor.getString(1);
					System.out.println("data1="+data1+"     minetype:"+minetype);
					if("vnd.android.cursor.item/name".equals(minetype)){
						//联系人 姓名
						map.put("name", data1);
					}
					else if("vnd.android.cursor.item/phone_v2".equals(minetype)){
						//联系人的电话号码
						map.put("phone", data1);
					}
				}
				list.add(map);
				dataCursor.close();
 			}
		}
	    cursor.close();
		return list;
}<uses-permission android:name="android.permission.READ_CONTACTS"/>通过获取联系人方法,巩固知识URI
URI(统一资源标识符)的使用方法
为系统的每一个资源给其一个名字,比方说通话记录。
1、每一个ContentProvider都拥有一个公共的URI,这个URI用于表示这个ContentProvider所提供的数据。
2、Android所提供的ContentProvider都存放在android.provider包中。 将其分为A,B,C,D 4个部分:

A:标准前缀,用来说明一个Content Provider控制这些数据,无法改变的;"content://"
B:URI 的标识,它定义了是哪个Content Provider提供这些数据。对于第三方应用程序,为了保证URI标识的唯一性,它必须是一个完整的、小写的 类名。这个标识在 元素的 authorities属性中说明:一般是定义该ContentProvider的包.类的名称;"content://hx.android.text.myprovider"
C:路径,不知道是不是路径,通俗的讲就是你要操作的数据库中表的名字,或者你也可以自己定义,记得在使用的时候保持一致就ok了;"content://hx.android.text.myprovider/tablename"
D:如果URI中包含表示需要获取的记录的ID;则就返回该id对应的数据,如果没有ID,就表示返回全部; "content://hx.android.text.myprovider/tablename/#" #表示数据id
4)手机防盗的最基本原理就是在sim卡绑定后,当更改sim卡后会给绑定好的sim卡手机发短信、报警的等处理,具体实现此处不做分析。
5)播放报警音乐
播放音乐简单例子代码:
-----1、创建raw 目录拷贝需要用的音乐文件
-----2、写播放音乐的代码;
MediaPlayer mediaPlayer =MediaPlayer.create(context, R.raw.ylzs);
mediaPlayer.setVolume(1.0f, 1.0f);
mediaPlayer.setLooping(false);
mediaPlayer.start();
abortBroadcast();-----3、演示默默音乐,并说明Android手机声音系统:铃声和多媒体音的区别
通过自己收到短信来播放报警音乐,通过广播SMSReceiver注册如下
<receiver android:name="com.example.mobilesafe.receiver.SMSReceiver">
            <intent-filter android:priority="1000" >
                <action android:name="android.provider.Telephony.SMS_RECEIVED"/>
            </intent-filter>
</receiver>
广播具体代码如下
public class SMSReceiver extends BroadcastReceiver {
	private static final String TAG = "SMSReceiver";
	private SharedPreferences sp;
	@Override
	public void onReceive(Context context, Intent intent) {
		// 写接收短信的代码
		Object[] objs = (Object[]) intent.getExtras().get("pdus");
		sp = context.getSharedPreferences("config", Context.MODE_PRIVATE);
		for(Object b:objs){
			//具体的某一条短信
			SmsMessage sms =SmsMessage.createFromPdu((byte[]) b);
			//发送者
			String sender = sms.getOriginatingAddress();//15555555556
			String safenumber = sp.getString("safenumber", "");//5556
			//5556
			///1559999995556
//			Toast.makeText(context, sender, 1).show();
			Log.i(TAG, "====sender=="+sender);
			String body = sms.getMessageBody();
			if(sender.contains(safenumber)){
				if("#*location*#".equals(body)){
					//得到手机的GPS
					Log.i(TAG, "得到手机的GPS");
					//启动服务
		 			Intent i = new Intent(context,GPSService.class);
					context.startService(i);
					SharedPreferences sp = context.getSharedPreferences("config", Context.MODE_PRIVATE);
					String lastlocation = sp.getString("lastlocation", null);
					if(TextUtils.isEmpty(lastlocation)){
						//位置没有得到
						SmsManager.getDefault().sendTextMessage(sender, null, "geting loaction.....", null, null);
					}else{
						SmsManager.getDefault().sendTextMessage(sender, null, lastlocation, null, null);
					}
					//把这个广播终止掉
					abortBroadcast();
				}else if("#*alarm*#".equals(body)){
					//播放报警影音
					Log.i(TAG, "播放报警影音");
		 			MediaPlayer player = MediaPlayer.create(context, R.raw.ylzs);
					player.setLooping(false);//
					player.setVolume(1.0f, 1.0f);
					player.start();
					abortBroadcast();
				}
				else if("#*wipedata*#".equals(body)){
					//远程清除数据
					Log.i(TAG, "远程清除数据");
					abortBroadcast();
				}
				else if("#*lockscreen*#".equals(body)){
					//远程锁屏
					Log.i(TAG, "远程锁屏");
					abortBroadcast();
				}
			}
		}
	}
}
可以看出,可以用其它手机给丢失手机发送短信获取手机的具体位置【精度、纬度、准确度】,并让丢失手机自动报警
关于获取手机具体位置的服务
public class SMSReceiver extends BroadcastReceiver {
	private static final String TAG = "SMSReceiver";
	private SharedPreferences sp;
	@Override
	public void onReceive(Context context, Intent intent) {
		// 写接收短信的代码
		Object[] objs = (Object[]) intent.getExtras().get("pdus");
		sp = context.getSharedPreferences("config", Context.MODE_PRIVATE);
		for(Object b:objs){
			//具体的某一条短信
			SmsMessage sms =SmsMessage.createFromPdu((byte[]) b);
			//发送者
			String sender = sms.getOriginatingAddress();//15555555556
			String safenumber = sp.getString("safenumber", "");//5556
			//5556
			///1559999995556
//			Toast.makeText(context, sender, 1).show();
			Log.i(TAG, "====sender=="+sender);
			String body = sms.getMessageBody();
			if(sender.contains(safenumber)){
				if("#*location*#".equals(body)){
					//得到手机的GPS
					Log.i(TAG, "得到手机的GPS");
					//启动服务
		 			Intent i = new Intent(context,GPSService.class);
					context.startService(i);
					SharedPreferences sp = context.getSharedPreferences("config", Context.MODE_PRIVATE);
					String lastlocation = sp.getString("lastlocation", null);
					if(TextUtils.isEmpty(lastlocation)){
						//位置没有得到
						SmsManager.getDefault().sendTextMessage(sender, null, "geting loaction.....", null, null);
					}else{
						SmsManager.getDefault().sendTextMessage(sender, null, lastlocation, null, null);
					}
					//把这个广播终止掉
					abortBroadcast();
				}else if("#*alarm*#".equals(body)){
					//播放报警影音
					Log.i(TAG, "播放报警影音");
		 			MediaPlayer player = MediaPlayer.create(context, R.raw.ylzs);
					player.setLooping(false);//
					player.setVolume(1.0f, 1.0f);
					player.start();
					abortBroadcast();
				}
				else if("#*wipedata*#".equals(body)){
					//远程清除数据
					Log.i(TAG, "远程清除数据");
					abortBroadcast();
				}
				else if("#*lockscreen*#".equals(body)){
					//远程锁屏
					Log.i(TAG, "远程锁屏");
					abortBroadcast();
				}
			}
		}
	}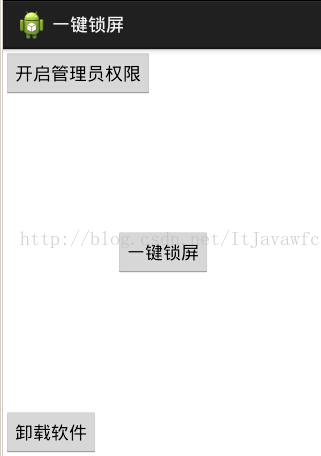
}6)一键锁屏&清除数据
-----1、引入设备超级管理员(device admin)
-----2、看文档 Develop-->API Guides--->Administration【好好看一下API,可以学习很多东西】
如果你是一个企业管理员,您可以利用api和Android设备管理系统功能和控制访问。
android 2.2引入了支持企业应用程序提供Android设备管理API。设备管理API提供了设备管理功能在系统级别。这些api允许您创建安全性敏感的应用程序是有用的在企业设置,IT专业人员需要丰富的控制员工的设备。例如,内置Android电子邮件应用程序利用了新的api来改善交流的支持。通过电子邮件应用程序,交流管理员可以执行密码策略——包括字母数字密码或数字针——在设备。管理员也可以远程擦(即恢复工厂默认值)丢失或被盗的手机。用户可以同步他们的电子邮件和日历数据交换。
-----3、在模拟器的ApiDemo里(打开/app/device admin)看这个功能,并演示锁屏;
-----4、创建工程、创建 MyAdmin
-----5、https://play.google.com 查看当前这类软件的下载量多少。
-----6、在设置里面去掉激活勾选框后,点击崩溃;
DevicePolicyManager;
-----7、注册超级管理员代码
//声明一个意图,作用是开启设备的超级管理员
 Intent intent = new Intent(DevicePolicyManager.ACTION_ADD_DEVICE_ADMIN);
  ComponentName cn = new ComponentName(this, MyAdmin.class);
          intent.putExtra(DevicePolicyManager.EXTRA_DEVICE_ADMIN, cn);
          //劝说用户开启管理员
          intent.putExtra(DevicePolicyManager.EXTRA_ADD_EXPLANATION,
                  "开启我把。开启我就可以锁屏了,开启送积分");
          startActivity(intent);
-----8、演示一键锁屏,并展示无法卸载;
-----9、卸载当前应用的功能代码;
 ComponentName cn = new ComponentName(this, MyAdmin.class);
//可以移除管理员
dpm.removeActiveAdmin(cn);
Intent intent = new Intent();
intent.setAction("android.intent.action.UNINSTALL_PACKAGE");
intent.addCategory("android.intent.category.DEFAULT");
intent.setData(Uri.parse("package:"+getPackageName()));
startActivity(intent);
-----10、点击锁屏的时候验证是否已经锁屏
 ComponentName cn = new ComponentName(this, MyAdmin.class);
if(dpm.isAdminActive(cn)){
//设备管理员的api
dpm.lockNow();
}else{
//	openAdmin(null);
Toast.makeText(this, "请先激活管理员", 0).show();
}
-----11、设置密码
dpm.resetPassword("123", 0);
-----12、取消密码:用代码、设置页面;
/data/system # 密码存放在这里
测试代码如下:最好看看API,可以学法哦非常多的东西
public class MainActivity extends Activity {
	/**
	 * 设备策略服务
	 */
	private DevicePolicyManager dpm;
	@Override
	protected void onCreate(Bundle savedInstanceState) {
		super.onCreate(savedInstanceState);
		setContentView(R.layout.activity_main);
		dpm = (DevicePolicyManager) getSystemService(DEVICE_POLICY_SERVICE);
	}
	/**
	 * 用代码去开启管理员
	 * @param view
	 */
	public void openAdmin(View view){
		//创建一个Intent
		Intent intent = new Intent(DevicePolicyManager.ACTION_ADD_DEVICE_ADMIN);
		//我要激活谁
		ComponentName   mDeviceAdminSample = new ComponentName(this,MyAdmin.class);

        intent.putExtra(DevicePolicyManager.EXTRA_DEVICE_ADMIN, mDeviceAdminSample);
       //劝说用户开启管理员权限
        intent.putExtra(DevicePolicyManager.EXTRA_ADD_EXPLANATION,
               "哥们开启我可以一键锁屏,你的按钮就不会经常失灵");
        startActivity(intent);
	}

	/**
	 * 一键锁屏
	 */

	public void lockscreen(View view){
		ComponentName   who = new ComponentName(this,MyAdmin.class);
		if(dpm.isAdminActive(who)){
			dpm.lockNow();//锁屏
			dpm.resetPassword("", 0);//设置屏蔽密码

			//清除Sdcard上的数据
//			dpm.wipeData(DevicePolicyManager.WIPE_EXTERNAL_STORAGE);
			//恢复出厂设置
//			dpm.wipeData(0);
		}else{
			Toast.makeText(this, "还没有打开管理员权限", 1).show();
			return ;
		}
	}

	/**
	 * 卸载当前软件
	 */

	public void uninstall(View view ){
		//1.先清除管理员权限
		ComponentName   mDeviceAdminSample = new ComponentName(this,MyAdmin.class);
		dpm.removeActiveAdmin(mDeviceAdminSample);
		//2.普通应用的卸载
		Intent intent = new Intent();
		intent.setAction("android.intent.action.VIEW");
		intent.addCategory("android.intent.category.DEFAULT");
		intent.setData(Uri.parse("package:"+getPackageName()));
		startActivity(intent);
	}
}
/**
 * 特殊的广播接收者
 * @author Administrator
 *
 */
public class MyAdmin extends DeviceAdminReceiver {

}
配置代码:
 <receiver
            android:name="com.itheima.lockscreen.MyAdmin"
            android:description="@string/sample_device_admin_description"
            android:label="@string/sample_device_admin"
            android:permission="android.permission.BIND_DEVICE_ADMIN" >
            <meta-data
                android:name="android.app.device_admin"
                android:resource="@xml/device_admin_sample" />
            <intent-filter>
                <action android:name="android.app.action.DEVICE_ADMIN_ENABLED" />
            </intent-filter>
</receiver>
<RelativeLayout xmlns:android="http://schemas.android.com/apk/res/android"
    xmlns:tools="http://schemas.android.com/tools"
    android:layout_width="match_parent"
    android:layout_height="match_parent"
    tools:context=".MainActivity" >
     <Button
        android:onClick="openAdmin"
        android:layout_width="wrap_content"
        android:layout_height="wrap_content"
        android:text="开启管理员权限" />
    <Button
        android:onClick="lockscreen"
        android:layout_centerInParent="true"
        android:layout_width="wrap_content"
        android:layout_height="wrap_content"
        android:text="一键锁屏" />
    <Button
        android:onClick="uninstall"
        android:layout_alignParentBottom="true"
        android:layout_width="wrap_content"
        android:layout_height="wrap_content"
        android:text="卸载软件" />
</RelativeLayout>
这个列子通过代码开启管理员的权限,其中还涉及到卸载软件相关代码:UI如下


 1万+
1万+


 被折叠的 条评论
为什么被折叠?
被折叠的 条评论
为什么被折叠?
 到【灌水乐园】发言


