


昨天一不小心,执行了rm xx -rf,把一个项目删除了。然后就是各种悔恨,各种自责,这个项目可是一周的工作量啊。最后肯定得解决,于是google搜索发现了恢复神器extundelete,最后顺利恢复了所有被我无意中的删除的文件。感谢上天,感谢extundelete。下面将个人的经历总结下。
如何使用extundelete
1) 下载工具extundelete
Ubuntu下下载这个工具太简单了
sudo apt-get install extundelete2) 使用
使用这个也很简单。使用extundelete–help命令,可以告诉我们很多。
Itleaks@ Itleaks::~$ extundelete --help
Usage: extundelete [options] [--] device-file
Options:
  ……………….
  --after dtime          Only process entries deleted on or after 'dtime'.
  --before dtime         Only process entries deleted before 'dtime'.
Actions:
  …………
  --restore-file 'path'  Will restore file 'path'. 'path' is relative to root
                         of the partition and does not start with a '/' (it
                         must be one of the paths returned by --dump-names).
                         The restored file is created in the current
                         directory as 'RECOVERED_FILES/path'.
  --restore-files 'path' Will restore files which are listed in the file 'path'.
                         Each filename should be in the same format as an option
                         to --restore-file, and there should be one per line.
  --output-dir 'path'    Restore files in the output dir 'path'.
                         By default the restored files are created under current directory 'RECOVERED_FILES'.
  --restore-all          Attempts to restore everything.
  ………..
我们知道当我们不小心删除了有用的文件,我们一般是比较容易知道删除的时间的,因此,使用时间这个option可以很快并且精确的恢复出我们想要的文件。那这个dtime怎么生成。请参考如下命令:
Itleaks@ Itleaks:~$ date -d "2014-06-01 23:02:00" +%s
1401634920
%s的意思是seconds since 1970-01-01 00:00:00 UTC,就是输入时间与1970-01-0100:00:00的时间差
然后就可以使用这个来恢复了
sudo extundelete /dev/sda8 --after 1401634920--restore-all现在我们来做个试验:具体操作如下
Itleaks@ Itleaks:/tmp$ echo "recovery test"> itleaks.test
Itleaks@ Itleaks:/tmp$ rm itleaks.test
Itleaks@ Itleaks:/tmp$ date -d "2014-06-01 22:28:00" +%s
1401632880
Itleaks@ Itleaks:/tmp$ sudo extundelete /dev/sda8 --after 1401632880 --restore-all
Only show and process deleted entries if they are deleted on or after 1401632880 and before 9223372036854775807.

WARNING: Extended attributes are not restored.
WARNING: EXT3_FEATURE_INCOMPAT_RECOVER is set.
The partition should be unmounted to undelete any files without further data loss.
If the partition is not currently mounted, this message indicates
it was improperly unmounted, and you should run fsck before continuing.
If you decide to continue, extundelete may overwrite some of the deleted
files and make recovering those files impossible.  You should unmount the
file system and check it with fsck before using extundelete.
Would you like to continue? (y/n)
y
Loading filesystem metadata ... 378 groups loaded.
Loading journal descriptors ...
27106 descriptors loaded.
Searching for recoverable inodes in directory / ...

85 recoverable inodes found.
Looking through the directory structure for deleted files ...
………………..
Unable to restore inode 2360218 (etc/brltty/brl-fs-bumpers.kti): No undeleted copies found in the journal.
Unable to restore inode 2359564 (etc/mtab~): No undeleted copies found in the journal.
Restored inode 2883641 to file RECOVERED_FILES/tmp/itleaks.test

Itleaks@ Itleaks:/tmp$ tree RECOVERED_FILES/
RECOVERED_FILES/
└── tmp
    └── itleaks.test

1 directory, 1 file
extundelete原理
这个是由于linuxext3文件系统的组织结构决定的,如下图:
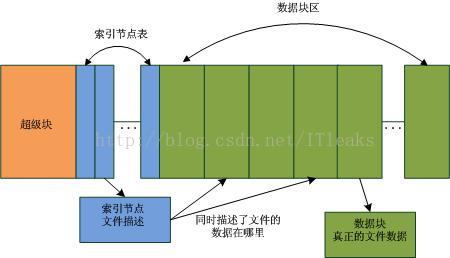
在linux系统中,超级块描述了分区的信息,一个分区被分为两个部分,索引节点表和数据块区,这个在格式化的时候就定下来了。文件(目录也是文件的一种,只不过它的内容是描述目录下的文件的)由索引节点描述,索引节点描述了文件的修改时间,文件的名称,文件的数据块地址等等。并且,linux对于文件删除操作是个懒动作,删除文件时系统只是将文件对应的索引节点及其拥有的数据块置为free(将nlink=0),而并没有做其他清空的,只有当这个索引节点或者数据块被真正用到的时候才会修改里面的数据。这就为我们文件修复提供了可趁之机。由于系统中的索引节点是固定大小的,因此可以很轻松的遍历扫描系统中所有的索引节点,找出free的索引节点并检查其数据块是否已经被用,如果没有则可修复并修复。同时,由于索引节点里的时间等信息也是保留的,因此就可以根据时间来恢复特定的被删除的文件。
文件误删除后的注意事项
从上面的分析可知,误删文件后,尽量不要做大的数据操作,以避免被删除的文件的数据块被重新使用,导致数据完全丢失。
/********************************
* 本文来自博客 “爱踢门”
* 转载请标明出处:http://blog.csdn.net/itleaks
******************************************/


 被折叠的 条评论
为什么被折叠?
被折叠的 条评论
为什么被折叠?
 到【灌水乐园】发言


