


一,Spring Batch快速入门
1,什么是Spring Batch
Spring Batch是用来处理大量数据操作的一个框架,主要用来读取大量数据,然后进行一定处理后输出指定的形式。
2,Spring Batch主要组成
Spring Batch主要由以下几部分组成:
JobRepository:用户注册Job的容器
JobLauncher:用来启动Job的接口
Job:我们要实际执行的任务,包含一个或多个Step
Step:Step-步骤包含ItemReader,ItemProcessor和ItemWrter
ItemReader:用来读取数据的接口
ItemProcessor:用来处理数据的接口
ItemWriter:用来输出数据的接口
以上Spring Batch的主要组成部分只需注册成Spring的bean即可。若想开启批处理的支持还需在配置类上使用@EnableBatchProcessing
一个示意的Spring Batch的配置如下:
package com.jack.springboot13batch.config;

import org.springframework.batch.core.Job;
import org.springframework.batch.core.Step;
import org.springframework.batch.core.configuration.annotation.EnableBatchProcessing;
import org.springframework.batch.core.configuration.annotation.JobBuilderFactory;
import org.springframework.batch.core.configuration.annotation.StepBuilderFactory;
import org.springframework.batch.core.launch.support.RunIdIncrementer;
import org.springframework.batch.core.launch.support.SimpleJobLauncher;
import org.springframework.batch.core.repository.JobRepository;
import org.springframework.batch.core.repository.support.JobRepositoryFactoryBean;
import org.springframework.batch.core.step.builder.SimpleStepBuilder;
import org.springframework.context.annotation.Bean;
import org.springframework.context.annotation.Configuration;
import org.springframework.transaction.PlatformTransactionManager;

import javax.sql.DataSource;

/**
 * create by jack 2017/10/23
 */
@Configuration
@EnableBatchProcessing
public class BatchConfig {

    @Bean
    public JobRepository jobRegistry(DataSource dataSource, PlatformTransactionManager transactionManager)throws Exception{
        JobRepositoryFactoryBean jobRepositoryFactoryBean = new JobRepositoryFactoryBean();
        jobRepositoryFactoryBean.setDataSource(dataSource);
        jobRepositoryFactoryBean.setTransactionManager(transactionManager);
        jobRepositoryFactoryBean.setDatabaseType("mysql");
        return jobRepositoryFactoryBean.getObject();
    }

    @Bean
    public SimpleJobLauncher jobLauncher(DataSource dataSource,PlatformTransactionManager transactionManager)throws Exception{
        SimpleJobLauncher jobLauncher = new SimpleJobLauncher();
        jobLauncher.setJobRepository(jobRegistry(dataSource,transactionManager));
        return jobLauncher;
    }

    @Bean
    public Job importJob(JobBuilderFactory jobBuilderFactory,Step step){
        return jobBuilderFactory.get("importJob")
                .incrementer(new RunIdIncrementer())
                .flow(step)
                .end()
                .build();
    }

    @Bean
    public SimpleStepBuilder<Object, Object> step1(StepBuilderFactory stepBuilderFactory, ItemReader<Person> reader, ItemWriter<Person> writer,
                                                   ItemProcessor<Person,Person> processor){
        return stepBuilderFactory
                .get("step1")
                .<Person,Person>chunk(65000)
                .reader(reader)
                .processor(processor)
                .writer(writer)
                .build();
    }

    @Bean
    public ItemReader<Person> reader()throws Exception{
        //新建ItemReader接口的实现类返回
        return reader;
    }


    @Bean
    public ItemProcessor<Person,Person> processor(){
        //新建ItemProcessor接口的实现类返回
        return processor;
    }

    @Bean
    public ItemWriter<Person> writer(DataSource dataSource){
        //新建ItemWriter接口的实现类返回
        return writer;
    }


}
3,Job监听
若需要监听我们的Job的执行情况,则定义个一个类实现JobExecutionListener,并在定义Job的Bean上绑定该监听器。
监听器的定义如下:
package com.jack.springboot13batch.test;

import org.springframework.batch.core.JobExecution;
import org.springframework.batch.core.JobExecutionListener;

/**
 * create by jack 2017/10/23
 */
public class MyJobListener implements JobExecutionListener {
    @Override
    public void beforeJob(JobExecution jobExecution) {
        //job开始之前
    }

    @Override
    public void afterJob(JobExecution jobExecution) {
        //job完成之后
    }
}
注册并绑定监听器到job:
@Bean
    public Job importJob(JobBuilderFactory jobBuilderFactory,Step step){
        return jobBuilderFactory.get("importJob")
                .incrementer(new RunIdIncrementer())
                .flow(step)
                .end()
                .listener(myJobListener())
                .build();
    }

    @Bean
    public MyJobListener myJobListener(){
        return new MyJobListener();
    }
4,数据读取
Spring Batch为我们提供了大量的ItemReader的实现,用来读取不同的数据来源。
5,数据处理及校验
数据处理和校验都要通过ItemProcessor接口实现来完成。
1)数据处理
数据处理只需实现ItemProcessor接口,重写其process方法。方法输入的参数是从ItemReader读取到的数据,返回的数据给ItemWriter。
package com.jack.springboot13batch.test;

import org.springframework.batch.item.ItemProcessor;

/**
 * create by jack 2017/10/23
 */
public class MyItemProcessor implements ItemProcessor<Person,Person>{
    @Override
    public Person process(Person person) throws Exception {
        String name = person.getName().toUpperCase();
        person.setName(name);
        return person;
    }
}
2)数据校验
我们可以JSR-303(主要实现由hibernate-validator)的注解,来校验ItemReader读取到的数据是否满足要求。
我们可以让我们的ItemProcessor实现ValidatingItemProcessor接口:
package com.jack.springboot13batch.test;

import org.springframework.batch.item.validator.ValidationException;

/**
 * create by jack 2017/10/23
 */
public class MyItemProcessor extends ValidatingItemProcessor<Person> {
    @Override
    public Person process(Person item) throws ValidationException {
        super.process(item);

        return item;
    }
}
定义我们的校验器,实现的Validator接口来自于Spring,我们将使用JSR-303的Validator来校验:
public class MyBeanValidator<T> implements Validator<T>,InitializingBean {
    private Validator validator;

    @Override
    public void afterPropertiesSet() throws Exception {
        ValidatorFactory validatorFactory = Validation.buildDefaultValidatorFactory();
        validator = validatorFactory.usingContext().getValidator();
    }
    @Override
    public void validate(T value)throws ValidationException{
        Set<ConstraintViolation<T>> constraintViolationSet = validator.validate(value);
        if (constraintViolationSet.size()) {
            StringBuilder message = new StringBuilder();
            for (ConstraintViolation<T> constraintViolation:constraintViolationSet
                 ) {
                message.append(constraintViolation.getMessage() + "\n");
            }
            throw new ValidationException(message.toString());
        }
    }


}
在定义我们的MyItemProcessor时必须将MyBeanValidator设置进去,代码如下:
 @Bean
    public ItemProcessor<Person,Person> processor(){
        //新建ItemProcessor接口的实现类返回
        MyItemProcessor processor = new MyItemProcessor();
        processor.setValidator(myBeanValidator());
        return processor;
    }

    @Bean
    public Validator<Person> myBeanValidator(){
        return new MyBeanValidator<Person>();
    }
6,数据输出
Spring Batch为我们提供了大量的ItemWriter的实现,用来将数据输出到不同的目的地。
7,计划任务
Spring Batch的任务是通过JobLauncher的run方法来执行的,因此我们只需在普通的计划任务方法中执行JobLauncher的run方法即可。
演示代码如下,别忘了配置类使用@EnableScheduling开启计划任务支持:
package com.jack.springboot13batch.test;

import org.springframework.batch.core.Job;
import org.springframework.batch.core.JobParameters;
import org.springframework.batch.core.JobParametersBuilder;
import org.springframework.batch.core.launch.JobLauncher;
import org.springframework.beans.factory.annotation.Autowired;
import org.springframework.scheduling.annotation.Scheduled;
import org.springframework.stereotype.Service;

/**
 * create by jack 2017/10/23
 */
@Service
public class ScheduledTaskService {
    @Autowired
    JobLauncher jobLauncher;
    @Autowired
    Job importJob;
    public JobParameters jobParameters;
    @Scheduled(fixedRate = 5000)
    public void execute()throws Exception{
        jobParameters = new JobParametersBuilder()
                .addLong("time",System.currentTimeMillis())
                .toJobParameters();
        jobLauncher.run(importJob, jobParameters);
    }
}
8,参数后置绑定
我们在ItemReader和ItemWriter的Bean定义的时候,参数已经硬编码在Bean的初始化中,代码如下:
@Bean
    public ItemReader<Person> reader()throws Exception{
        //新建ItemReader接口的实现类返回
        FlatFileItemReader<Person> reader = new FlatFileItemReader<Person>();
        reader.setResource(new ClassPathResource("people.csv"));
        return reader;
    }
这时我们要读取的文件的位置已经硬编码在Bean的定义中,这在很多情况下不符合我们的实际需求,这时我们需要使用参数后置绑定。
要实现参数后置绑定,我们可以在JobParameters中绑定参数,在Bean定义的时候使用一个特殊的Bean生命周期注解@StepScope,然后通过@Value注入此参数。
String path = "people.csv";
    JobParameters jobParameters = new JobParametersBuilder()
            .addLong("time",System.currentTimeMillis())
            .addString("input.file.name",path)
            .toJobParameters();
    jobParameters.run(importJob,jobParameters);
定义Bean:
 @Bean
    @StepScope
    public ItemReader<Person> reader(@Value("{jobParameters['input.file.name']}") String pathToFile)throws Exception{
        FlatFileItemReader<Person> reader = new FlatFileItemReader<Person>();
        reader.setResource(new ClassPathResource(pathToFile));
        return reader;
    }
二,Spring Boot的支持
Spring Boot对Spring Batch支持的源码位于org.springframework.boot.autoconfigure.batch下。
Spring Boot为我们自动初始化了Spring Batch存储批处理记录的数据库,且当我们程序启动时,会自动执行我们定义的Job的Bean。
Spring Boot提供如下属性来定制Spring Batch:
#启动时要执行的job,默认执行全部job
spring.batch.job.name=job1,job2
#是否自动执行定义的job,默认是
spring.batch.job.enabled=true
#是否初始化Spring Batch的数据库,默认为是
spring.batch.initializer.enabled=true
spring.batch.schema=
#设置Spring Batch的数据库表的前缀
spring.batch.table-prefix=
三,实战
下面将使用Spring Batch将csv文件中数据使用JDBC批处理的方式插入数据库。
1,新建Spring Boot项目
新建Spring Boot项目,依赖jdbc,web,spring-boot-starter-batch,mysql驱动等,详细的pom.xml配置如下:
<?xml version="1.0" encoding="UTF-8"?>
<project xmlns="http://maven.apache.org/POM/4.0.0" xmlns:xsi="http://www.w3.org/2001/XMLSchema-instance"
	xsi:schemaLocation="http://maven.apache.org/POM/4.0.0 http://maven.apache.org/xsd/maven-4.0.0.xsd">
	<modelVersion>4.0.0</modelVersion>

	<groupId>com.jack</groupId>
	<artifactId>springboot13batch</artifactId>
	<version>0.0.1-SNAPSHOT</version>
	<packaging>jar</packaging>

	<name>springboot13batch</name>
	<description>Demo project for Spring Boot</description>

	<parent>
		<groupId>org.springframework.boot</groupId>
		<artifactId>spring-boot-starter-parent</artifactId>
		<version>1.5.8.RELEASE</version>
		<relativePath/> <!-- lookup parent from repository -->
	</parent>

	<properties>
		<project.build.sourceEncoding>UTF-8</project.build.sourceEncoding>
		<project.reporting.outputEncoding>UTF-8</project.reporting.outputEncoding>
		<java.version>1.8</java.version>
	</properties>

	<dependencies>
		<dependency>
			<groupId>org.springframework.boot</groupId>
			<artifactId>spring-boot-starter-batch</artifactId>
		</dependency>
		<dependency>
			<groupId>org.springframework.boot</groupId>
			<artifactId>spring-boot-starter-jdbc</artifactId>
		</dependency>
		<dependency>
			<groupId>org.springframework.boot</groupId>
			<artifactId>spring-boot-starter-web</artifactId>
		</dependency>

		<!--mysql连接驱动-->
		<!-- https://mvnrepository.com/artifact/mysql/mysql-connector-java -->
		<dependency>
			<groupId>mysql</groupId>
			<artifactId>mysql-connector-java</artifactId>
		</dependency>

		<!--添加hibernate-validator依赖,作为数据校验使用-->
		<dependency>
			<groupId>org.hibernate</groupId>
			<artifactId>hibernate-validator</artifactId>
		</dependency>

		<!-- https://mvnrepository.com/artifact/com.alibaba/fastjson -->
		<dependency>
			<groupId>com.alibaba</groupId>
			<artifactId>fastjson</artifactId>
			<version>1.2.39</version>
		</dependency>

		<dependency>
			<groupId>org.springframework.boot</groupId>
			<artifactId>spring-boot-starter-test</artifactId>
			<scope>test</scope>
		</dependency>
	</dependencies>

	<build>
		<plugins>
			<plugin>
				<groupId>org.springframework.boot</groupId>
				<artifactId>spring-boot-maven-plugin</artifactId>
			</plugin>
		</plugins>
	</build>


</project>
applicaton.yml配置如下:
#启动时要执行的job,默认执行全部job
#spring.batch.job.name=job1,job2
#是否自动执行定义的job,默认是
#spring.batch.job.enabled=true
#是否初始化Spring Batch的数据库,默认为是
#spring.batch.initializer.enabled=true
#spring.batch.schema=
#设置Spring Batch的数据库表的前缀
#spring.batch.table-prefix=
server:
  port: 9090

spring:
  datasource:
    driver-class-name: com.mysql.jdbc.Driver
    url: jdbc:mysql://127.0.0.1:3306/jack
    username: root
    password: root
测试csv数据,位于src/main/resources/people.csv中,内容如下:
jack1,18,汉族,北京
jack2,19,汉族,上海
jack3,20,非汉族,广州
jack4,21,非汉族,深圳
jack5,22,汉族,长沙
数据表定义如下:位于src/main/resources/schema.sql,内容如下:
CREATE TABLE person(
id int PRIMARY KEY AUTO_INCREMENT,
name VARCHAR(20),
age int,
nation VARCHAR(20),
address VARCHAR(20)
);
2,领域模型类
package com.jack.springboot13batch.entity;

import javax.validation.constraints.Size;

/**
 * create by jack 2017/10/28
 * 领域模型类
 */
public class Person {
    /**
     * 使用JSR-303注解来校验数据
     */
    @Size(max = 5,min = 2)
    private String name;
    private int age;
    private String nation;
    private String address;

    public String getName() {
        return name;
    }

    public void setName(String name) {
        this.name = name;
    }

    public int getAge() {
        return age;
    }

    public void setAge(int age) {
        this.age = age;
    }

    public String getNation() {
        return nation;
    }

    public void setNation(String nation) {
        this.nation = nation;
    }

    public String getAddress() {
        return address;
    }

    public void setAddress(String address) {
        this.address = address;
    }

}
3,数据处理及校验
1)处理:
package com.jack.springboot13batch.batch;
import com.jack.springboot13batch.entity.Person;
import org.springframework.batch.item.validator.ValidatingItemProcessor;
import org.springframework.batch.item.validator.ValidationException;
/**
* create by jack 2017/10/28
* 处理
*/
public class CsvItemProcessor extends ValidatingItemProcessor<Person>{
@Override
public Person process(Person item) throws ValidationException {
/**
* 需要执行super.process(item)才会调用自定义校验器
*/
super.process(item);
/**
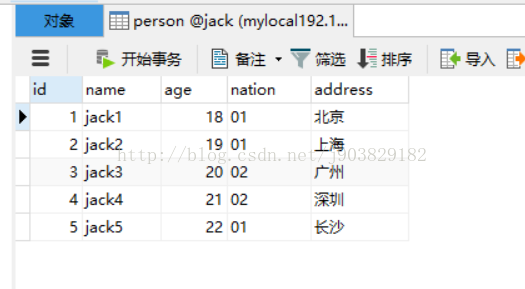
* 对数据进行简单的处理,若民族为汉族,则数据转换为01,其余转换为02
*/
if (item.getNation().equals("汉族")) {
item.setNation("01");
} else {
item.setNation("02");
}
return item;
}
}
2)校验
package com.jack.springboot13batch.batch;

import org.springframework.batch.item.validator.ValidationException;
import org.springframework.batch.item.validator.Validator;
import org.springframework.beans.factory.InitializingBean;

import javax.validation.ConstraintViolation;
import javax.validation.Validation;
import javax.validation.ValidatorFactory;
import java.util.Set;


/**
 * create by jack 2017/10/28
 */
public class CsvBeanValidator<T> implements Validator<T>,InitializingBean {
    private javax.validation.Validator validator;
    @Override
    public void validate(T value) throws ValidationException {
        /**
         * 使用Validator的validate方法校验数据
         */
        Set<ConstraintViolation<T>> constraintViolations =
                validator.validate(value);
        if (constraintViolations.size() > 0) {
            StringBuilder message = new StringBuilder();
            for (ConstraintViolation<T> constraintViolation : constraintViolations) {
                message.append(constraintViolation.getMessage() + "\n");
            }
            throw new ValidationException(message.toString());
        }
    }

    /**
     * 使用JSR-303的Validator来校验我们的数据,在此进行JSR-303的Validator的初始化
     * @throws Exception
     */
    @Override
    public void afterPropertiesSet() throws Exception {
        ValidatorFactory validatorFactory =
                Validation.buildDefaultValidatorFactory();
        validator = validatorFactory.usingContext().getValidator();
    }
}
4,监听
package com.jack.springboot13batch.batch;
import org.springframework.batch.core.JobExecution;
import org.springframework.batch.core.JobExecutionListener;
/**
* create by jack 2017/10/28
* 监听器实现JobExecutionListener接口,并重写其beforeJob,afterJob方法即可
*/
public class CsvJobListener implements JobExecutionListener {
private long startTime;
private long endTime;
@Override
public void beforeJob(JobExecution jobExecution) {
startTime = System.currentTimeMillis();
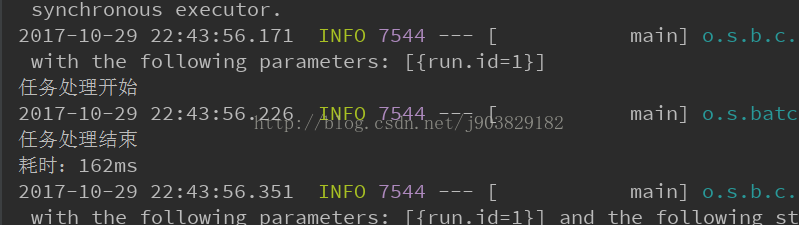
System.out.println("任务处理开始");
}
@Override
public void afterJob(JobExecution jobExecution) {
endTime = System.currentTimeMillis();
System.out.println("任务处理结束");
System.out.println("耗时:"+(endTime-startTime)+"ms");
}
}
5,配置
配置的完成代码如下:
package com.jack.springboot13batch.batch;

import com.jack.springboot13batch.entity.Person;
import org.springframework.batch.core.Job;
import org.springframework.batch.core.Step;
import org.springframework.batch.core.configuration.annotation.EnableBatchProcessing;
import org.springframework.batch.core.configuration.annotation.JobBuilderFactory;
import org.springframework.batch.core.configuration.annotation.StepBuilderFactory;
import org.springframework.batch.core.launch.support.RunIdIncrementer;
import org.springframework.batch.core.launch.support.SimpleJobLauncher;
import org.springframework.batch.core.repository.JobRepository;
import org.springframework.batch.core.repository.support.JobRepositoryFactoryBean;
import org.springframework.batch.item.ItemProcessor;
import org.springframework.batch.item.ItemReader;
import org.springframework.batch.item.ItemWriter;
import org.springframework.batch.item.database.BeanPropertyItemSqlParameterSourceProvider;
import org.springframework.batch.item.database.JdbcBatchItemWriter;
import org.springframework.batch.item.file.FlatFileItemReader;
import org.springframework.batch.item.file.mapping.BeanWrapperFieldSetMapper;
import org.springframework.batch.item.file.mapping.DefaultLineMapper;
import org.springframework.batch.item.file.transform.DelimitedLineTokenizer;
import org.springframework.batch.item.validator.Validator;
import org.springframework.context.annotation.Bean;
import org.springframework.context.annotation.Configuration;
import org.springframework.core.io.ClassPathResource;
import org.springframework.transaction.PlatformTransactionManager;

import javax.sql.DataSource;


/**
 * create by jack 2017/10/28
 * 配置类
 */
@Configuration
@EnableBatchProcessing
public class CsvBatchConfig {

    /**
     * ItemReader定义,用来读取数据
     * 1,使用FlatFileItemReader读取文件
     * 2,使用FlatFileItemReader的setResource方法设置csv文件的路径
     * 3,对此对cvs文件的数据和领域模型类做对应映射
     * @return
     * @throws Exception
     */
    @Bean
    public ItemReader<Person> reader()throws Exception {
        FlatFileItemReader<Person> reader = new FlatFileItemReader<>();
        reader.setResource(new ClassPathResource("people.csv"));
        reader.setLineMapper(new DefaultLineMapper<Person>(){
            {
                setLineTokenizer(new DelimitedLineTokenizer(){
                    {
                        setNames(new String[]{"name","age","nation","address"});
                    }
                });
                setFieldSetMapper(new BeanWrapperFieldSetMapper<Person>(){{
                    setTargetType(Person.class);
                }});
            }
        });
        return reader;
    }

    /**
     * ItemProcessor定义,用来处理数据
     * @return
     */
    @Bean
    public ItemProcessor<Person,Person> processor(){
        //使用我们自定义的ItemProcessor的实现CsvItemProcessor
        CsvItemProcessor processor = new CsvItemProcessor();
        //为processor指定校验器为CsvBeanValidator()
        processor.setValidator(csvBeanValidator());
        return processor;
    }

    /**
     * ItemWriter定义,用来输出数据
     * spring能让容器中已有的Bean以参数的形式注入,Spring Boot已经为我们定义了dataSource
     * @param dataSource
     * @return
     */
    @Bean
    public ItemWriter<Person> writer(DataSource dataSource){
        JdbcBatchItemWriter<Person> writer = new JdbcBatchItemWriter<>();
        //我们使用JDBC批处理的JdbcBatchItemWriter来写数据到数据库
        writer.setItemSqlParameterSourceProvider(new BeanPropertyItemSqlParameterSourceProvider<>());
        String sql = "insert into person "+" (name,age,nation,address) "
                +" values(:name,:age,:nation,:address)";
        //在此设置要执行批处理的SQL语句
        writer.setSql(sql);
        writer.setDataSource(dataSource);
        return writer;
    }

    /**
     * JobRepository,用来注册Job的容器
     * jobRepositor的定义需要dataSource和transactionManager,Spring Boot已为我们自动配置了
     * 这两个类,Spring可通过方法注入已有的Bean
     * @param dataSource
     * @param transactionManager
     * @return
     * @throws Exception
     */
    @Bean
    public JobRepository jobRepository(DataSource dataSource, PlatformTransactionManager transactionManager)throws Exception{

        JobRepositoryFactoryBean jobRepositoryFactoryBean =
                new JobRepositoryFactoryBean();
        jobRepositoryFactoryBean.setDataSource(dataSource);
        jobRepositoryFactoryBean.setTransactionManager(transactionManager);
        jobRepositoryFactoryBean.setDatabaseType("mysql");
        return jobRepositoryFactoryBean.getObject();
    }

    /**
     * JobLauncher定义,用来启动Job的接口
     * @param dataSource
     * @param transactionManager
     * @return
     * @throws Exception
     */
    @Bean
    public SimpleJobLauncher jobLauncher(DataSource dataSource,PlatformTransactionManager transactionManager)throws Exception{
        SimpleJobLauncher jobLauncher = new SimpleJobLauncher();
        jobLauncher.setJobRepository(jobRepository(dataSource, transactionManager));
        return jobLauncher;
    }

    /**
     * Job定义,我们要实际执行的任务,包含一个或多个Step
     * @param jobBuilderFactory
     * @param s1
     * @return
     */
    @Bean
    public Job importJob(JobBuilderFactory jobBuilderFactory, Step s1){
        return jobBuilderFactory.get("importJob")
                .incrementer(new RunIdIncrementer())
                .flow(s1)//为Job指定Step
                .end()
                .listener(csvJobListener())//绑定监听器csvJobListener
                .build();
    }

    /**
     *step步骤,包含ItemReader,ItemProcessor和ItemWriter
     * @param stepBuilderFactory
     * @param reader
     * @param writer
     * @param processor
     * @return
     */
    @Bean
    public Step step1(StepBuilderFactory stepBuilderFactory,ItemReader<Person> reader,ItemWriter<Person> writer,
                      ItemProcessor<Person,Person> processor){
        return stepBuilderFactory
                .get("step1")
                .<Person,Person>chunk(65000)//批处理每次提交65000条数据
                .reader(reader)//给step绑定reader
                .processor(processor)//给step绑定processor
                .writer(writer)//给step绑定writer
                .build();
    }

    @Bean
    public CsvJobListener csvJobListener(){
        return new CsvJobListener();
    }

    @Bean
    public Validator<Person> csvBeanValidator(){
        return new CsvBeanValidator<Person>();
    }


}
上面的配置代码有点长,首先我们的配置类要使用@EnableBatchProcessing开启批处理的支持,这点不要忘记。
6,运行
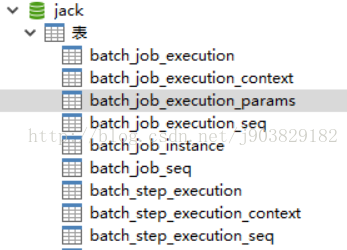
启动程序,Spring Boot会自动初始化Spring Batch数据库,并将csv中的数据导入到数据库中。
为我们初始化的Spring Batch数据库如下:
监听效果如下:
数据已导入且做转换处理,如下图:
将在Person类上定义的:
@Size(max = 5,min = 2)
修改为:@Size(max = 4,min = 2)
删除掉数据的数据,启动程序,控制台输出校验错误,如下:

7,手动触发任务
很多时候批处理任务是人为触发的,下面我们添加一个控制器,通过人为触发批处理任务,并演示参数后置绑定的使用。
注释掉CsvBatchConfig类的@Configuration注解,让此配置类不再起效。新建TriggerBatchConfig配置类,内容与CsvBatchConfig完全保持一致,除了修改定义ItemReader这个Bean,ItemReader修改后的定义如下:
@Bean
    @StepScope
    public FlatFileItemReader<Person> reader(@Value("#{jobParameters['input.file.name']}") String pathToFile){
        FlatFileItemReader<Person> reader = new FlatFileItemReader<>();
        //
        reader.setResource(new ClassPathResource(pathToFile));
        reader.setLineMapper(new DefaultLineMapper<Person>(){{
            setLineTokenizer(new DelimitedLineTokenizer(){{
                setNames(new String[]{"name","age","nation","address"});
            }});
            setFieldSetMapper(new BeanWrapperFieldSetMapper<Person>(){{
                setTargetType(Person.class);
            }});
        }});
        return reader;
    }
此处需要注意Bean的类型改为FlatFileItemReader,而不是ItemReader。因为ItemReader接口中没有read方法,若使用ItemReader则会报一个“Reader must be open before it can be read”错误。
控制器定义如下:
package com.jack.springboot13batch.controller;

import org.springframework.batch.core.Job;
import org.springframework.batch.core.JobParameters;
import org.springframework.batch.core.JobParametersBuilder;
import org.springframework.batch.core.launch.JobLauncher;
import org.springframework.beans.factory.annotation.Autowired;
import org.springframework.web.bind.annotation.RequestMapping;
import org.springframework.web.bind.annotation.RestController;

/**
 * create by jack 2017/10/29
 */

@RestController
@RequestMapping("batch")
public class DemoController {
    @Autowired
    private JobLauncher jobLauncher;
    @Autowired
    private Job importJob;
    public JobParameters jobParameters;

    @RequestMapping("/imp")
    public String imp (String fileName)throws Exception{
        String path = fileName+".csv";
        jobParameters = new JobParametersBuilder()
                .addLong("time",System.currentTimeMillis())
                .addString("input.file.name",path)
                .toJobParameters();
        jobLauncher.run(importJob, jobParameters);
        return "ok";
    }

}
此时我们还要关闭Spring Boot为我们自动执行Job的配置,在application.properties里使用下面代码关闭配置:
spring.batch.job.enabled=false
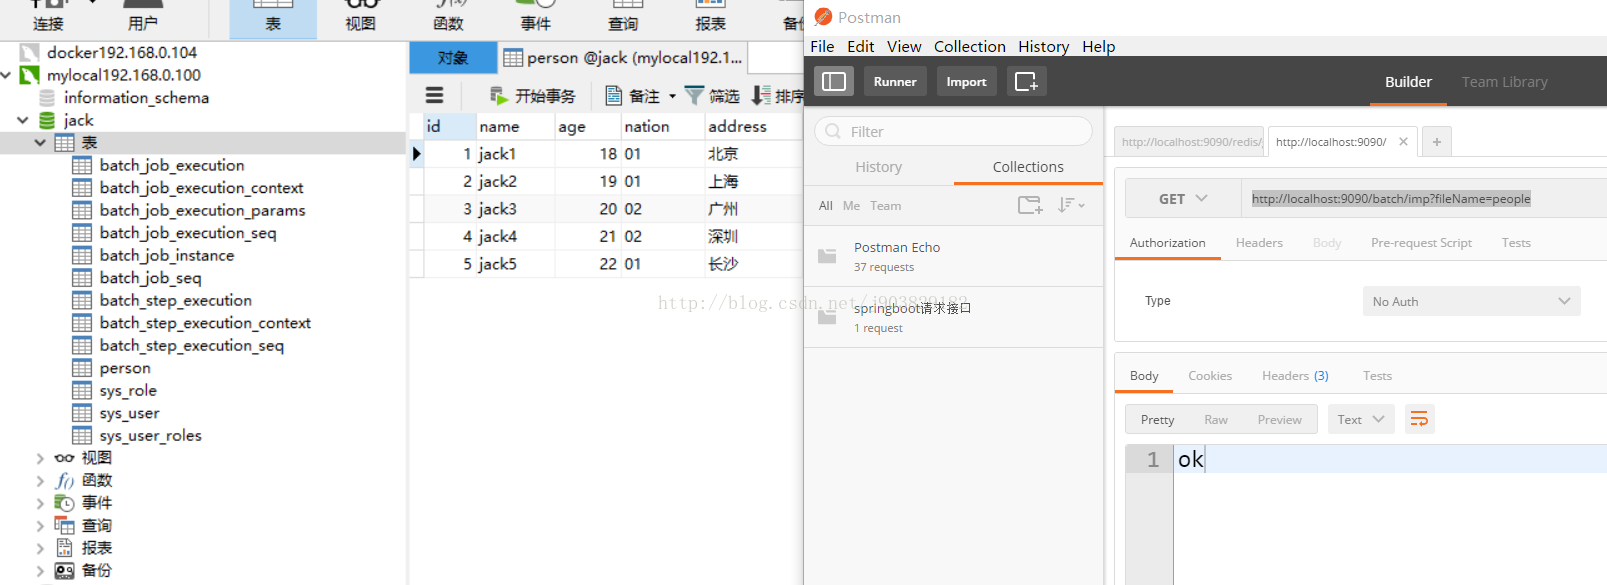
此时我们访问http://localhost:9090/batch/imp?fileName=people,可获得相同的数据导入效果,如下:
代码地址github见:https://github.com/wj903829182/SpringCloudTwo/tree/master/springboot13batch


 1172
1172


 被折叠的 条评论
为什么被折叠?
被折叠的 条评论
为什么被折叠?
 到【灌水乐园】发言


