


1、开发工具:Eclipse4.5 + tomcat8 + jdk8 + cxf3.1.4 + spring4.2
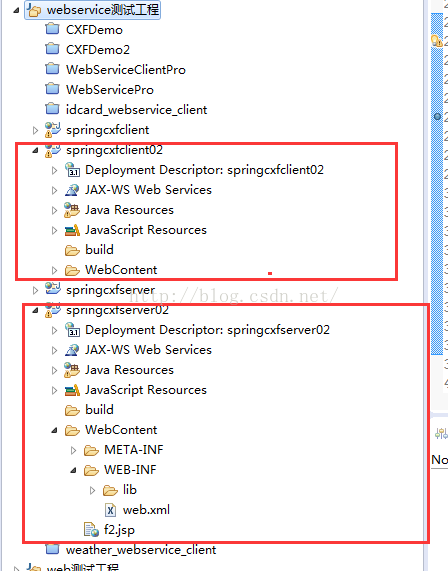
2、首先Eclipse新建两个web工程,,一个模拟server端发布webservice,,一个模拟client端,调用webservice,,如下图,我建的两个工程:分别为springcxfserver02和springcxfclient02
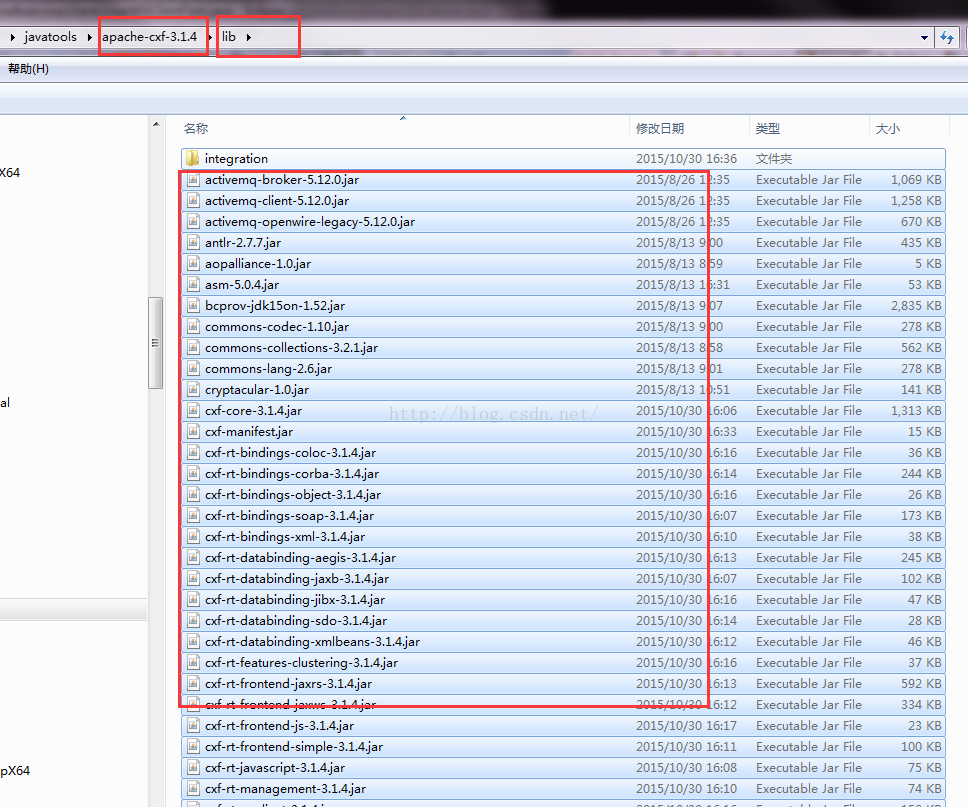
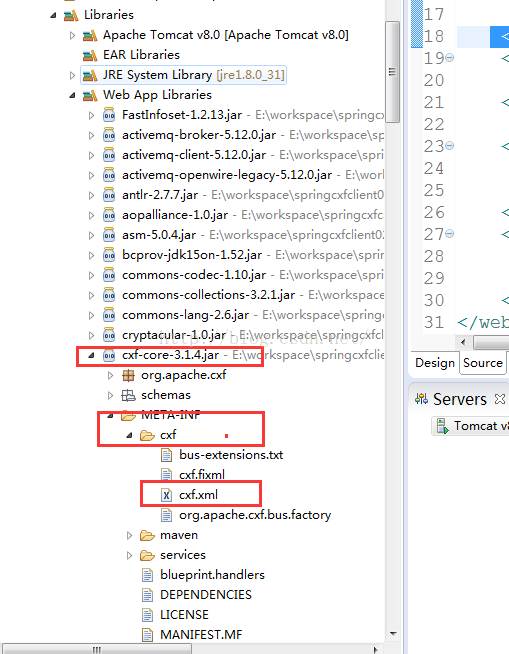
3、将下载的apache-cxf-3.1.4解压后,在lib目录下的所有jar文件(其实不需要所有,这里自己懒得选了,就选所有了),copy到springcxfserver02工程的lib目录 下,这个目录下已经有了spring的jar,,所以,无需再去spring包下找jar了
4、建测试代码,:
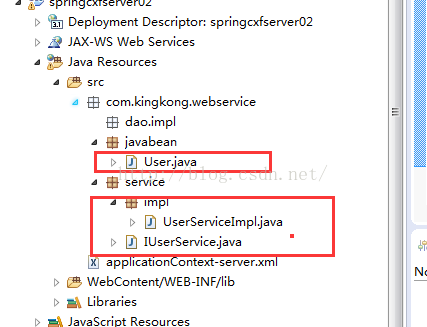
代码如下:
接口:IUserService。。。
package com.kingkong.webservice.service;
import java.util.List;
import javax.jws.WebService;
import com.kingkong.webservice.javabean.User;
@WebService
public interface IUserService {
public User getUserById(long id);
public List<User> getAllUsers();
}
实现类:UserServiceImpl...
package com.kingkong.webservice.service.impl;
import java.util.ArrayList;
import java.util.List;
import javax.jws.WebService;
import com.kingkong.webservice.javabean.User;
import com.kingkong.webservice.service.IUserService;
@WebService
public class UserServiceImpl implements IUserService {
@Override
public User getUserById(long id) {
User user = new User(100000, "testhao", 29);
System.out.println(user.toString());
return user;
}
@Override
public List<User> getAllUsers() {
List<User> list = new ArrayList<>();
User user = new User(100000, "test", 29);
User user1 = new User(100001, "test1", 19);
User user2 = new User(100002, "test2", 39);
list.add(user);
list.add(user1);
list.add(user2);
System.out.println(list.toString());
return list;
}
}
bean类:
package com.kingkong.webservice.javabean;
public class User {
private long id;
private String name;
private int age;
/**
* @param id
* @param name
* @param age
*/
public User(long id, String name, int age) {
super();
this.id = id;
this.name = name;
this.age = age;
}
public long getId() {
return id;
}
public void setId(long id) {
this.id = id;
}
public String getName() {
return name;
}
public void setName(String name) {
this.name = name;
}
public int getAge() {
return age;
}
public void setAge(int age) {
this.age = age;
}
@Override
public String toString() {
return "User [id=" + id + ", name=" + name + ", age=" + age + "]";
}
}
5、配置web.xml整合spring,,,,配置如下:
<?xml version="1.0" encoding="UTF-8"?>
<web-app xmlns:xsi="http://www.w3.org/2001/XMLSchema-instance" xmlns="http://xmlns.jcp.org/xml/ns/javaee" xsi:schemaLocation="http://xmlns.jcp.org/xml/ns/javaee http://xmlns.jcp.org/xml/ns/javaee/web-app_3_1.xsd" id="WebApp_ID" version="3.1">
<display-name>springcxfserver02</display-name>
<welcome-file-list>
<welcome-file>index.html</welcome-file>
<welcome-file>index.htm</welcome-file>
<welcome-file>index.jsp</welcome-file>
<welcome-file>default.html</welcome-file>
<welcome-file>default.htm</welcome-file>
<welcome-file>default.jsp</welcome-file>
</welcome-file-list>
<!-- 设置Spring容器加载配置文件路径 -->
<context-param>
<param-name>contextConfigLocation</param-name>
<param-value>classpath*:applicationContext-server.xml</param-value>
</context-param>
<!-- 加载Spring容器配置 -->
<listener>
<listener-class>org.springframework.web.context.ContextLoaderListener</listener-class>
</listener>
<servlet>
<servlet-name>CXFService</servlet-name>
<servlet-class>org.apache.cxf.transport.servlet.CXFServlet</servlet-class>
</servlet>
<servlet-mapping>
<servlet-name>CXFService</servlet-name>
<url-pattern>/webservice/*</url-pattern>
</servlet-mapping>
</web-app>
6、在src目录下,新建一个spring配置文件applicationContext-server.xml,,,配置如下:
<?xml version="1.0" encoding="UTF-8"?>
<beans xmlns="http://www.springframework.org/schema/beans"
xmlns:context="http://www.springframework.org/schema/context"
xmlns:jaxws="http://cxf.apache.org/jaxws" xmlns:xsi="http://www.w3.org/2001/XMLSchema-instance"
xsi:schemaLocation="http://www.springframework.org/schema/beans http://www.springframework.org/schema/beans/spring-beans-3.0.xsd http://www.springframework.org/schema/context http://www.springframework.org/schema/context/spring-context-3.0.xsd http://cxf.apache.org/jaxws http://cxf.apache.org/schemas/jaxws.xsd">
<!-- cxf3以后,只需要引入这个配置文件即可,其他两个废弃掉了-->
<import resource="classpath:META-INF/cxf/cxf.xml" />
<jaxws:endpoint id="userService"
implementor="com.kingkong.webservice.service.impl.UserServiceImpl"
address="/userWS">
</jaxws:endpoint>
</beans>
cxf3以后,只需要引入这个配置文件即可,其他两个废弃掉了
<import resource="classpath:META-INF/cxf/cxf.xml" />
可以cxf核心包下,看一下,也只有cxf.xml这一个配置文件了,如里配置原来的3个,启服务时,会报错
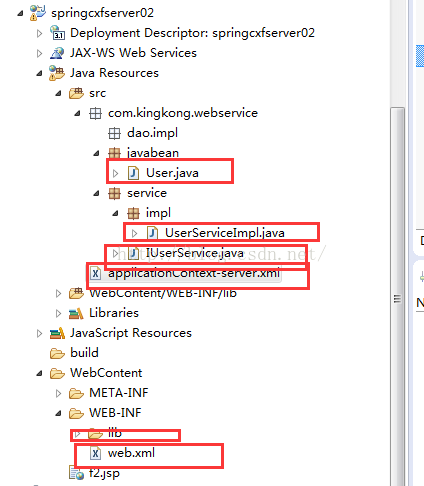
最后的服务端的工程结构如下图:
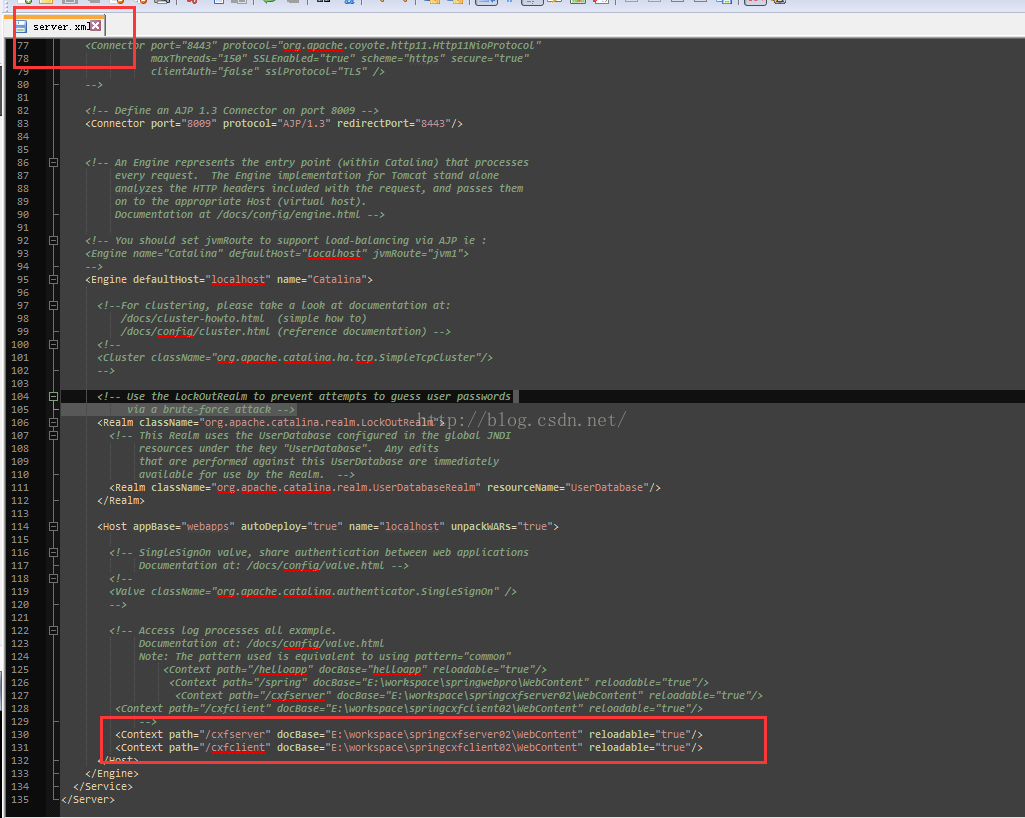
7、将web工程部署到tomcat中,在tomcat的server.xml配置文件中,加入工程:
<Context path="/cxfserver" docBase="E:\workspace\springcxfserver02\WebContent" reloadable="true"/>
<Context path="/cxfclient" docBase="E:\workspace\springcxfclient02\WebContent" reloadable="true"/>
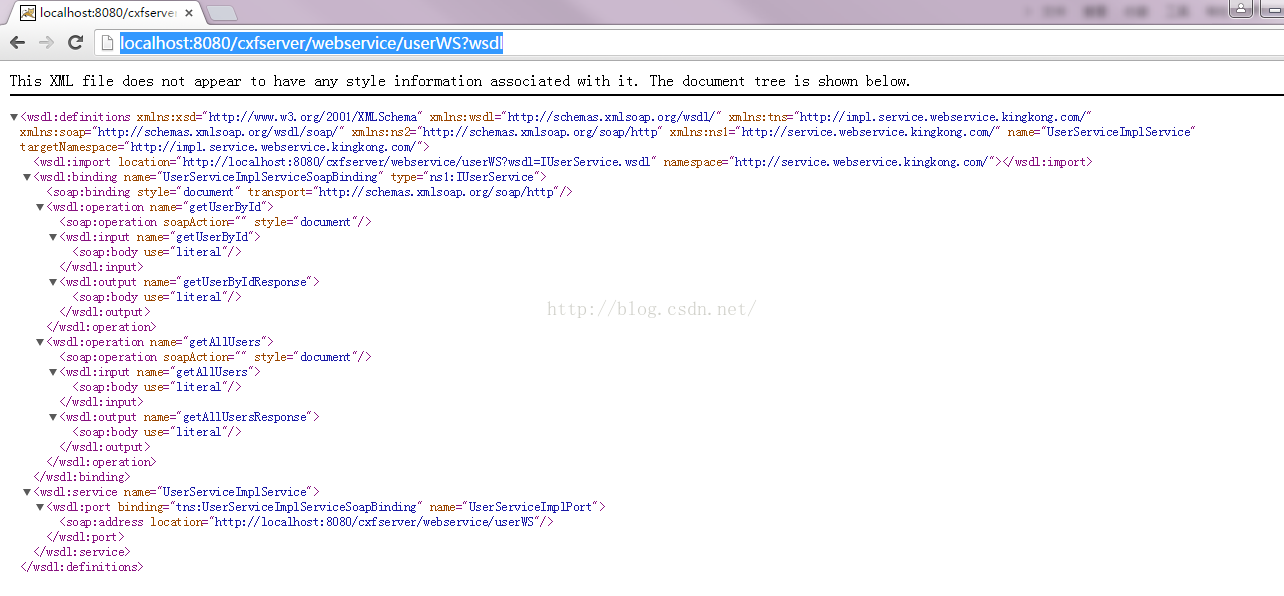
启动tomcat,,,在浏览器中输入发布后的,wsdl地址:
http://localhost:8080/cxfserver/webservice/userWS?wsdl
这个地址,其实是在applicationContext-server.xml配置文件中的配置,发布地址为/userWS,代码片断如下:
<jaxws:endpoint id="userService"
implementor="com.kingkong.webservice.service.impl.UserServiceImpl"
address="/userWS">
</jaxws:endpoint>
web.xml中配置的cxf的servlet中,拦截所有以/webservice的所有请求,代码片断如下
<servlet-mapping>
<servlet-name>CXFService</servlet-name>
<url-pattern>/webservice/*</url-pattern>
</servlet-mapping>
如见到下图,则说明,服务端已发布成功!:
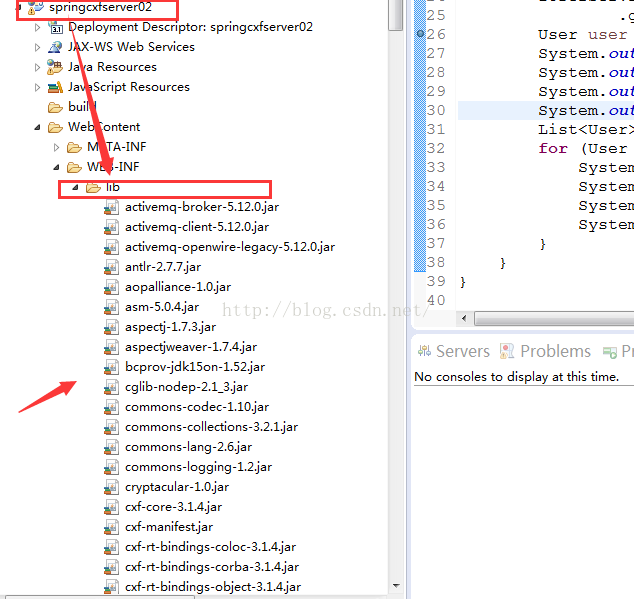
8、服务端写好后,接下来,编写,客户端调用程序:同样的,将cxf包下lib目录下的所有jar,,copy到
springcxfclient02工程下,然后在src下新建一个spring配置文件,名称为client-bean.xml,,,配置如下
<?xml version="1.0" encoding="UTF-8"?>
<beans xmlns="http://www.springframework.org/schema/beans"
xmlns:context="http://www.springframework.org/schema/context"
xmlns:jaxws="http://cxf.apache.org/jaxws" xmlns:xsi="http://www.w3.org/2001/XMLSchema-instance"
xsi:schemaLocation="http://www.springframework.org/schema/beans http://www.springframework.org/schema/beans/spring-beans-3.0.xsd http://www.springframework.org/schema/context http://www.springframework.org/schema/context/spring-context-3.0.xsd http://cxf.apache.org/jaxws http://cxf.apache.org/schemas/jaxws.xsd">
<jaxws:client id="userClient"
serviceClass="com.kingkong.webservice.service.impl.IUserService"
address="http://localhost:8080/cxfserver/webservice/userWS">
</jaxws:client>
</beans>
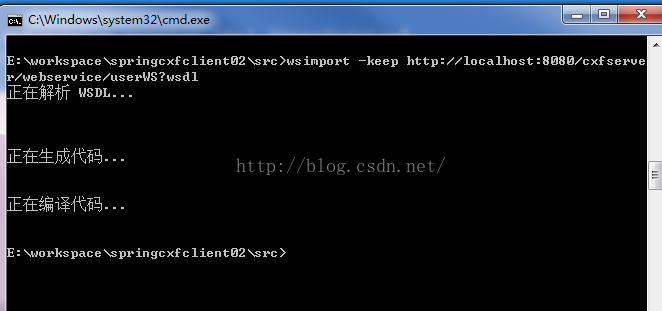
9、根据wsdl文件,生成客户端代码:如下图,,用jdk的wsimport,,,,,在cmd命令行下,将目录指定到当前src目录 下,,
执行命令:
wsimport -keep http://localhost:8080/cxfserver/webservice/userWS?wsdl
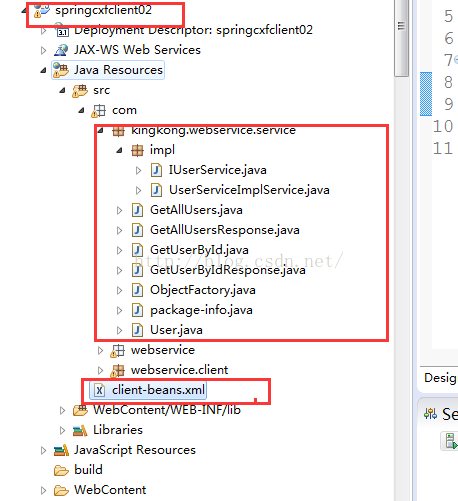
然后刷新工程,查看生成的代码如下:
10、最后在客户端新建一个类,测试调用服务端的webservice程序:如下:
package com.webservice.client;
import java.util.List;
import org.springframework.context.support.ClassPathXmlApplicationContext;
import com.kingkong.webservice.service.User;
import com.kingkong.webservice.service.impl.IUserService;
public class UserWSClientTest {
public static void main(String[] args) {
ClassPathXmlApplicationContext classPathXmlApplicationContext = new ClassPathXmlApplicationContext(
new String[] { "client-beans.xml" });
IUserService userService = (IUserService) classPathXmlApplicationContext
.getBean("userClient");
User user = userService.getUserById(1000);
System.out.println(user.getId());
System.out.println(user.getName());
System.out.println(user.getAge());
System.out.println("-------------------");
List<User> allUsers = userService.getAllUsers();
for (User u : allUsers) {
System.out.println(u.getId());
System.out.println(u.getName());
System.out.println(u.getAge());
System.out.println("-------------------");
}
}
}
最后测试成功!!!


 1726
1726


 被折叠的 条评论
为什么被折叠?
被折叠的 条评论
为什么被折叠?
 到【灌水乐园】发言


