


 本文指导如何使用CoreData在iOS应用中记录经纬度坐标,并实现坐标编辑功能,包括创建工程、理解关键组件、实现TableViewController、添加位置支持、创建自定义ManagedObject类、添加和获取事件、数据删除及显示效果。
上一篇文章我们从一个小例子讲解了Core Data的使用方式,其实尽管概念很多,但实际应用的时候大多数情况下我们不需要接触太多的类和方法,只要拿到context并且操作即可。
这次我们看看iOS自带的一个小例子,原文参见:Core Data Tutorial for iOS。由于上一次我们已经讲述了基本概念和实现方法,这次我的描述会简练一些,不再一步一步详细讲解。
本次目标是创建一个应用程序,可以记录每次你保存的经纬度坐标,并且可以对这些坐标(我们保存为一个Event实体)进行编辑。
我的演示环境是XCode 4.6.3,所以有些地方和原文是不同的,这里都已我自己的环境为准。
建立工程
步骤
- 创建一个Empty Application,起名叫Locations,选择Devices为iPhone,并且使用ARC;
- 添加CoreLocation.framework;
- 添加一个Storyboard文件,并在工程属性中选择Main Storyboard为这个文件;
- 至此,操作步骤完成。
对工程的理解
以上步骤完成后,我们的工程中多了很多文件,我们一一讲解如下:
- 应用的代理类AppDelegate(.h和.m文件);
- 一个.xib界面描述文件;
- 一个Core Data的模型文件.xcdatamodelId;
- 这个工程还引用了CoreLocation.framework;
我们还能看到对于AppDelegate.h,会自动生成相关Core Data的处理:
@property (readonly, strong, nonatomic) NSManagedObjectContext *managedObjectContext;
@property (readonly, strong, nonatomic) NSManagedObjectModel *managedObjectModel;
@property (readonly, strong, nonatomic) NSPersistentStoreCoordinator *persistentStoreCoordinator;

- (void)saveContext;
- (NSURL *)applicationDocumentsDirectory;
就像方法暗指的那样,applicationDocumentsDirectory方法返回的是app的文档路径,数据将被保存在那里。
Core Data Stack
这里的stack指的是Core Data framework中一系列对象的集合,这些对象协同工作,将模型从文件中取出,或者写入到文件中。从类比的角度说,Core Data可以被看为一个数据库,保存了记录和表(Core Data中的数据有可能真的被保存在数据库中,例如SQLite,但是这个不是一定的)。一个最简单和最频繁使用的Core Data Stack结构如下(可以和上一篇文章印证):
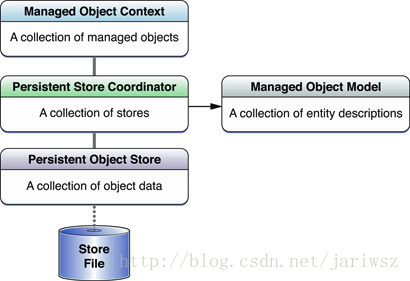
其中你最常用的是Managed Object Context和其包含的Managed Object对象。
Managed Object和Managed Object Context
Managed Object是一个NSManagedObject或者他的子类的对象。他代表了在Store中保存的一个对象的记录,所以他是一个由Core Data管理的模型。Managed Object对象管理应用中使用的数据,例如:一个人力资源管理系统中的部门和雇员信息;一个绘图程序中的形状、文本和分组信息;一个音乐程序中的音轨信息。一个Managed Object始终和一个Managed Object Context相关联。
Managed Object Context是一个NSManagedObjectContext类的实例。一个context代表了一个应用中与数据有关的内存区域。context的主要职责是用来管理managed object对象。Context对象是你的应用的控制中枢,负责生命周期管理到验证、Managed Object间的关系维护、重做和取消等功能。
当你新建一个Managed Object的时候,首先要将其放入Context中。你将对象取回(fetch)的时候,同样将其存入context对象。所有的操作都在内存中,一直到你通过commit提交你的修改为止。
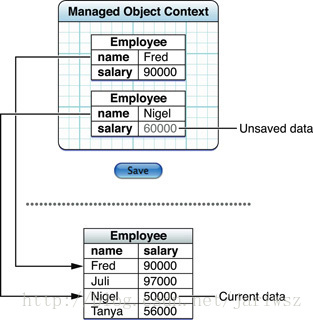
下面的图演示了记录(record)和对象(object)的关系,注意有个Nigel对象没有保存,所以Store中的salary仍然是50000,另外有两个对象未纳入context管理。
Managed Object Model
Managed Object Model是一个NSManagedObjectModel类的实例,他描述了数据库的Schema,所以你的数据能够保存到Store中。一个模型(model)是一个实体对象模型(NSEntityDescription)的集合。一个实体描述根据实体的名字描述一个实体,类名,及其属性。
下图描述了模型的实体描述、数据库中表和Managed Object中单个对象的关系:
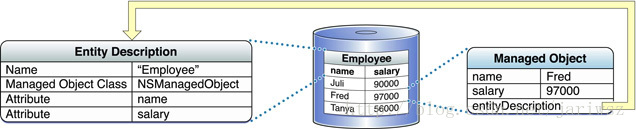
每个Managed Object都有对应的实体描述。
Core Data使用模型来在应用的managed object和数据库的记录中描述映射关系。所以一定要对改变模型(描述)小心处理。Core Data无法使用你之前的模型来使用现在的数据。(实际上需要通过版本管理来处理这种变更,而不是完全不能处理)
Persistent Store Coordinator
PSC扮演的角色是告诉Core Data如何管理数据。大多数时候你完全不用关心这个对象。
一个PSC是NSPersistentStoreCoordinator类的一个实例,他管理了一系列的persistent object store。一个persistent object stores代表一个需要序列化的外部文件或数据库。实际上Core Data支持多种持久化数据类型,甚至你可以声明自己的数据文件类型。
在iOS中,一般你仅有一个store,但在复杂的应用(例如OSX)中你可能有多个保存实体的store,所以PSC需要来管理这些store,当你需要取回数据时,PSC将取回所有结果。
下图模拟了coordinator的工作角色,实际情况通常不会这么复杂:
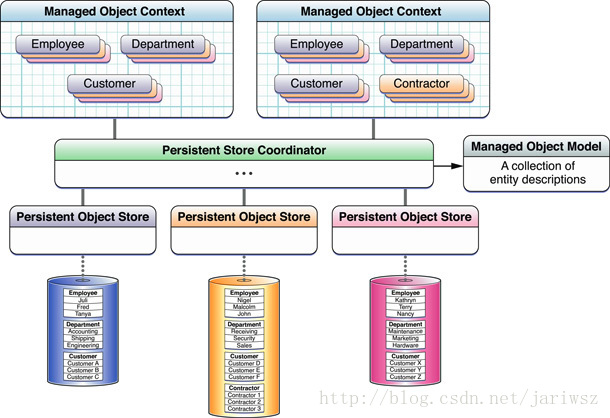
Table View Controller
这一小节主要实现Table View Controller相关功能。下面我们一步一步来执行以下步骤,:
- 在Storyboard中创建一个Table View,并将其嵌入到Navigation Controller中;
- 添加两个按钮到Navigation Bar上面,并且将左边按钮的Identifier改为Edit,右边Identifier修改为Add;
- 添加一个UITableViewController的子类,名字为LocationsListViewController;
- 添加对位置信息的支持,所以LocationsListViewController的头文件变为:
#import <UIKit/UIKit.h>
#import <CoreLocation/CoreLocation.h>

@interface LocationsListViewController : UITableViewController <CLLocationManagerDelegate>

@property (nonatomic, retain) NSMutableArray *eventsArray;
@property (nonatomic, retain) NSManagedObjectContext *managedObjectContext;

@property (nonatomic, retain) CLLocationManager *locationManager;
@property (nonatomic, retain) UIBarButtonItem *addButton;

@end
- 实现文件中对于location获取相关代码实现如下:
@implementation LocationsListViewController

@synthesize eventsArray;
@synthesize locationManager;
@synthesize managedObjectContext;
@synthesize addButton;


- (CLLocationManager *)locationManager {

    if (locationManager != nil) {
        return locationManager;
    }

    locationManager = [[CLLocationManager alloc] init];
    locationManager.desiredAccuracy = kCLLocationAccuracyNearestTenMeters;
    locationManager.delegate = self;

    return locationManager;
}

- (void)locationManager:(CLLocationManager *)manager
    didUpdateToLocation:(CLLocation *)newLocation
           fromLocation:(CLLocation *)oldLocation {
    addButton.enabled = YES;
}

- (void)locationManager:(CLLocationManager *)manager
       didFailWithError:(NSError *)error {
    addButton.enabled = NO;
}

- (id)initWithStyle:(UITableViewStyle)style
{
    self = [super initWithStyle:style];
    if (self) {
        // Custom initialization
    }
    return self;
}

- (void)viewDidLoad
{
    [super viewDidLoad];

    // Set the title.
    self.title = @"Locations";

    // Set up the buttons.
    self.navigationItem.leftBarButtonItem = self.editButtonItem;

    addButton = [[UIBarButtonItem alloc] initWithBarButtonSystemItem:UIBarButtonSystemItemAdd
                                                              target:self action:@selector(addEvent)];
    addButton.enabled = NO;
    self.navigationItem.rightBarButtonItem = addButton;

    // Start the location manager.
    [[self locationManager] startUpdatingLocation];
}
这里剩下addEvent未实现。 - 接着我们去AppDelegate类,将didFinishLaunchingWithOptions修改为:
- (BOOL)application:(UIApplication *)application didFinishLaunchingWithOptions:(NSDictionary *)launchOptions
{
    return YES;
}
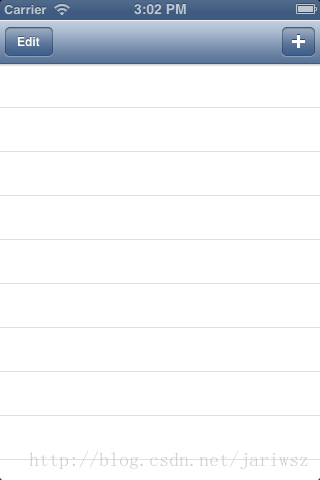
- 至此,本阶段工作完成,运行程序显示如下界面:
Managed Object and Model
这一部分比较简单,步骤如下:
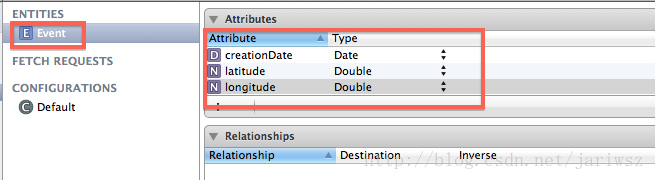
- 打开Locations.xcdatamodeld文件,Add Entity,名字叫Event;
- 分别添加属性如下图:
- 创建自定义的Managed Object类。原则上你可以直接使用NSManagedObject,但实际上大部分情况下都会使用他的子类,好处如下:
- 从开发工具获得更好的支持。例如属性存取方法的自动完成、编译时类型和符号的检测等;
- 支持实体的自定义方法。大多数情况下你希望实体提供特殊的逻辑,例如自定义的验证、或者衍生的属性等。例如,一个Person实体的hasDriversLicense属性在age属性不到17时不可能是true(所以会有一个校验),或者一个fullName方法返回的是firstName和lastName的一个合适的拼接。
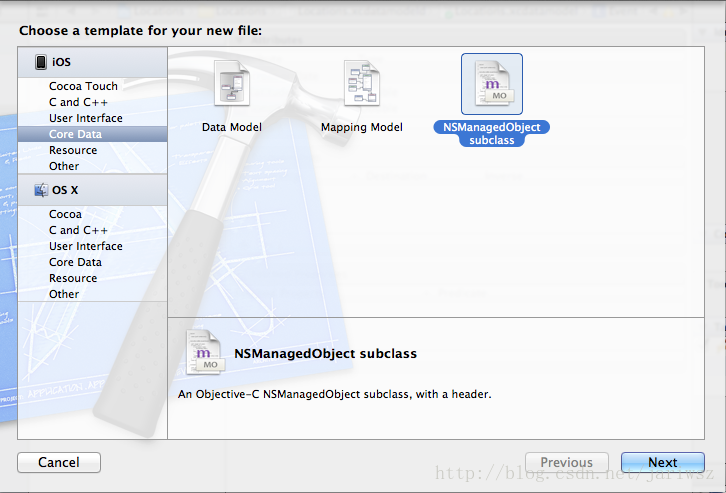
- 我们选择Event这个Entity,然后新建一个文件,选择Core Data分类中的NSManagedObject subclass。
- 我们可以看到自动生成的代码中包含了Event这个实体映射的域模型了。
Adding Events
这一小节的目标是添加事件并且将其显示在ListView中。
- 在story board中将我们的list view和我们之前创建的LocationsListViewController相关联;
- 在LocationsListViewController中添加方法:
- (void)addEvent {
    // Get the Current Location
    CLLocation *location = [locationManager location];
    if (!location) {
        return;
    }

    // Create and configure a new instance of the Event entity.
    Event *event = (Event *)[NSEntityDescription insertNewObjectForEntityForName:@"Event" inManagedObjectContext:managedObjectContext];

    CLLocationCoordinate2D coordinate = [location coordinate];
    [event setLatitude:[NSNumber numberWithDouble:coordinate.latitude]];
    [event setLongitude:[NSNumber numberWithDouble:coordinate.longitude]];
    [event setCreationDate:[NSDate date]];

    // Save the New Event
    NSError *error = nil;
    if (![managedObjectContext save:&error]) {
        // Handle the error.
        NSLog(@"Save Event failed.");
        return ;
    }

    // Update the Events Array and the Table View
    [eventsArray insertObject:event atIndex:0];
    NSIndexPath *indexPath = [NSIndexPath indexPathForRow:0 inSection:0];
    [self.tableView insertRowsAtIndexPaths:[NSArray arrayWithObject:indexPath]
                          withRowAnimation:UITableViewRowAnimationFade];
    [self.tableView scrollToRowAtIndexPath:[NSIndexPath indexPathForRow:0 inSection:0] atScrollPosition:UITableViewScrollPositionTop animated:YES];
}
- 其余涉及到Table View的显示代码如下(注意设置Table View的Cell的Identifier为Cell,区分大小写;同时将Cell的Style设置为Right Detail):
- (NSInteger)numberOfSectionsInTableView:(UITableView *)tableView
{
    // Return the number of sections.
    return 1;
}

- (NSInteger)tableView:(UITableView *)tableView numberOfRowsInSection:(NSInteger)section
{
    return [eventsArray count];
}

- (UITableViewCell *)tableView:(UITableView *)tableView cellForRowAtIndexPath:(NSIndexPath *)indexPath
{
    // A date formatter for the time stamp.
    static NSDateFormatter *dateFormatter = nil;
    if (dateFormatter == nil) {
        dateFormatter = [[NSDateFormatter alloc] init];
        [dateFormatter setTimeStyle:NSDateFormatterMediumStyle];
        [dateFormatter setDateStyle:NSDateFormatterMediumStyle];
    }

    // A number formatter for the latitude and longitude.
    static NSNumberFormatter *numberFormatter = nil;
    if (numberFormatter == nil) {
        numberFormatter = [[NSNumberFormatter alloc] init];
        [numberFormatter setNumberStyle:NSNumberFormatterDecimalStyle];
        [numberFormatter setMaximumFractionDigits:3];
    }

    static NSString *CellIdentifier = @"Cell";

    // Dequeue or create a new cell.
    UITableViewCell *cell = [tableView dequeueReusableCellWithIdentifier:CellIdentifier];
    if (cell == nil) {
        cell = [[UITableViewCell alloc] initWithStyle:UITableViewCellStyleSubtitle reuseIdentifier:CellIdentifier];
    }

    Event *event = (Event *)[eventsArray objectAtIndex:indexPath.row];

    cell.textLabel.text = [dateFormatter stringFromDate:[event creationDate]];

    NSString *string = [NSString stringWithFormat:@"%@, %@",
                        [numberFormatter stringFromNumber:[event latitude]],
                        [numberFormatter stringFromNumber:[event longitude]]];
    cell.detailTextLabel.text = string;

    return cell;
}
- 还要实现一个getManagedObjectContext的方法:
- (NSManagedObjectContext *)getManagedObjectContext {
    NSManagedObjectContext *context = nil;
    id delegate = [[UIApplication sharedApplication] delegate];
    if ([delegate performSelector:@selector(managedObjectContext)]) {
        context = [delegate managedObjectContext];
    }
    return context;
}
- 最后在viewDidLoad方法最末尾加上eventArray和context的初始化代码:
    eventsArray = [[NSMutableArray alloc] init];
    managedObjectContext = self.getManagedObjectContext;
- 运行程序,添加event看看效果。
Fetching Events
获取数据的步骤比较简单:
- 创建请求;
- 设置排序条件(可选);
- 执行查询;
- 将数据放到我们准备好的(可变)数组中;
具体代码如下,我们需要创建一个loadData方法,然后在viewDidLoad中执行loadData:
-(void)loadData
{
    // Create the Request
    NSFetchRequest *request = [[NSFetchRequest alloc] init];
    NSEntityDescription *entity = [NSEntityDescription entityForName:@"Event" inManagedObjectContext:managedObjectContext];
    [request setEntity:entity];
    // Set the Sort Descriptor
    NSSortDescriptor *sortDescriptor = [[NSSortDescriptor alloc] initWithKey:@"creationDate" ascending:NO];
    NSArray *sortDescriptors = [[NSArray alloc] initWithObjects:sortDescriptor, nil];
    [request setSortDescriptors:sortDescriptors];
    // Execute the Request
    NSError *error = nil;
    NSMutableArray *mutableFetchResults = [[managedObjectContext executeFetchRequest:request error:&error] mutableCopy];
    if (mutableFetchResults == nil) {
        // Handle the error.
        NSLog(@"error loading data");
    }
    // Finish Up
    [self setEventsArray:mutableFetchResults];
}
Deleting Events
删除操作主要是覆盖commitEditingStyle方法,删除Object、删除界面中的显示,代码如下:
- (void)tableView:(UITableView *)tableView commitEditingStyle:(UITableViewCellEditingStyle)editingStyle forRowAtIndexPath:(NSIndexPath *)indexPath
{
    if (editingStyle == UITableViewCellEditingStyleDelete) {
        // Delete the managed object at the given index path.
        NSManagedObject *eventToDelete = [eventsArray objectAtIndex:indexPath.row];
        [managedObjectContext deleteObject:eventToDelete];

        // Update the array and table view.
        [eventsArray removeObjectAtIndex:indexPath.row];
        [tableView deleteRowsAtIndexPaths:[NSArray arrayWithObject:indexPath] withRowAnimation:YES];

        // Commit the change.
        NSError *error = nil;
        if (![managedObjectContext save:&error]) {
            // Handle the error.
        }
    }
    else if (editingStyle == UITableViewCellEditingStyleInsert) {
        // Create a new instance of the appropriate class, insert it into the array, and add a new row to the table view
    }
}
至此,这个例子完成,运行即可查看效果。


 被折叠的 条评论
为什么被折叠?
被折叠的 条评论
为什么被折叠?
 到【灌水乐园】发言


