


前言
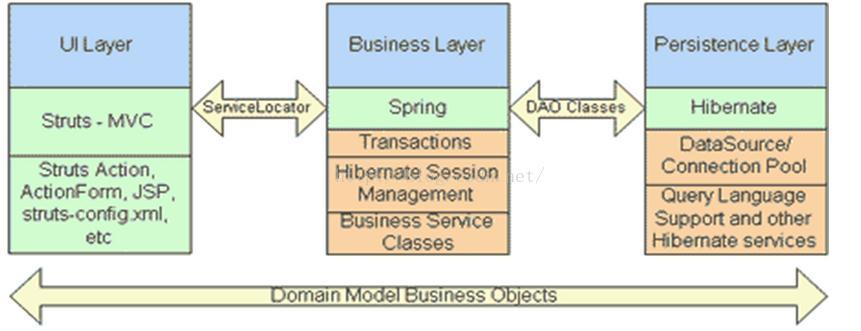
首先,SSH不是一个框架,而是多个框架(struts+spring+hibernate)的集成,是目前较流行的一种Web应用程序开源集成框架,用于构建灵活、易于扩展的多层Web应用程序。
集成SSH框架的系统从职责上分为四层:表示层、业务逻辑层、数据持久层和域模块层(实体层)。
Struts作为系统的整体基础架构,负责MVC的分离,在Struts框架的模型部分,控制业务跳转,利用Hibernate框架对持久层提供支持。Spring一方面作为一个轻量级的IoC容器,负责查找、定位、创建和管理对象及对象之间的依赖关系,另一方面能使Struts和Hibernate更好地工作。
由SSH构建系统的基本业务流程是:
1、在表示层中,首先通过JSP页面实现交互界面,负责传送请求(Request)和接收响应(Response),然后Struts根据配置文件(struts-config.xml)将ActionServlet接收到的Request委派给相应的Action处理。
2、在业务层中,管理服务组件的Spring IoC容器负责向Action提供业务模型(Model)组件和该组件的协作对象数据处理(DAO)组件完成业务逻辑,并提供事务处理、缓冲池等容器组件以提升系统性能和保证数据的完整性。
3、在持久层中,则依赖于Hibernate的对象化映射和数据库交互,处理DAO组件请求的数据,并返回处理结果。
采用上述开发模型,不仅实现了视图、控制器与模型的彻底分离,而且还实现了业务逻辑层与持久层的分离。这样无论前端如何变化,模型层只需很少的改动,并且数据库的变化也不会对前端有所影响,大大提高了系统的可复用性。而且由于不同层之间耦合度小,有利于团队成员并行工作,大大提高了开发效率。
有关SSH更多的知识可查看微博:http://blog.csdn.net/shan9liang/article/details/8803989
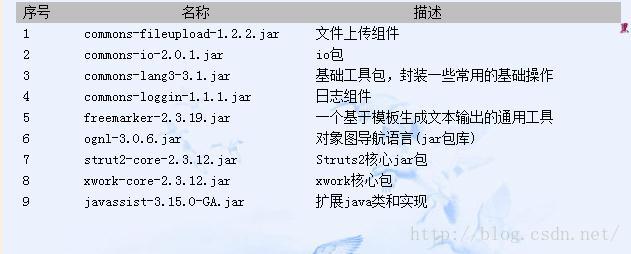
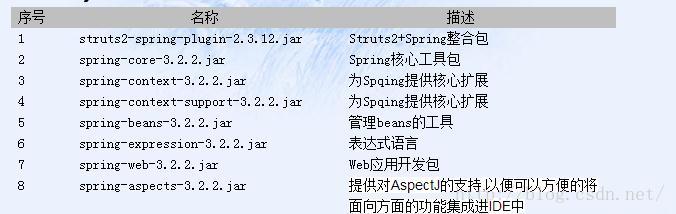
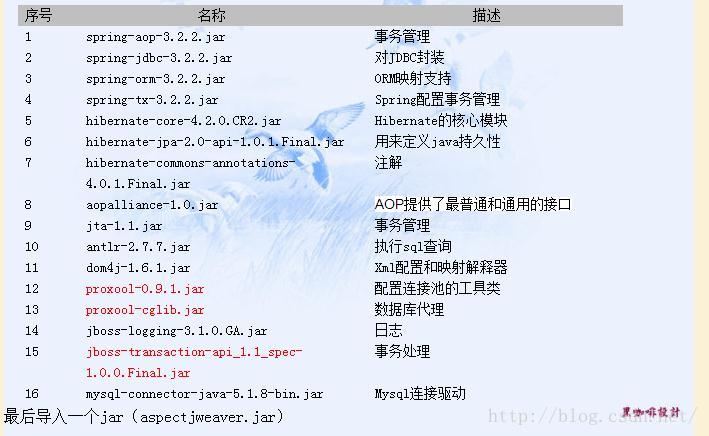
一 框架搭建啦!!! 准备好相应的jar包
这里首先你要准备的Spring jar包 ,struts2jar包 然后就是持久层的hibernate框架jar包
框架的下载地址:
1、Struts2:http://struts.apache.org/download
2 Spring:http://www.springsource.org/download/community
3 hibernate:http://sourceforge.net/projects/hibernate/files/hibernate4/
struts2搭建需要用到的jar包
Spring3整合所需要用到的jar包
hinernate整合所需要用到的jar包
jar包准备好了过后需要将jar包放在WEB-INF/lib目录下 这个目录是专门存放jar包的目录
我将我项目结构贴图出来,方便大家参考
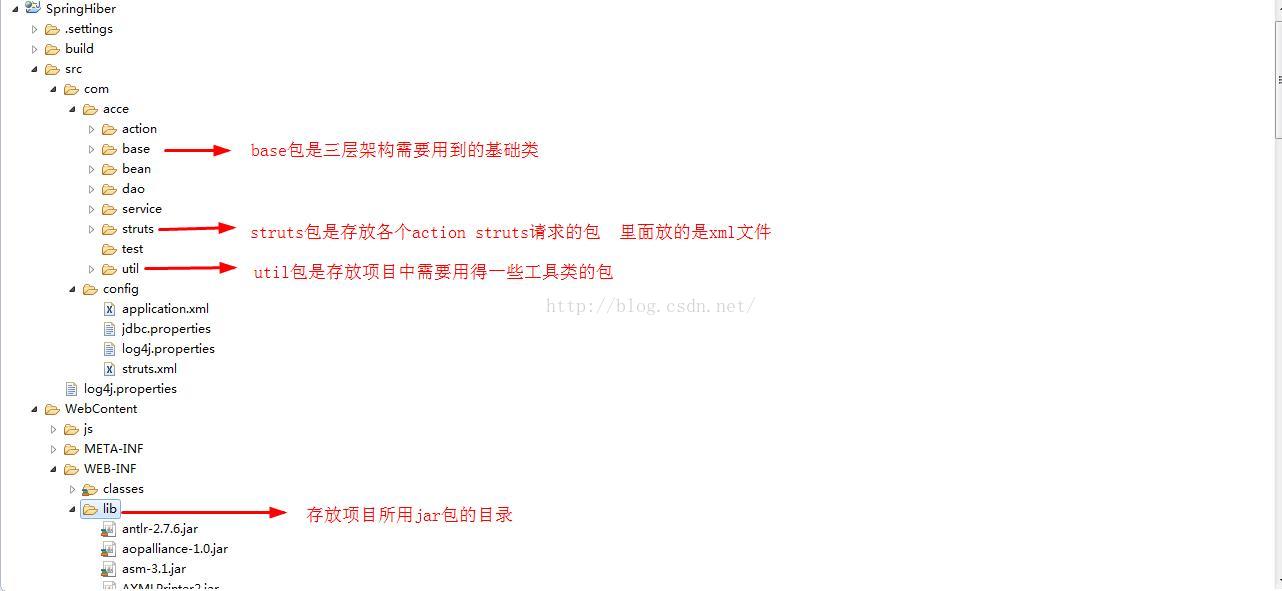
按照我的项目结构新建目录吧 下面就来新建各个框架相关联的配置了
在WEB-INF目录下新建classes文件夹 将配置文件(除开struts--xxxx.xml文件不放在里面 )放在这个文件夹里面
新建application.xm文件 关联Spring一些配置和数据库连接池的一些配置 以及事务的配置都在这里面
<span style="font-size:18px;font-weight: normal;"><?xml version="1.0" encoding="UTF-8"?>
<beans
	xmlns="http://www.springframework.org/schema/beans"
	xmlns:xsi="http://www.w3.org/2001/XMLSchema-instance"
	xmlns:p="http://www.springframework.org/schema/p"
	xmlns:aop="http://www.springframework.org/schema/aop"
	xmlns:tx="http://www.springframework.org/schema/tx"
	xmlns:context="http://www.springframework.org/schema/context"
	xmlns:task="http://www.springframework.org/schema/task"
	xsi:schemaLocation="http://www.springframework.org/schema/beans
	http://www.springframework.org/schema/beans/spring-beans-3.0.xsd
	http://www.springframework.org/schema/aop
	http://www.springframework.org/schema/aop/spring-aop-3.0.xsd
	http://www.springframework.org/schema/tx
	http://www.springframework.org/schema/tx/spring-tx-3.0.xsd
	http://www.springframework.org/schema/context
	http://www.springframework.org/schema/context/spring-context-3.0.xsd
	http://www.springframework.org/schema/task
	http://www.springframework.org/schema/task/spring-task-3.0.xsd">

	<!-- MySQL 数据源配置 -->
	<!-- <bean id="dataSource" class="org.apache.commons.dbcp.BasicDataSource">
		<property name="driverClassName" value="com.mysql.jdbc.Driver"/>
		<property name="url" value="jdbc:mysql://127.0.0.1:3306/order"/>
		<property name="username" value="root"/>
		<property name="password" value="123456"/>
	</bean>
	-->


	<!-- spring自动扫描bean,使用注解的时候扫描包 -->
	<context:component-scan base-package="com.acce"/>

	<!-- 定时任务调度 -->
	<task:annotation-driven scheduler="qbScheduler" mode="proxy"/>
    <task:scheduler id="qbScheduler" pool-size="10"/>

	<!-- 配置数据库jdbc.properties的地址 -->
	<bean id="propertyConfigurer" class="org.springframework.beans.factory.config.PropertyPlaceholderConfigurer">
		<property name="locations">
			<list>
				<!-- <value>/WEB-INF/classes/jdbc.properties</value> -->
				<value>classpath:jdbc.properties</value>
			</list>
		</property>
	</bean>

	<!-- C3P0 数据源连接池配置 -->
	<bean id="dataSource" class="com.mchange.v2.c3p0.ComboPooledDataSource" destroy-method="close">
       <!-- 指定连接数据库的驱动 -->
       <property name="driverClass" value="${jdbc.driverClassName}"/>
       <!-- 指定连接数据库的URL -->
       <property name="jdbcUrl" value="${jdbc.url}"/>
       <!-- 指定连接数据库的用户名 -->
       <property name="user" value="${jdbc.username}"/>
       <!-- 指定连接数据库的密码 -->
       <property name="password" value="${jdbc.password}"/>
       <!-- 指定连接数据库连接池的最大连接数 -->
       <property name="maxPoolSize" value="100"/>
       <!-- 指定连接数据库连接池的最小连接数 -->
       <property name="minPoolSize" value="20"/>
       <!-- 指定连接数据库连接池的初始化连接数 -->
       <property name="initialPoolSize" value="20"/>
       <!-- 指定连接数据库连接池的连接a的最大空闲时间 -->
       <property name="maxIdleTime" value="20"/>
    </bean>

	<!-- Session 工厂配置 -->
	<bean id="sessionFactory" class="org.springframework.orm.hibernate3.annotation.AnnotationSessionFactoryBean">
		<property name="dataSource">
			<ref bean="dataSource"/>
		</property>
		<property name="hibernateProperties">
			<props>
				<prop key="hibernate.dialect">org.hibernate.dialect.MySQLDialect</prop>
				<prop key="hibernate.hbm2ddl.auto">none</prop>
				<prop key="hibernate.show_sql">true</prop>
				<prop key="hibernate.format_sql">true</prop>
				<prop key="hibernate.connection.release_mode">auto</prop>
			</props>
		</property>
		<property name="packagesToScan">
			<list>
				<value>com.acce</value>
			</list>
		</property>
	</bean>

	<!-- 配置事务管理器 -->
	<bean id="transactionManager" class="org.springframework.orm.hibernate3.HibernateTransactionManager">
		<property name="sessionFactory" ref="sessionFactory"/>
	</bean>

	<!-- 使用注解配置事务 开始-->
	<tx:advice id="txAdvice" transaction-manager="transactionManager">
        <tx:attributes>
        	  	<!-- 定义所有get/find/load/list/query开头的方法都是只读的 -->
        		<tx:method name="get*" read-only="true"/>
        		<tx:method name="find*" read-only="true"/>
        		<tx:method name="load*" read-only="true"/>
        		<tx:method name="list*" read-only="true"/>
        		<tx:method name="is*" propagation="REQUIRED"/>
        		<tx:method name="query*" read-only="true"/>
        		<tx:method name="add*" propagation="REQUIRED" /> <!--如果不把save update delete都配置上 -->
        		<tx:method name="save*" propagation="REQUIRED" /> <!--如果不把save update delete都配置上 -->
        		<tx:method name="update*" propagation="REQUIRED"/><!--如果不把save update delete都配置上 -->
        		<tx:method name="delete*" propagation="REQUIRED"/><!--如果不把save update delete都配置上 -->
        		<!-- 调用事务的方法名称  统一使用do前缀 -->
        		<tx:method name="do*" propagation="REQUIRED"/>
        </tx:attributes>
    </tx:advice>

    <!-- <aop:config>
        <aop:pointcut id="interceptorPointCuts" expression="execution(* com.acce.*.service.*.*(..)) or execution(* com.acce.*.*.service.*.*(..)) or execution(* com.acce.*.service.*.*.*(..))" />
        <aop:advisor advice-ref="txAdvice" pointcut-ref="interceptorPointCuts" />
    </aop:config>  -->

    <!-- 使用注解配置事务 结束-->

   <!--
    <aop:config proxy-target-class="true" >
	 <aop:aspect id="logAspect" ref="logService">
	  	<aop:pointcut expression="execution(* com.wfsd.*.service.*.do*(..))" id="logPointCut"/>
	  	<aop:after method="doOperationLogs" pointcut-ref="logPointCut"/>
	 	</aop:aspect>
	</aop:config>
 	<bean id="logService" class="com.wfsd.busindess.service.LogService"></bean> -->
	</beans></span>
<span style="font-size:18px;font-weight: normal;"><?xml version="1.0" encoding="UTF-8"?>
<beans
xmlns="http://www.springframework.org/schema/beans"
xmlns:xsi="http://www.w3.org/2001/XMLSchema-instance"
xmlns:p="http://www.springframework.org/schema/p"
xmlns:aop="http://www.springframework.org/schema/aop"
xmlns:tx="http://www.springframework.org/schema/tx"
xmlns:context="http://www.springframework.org/schema/context"
xmlns:task="http://www.springframework.org/schema/task"
xsi:schemaLocation="http://www.springframework.org/schema/beans
http://www.springframework.org/schema/beans/spring-beans-3.0.xsd
http://www.springframework.org/schema/aop
http://www.springframework.org/schema/aop/spring-aop-3.0.xsd
http://www.springframework.org/schema/tx
http://www.springframework.org/schema/tx/spring-tx-3.0.xsd
http://www.springframework.org/schema/context
http://www.springframework.org/schema/context/spring-context-3.0.xsd
http://www.springframework.org/schema/task
http://www.springframework.org/schema/task/spring-task-3.0.xsd">
<!-- MySQL 数据源配置 -->
<!-- <bean id="dataSource" class="org.apache.commons.dbcp.BasicDataSource">
<property name="driverClassName" value="com.mysql.jdbc.Driver"/>
<property name="url" value="jdbc:mysql://127.0.0.1:3306/order"/>
<property name="username" value="root"/>
<property name="password" value="123456"/>
</bean>
-->
<!-- spring自动扫描bean,使用注解的时候扫描包 -->
<context:component-scan base-package="com.acce"/>
<!-- 定时任务调度 -->
<task:annotation-driven scheduler="qbScheduler" mode="proxy"/>
<task:scheduler id="qbScheduler" pool-size="10"/>
<!-- 配置数据库jdbc.properties的地址 -->
<bean id="propertyConfigurer" class="org.springframework.beans.factory.config.PropertyPlaceholderConfigurer">
<property name="locations">
<list>
<!-- <value>/WEB-INF/classes/jdbc.properties</value> -->
<value>classpath:jdbc.properties</value>
</list>
</property>
</bean>
<!-- C3P0 数据源连接池配置 -->
<bean id="dataSource" class="com.mchange.v2.c3p0.ComboPooledDataSource" destroy-method="close">
<!-- 指定连接数据库的驱动 -->
<property name="driverClass" value="${jdbc.driverClassName}"/>
<!-- 指定连接数据库的URL -->
<property name="jdbcUrl" value="${jdbc.url}"/>
<!-- 指定连接数据库的用户名 -->
<property name="user" value="${jdbc.username}"/>
<!-- 指定连接数据库的密码 -->
<property name="password" value="${jdbc.password}"/>
<!-- 指定连接数据库连接池的最大连接数 -->
<property name="maxPoolSize" value="100"/>
<!-- 指定连接数据库连接池的最小连接数 -->
<property name="minPoolSize" value="20"/>
<!-- 指定连接数据库连接池的初始化连接数 -->
<property name="initialPoolSize" value="20"/>
<!-- 指定连接数据库连接池的连接a的最大空闲时间 -->
<property name="maxIdleTime" value="20"/>
</bean>
<!-- Session 工厂配置 -->
<bean id="sessionFactory" class="org.springframework.orm.hibernate3.annotation.AnnotationSessionFactoryBean">
<property name="dataSource">
<ref bean="dataSource"/>
</property>
<property name="hibernateProperties">
<props>
<prop key="hibernate.dialect">org.hibernate.dialect.MySQLDialect</prop>
<prop key="hibernate.hbm2ddl.auto">none</prop>
<prop key="hibernate.show_sql">true</prop>
<prop key="hibernate.format_sql">true</prop>
<prop key="hibernate.connection.release_mode">auto</prop>
</props>
</property>
<property name="packagesToScan">
<list>
<value>com.acce</value>
</list>
</property>
</bean>
<!-- 配置事务管理器 -->
<bean id="transactionManager" class="org.springframework.orm.hibernate3.HibernateTransactionManager">
<property name="sessionFactory" ref="sessionFactory"/>
</bean>
<!-- 使用注解配置事务 开始-->
<tx:advice id="txAdvice" transaction-manager="transactionManager">
<tx:attributes>
<!-- 定义所有get/find/load/list/query开头的方法都是只读的 -->
<tx:method name="get*" read-only="true"/>
<tx:method name="find*" read-only="true"/>
<tx:method name="load*" read-only="true"/>
<tx:method name="list*" read-only="true"/>
<tx:method name="is*" propagation="REQUIRED"/>
<tx:method name="query*" read-only="true"/>
<tx:method name="add*" propagation="REQUIRED" /> <!--如果不把save update delete都配置上 -->
<tx:method name="save*" propagation="REQUIRED" /> <!--如果不把save update delete都配置上 -->
<tx:method name="update*" propagation="REQUIRED"/><!--如果不把save update delete都配置上 -->
<tx:method name="delete*" propagation="REQUIRED"/><!--如果不把save update delete都配置上 -->
<!-- 调用事务的方法名称 统一使用do前缀 -->
<tx:method name="do*" propagation="REQUIRED"/>
</tx:attributes>
</tx:advice>
<!-- <aop:config>
<aop:pointcut id="interceptorPointCuts" expression="execution(* com.acce.*.service.*.*(..)) or execution(* com.acce.*.*.service.*.*(..)) or execution(* com.acce.*.service.*.*.*(..))" />
<aop:advisor advice-ref="txAdvice" pointcut-ref="interceptorPointCuts" />
</aop:config> -->
<!-- 使用注解配置事务 结束-->
<!--
<aop:config proxy-target-class="true" >
<aop:aspect id="logAspect" ref="logService">
<aop:pointcut expression="execution(* com.wfsd.*.service.*.do*(..))" id="logPointCut"/>
<aop:after method="doOperationLogs" pointcut-ref="logPointCut"/>
</aop:aspect>
</aop:config>
<bean id="logService" class="com.wfsd.busindess.service.LogService"></bean> -->
</beans></span>里面具体的配置说明就不一一说明了 都有注释 不懂可以看注释 。。。。。。。。。。
#jdbc.driverClassName=com.mysql.jdbc.Driver
#jdbc.username=hello
#jdbc.password=hello
#jdbc.url=jdbc\:mysql\:/127.0.0.1\:3306/jasondb?useUnicode\=true&characterEncoding\=UTF-8
jdbc.url=jdbc:mysql://127.0.0.1:3306/jasondb?useUnicode\=true&characterEncoding\=UTF-8
jdbc.driverClassName=com.mysql.jdbc.Driver
jdbc.username=root
jdbc.password=root
#jdbc.url=jdbc\:mysql\://192.168.89.107\:3306/advert01?useUnicode\=true&characterEncoding\=UTF-8
# Configure logging for testing: optionally with log file
#\u53EF\u4EE5\u8BBE\u7F6E\u7EA7\u522B\uFF1Adebug>info>error
#debug:\u53EF\u4EE5\u663E\u5F0Fdebug,info,error
#info:\u53EF\u4EE5\u663E\u5F0Finfo,error
#error:\u53EF\u4EE5\u663E\u5F0Ferror

log4j.rootLogger=debug,appender1
#log4j.rootLogger=info,appender1
#log4j.rootLogger=error,appender1

#\u8F93\u51FA\u5230\u63A7\u5236\u53F0
log4j.appender.appender1=org.apache.log4j.ConsoleAppender
#\u6837\u5F0F\u4E3ATTCCLayout
log4j.appender.appender1.layout=org.apache.log4j.TTCCLayout<?xml version="1.0" encoding="UTF-8" ?>
<!DOCTYPE struts PUBLIC
"-//Apache Software Foundation//DTD Struts Configuration 2.1//EN"
"http://struts.apache.org/dtds/struts-2.1.dtd">
<struts>
<constant name="struts.objectFactory" value="spring"/>
<!-- 设置浏览器是否缓存静态内容,默认值为true(生产环境下使用),开发阶段最好关闭 -->
<constant name="struts.serve.static.browserCache" value="false"/>
<!-- 当struts的配置文件修改后,系统是否自动重新加载该文件,默认值为false(生产环境下使用),开发阶段最好打开 -->
<constant name="struts.configuration.xml.reload" value="true"/>
<!-- 开发模式下使用,这样可以打印出更详细的错误信息1111 -->
<constant name="struts.devMode" value="true" />
<!-- 默认的视图主题 -->
<constant name="struts.ui.theme" value="simple" />
<!--<constant name="struts.multipart.saveDir" value ="/temp" />-->
<constant name="struts.multipart.maxSize" value ="9000000000" />
<constant name="struts.enable.DynamicMethodInvocation" value="false"/>
<constant name="struts.action.extension" value="do" />
<constant name="struts.i18n.encoding" value="utf-8" />
<include file="com/acce/struts/struts-user.xml"></include>
</struts>
<?xml version="1.0" encoding="UTF-8"?>
<web-app xmlns:xsi="http://www.w3.org/2001/XMLSchema-instance" xmlns="http://java.sun.com/xml/ns/javaee" xmlns:web="http://java.sun.com/xml/ns/javaee/web-app_2_5.xsd" xsi:schemaLocation="http://java.sun.com/xml/ns/javaee http://java.sun.com/xml/ns/javaee/web-app_3_0.xsd" version="3.0">
  <display-name>advert</display-name>
  <listener>
    <listener-class>org.springframework.web.context.ContextLoaderListener</listener-class>
  </listener>
  <context-param>
    <param-name>contextConfigLocation</param-name>
    <param-value>classpath:application.xml</param-value>
  </context-param>
  <session-config>
    <session-timeout>30</session-timeout>
  </session-config>
  <filter>
    <filter-name>characterEncodingFilter</filter-name>
    <filter-class>org.springframework.web.filter.CharacterEncodingFilter</filter-class>
    <init-param>
      <param-name>encoding</param-name>
      <param-value>UTF-8</param-value>
    </init-param>
    <init-param>
      <param-name>forceEncoding</param-name>
      <param-value>true</param-value>
    </init-param>
  </filter>
  <filter-mapping>
    <filter-name>characterEncodingFilter</filter-name>
    <url-pattern>/*</url-pattern>
  </filter-mapping>
  <listener>
    <listener-class>
		org.springframework.web.context.request.RequestContextListener
	</listener-class>
  </listener>
  <filter>
    <filter-name>hibernateOpenSessionInView</filter-name>
    <filter-class>org.springframework.orm.hibernate3.support.OpenSessionInViewFilter</filter-class>
  </filter>
  <filter-mapping>
    <filter-name>hibernateOpenSessionInView</filter-name>
    <url-pattern>*.do</url-pattern>
  </filter-mapping>
 <!--  <filter>
    <filter-name>authorityFilter</filter-name>
    <filter-class>com.dz.base.filter.AuthorityFilter</filter-class>
  </filter> -->
  <!-- <filter-mapping>
    <filter-name>authorityFilter</filter-name>
    <url-pattern>*.jsp</url-pattern>
  </filter-mapping> -->
  <!-- <filter-mapping>
    <filter-name>authorityFilter</filter-name>
    <url-pattern>*.do</url-pattern>
  </filter-mapping> -->
  <!-- <listener>
    <listener-class>
		com.dz.base.util.CodeListener
	</listener-class>
  </listener> -->
  <filter>
    <filter-name>struts2</filter-name>
    <filter-class>
  		org.apache.struts2.dispatcher.ng.filter.StrutsPrepareAndExecuteFilter
  	</filter-class>
  </filter>
  <filter-mapping>
    <filter-name>struts2</filter-name>
    <url-pattern>/*</url-pattern>
  </filter-mapping>
  <welcome-file-list>
    <welcome-file>login.jsp</welcome-file>
  </welcome-file-list>
</web-app>
说明
本文档是个人总结的经验,仅供参考学习,同时欢迎朋友们一起沟通学习,文档中会对使用的jar做详细解说,对配置的过程使用图文说明,因为SSH博大精深,很多知识在搭建过程中没有使用到,只是一个基础框架的搭建,能测试通过就可以,所以对于高要求的开发,需要自己添加jar、增加方法和配置,同时文档中出现的纰漏希望朋友们等指正。


 3万+
3万+


 被折叠的 条评论
为什么被折叠?
被折叠的 条评论
为什么被折叠?
 到【灌水乐园】发言


