


Spring配置支持XML配置和注解配置两种配置方式。在XML中使用
<beans>和<Bean>配置Bean,注解支持@Configuration,@Bean,@Import和@DependsOn,注解配置从Spring3.0开始支持。
下面的例子使用的Bean的代码
package com.codestd.springstudy.lesson01;

import org.apache.commons.logging.Log;
import org.apache.commons.logging.LogFactory;
import org.springframework.stereotype.Service;

public class SpringBean {
    private Log logger = LogFactory.getLog(getClass());

    public void print(){
        logger.info("This Object ID is "+Integer.toHexString(this.hashCode()));
    }
}
使用@Configuration配置Bean
创建配置类
配置方法如下,使用@Configuration表示类为Spring配置类。使用@Bean配置方法返回Bean,方法的返回类型为Bean类型,方法名为Bean在Spring上下文中的ID。
package com.codestd.springstudy.lesson01;

import org.springframework.context.annotation.Bean;
import org.springframework.context.annotation.Configuration;

@Configuration
public class ApplicationConfig {

    @Bean
    public SpringBean springBean(){
        System.out.println("create SpringBean");
        return new SpringBean();
    }
}
使用AnnotationConfigApplicationContext测试
可以直接使用AnnotationConfigApplicationContext类来初始化Spring容器。然后使用getBean()从容器中获取Bean
@Test
public void test() {
    ApplicationContext ctx = new AnnotationConfigApplicationContext(ApplicationConfig.class);
    SpringBean spBean = (SpringBean)ctx.getBean("springBean");
    System.out.println(spBean);
    spBean.print();
}
使用使用Spring Test和Junit测试
需要添加spring-test依赖包
package com.codestd.springstudy.lesson01;

import javax.annotation.Resource;

import org.junit.Test;
import org.junit.runner.RunWith;
import org.springframework.test.context.ContextConfiguration;
import org.springframework.test.context.junit4.SpringJUnit4ClassRunner;

@RunWith(SpringJUnit4ClassRunner.class)
@ContextConfiguration(classes={ApplicationConfig.class})
public class ApplicationConfigTest {

    @Resource
    private SpringBean spBean;

    @Test
    public void test() {
        System.out.println(spBean);
        spBean.print();
    }

}

使用XML配置Bean
语法:<bean id="beanId" class="className" />
其中ID是Bean在Spring容器中的唯一标识,在配置文件中不能重复。
<?xml version="1.0" encoding="UTF-8"?>
<beans xmlns="http://www.springframework.org/schema/beans"
    xmlns:xsi="http://www.w3.org/2001/XMLSchema-instance"
    xsi:schemaLocation="http://www.springframework.org/schema/beans
        http://www.springframework.org/schema/beans/spring-beans-4.1.xsd">

    <bean id="springBean" class="com.codestd.springstudy.lesson01.SpringBean" />
</beans>
使用ClassPathXmlApplicationContext测试
使用ClassPathXmlApplicationContext加载Spring配置文件,初始化Spring容器。然后使用getBean()从容器中获取Bean
@SuppressWarnings("resource")
@Test
public void testWhithoutSpringTest(){
    ApplicationContext ctx = new ClassPathXmlApplicationContext("classpath:lesson01/applicationContext.xml");
    SpringBean springBean = (SpringBean) ctx.getBean("springBean");
    springBean.print();
}
使用Junit测试
package com.codestd.springstudy.lesson01;

import javax.annotation.Resource;

import org.junit.Test;
import org.junit.runner.RunWith;
import org.springframework.context.ApplicationContext;
import org.springframework.context.support.ClassPathXmlApplicationContext;
import org.springframework.test.context.ContextConfiguration;
import org.springframework.test.context.junit4.SpringJUnit4ClassRunner;

@RunWith(SpringJUnit4ClassRunner.class)
@ContextConfiguration(locations={"classpath:lesson01/applicationContext.xml"})
public class SpringBeanTest{

    @Resource(name="springBean")
    private SpringBean springBean;

    @Test
    public void testPrint() {
        this.springBean.print();
    }
}
与使用Java类配置的区别在于,Java类配置时使用的是classes,而使用XML配置时使用的是locations。
XML配置和注解混合使用
1、首先需要在XML中加入context标签支持,然后在XML中配置注解支持以及扫描的包。
<?xml version="1.0" encoding="UTF-8"?>
<beans xmlns="http://www.springframework.org/schema/beans"
    xmlns:aop="http://www.springframework.org/schema/aop"
    xmlns:context="http://www.springframework.org/schema/context"
    xmlns:xsi="http://www.w3.org/2001/XMLSchema-instance"
    xsi:schemaLocation="http://www.springframework.org/schema/beans
        http://www.springframework.org/schema/beans/spring-beans-4.1.xsd
        http://www.springframework.org/schema/aop
        http://www.springframework.org/schema/aop/spring-aop-4.1.xsd
        http://www.springframework.org/schema/context
        http://www.springframework.org/schema/context/spring-context-4.1.xsd">

    <context:annotation-config />
    <context:component-scan base-package="com.codestd.springstudy" />
</beans>
2、这样Spring就会自动扫描@Configuration配置了。见上面的ApplicationConfig类。这样就不用在XML中配置Bean了。
3、测试代码同使用XML测试部分
Bean初始化及销毁
初始化全部是在Spring容器注入属性后进行。
XML配置方式
使用Bean配置中的init-method和destroy-method配置初始化方法和销毁的方法。
方法必须是void类型且不带任何参数的。
代码如下
public void init(){
    System.out.println("Bean初始化");
}

public void destory(){
    System.out.println("Bean销毁");
}
配置如下
<bean id="springBean" class="com.codestd.springstudy.lesson01.SpringBean" destroy-method="destroy" init-method="init"/>运行结果

注解方式
使用@PostConstruct和@PreDestroy注解,来标识方式是Bean初始化方法还是销毁的方法。
@PostConstruct
public void init(){
    System.out.println("Bean初始化");
}

@PreDestroy
public void destroy(){
    System.out.println("Bean销毁");
}
运行结果同上
实现Spring接口的方式
实现Spring的InitializingBean和DisposableBean接口,然后分别实现afterPropertiesSet()方法和 destroy()方法即可。
package com.codestd.springstudy.lesson01;

import org.apache.commons.logging.Log;
import org.apache.commons.logging.LogFactory;
import org.springframework.beans.factory.DisposableBean;
import org.springframework.beans.factory.InitializingBean;

public class SpringBean implements InitializingBean,DisposableBean{
    private Log logger = LogFactory.getLog(getClass());

    public void print(){
        logger.info("This Object ID is "+Integer.toHexString(this.hashCode()));
    }

    @Override
    public void destroy(){
        System.out.println("Bean销毁");
    }

    @Override
    public void afterPropertiesSet() throws Exception {
        System.out.println("Bean初始化");

    }
}
运行结果同上
使用@Import或<import />
public class SpringBean {
}

public class SpringBean2 {
}

@Configuration
public class Config2 {

    @Bean
    public SpringBean2 springBean2(){
        return new SpringBean2();
    }

}

@Configuration
@Import(Config2.class)
public class ApplicationConfig {

    @Bean
    public SpringBean springBean(){
        return new SpringBean();
    }
}

@RunWith(SpringJUnit4ClassRunner.class)
@ContextConfiguration(classes={ApplicationConfig.class})
public class ApplicationConfigTest {

    @Resource
    private SpringBean spBean;

    @Resource
    private SpringBean2 spBean2;

    @Test
    public void test() {
        System.out.println(spBean);
        System.out.println(spBean2);
    }

}
@Import注解等同于XML配置中的<import />标签。
使用@DependsOn或depends-on
用来确定bean定义中依赖关系不明确或者没有直接依赖关系时,指定bean在初始化或销毁时的明确顺序。
A depends on B,则Spring总会保证B比A先实例化,且在A之后销毁。一个Bean可以依赖多个Bean
@Component("a")
public class A {

    @PostConstruct
    public void init(){
        System.out.println("Bean A init");
    }

    @PreDestroy
    public void destroy(){
        System.out.println("Bean A destroy");
    }

}

@Component
public class B {

    @PostConstruct
    public void init(){
        System.out.println("Bean B init");
    }

    @PreDestroy
    public void destroy(){
        System.out.println("Bean B destroy");
    }

}

//测试类
@RunWith(SpringJUnit4ClassRunner.class)
@ContextConfiguration(locations={"classpath:lesson01/applicationContext.xml"})
public class ApplicationConfigTest {

    @Resource(name="a")
    private A a;

    @Test
    public void test() {
        System.out.println(a);
    }
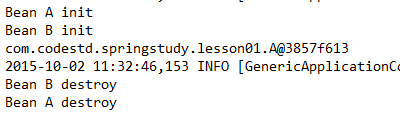
}在不使用@DependsOn之前的运行结果是
在A上加上@DependsOn('b'),让A依赖于B
@Component("a")
@DependsOn({"b"})
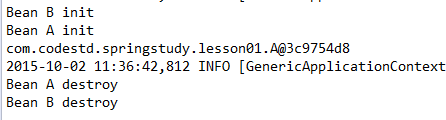
public class A {加上之后的运行结果如下,B比A先实例化,且在A之后销毁。
使用XML配置时使用<bean id="" class="" depends-on="" />配置。
Bean的生命周期
- singleton:默认属性,Spring的IOC容器中只存在一个该Bean的实例,每次请求都返回同一个地址的对象。
- prototype:每次请求Bean都会创建一个新的实例,调用者负责Bean后续生命周期的管理。
- request :每次HTTP请求都会产生一个新的Bean。
- session:session作用域表示该针对每一次HTTP请求都会产生一个新的bean,同时该bean仅在当前HTTP session内有效。
在XML中使用<bean id="" class="" scope="" />配置,在注解配置时使用@Scope配置


 115
115

 被折叠的 条评论
为什么被折叠?
被折叠的 条评论
为什么被折叠?
 到【灌水乐园】发言


