GitHub
src="//ghbtns.com/github-btn.html?user=je-ge&repo=spring-boot&type=watch&count=true" scrolling="0" width="110" height="20">技能要求
- 最好对Spring有一定认识
- 最好对Maven有一定认识
简介
Spring Boot是由Pivotal团队提供的全新框架,其设计目的是用来简化新Spring应用的初始搭建以及开发过程。该框架使用了特定的方式来进行配置,从而使开发人员不再需要定义样板化的配置。通过这种方式,Spring Boot致力于在蓬勃发展的快速应用开发领域(rapid application development)成为领导者。
功能
- 创建独立的Spring applications
- 能够使用内嵌的Tomcat, Jetty or Undertow,不需要部署war
- 提供starter pom来简化maven配置
- 自动配置Spring
- 提供一些生产环境的特性,比如metrics, health checks and externalized configuration
- 绝对没有代码生成和XML配置要求
开篇
- 如果你用过Spring JavaConfig的话,会发现虽然没有了xml配置的繁琐,但是使用各种注解导入也是很大的坑,
- 然后在使用一下Spring Boot,你会有一缕清风拂过的感觉,
- 最后真是爽的不得了。。。
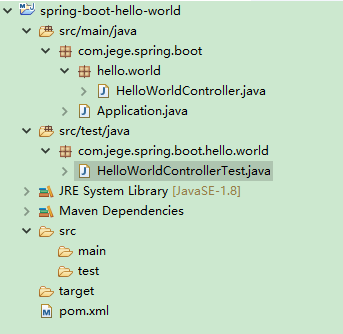
项目结构图
核心注解类说明
@RestController
就是@Controller+@ResponseBody组合,支持RESTful访问方式,返回结果都是json字符串
@SpringBootApplication
就是@SpringBootConfiguration+@EnableAutoConfiguration+
@ComponentScan等组合在一下,非常简单,使用也方便
@SpringBootTest
Spring Boot版本1.4才出现的,具有Spring Boot支持的引导程序(例如,加载应用程序、属性,为我们提供Spring Boot的所有精华部分)
关键是自动导入测试需要的类。。。
配置文件pom.xml
<project xmlns="http://maven.apache.org/POM/4.0.0" xmlns:xsi="http://www.w3.org/2001/XMLSchema-instance"
    xsi:schemaLocation="http://maven.apache.org/POM/4.0.0 http://maven.apache.org/xsd/maven-4.0.0.xsd">
    <modelVersion>4.0.0</modelVersion>

    <groupId>com.jege.spring.boot</groupId>
    <artifactId>spring-boot-hello-world</artifactId>
    <version>0.0.1-SNAPSHOT</version>
    <packaging>jar</packaging>

    <name>spring-boot-hello-world</name>
    <url>http://maven.apache.org</url>

    <!-- 公共spring-boot配置,下面依赖jar文件不用在写版本号 -->
    <parent>
        <groupId>org.springframework.boot</groupId>
        <!-- 自动包含以下信息: -->
        <!-- 1.使用Java6编译级别 -->
        <!-- 2.使UTF-8编码 -->
        <!-- 3.实现了通用的测试框架 (JUnit, Hamcrest, Mockito). -->
        <!-- 4.智能资源过滤 -->
        <!-- 5.智能的插件配置(exec plugin, surefire, Git commit ID, shade). -->
        <artifactId>spring-boot-starter-parent</artifactId>
        <!-- spring boot 1.x最后稳定版本 -->
        <version>1.4.1.RELEASE</version>
        <!-- 表示父模块pom的相对路径,这里没有值 -->
        <relativePath />
    </parent>

    <properties>
        <project.build.sourceEncoding>UTF-8</project.build.sourceEncoding>
        <java.version>1.8</java.version>
    </properties>

    <dependencies>

        <!-- web -->
        <dependency>
            <groupId>org.springframework.boot</groupId>
            <artifactId>spring-boot-starter-web</artifactId>
        </dependency>

        <!-- 测试 -->
        <dependency>
            <groupId>org.springframework.boot</groupId>
            <artifactId>spring-boot-starter-test</artifactId>
            <!-- 只在test测试里面运行 -->
            <scope>test</scope>
        </dependency>

    </dependencies>

    <build>
        <finalName>spring-boot-hello-world</finalName>
        <plugins>
            <!-- jdk编译插件 -->
            <plugin>
                <groupId>org.apache.maven.plugins</groupId>
                <artifactId>maven-compiler-plugin</artifactId>
                <configuration>
                    <source>${java.version}</source>
                    <target>${java.version}</target>
                </configuration>
            </plugin>
        </plugins>
    </build>
</project>
启动类Application
package com.jege.spring.boot;

import org.springframework.boot.SpringApplication;
import org.springframework.boot.autoconfigure.SpringBootApplication;

/**
 * @author JE哥
 * @email 1272434821@qq.com
 * @description:spring boot 启动类
 */

@SpringBootApplication
public class Application {

  public static void main(String[] args) {
    SpringApplication.run(Application.class, args);
  }

}
控制器HelloWorldController
package com.jege.spring.boot.hello.world;

import java.util.Arrays;
import java.util.List;

import org.springframework.web.bind.annotation.RequestMapping;
import org.springframework.web.bind.annotation.RestController;

/**
 * @author JE哥
 * @email 1272434821@qq.com
 * @description:看看spring-boot的强大和方便
 */
@RestController
public class HelloWorldController {

  @RequestMapping("/hello1")
  public String hello1() {
    return "Hello World";
  }

  @RequestMapping("/hello2")
  public List<String> hello2() {
    return Arrays.asList(new String[] { "A", "B", "C" });
  }
}
测试类HelloWorldControllerTest
package com.jege.spring.boot.hello.world;

import static org.hamcrest.Matchers.equalTo;
import static org.springframework.test.web.servlet.result.MockMvcResultMatchers.content;
import static org.springframework.test.web.servlet.result.MockMvcResultMatchers.status;

import org.junit.Before;
import org.junit.Test;
import org.springframework.boot.test.context.SpringBootTest;
import org.springframework.http.MediaType;
import org.springframework.test.web.servlet.MockMvc;
import org.springframework.test.web.servlet.request.MockMvcRequestBuilders;
import org.springframework.test.web.servlet.setup.MockMvcBuilders;

/**
 * @author JE哥
 * @email 1272434821@qq.com
 * @description:以Mock方式测试Controller
 */
@SpringBootTest
public class HelloWorldControllerTest {

  private MockMvc mockMvc;

  @Before
  public void setUp() throws Exception {
    mockMvc = MockMvcBuilders.standaloneSetup(new HelloWorldController()).build();
  }

  @Test
  public void getHello() throws Exception {
    mockMvc.perform(MockMvcRequestBuilders.get("/hello1").accept(MediaType.APPLICATION_JSON)).andExpect(status().isOk())
    .andExpect(content().string(equalTo("Hello World")));
  }

  @Test
  public void getHello2() throws Exception {
    mockMvc.perform(MockMvcRequestBuilders.get("/hello2").accept(MediaType.APPLICATION_JSON)).andExpect(status().isOk())
    .andExpect(content().string(equalTo("[\"A\",\"B\",\"C\"]")));
  }

}
运行
运行Application的main方法,打开浏览器:
http://localhost:8080/hello1
输出Hello World
http://localhost:8080/hello2
输出[“A”,”B”,”C”]
运行HelloWorldControllerTest
以Mock方式测试Controller
源码地址
https://github.com/je-ge/spring-boot
如果觉得我的文章或者代码对您有帮助,可以请我喝杯咖啡。
您的支持将鼓励我继续创作!谢谢!


 1万+
1万+

 被折叠的 条评论
为什么被折叠?


