单步调试代码可以非常直观地了解程序运行过程中状态变化。本文讲述了如何使用Counterclockwise远程调试Storm的Java和Clojure源码。这样可以更加直观和清晰地了解Storm源码。步骤如下:
Step 1:
安装Counterclockwise, 有两种安装方式,一个是使用单独的Counterclockwise应用程序,另一个方式是作为插件安装到已有的Eclipse中。
Step 2:
下载Storm源码,并将storm-core目录导入到Counterclockwise中。因为Storm源码是基于maven构建的,所以建议安装mvn插件。如果装有mvn插件,可以作为Maven工程导入到Counterclockwise中。
Step 3:
在远程服务器中使用命令行运行nimbus或者supervisor服务,并带上debug参数。本文以调试nimbus为例。我开始想直接在bin/storm python脚本中加上debug参数,但没有实验成功。后来直接带上debug参数运行nimbus的启动命令,而不通过bin/storm脚本,实验成功了。
下面是nimbus启动命令(除了加上debug参数,其它和bin/storm中启动nimbus所带的参数是一样的):
/usr/java/default/bin/java -server -Dstorm.options= -Dstorm.home=/opt/storm -Dstorm.log.dir=/opt/storm/logs -Djava.library.path=/usr/local/lib:/opt/local/lib:/usr/lib -Dstorm.conf.file= -cp /opt/storm/lib/json-simple-1.1.jar:/opt/storm/lib/jetty-util-6.1.26.jar:/opt/storm/lib/snakeyaml-1.11.jar:/opt/storm/lib/clj-time-0.4.1.jar:/opt/storm/lib/storm-core-0.9.3.jar:/opt/storm/lib/commons-lang-2.5.jar:/opt/storm/lib/ring-jetty-adapter-0.3.11.jar:/opt/storm/lib/clj-stacktrace-0.2.2.jar:/opt/storm/lib/clout-1.0.1.jar:/opt/storm/lib/minlog-1.2.jar:/opt/storm/lib/objenesis-1.2.jar:/opt/storm/lib/slf4j-api-1.7.5.jar:/opt/storm/lib/tools.macro-0.1.0.jar:/opt/storm/lib/core.incubator-0.1.0.jar:/opt/storm/lib/ring-core-1.1.5.jar:/opt/storm/lib/chill-java-0.3.5.jar:/opt/storm/lib/ring-devel-0.3.11.jar:/opt/storm/lib/tools.logging-0.2.3.jar:/opt/storm/lib/servlet-api-2.5.jar:/opt/storm/lib/commons-exec-1.1.jar:/opt/storm/lib/ring-servlet-0.3.11.jar:/opt/storm/lib/logback-classic-1.0.13.jar:/opt/storm/lib/jgrapht-core-0.9.0.jar:/opt/storm/lib/commons-codec-1.6.jar:/opt/storm/lib/carbonite-1.4.0.jar:/opt/storm/lib/commons-io-2.4.jar:/opt/storm/lib/hiccup-0.3.6.jar:/opt/storm/lib/reflectasm-1.07-shaded.jar:/opt/storm/lib/jline-2.11.jar:/opt/storm/lib/jetty-6.1.26.jar:/opt/storm/lib/disruptor-2.10.1.jar:/opt/storm/lib/kryo-2.21.jar:/opt/storm/lib/clojure-1.5.1.jar:/opt/storm/lib/commons-logging-1.1.3.jar:/opt/storm/lib/log4j-over-slf4j-1.6.6.jar:/opt/storm/lib/logback-core-1.0.13.jar:/opt/storm/lib/commons-fileupload-1.2.1.jar:/opt/storm/lib/asm-4.0.jar:/opt/storm/lib/tools.cli-0.2.4.jar:/opt/storm/lib/math.numeric-tower-0.0.1.jar:/opt/storm/lib/compojure-1.1.3.jar:/opt/storm/lib/joda-time-2.0.jar:/opt/storm/conf -Xmx1024m -Xdebug -Xrunjdwp:transport=dt_socket,address=8000,server=y,suspend=y -Dlogfile.name=nimbus.log -Dlogback.configurationFile=/opt/storm/logback/cluster.xml backtype.storm.daemon.nimbus
Step 4:
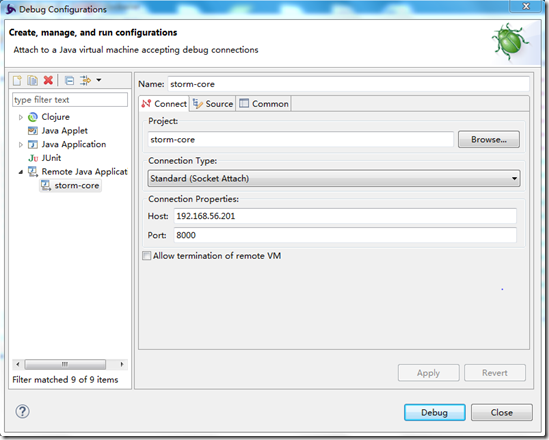
设置Counterclockwise的远程调试,作为客户端远程挂到nimbus jvm进程上(因为nimbus以服务器模式启动调试,所以这里Counterclockwise使用Socket Attach方式远程挂到nimbus进程上。当然也可以以客户端模式启动调试,这样Counterclockwise就需要作为调试的Socket Listener)。
Project需要选择导入到Counterclockwise的storm源码工程名称(因为我的工程名是storm-core, 所以截图中看到Project为storm-core)
到这里我们就可以设置断点,远程单步调试了。尽情享受了解每一个变量运行时值的乐趣:-)
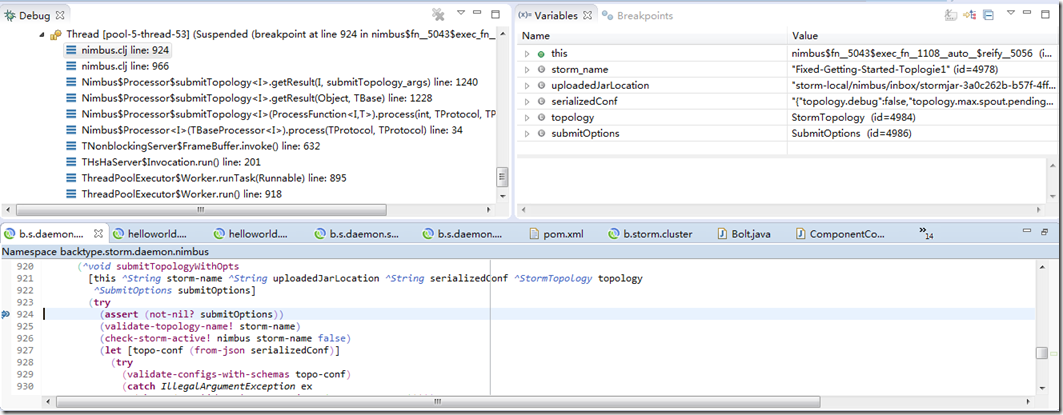
下图是调试nimbus.cli中submitTopologyWithOps方法(提交和运行一个Topology的过程),可以在Variables中看到Clojure代码中的变量值。
转载请附上原博客地址:http://blog.csdn.net/jeff_fangji/article/details/45460005


 2084
2084


 被折叠的 条评论
为什么被折叠?


