


 本文详细介绍霍夫变换圆检测算法的数学原理与实现过程,并通过示例代码展示如何在图像中检测特定半径的圆。文章还介绍了图像预处理的重要性及其对霍夫变换的影响。
图像处理之霍夫变换圆检测算法
之前写过一篇文章讲述霍夫变换原理与利用霍夫变换检测直线, 结果发现访问量还是蛮
多,有点超出我的意料,很多人都留言说代码写得不好,没有注释,结构也不是很清晰,所以
我萌发了再写一篇,介绍霍夫变换圆检测算法,同时也尽量的加上详细的注释,介绍代码
结构.让更多的人能够读懂与理解.
一:霍夫变换检测圆的数学原理
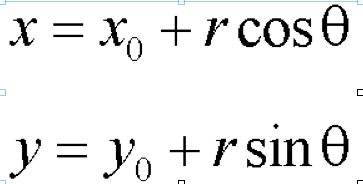
根据极坐标,圆上任意一点的坐标可以表示为如上形式, 所以对于任意一个圆, 假设
中心像素点p(x0, y0)像素点已知, 圆半径已知,则旋转360由极坐标方程可以得到每
个点上得坐标同样,如果只是知道图像上像素点, 圆半径,旋转360°则中心点处的坐
标值必定最强.这正是霍夫变换检测圆的数学原理.
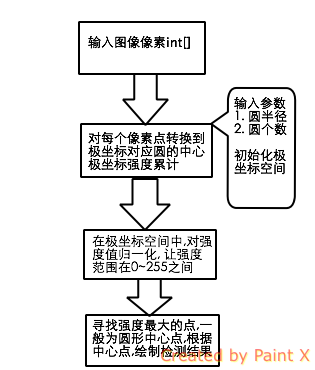
二:算法流程
该算法大致可以分为以下几个步骤
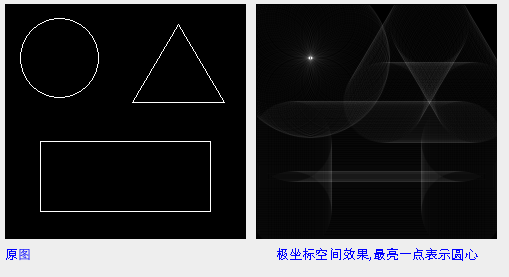
三:运行效果
图像从空间坐标变换到极坐标效果, 最亮一点为圆心.
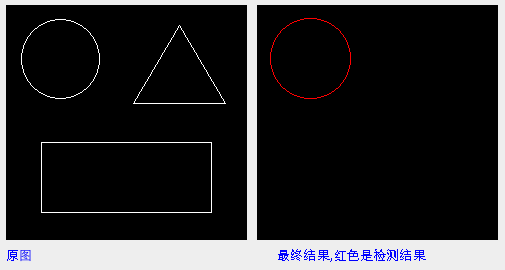
图像从极坐标变换回到空间坐标,检测结果显示:
四:关键代码解析
个人觉得这次注释已经是非常的详细啦,而且我写的还是中文注释
	/**
	 * 霍夫变换处理 - 检测半径大小符合的圆的个数
	 * 1. 将图像像素从2D空间坐标转换到极坐标空间
	 * 2. 在极坐标空间中归一化各个点强度,使之在0〜255之间
	 * 3. 根据极坐标的R值与输入参数(圆的半径)相等,寻找2D空间的像素点
	 * 4. 对找出的空间像素点赋予结果颜色(红色)
	 * 5. 返回结果2D空间像素集合
	 * @return int []
	 */
	public int[] process() {

		// 对于圆的极坐标变换来说,我们需要360度的空间梯度叠加值
		acc = new int[width * height];
		for (int y = 0; y < height; y++) {
			for (int x = 0; x < width; x++) {
				acc[y * width + x] = 0;
			}
		}
		int x0, y0;
		double t;
		for (int x = 0; x < width; x++) {
			for (int y = 0; y < height; y++) {

				if ((input[y * width + x] & 0xff) == 255) {

					for (int theta = 0; theta < 360; theta++) {
						t = (theta * 3.14159265) / 180; // 角度值0 ~ 2*PI
						x0 = (int) Math.round(x - r * Math.cos(t));
						y0 = (int) Math.round(y - r * Math.sin(t));
						if (x0 < width && x0 > 0 && y0 < height && y0 > 0) {
							acc[x0 + (y0 * width)] += 1;
						}
					}
				}
			}
		}

		// now normalise to 255 and put in format for a pixel array
		int max = 0;

		// Find max acc value
		for (int x = 0; x < width; x++) {
			for (int y = 0; y < height; y++) {

				if (acc[x + (y * width)] > max) {
					max = acc[x + (y * width)];
				}
			}
		}

		// 根据最大值,实现极坐标空间的灰度值归一化处理
		int value;
		for (int x = 0; x < width; x++) {
			for (int y = 0; y < height; y++) {
				value = (int) (((double) acc[x + (y * width)] / (double) max) * 255.0);
				acc[x + (y * width)] = 0xff000000 | (value << 16 | value << 8 | value);
			}
		}

		// 绘制发现的圆
		findMaxima();
		System.out.println("done");
		return output;
}package com.gloomyfish.image.transform.hough;
/***
*
* 传入的图像为二值图像,背景为黑色,目标前景颜色为为白色
* @author gloomyfish
*
*/
public class CircleHough {
private int[] input;
private int[] output;
private int width;
private int height;
private int[] acc;
private int accSize = 1;
private int[] results;
private int r; // 圆周的半径大小
public CircleHough() {
System.out.println("Hough Circle Detection...");
}
public void init(int[] inputIn, int widthIn, int heightIn, int radius) {
r = radius;
width = widthIn;
height = heightIn;
input = new int[width * height];
output = new int[width * height];
input = inputIn;
for (int y = 0; y < height; y++) {
for (int x = 0; x < width; x++) {
output[x + (width * y)] = 0xff000000; //默认图像背景颜色为黑色
}
}
}
public void setCircles(int circles) {
accSize = circles; // 检测的个数
}
/**
* 霍夫变换处理 - 检测半径大小符合的圆的个数
* 1. 将图像像素从2D空间坐标转换到极坐标空间
* 2. 在极坐标空间中归一化各个点强度,使之在0〜255之间
* 3. 根据极坐标的R值与输入参数(圆的半径)相等,寻找2D空间的像素点
* 4. 对找出的空间像素点赋予结果颜色(红色)
* 5. 返回结果2D空间像素集合
* @return int []
*/
public int[] process() {
// 对于圆的极坐标变换来说,我们需要360度的空间梯度叠加值
acc = new int[width * height];
for (int y = 0; y < height; y++) {
for (int x = 0; x < width; x++) {
acc[y * width + x] = 0;
}
}
int x0, y0;
double t;
for (int x = 0; x < width; x++) {
for (int y = 0; y < height; y++) {
if ((input[y * width + x] & 0xff) == 255) {
for (int theta = 0; theta < 360; theta++) {
t = (theta * 3.14159265) / 180; // 角度值0 ~ 2*PI
x0 = (int) Math.round(x - r * Math.cos(t));
y0 = (int) Math.round(y - r * Math.sin(t));
if (x0 < width && x0 > 0 && y0 < height && y0 > 0) {
acc[x0 + (y0 * width)] += 1;
}
}
}
}
}
// now normalise to 255 and put in format for a pixel array
int max = 0;
// Find max acc value
for (int x = 0; x < width; x++) {
for (int y = 0; y < height; y++) {
if (acc[x + (y * width)] > max) {
max = acc[x + (y * width)];
}
}
}
// 根据最大值,实现极坐标空间的灰度值归一化处理
int value;
for (int x = 0; x < width; x++) {
for (int y = 0; y < height; y++) {
value = (int) (((double) acc[x + (y * width)] / (double) max) * 255.0);
acc[x + (y * width)] = 0xff000000 | (value << 16 | value << 8 | value);
}
}
// 绘制发现的圆
findMaxima();
System.out.println("done");
return output;
}
private int[] findMaxima() {
results = new int[accSize * 3];
int[] output = new int[width * height];
// 获取最大的前accSize个值
for (int x = 0; x < width; x++) {
for (int y = 0; y < height; y++) {
int value = (acc[x + (y * width)] & 0xff);
// if its higher than lowest value add it and then sort
if (value > results[(accSize - 1) * 3]) {
// add to bottom of array
results[(accSize - 1) * 3] = value; //像素值
results[(accSize - 1) * 3 + 1] = x; // 坐标X
results[(accSize - 1) * 3 + 2] = y; // 坐标Y
// shift up until its in right place
int i = (accSize - 2) * 3;
while ((i >= 0) && (results[i + 3] > results[i])) {
for (int j = 0; j < 3; j++) {
int temp = results[i + j];
results[i + j] = results[i + 3 + j];
results[i + 3 + j] = temp;
}
i = i - 3;
if (i < 0)
break;
}
}
}
}
// 根据找到的半径R,中心点像素坐标p(x, y),绘制圆在原图像上
System.out.println("top " + accSize + " matches:");
for (int i = accSize - 1; i >= 0; i--) {
drawCircle(results[i * 3], results[i * 3 + 1], results[i * 3 + 2]);
}
return output;
}
private void setPixel(int value, int xPos, int yPos) {
/// output[(yPos * width) + xPos] = 0xff000000 | (value << 16 | value << 8 | value);
output[(yPos * width) + xPos] = 0xffff0000;
}
// draw circle at x y
private void drawCircle(int pix, int xCenter, int yCenter) {
pix = 250; // 颜色值,默认为白色
int x, y, r2;
int radius = r;
r2 = r * r;
// 绘制圆的上下左右四个点
setPixel(pix, xCenter, yCenter + radius);
setPixel(pix, xCenter, yCenter - radius);
setPixel(pix, xCenter + radius, yCenter);
setPixel(pix, xCenter - radius, yCenter);
y = radius;
x = 1;
y = (int) (Math.sqrt(r2 - 1) + 0.5);
// 边缘填充算法, 其实可以直接对循环所有像素,计算到做中心点距离来做
// 这个方法是别人写的,发现超赞,超好!
while (x < y) {
setPixel(pix, xCenter + x, yCenter + y);
setPixel(pix, xCenter + x, yCenter - y);
setPixel(pix, xCenter - x, yCenter + y);
setPixel(pix, xCenter - x, yCenter - y);
setPixel(pix, xCenter + y, yCenter + x);
setPixel(pix, xCenter + y, yCenter - x);
setPixel(pix, xCenter - y, yCenter + x);
setPixel(pix, xCenter - y, yCenter - x);
x += 1;
y = (int) (Math.sqrt(r2 - x * x) + 0.5);
}
if (x == y) {
setPixel(pix, xCenter + x, yCenter + y);
setPixel(pix, xCenter + x, yCenter - y);
setPixel(pix, xCenter - x, yCenter + y);
setPixel(pix, xCenter - x, yCenter - y);
}
}
public int[] getAcc() {
return acc;
}
}
package com.gloomyfish.image.transform.hough;

import java.awt.BorderLayout;
import java.awt.Color;
import java.awt.Dimension;
import java.awt.FlowLayout;
import java.awt.Graphics;
import java.awt.Graphics2D;
import java.awt.GridLayout;
import java.awt.event.ActionEvent;
import java.awt.event.ActionListener;
import java.awt.image.BufferedImage;
import java.io.File;

import javax.imageio.ImageIO;
import javax.swing.BorderFactory;
import javax.swing.JButton;
import javax.swing.JFrame;
import javax.swing.JPanel;
import javax.swing.JSlider;
import javax.swing.event.ChangeEvent;
import javax.swing.event.ChangeListener;

public class HoughUI extends JFrame implements ActionListener, ChangeListener {
	/**
	 *
	 */
	public static final String CMD_LINE = "Line Detection";
	public static final String CMD_CIRCLE = "Circle Detection";
	private static final long serialVersionUID = 1L;
	private BufferedImage sourceImage;
// 	private BufferedImage houghImage;
	private BufferedImage resultImage;
	private JButton lineBtn;
	private JButton circleBtn;
	private JSlider radiusSlider;
	private JSlider numberSlider;
	public HoughUI(String imagePath)
	{
		super("GloomyFish-Image Process Demo");
		try{
			File file = new File(imagePath);
			sourceImage = ImageIO.read(file);
		} catch(Exception e){
			e.printStackTrace();
		}
		initComponent();
	}

	private void initComponent() {
		int RADIUS_MIN = 1;
		int RADIUS_INIT = 1;
		int RADIUS_MAX = 51;
		lineBtn = new JButton(CMD_LINE);
		circleBtn = new JButton(CMD_CIRCLE);
		radiusSlider = new JSlider(JSlider.HORIZONTAL, RADIUS_MIN, RADIUS_MAX, RADIUS_INIT);
		radiusSlider.setMajorTickSpacing(10);
		radiusSlider.setMinorTickSpacing(1);
		radiusSlider.setPaintTicks(true);
		radiusSlider.setPaintLabels(true);
		numberSlider = new JSlider(JSlider.HORIZONTAL, RADIUS_MIN, RADIUS_MAX, RADIUS_INIT);
		numberSlider.setMajorTickSpacing(10);
		numberSlider.setMinorTickSpacing(1);
		numberSlider.setPaintTicks(true);
		numberSlider.setPaintLabels(true);

		JPanel sliderPanel = new JPanel();
		sliderPanel.setLayout(new GridLayout(1, 2));
		sliderPanel.setBorder(BorderFactory.createTitledBorder("Settings:"));
		sliderPanel.add(radiusSlider);
		sliderPanel.add(numberSlider);
		JPanel btnPanel = new JPanel();
		btnPanel.setLayout(new FlowLayout(FlowLayout.RIGHT));
		btnPanel.add(lineBtn);
		btnPanel.add(circleBtn);


		JPanel imagePanel = new JPanel(){

			private static final long serialVersionUID = 1L;

			protected void paintComponent(Graphics g) {
				if(sourceImage != null)
				{
					Graphics2D g2 = (Graphics2D) g;
					g2.drawImage(sourceImage, 10, 10, sourceImage.getWidth(), sourceImage.getHeight(),null);
					g2.setPaint(Color.BLUE);
					g2.drawString("原图", 10, sourceImage.getHeight() + 30);
					if(resultImage != null)
					{
						g2.drawImage(resultImage, resultImage.getWidth() + 20, 10, resultImage.getWidth(), resultImage.getHeight(), null);
						g2.drawString("最终结果,红色是检测结果", resultImage.getWidth() + 40, sourceImage.getHeight() + 30);
					}
				}
			}

		};
		this.getContentPane().setLayout(new BorderLayout());
		this.getContentPane().add(sliderPanel, BorderLayout.NORTH);
		this.getContentPane().add(btnPanel, BorderLayout.SOUTH);
		this.getContentPane().add(imagePanel, BorderLayout.CENTER);

		// setup listener
		this.lineBtn.addActionListener(this);
		this.circleBtn.addActionListener(this);
		this.numberSlider.addChangeListener(this);
		this.radiusSlider.addChangeListener(this);
	}

	public static void main(String[] args)
	{
		String filePath = System.getProperty ("user.home") + "/Desktop/" + "zhigang/hough-test.png";
		HoughUI frame = new HoughUI(filePath);
		// HoughUI frame = new HoughUI("D:\\image-test\\lines.png");
		frame.setDefaultCloseOperation(JFrame.EXIT_ON_CLOSE);
		frame.setPreferredSize(new Dimension(800, 600));
		frame.pack();
		frame.setVisible(true);
	}

	@Override
	public void actionPerformed(ActionEvent e) {
		if(e.getActionCommand().equals(CMD_LINE))
		{
			HoughFilter filter = new HoughFilter(HoughFilter.LINE_TYPE);
			resultImage = filter.filter(sourceImage, null);
			this.repaint();
		}
		else if(e.getActionCommand().equals(CMD_CIRCLE))
		{
			HoughFilter filter = new HoughFilter(HoughFilter.CIRCLE_TYPE);
			resultImage = filter.filter(sourceImage, null);
			// resultImage = filter.getHoughSpaceImage(sourceImage, null);
			this.repaint();
		}

	}

	@Override
	public void stateChanged(ChangeEvent e) {
		// TODO Auto-generated method stub

	}
}
使用霍夫变换检测圆与直线时候,一定要对图像进行预处理,灰度化以后,提取
图像的边缘使用非最大信号压制得到一个像素宽的边缘, 这个步骤对霍夫变
换非常重要.否则可能导致霍夫变换检测的严重失真.
第一次用Mac发博文,编辑不好请见谅!


 3万+
3万+

 被折叠的 条评论
为什么被折叠?
被折叠的 条评论
为什么被折叠?
 到【灌水乐园】发言


