


图像处理之HOG特征提取算法
HOG(Histogram of Oriented Gradient)特征在对象识别与模式匹配中是一种常见的特征提取算法,是基于本地像素块进行特征直方图提取的一种算法,对象局部的变形与光照影响有很好的稳定性,最初是用HOG特征来来识别人像,通过HOG特征提取+SVM训练,可以得到很好的效果,OpenCV已经有了。HOG特征提取的大致流程如下:

第一步:
Gamma校正,主要是对输入图像进行校正,主要是为了补偿显示器带来的灰度偏差。常见的系数在2.5左右,这个方面的资料非常多。ImageJ的源代码中也有Gamma校正的实现,可以参照。
第二步:
图像转灰度,这个也属于常见操作了。
第三步:
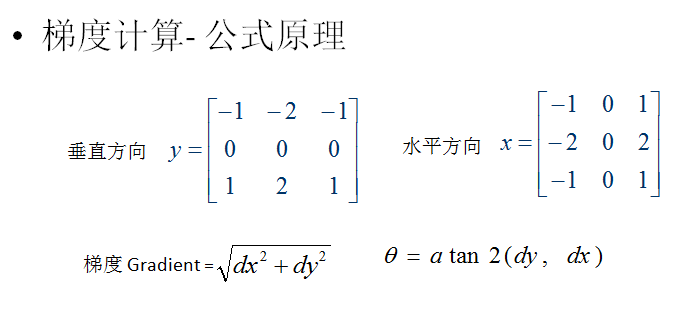
计算图像的梯度与方向,可以使用SOBEL算子实现,最终得到图像的梯度振幅与角度。
第四步:
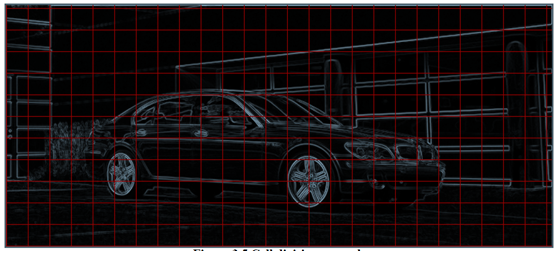
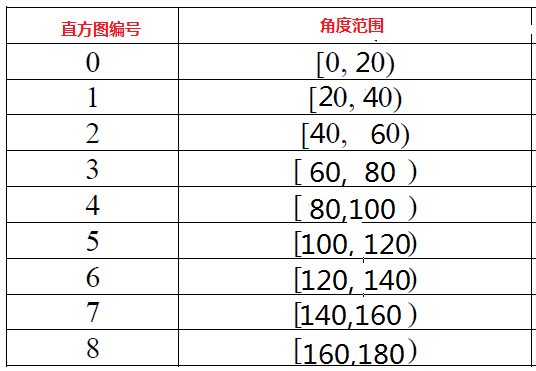
将图像划分为8x8的小网格,对每个小网格内的图像做梯度方向直方图,每个8x8=64个像素为一个CELL,对每个CELL根据角度分为9个直方图块(BIN),每个BIN的范围是20度。假设在CELL的某个像素点的角度是10,则把他对应的梯度值累加放到第一个编号是0的直方图中,最终得到编号是0~8的各个直方图的数据。这样做的一个不好的地方是,没有精准反应出来梯度权重对相邻直方图的影响,得到直方图也不是反锯齿的数据,所以一个刚好的方法,是根据角度的值,计算对应像素的梯度在左右相邻直方图上的权重,根据权重累加相应的值到相邻的直方图中。这样就完成了HOG中最重要的一步,权重角度直方图数据统计。CELL网格分割图如下:
得到对应的直方图如下:

角度直方图的编号与角度范围。
五:块描述子
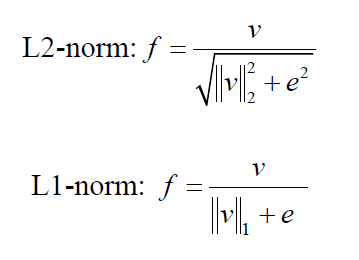
将2x2的网格单元组合成为一个大的块(Block)对每个块之间有1/2部分是重叠区域。主要是将每个Cell的直方图合并为一个大的直方图向量,这样每个块就有36个向量描述子。对每个块的描述子做归一化处理,常见的归一化处理为L2-norm或者L1-norm,公式如下:
这样就得到每个块的描述子,对一个对象特征来说块可以是矩形的也可以是圆形的,根据要提取对象特征决定。得到特征之后,在目标图像上以一个CELL大小为步长,检测目标图像上是否有匹配的对象特征,对象特征匹配可以基于相似度,最常见的是欧几里得距离与巴斯系数。
举例:
对于64x128的像素块,可以分为8x16个Cell分为7x15个块(R-HOG) 总计的直方图向量数为:7x15x2x2x9 = 3780个向量
关键部分的代码实现:
public static List<HOGBlock> extract(byte[] gradient, int[] orientation, int width, int height) {

		// cell histograms
		int step = 8;
		int index = 0;
		int numRowBins = height / step;
		int numColBins = width / step;
		int binindex = 0, theta=0, gw = 0;
		float ww=0, wn=0, wp=0;
		HOGCell[][] cells = new HOGCell[numRowBins][numColBins];
		for (int row = 0; row < height; row += step) {
			for (int col = 0; col < width; col += step) {
				int roffset = 0, coffset = 0;
				cells[row / step][col / step] = new HOGCell();
				cells[row / step][col / step].row = row;
				cells[row / step][col / step].col = col;
				cells[row / step][col / step].bins = new double[9];
				for (int y = 0; y < step; y++) {
					for (int x = 0; x < step; x++) {
						roffset = y + row;
						if (roffset >= height) {
							roffset = 0;
						}
						coffset = x + col;
						if (coffset >= width) {
							coffset = 0;
						}
						index = roffset * width + coffset;
						theta = orientation[index];
						// 计算权重梯度,一次双线性插值
						ww = theta % 20;
						if(ww >= 10) {
							wn = ww - 10;
							wp = (20-wn) / 20.0f;
						}
						else {
							wn = 10 - ww;
							wp = (20-wn) / 20.0f;
						}

						// 获取方向
						binindex = theta / 20;
						if (binindex >= 9) {
							binindex = 8;
						}

						// 权重梯度值累加, 反锯齿
						gw = (gradient[index]&0xff);
						if(ww >=10) {
							cells[row / step][col / step].bins[binindex] += (wp*gw);
							if(binindex < 8) {
								cells[row / step][col / step].bins[binindex+1] += ((1.0-wp)*gw);
							}
						}
						else {
							cells[row / step][col / step].bins[binindex] += (wp*gw);
							if(binindex > 0) {
								cells[row / step][col / step].bins[binindex-1] += ((1.0-wp)*gw);
							}
						}
					}
				}
			}
		}

		// merge as blocks for 2x2 cells, if cells less than 2x2 cells, just one
		// block
		index = 0;
		List<HOGBlock> blocks = new ArrayList<HOGBlock>();
		for (int i = 0; i < numRowBins - 1; i++) {
			for (int j = 0; j < numColBins - 1; j++) {
				int cellxoff = j + 1;
				int cellyoff = i + 1;
				if (cellxoff >= numColBins) {
					cellxoff = 0;
				}
				if (cellyoff >= numRowBins) {
					cellyoff = 0;
				}
				// 2x2
				HOGCell cell1 = cells[i][j];
				HOGCell cell2 = cells[i][cellxoff];
				HOGCell cell3 = cells[cellyoff][j];
				HOGCell cell4 = cells[cellyoff][cellxoff];
				HOGBlock block = new HOGBlock();
				block.vector = generateBlockVector(cell1, cell2, cell3, cell4);
				block.width = 2;
				block.height = 2;
				block.xpos = cell1.col;
				block.ypos = cell1.row;
				block.bindex = index;
				blocks.add(index, block);
				index++;
			}
		}

		// Block 归一化
		for (HOGBlock cellsBlock : blocks) {
			blockL1SquareNorm(cellsBlock);
		}

		return blocks;
	}


 1114
1114


 被折叠的 条评论
为什么被折叠?
被折叠的 条评论
为什么被折叠?
 到【灌水乐园】发言


