


rsync服务端+sersync实现实时分发同步
sersync项目利用inotify与rsync技术实现对服务器数据实时同步到解决方案,其中inotify用于监控sersync所在服务器上文件系统的事件变化,rsync是目前广泛使用的本地及异地数据同步工具,其优点是只对变化的目录数据操作。
sersync项目的优点:
1)使用C++编写,对linux系统文件产生的临时文件和重复的文件操作会进行过滤,再结合rsync同步到时候,会减少网络资源,因此速度更快。
2)sersync配置起来很简单,其中bin目录下是已经编译好的二进制文件,配合bin目录下的xml文件直接使用即可。
3)使用多线程进行同步,尤其在同步较大文件时,能够保证多个服务器实时保持同步状态。
4)sersync自带出错处理机制,通过失败队列对出错的文件重新同步,如果扔失败,则每10个小时对同步失败的文件再重新同步。
5)sersync自带crontab功能,只需在xml配置文件中开启,即可按预先的配置,隔一段时间整理同步一次。
6)sersync自带socket与http的协议扩展,可以满足有特需要去掉公司二次开发。
inotify参考:https://www.ibm.com/developerworks/cn/linux/l-inotify/index.html
安装配置:
架构图如下:
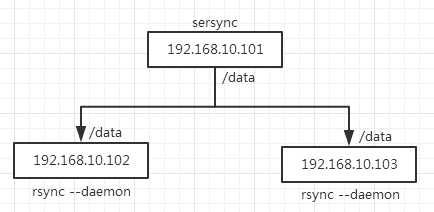
说明:192.168.10.102、192.168.10.103上安装rsync服务端。192.168.10.101上安装sersync。
配置rsync服务端:
192.168.10.102、192.168.10.103上做如下操作:
安装rsync
1. yum安装
yum -y install rsync
2. 源码编译安装
下载源码包,解压,编译安装
配置rsync
1. 创建密码文件/etc/rsync.password,并修改权限.
echo "rsyncback:rsyncback#123" > /etc/rsync.password
chmod 600 /etc/rsync.password
2. 创建配置文件/etc/rsyncd.conf
#/etc/rsyncd.conf
uid = root
gid = root
use chroot = no
max connections = 200
hosts allow = *
timeout = 600
log file = /var/log/rsyncd.log
pid file = /var/run/rsyncd.pid
lock file = /var/run/rsync.lock
ignore errors
read only = false
list = false
auth users = rsyncback
secrets file = /etc/rsync.password
transfer logging = yes
#Module definitions
[data]
comment = data for back
path = /data/
3. 创建/data目录,启动rsync服务
mkdir /data
/usr/bin/rsync --damon
4. 在sersync机器(192.168.10.101)上测试
echo "rsyncback#123" > /etc/rsync.password
rsync -zvaP --password-file=/etc/rsync.password /data rsyncback@192.168.10.102::data
rsync -zvaP --password-file=/etc/rsync.password /data rsyncback@192.168.10.103::data
配置sersync:
192.168.10.101上做如下操作:
1. 安装sersync
wget https://storage.googleapis.com/google-code-archive-downloads/v2/code.google.com/sersync/sersync2.5.4_64bit_binary_stable_final.tar.gz
tar zxvf sersync2.5.4_64bit_binary_stable_final.tar.gz
cp -rf GNU-Linux-x86/ /usr/local/sersync/
cd /usr/local/sersync/
mkdir bin logs conf
mv confxml.xml conf/
mv sersync2 bin/sersync
2. 修改环境变量
echo "export PATH=\$PATH:/usr/local/sersync/bin" >>/etc/profile
source /etc/profile
which sersync
3. 修改配置文件
<?xml version="1.0" encoding="ISO-8859-1"?>
<head version="2.5">
    <host hostip="192.168.10.101" port="8008"></host>
    <debug start="false"/>
    <fileSystem xfs="false"/>
    <filter start="false">
        <exclude expression="(.*)\.svn"></exclude>
        <exclude expression="(.*)\.gz"></exclude>
        <exclude expression="^info/*"></exclude>
        <exclude expression="^static/*"></exclude>
    </filter>
    <inotify>     #监控的inotify事件
        <delete start="true"/>
        <createFolder start="true"/>
        <createFile start="false"/>
        <closeWrite start="true"/>
        <moveFrom start="true"/>
        <moveTo start="true"/>
        <attrib start="false"/>
        <modify start="false"/>
    </inotify>

    <sersync>
        <localpath watch="/data">     #指定本地要同步的目录
            <remote ip="192.168.10.102" name="data"/>   #指定远端rsync服务端的ip和模块名
            <remote ip="192.168.10.103" name="data"/>
            <!--<remote ip="192.168.8.40" name="tongbu"/>-->
        </localpath>
        <rsync>
            <commonParams params="-artuz"/>     #指定rsync同步选项
            <auth start="true" users="rsyncback" passwordfile="/etc/rsync.password"/> #开启指定密码,对应rsync同时的用户名和密码文件
            <userDefinedPort start="false" port="874"/><!-- port=874 -->
            <timeout start="false" time="100"/><!-- timeout=100 -->
            <ssh start="false"/>
        </rsync>
        <failLog path="/usr/local/sersync/logs/rsync_fail_log.sh" timeToExecute="60"/><!--default every 60mins execute once-->  #指定监控队列存放位置
        <crontab start="true" schedule="120"><!--120mins-->    #指定多长时间全量同步一次
           <crontabfilter start="false">
               <exclude expression="*.php"></exclude>
               <exclude expression="info/*"></exclude>
           </crontabfilter>
        </crontab>
        <plugin start="false" name="command"/>
    </sersync>

    <plugin name="command">
        <param prefix="/bin/sh" suffix="" ignoreError="true"/>  <!--prefix /opt/tongbu/mmm.sh suffix-->
        <filter start="false">
           <include expression="(.*)\.php"/>
           <include expression="(.*)\.sh"/>
        </filter>
    </plugin>

    <plugin name="socket">
        <localpath watch="/opt/tongbu">
            <deshost ip="192.168.138.20" port="8009"/>
        </localpath>
    </plugin>
    <plugin name="refreshCDN">
        <localpath watch="/data0/htdocs/cms.xoyo.com/site/">
            <cdninfo domainname="ccms.chinacache.com" port="80" username="xxxx" passwd="xxxx"/>
            <sendurl base="http://pic.xoyo.com/cms"/>
            <regexurl regex="false" match="cms.xoyo.com/site([/a-zA-Z0-9]*).xoyo.com/images"/>
        </localpath>
    </plugin>
</head>
4. 启动sersync服务
sersync -r -d -o /usr/local/sersync/conf/confxml.xml
    参数说明:
       -r 开启实时监控之前对主服务器目录与远程目录目录进行一次整体同步,如果设置了过滤器,即在xml文件中,filter为true,则暂时不能使用-r参数进行整体同步.
       -o 指定配置文件,如不指定sersync会使用sersync可执行文件目录下的默认配置文件confxml.xml.
       -n 指定默认的线程池的线程总数,如不指定默认启动线程池数量是10个
       -d 后台启动服务
       -m 不进行同步,只运行插件,如:sersync -m command 则在监控到事件后,不对远程目录服务器进行同步,而是直接运行command插件
5. 测试同步
完。


 1243
1243


 被折叠的 条评论
为什么被折叠?
被折叠的 条评论
为什么被折叠?
 到【灌水乐园】发言


