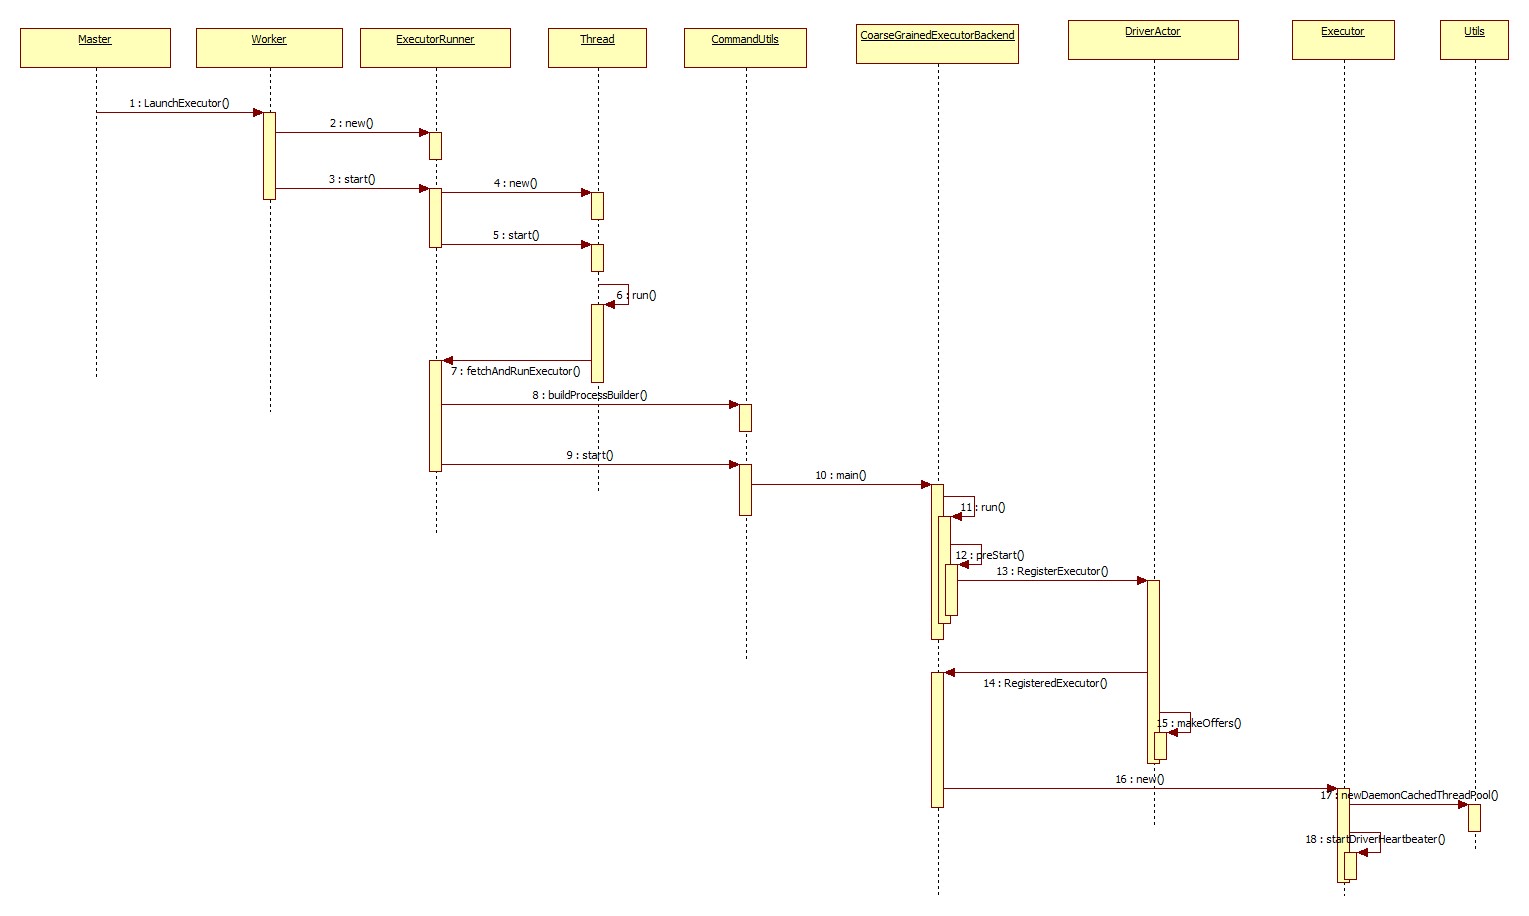
上一节介绍了worker启动了一个名为CoarseGrainedExecutorBackend的进程,首先看下CoarseGrainedExecutorBackend类的main方法
def main(args: Array[String]) {
	//定义变量接收args命令行参数
	var driverUrl: String = null
	var executorId: String = null
	var hostname: String = null
	var cores: Int = 0
	var appId: String = null
	var workerUrl: Option[String] = None
	val userClassPath = new mutable.ListBuffer[URL]()
	//变量赋值...略过
	run(driverUrl, executorId, hostname, cores, appId, workerUrl, userClassPath)
} private def run(
driverUrl: String,
executorId: String,
hostname: String,
cores: Int,
appId: String,
workerUrl: Option[String],
userClassPath: Seq[URL]) {
//只保留核心代码...
SparkHadoopUtil.get.runAsSparkUser { () =>
// Debug code
Utils.checkHost(hostname)
// Bootstrap to fetch the driver's Spark properties.
val executorConf = new SparkConf
val port = executorConf.getInt("spark.executor.port", 0)
//创建ActorSystem,其用来获取driverActor的代理
val (fetcher, _) = AkkaUtils.createActorSystem("driverPropsFetcher",
hostname, port , executorConf,
new SecurityManager(executorConf))
//通过actorSystem获得driverActor的代理
val driver = fetcher.actorSelection(driverUrl)
//创建ExecutorEnv,其实又创建了一个actorSystem
val env = SparkEnv.createExecutorEnv(
driverConf, executorId, hostname, port, cores, isLocal = false)
//使用actorSystem实例化CoarseGrainedExecutorBackend这个Actor(此时其生命周期被调用)
env.actorSystem.actorOf(
Props(classOf[CoarseGrainedExecutorBackend],
driverUrl, executorId, sparkHostPort, cores, userClassPath, env),
name = "Executor")
//...
env.actorSystem.awaitTermination()
}
} override def preStart() {
logInfo("Connecting to driver: " + driverUrl)
driver = context.actorSelection(driverUrl)
driver ! RegisterExecutor(executorId, hostPort, cores, extractLogUrls)
context.system.eventStream.subscribe(self, classOf[RemotingLifecycleEvent])
} case RegisterExecutor(executorId, hostPort, cores, logUrls) =>
//只保留核心代码
Utils.checkHostPort(hostPort, "Host port expected " + hostPort)
if (executorDataMap.contains(executorId)) {
sender ! RegisterExecutorFailed("Duplicate executor ID: " + executorId)
} else {
logInfo("Registered executor: " + sender + " with ID " + executorId)
//通知executor注册成功
sender ! RegisteredExecutor
listenerBus.post(
SparkListenerExecutorAdded(System.currentTimeMillis(), executorId, data))
//查看当前是否有任务需要提交(driver端->executor端)
makeOffers()
} makeOffers方法如下(之后再分析)
    // Make fake resource offers on all executors
    def makeOffers() {
      launchTasks(scheduler.resourceOffers(executorDataMap.map { case (id, executorData) =>
        new WorkerOffer(id, executorData.executorHost, executorData.freeCores)
      }.toSeq))
} case RegisteredExecutor =>
logInfo("Successfully registered with driver")
val (hostname, _) = Utils.parseHostPort(hostPort)
executor = new Executor(executorId, hostname, env, userClassPath, isLocal = false)private[spark] class Executor(
executorId: String,
executorHostname: String,
env: SparkEnv,
userClassPath: Seq[URL] = Nil,
isLocal: Boolean = false)
extends Logging
{
//只保留我们关心的代码
// Start worker thread pool
val threadPool = Utils.newDaemonCachedThreadPool("Executor task launch worker")
//Create an actor for receiving RPCs from the driver
private val executorActor = env.actorSystem.actorOf(
Props(new ExecutorActor(executorId)), "ExecutorActor")
//send heart beater to driver(executor->driver)
startDriverHeartbeater()
//启动一个任务
def launchTask(
context: ExecutorBackend,
taskId: Long,
attemptNumber: Int,
taskName: String,
serializedTask: ByteBuffer) {
//把当前的任务封装成TaskRunner
val tr = new TaskRunner(context, taskId = taskId, attemptNumber = attemptNumber, taskName,
serializedTask)
runningTasks.put(taskId, tr)
//使用线程池来执行这个任务
threadPool.execute(tr)
}
}Executor构造器中创建了一个可变线池来执行任务,同时向driver发送心跳更新任务的运行状态。


 3342
3342


 被折叠的 条评论
为什么被折叠?


