


今天学习一下使用开源组件slidingmenu_library来模拟实现人人客户端的主页侧滑界面。要模拟实现这个界面,首先要先学习这个开源组件的基本用法,开始今天的学习;
1:slidingmenu_library基本使用;
2:编写代码模仿实现人人客户端主页侧滑;
1.1:开源组件的下载:
该组件开源,我们可以通过把该项目当做libs目录的jar包引入到我们的项目中轻松方便的使用。其中主要实现了侧滑与ActionBar.下载目录如下:
    SlidingMenu https://github.com/jfeinstein10/SlidingMenu
    ActionBarSherlock https://github.com/JakeWharton/ActionBarSherlock
同时我在资源中已经上传点击下载slidingmenu_library
1.2:该组件的使用方式:
①:下载完该项目,通过Eclipse,import到工作项目中:
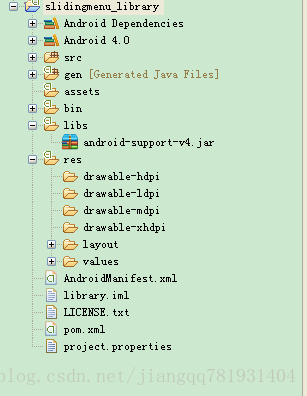
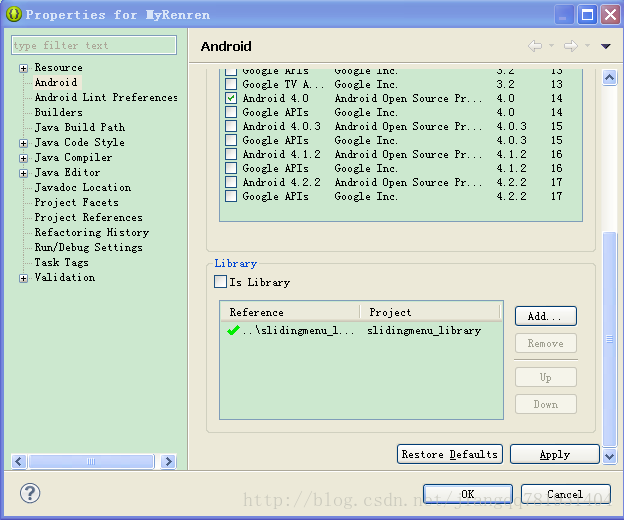
②:创建新项目,把该slidingmenu_library,通过libary方式引入进来:具体步骤为(myRenren).右击该项目,选择properties->点击Android->右下方libary,选择add,slidingmenu进来->apply,ok
特别提醒一个问题,因为我之前都是按照这个方式去进行导入,但是新项目总是会出现一个问题,所以你要在项目要引入该开源组件之前,记得看下项目中的libs文件夹,把里面的android-support-v4.jar这个包给删除掉,因为开源组件中已经包含这个包了.
2.1现在正是使用这个组件模式实现人人客户端侧滑主界面:
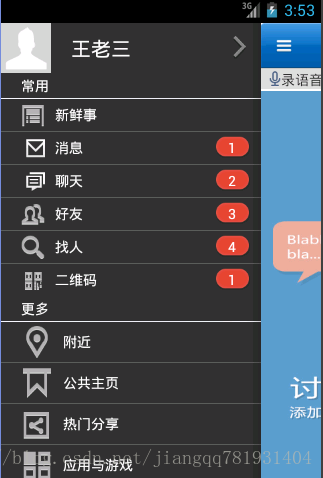
2.1.1俗话说有图有真相,先看我实现的效果图,比较简单,首页的内容部分也就直接用图片去代替了;

2.1.2:开始实现,分析一下右边列表的那个界面(我自己的实现的思路):
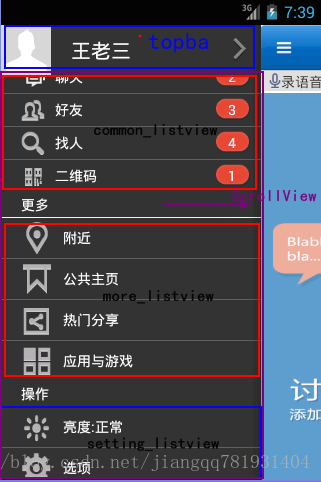
下面是的常用,更多,操作,我设置成了三个listview,自然一个屏幕肯定放不下,所以快可以想到在三个listview的外边加入一个ScrollView。随即这样问题就出来了,ScrollView与Listview发生冲突了,因为Listview本来就带有滚动。这样的问题同样也会发生在ScrollView与GridView中。查阅网上资料给出一种比较常用的方法:重写ListView
         package com.pps.myrenren.custom;
import android.content.Context;
import android.util.AttributeSet;
import android.widget.ListView;
/**
 * 重写ListView->实现Listview和ScrollView的滚动不冲突
 * @author jiangqingqing
 *
 */
public class MyListView extends ListView {
	public MyListView(Context context) {
		super(context);
	}
	public MyListView(Context context, AttributeSet attrs) {
		super(context, attrs);
	}

	public MyListView(Context context, AttributeSet attrs, int defStyle) {
		super(context, attrs, defStyle);
	}
	@Override
	protected void onMeasure(int widthMeasureSpec, int heightMeasureSpec) {
		int expandSpec = MeasureSpec.makeMeasureSpec(Integer.MAX_VALUE >> 2,
				MeasureSpec.AT_MOST);
		super.onMeasure(widthMeasureSpec, expandSpec);
	}

}
在该列表的顶部是一个横条,单独写这个布局,然后include进来(left_bottom_top.xml):
<?xml version="1.0" encoding="utf-8"?>
<RelativeLayout xmlns:android="http://schemas.android.com/apk/res/android"
    android:layout_width="fill_parent"
    android:layout_height="wrap_content"
     >
    <ImageView
        android:id="@+id/img_icon_top"
        android:layout_width="50dip"
        android:layout_height="50dip"
        android:layout_centerVertical="true"
        android:src="@drawable/v_5_9_lbs_nearby_person_portrait_default"
        />
     <TextView
        android:id="@+id/tv_name_top"
        android:layout_width="wrap_content"
        android:layout_height="wrap_content"
        android:text="王老三"
        android:layout_toRightOf="@id/img_icon_top"
        android:textSize="20sp"
        android:layout_centerVertical="true"
        android:layout_marginLeft="20dip"
        android:textColor="@color/whilte"/>

     <ImageButton
         android:id="@+id/imgbtn_toggle_top"
         android:layout_width="wrap_content"
         android:layout_height="wrap_content"
         android:background="@drawable/v5_3_0_profile_arrow_back"
         android:layout_alignParentRight="true"
         android:layout_centerInParent="true"
         android:layout_marginRight="15dip"/>
</RelativeLayout>
接着该列表的布局如下fragment_left_bottom.xml
<?xml version="1.0" encoding="utf-8"?>
<LinearLayout xmlns:android="http://schemas.android.com/apk/res/android"
    android:layout_width="fill_parent"
    android:layout_height="fill_parent"
    android:background="@drawable/renren_news_first_image_bg"
    android:orientation="vertical" >
    <!-- 顶部头像,姓名,标签 -->
    <include layout="@layout/left_bottom_top" />
    <ScrollView
        android:layout_width="fill_parent"
        android:layout_height="wrap_content" >
        <LinearLayout
            android:layout_width="fill_parent"
            android:layout_height="wrap_content"
            android:orientation="vertical" >
            <!-- 常用 -->
            <TextView
                android:id="@+id/left_tv_commom"
                android:layout_width="wrap_content"
                android:layout_height="wrap_content"
                android:paddingBottom="3dip"
                android:paddingLeft="20dip"
                android:paddingTop="3dip"
                android:text="@string/left_bottom_commom"
                android:textColor="@color/whilte" />

           <ImageView
               android:layout_width="fill_parent"
               android:layout_height="wrap_content"
               android:background="@drawable/v5_0_1_divider_new"/>
           <!-- 常用列表 --><!-- 常用列表与更多列表使用同一个item布局 自定义适配器 -->
           <com.pps.myrenren.custom.MyListView
               android:id="@+id/listview_common"
               android:layout_width="fill_parent"
               android:layout_height="wrap_content"
               android:cacheColorHint="#00000000"
               android:divider="@drawable/v5_0_1_divider_line_new"/>
            <TextView
                android:id="@+id/left_tv_more"
                android:layout_width="wrap_content"
                android:layout_height="wrap_content"
                android:paddingBottom="3dip"
                android:paddingLeft="20dip"
                android:paddingTop="3dip"
                android:text="@string/left_bottom_more"
                android:textColor="@color/whilte" />
           <ImageView
               android:layout_width="fill_parent"
               android:layout_height="wrap_content"
               android:background="@drawable/v5_0_1_divider_new"/>
           <!-- 更多列表 -->
           <com.pps.myrenren.custom.MyListView
               android:id="@+id/listview_more"
               android:layout_width="fill_parent"
               android:layout_height="wrap_content"
               android:cacheColorHint="#00000000"
               android:divider="@drawable/v5_0_1_divider_line_new"/>
         <!--     <TextView
                android:id="@+id/left_tv_recommend"
                android:layout_width="wrap_content"
                android:layout_height="wrap_content"
                android:paddingBottom="3dip"
                android:paddingLeft="20dip"
                android:paddingTop="3dip"
                android:text="@string/left_bottom_recommend"
                android:textColor="@color/whilte" />
           <ImageView
               android:layout_width="fill_parent"
               android:layout_height="wrap_content"
               android:background="@drawable/v5_0_1_divider_line_new"/>


           <ListView
               android:id="@+id/listview_recommend"
               android:layout_width="fill_parent"
               android:layout_height="wrap_content"
               android:cacheColorHint="#00000000"
               android:divider="@drawable/v5_0_1_divider_new"/>
           <TextView
                android:id="@+id/left_tv_app"
                android:layout_width="wrap_content"
                android:layout_height="wrap_content"
                android:paddingBottom="3dip"
                android:paddingLeft="20dip"
                android:paddingTop="3dip"
                android:text="@string/left_bottom_app"
                android:textColor="@color/whilte" />

           <ImageView
               android:layout_width="fill_parent"
               android:layout_height="wrap_content"
               android:background="@drawable/v5_0_1_divider_line_new"/>

           <ListView
               android:id="@+id/listview_app"
               android:layout_width="fill_parent"
               android:layout_height="wrap_content"
               android:cacheColorHint="#00000000"
               android:divider="@drawable/v5_0_1_divider_new"/>  -->
           <TextView
                android:id="@+id/left_tv_setting"
                android:layout_width="wrap_content"
                android:layout_height="wrap_content"
                android:paddingBottom="3dip"
                android:paddingLeft="20dip"
                android:paddingTop="3dip"
                android:text="@string/left_bottom_setting"
                android:textColor="@color/whilte" />
           <ImageView
               android:layout_width="fill_parent"
               android:layout_height="wrap_content"
               android:background="@drawable/v5_0_1_divider_new"/>
           <com.pps.myrenren.custom.MyListView
               android:id="@+id/listview_setting"
               android:layout_width="fill_parent"
               android:layout_height="wrap_content"
               android:cacheColorHint="#00000000"
               android:divider="@drawable/v5_0_1_divider_line_new"/>
        </LinearLayout>
    </ScrollView>

</LinearLayout>
下面是主界面的真正实现MainActivity.java
其中我们要进行初始化slidingmenu,在initSlidingMenu()方法中:
/**
	 * 初始化滑动菜单
	 */
	private void initSlidingMenu(Bundle savedInstanceState) {
		// 设置滑动菜单的视图
		setBehindContentView(R.layout.menu_frame);
		getSupportFragmentManager().beginTransaction().replace(R.id.menu_frame, new LeftBottomFragment()).commit();
		// 实例化滑动菜单对象
		SlidingMenu sm = getSlidingMenu();
		// 设置滑动阴影的宽度
		sm.setShadowWidthRes(R.dimen.shadow_width);
		// 设置滑动阴影的图像资源
		sm.setShadowDrawable(R.drawable.shadow);
		// 设置滑动菜单视图的宽度
		sm.setBehindOffsetRes(R.dimen.slidingmenu_offset);
		// 设置渐入渐出效果的值
		sm.setFadeDegree(0.35f);
		// 设置触摸屏幕的模式
		sm.setTouchModeAbove(SlidingMenu.TOUCHMODE_FULLSCREEN);
	}
2.2.3最后是列表的Fragment中的代码,就是一些去资源文件,数据,布局的一些设置。比较简单,
package com.pps.myrenren.activity;

import java.util.ArrayList;
import java.util.List;

import android.content.Context;
import android.os.Bundle;
import android.support.v4.app.Fragment;
import android.view.LayoutInflater;
import android.view.View;
import android.view.ViewGroup;
import android.widget.ListView;

import com.pps.myrenren.adapter.CommonOrMoreAdapter;
import com.pps.myrenren.adapter.SettingAdapter;
import com.pps.myrenren.model.ItemComOrMoreModel;
import com.pps.myrenren.model.ItemSettingModel;

public class LeftBottomFragment extends Fragment{
	private View mView;
	private Context mContext;
	private ListView listview_common;
	private ListView listview_more;
	private ListView listview_setting;

	private List<ItemComOrMoreModel> commonModels;  //常用列表的Item集合
	private List<ItemComOrMoreModel> moreModels;    //更多列表的item集合
	private List<ItemSettingModel> settingModels;   //设置列表的item集合
	public View onCreateView(LayoutInflater inflater, ViewGroup container,
			Bundle savedInstanceState) {
		if (null == mView) {
			mView = inflater.inflate(R.layout.fragment_left_bottom, container,
					false);
			initView();
			initValidata();
			bindData();
		}
		return mView;
	}
	/**
	 * 初始化界面元素
	 */
	private void initView() {
		listview_common = (ListView) mView.findViewById(R.id.listview_common);
		listview_more = (ListView) mView.findViewById(R.id.listview_more);
		listview_setting = (ListView) mView.findViewById(R.id.listview_setting);

	}
	/**
	 * 初始化变量
	 */
	private void initValidata() {
		mContext = mView.getContext();
		commonModels=new ArrayList<ItemComOrMoreModel>();
		moreModels=new ArrayList<ItemComOrMoreModel>();
		settingModels=new ArrayList<ItemSettingModel>();
		//1:进行构造常用列表中的数据,图标,名称,数量
		Integer[] common_icon_id = new Integer[] {
				R.drawable.v5_2_1_desktop_list_newsfeed,
				R.drawable.v5_2_1_desktop_list_message,
				R.drawable.v5_2_1_desktop_list_chat,
				R.drawable.v5_2_1_desktop_list_friends,
				R.drawable.v5_2_1_desktop_list_search,
				R.drawable.v5_9_3_desktop_list_barcode };
		String[] arrays_commom=mContext.getResources().getStringArray(R.array.arrays_commom);
		int[] common_number=new int[]{0,1,2,3,4,1};
		for(int i=0;i<common_icon_id.length;i++)
		{
			ItemComOrMoreModel commcon=new ItemComOrMoreModel(common_icon_id[i], arrays_commom[i], common_number[i]);
			commonModels.add(commcon);
		}

		//2:进行构造更多列表中的数据,图标,名称,数量
		Integer[] more_icon_id=new Integer[]
				{R.drawable.v5_2_1_desktop_list_location,R.drawable.v5_2_1_desktop_list_page,R.drawable.v5_2_0_desktop_list_hot,R.drawable.v5_2_1_desktop_list_apps_center};
		String[] arrays_more=mContext.getResources().getStringArray(R.array.arrays_more);
		int[] more_number=new int[]{0,0,0,0};
		for(int i=0;i<more_icon_id.length;i++)
		{
			ItemComOrMoreModel more=new ItemComOrMoreModel(more_icon_id[i],arrays_more[i],more_number[i]);
		    moreModels.add(more);
		}

		//3:进行构造设置列表中的数据,图标,名称
		Integer[] setting_icon_id=new Integer[]{R.drawable.v_5_8day_mode_unselected,R.drawable.v5_2_1_desktop_list_settings,R.drawable.v5_2_1_desktop_list_log_out};
		String[] arrays_setting=mContext.getResources().getStringArray(R.array.arrays_setting);
		for(int i=0;i<setting_icon_id.length;i++)
		{
			ItemSettingModel setting=new ItemSettingModel(setting_icon_id[i],arrays_setting[i]);
			settingModels.add(setting);
		}
	}

	/**
	 * 绑定数据
	 */
	private void bindData() {
       //创建适配器并且进行绑定数据到listview中
		listview_common.setAdapter(new CommonOrMoreAdapter(mContext, commonModels));
		listview_more.setAdapter(new CommonOrMoreAdapter(mContext, moreModels));
		listview_setting.setAdapter(new SettingAdapter(mContext, settingModels));
	}

}
上面是实现效果的主要代码,有兴趣的直接可以下载看下详细代码
http://download.csdn.net/detail/jiangqq781931404/5815443


 1万+
1万+

 被折叠的 条评论
为什么被折叠?
被折叠的 条评论
为什么被折叠?
 到【灌水乐园】发言


