


转载自:http://blog.csdn.net/aigestudio/article/details/41146111
前两节我们分别分析了网易评论列表界面和生成一些我们需要的测试数据,生成测试数据那段如果大家看着看得头疼没关系,直接调业务对象中的方法生成数据即可不必理会我是怎么处理的,接下来的对于大家来说才是让各位感兴趣的东西
界面分析了、数据也有了,那我们如何实现这样的一个界面呢?首先我们来看一下整个项目的结构图大致了解下:

MainActivity是该应用的入口Activity,里面就对ActionBar和Fragment做了一些初始化:
- package com.aigestudio.neteasecommentlistdemo.activities;
- import android.os.Bundle;
- import android.support.v7.app.ActionBar;
- import android.support.v7.app.ActionBarActivity;
- import com.aigestudio.neteasecommentlistdemo.R;
- import com.aigestudio.neteasecommentlistdemo.bo.SQLiteDataBO;
- import com.aigestudio.neteasecommentlistdemo.fragment.CommentFragment;
- /**
- * 应用的入口Activity
- * 没有做太多的逻辑,除了ActionBar所有的界面元素都集成在Fragment中
- *
- * @author Aige
- * @since 2014/11/14
- */
- public class MainActivity extends ActionBarActivity {
- private ActionBar actionBar;//状态栏
- private SQLiteDataBO sqLiteDataBO;//数据业务对象
- @Override
- protected void onCreate(Bundle savedInstanceState) {
- super.onCreate(savedInstanceState);
- setContentView(R.layout.activity_main);
- //初始化控件
- initWidget();
- //初始化数据:一次即可,如果你clean了项目需要重新生成数据,生成数据前前注释掉上面的initWidget()初始化控件方法
- // sqLiteDataBO = new SQLiteDataBO(this);
- // sqLiteDataBO.initServerData();
- }
- /**
- * 初始化控件
- */
- private void initWidget() {
- //初始化ActionBar
- initActionBar();
- //设置当前显示的Fragment
- getSupportFragmentManager().beginTransaction().add(R.id.container, new CommentFragment()).commit();
- }
- /**
- * 初始化ActionBar
- */
- private void initActionBar() {
- actionBar = getSupportActionBar();
- actionBar.setDisplayShowTitleEnabled(false);
- actionBar.setDisplayShowHomeEnabled(true);
- actionBar.setHomeButtonEnabled(true);
- actionBar.setDisplayHomeAsUpEnabled(true);
- }
- }
重点在CommentFragment类里面,在该类里面我们获取数据库的数据并将其传入Adapter
- package com.aigestudio.neteasecommentlistdemo.fragment;
- import android.os.Bundle;
- import android.support.annotation.Nullable;
- import android.support.v4.app.Fragment;
- import android.util.Log;
- import android.view.LayoutInflater;
- import android.view.View;
- import android.view.ViewGroup;
- import android.widget.BaseAdapter;
- import android.widget.ListView;
- import com.aigestudio.neteasecommentlistdemo.R;
- import com.aigestudio.neteasecommentlistdemo.beans.Post;
- import com.aigestudio.neteasecommentlistdemo.bo.CommentFMBO;
- import com.aigestudio.neteasecommentlistdemo.dao.ServerDAO;
- import com.aigestudio.neteasecommentlistdemo.views.PostView;
- import java.util.ArrayList;
- import java.util.HashSet;
- import java.util.List;
- import java.util.Map;
- /**
- * 唯一的一个Fragment用来显示界面
- *
- * @author Aige
- * @since 2014/11/14
- */
- public class CommentFragment extends Fragment {
- private ListView lvContent;//填充内容的List列表
- private ServerDAO serverDAO;//服务器数据的访问对象
- private CommentFMBO commentFMBO;//业务对象
- private List<Post> posts;//存储帖子的列表
- @Override
- public void onCreate(Bundle savedInstanceState) {
- super.onCreate(savedInstanceState);
- //初始化服务器数据库DAO
- serverDAO = new ServerDAO(getActivity());
- //初始化存储帖子的列表
- posts = new ArrayList<Post>();
- //初始化业务对象
- commentFMBO = new CommentFMBO(serverDAO);
- }
- @Override
- public View onCreateView(LayoutInflater inflater, @Nullable ViewGroup container, @Nullable Bundle savedInstanceState) {
- //获取根布局
- View rootView = inflater.inflate(R.layout.fragment_comment, container, false);
- //获取ListView控件
- lvContent = (ListView) rootView.findViewById(R.id.comment_fm_content_lv);
- //初始化数据
- initData();
- return rootView;
- }
- /**
- * 初始化数据
- * <p/>
- * 注:数据的加载方式非按实际方式以远端服务器异步加载,So……别钻空子~~
- */
- private void <span style="color:#990000;"><strong>initData</strong></span>() {
- //查询赞前十的帖子
- List<Map<String, String>> praiseTop10Post = serverDAO.queryMulti("user_praise", new String[]{"postFlag"}, null, null, "postFlag", null, "count(postFlag) desc", "10");
- // List<Map<String, String>> praiseTop10Post = serverDAO.queryMulti("select postFlag from user_praise group by postFlag order by count(postFlag) desc limit 10");
- //查询Post数据
- posts = commentFMBO.queryPost(praiseTop10Post, "postFlag", posts, Post.Type.HOTTEST);
- //查询最新的十条帖子数据
- List<Map<String, String>> newestTop10Posts = serverDAO.queryMulti("post", new String[]{"flag"}, null, null, null, null, "_id desc", "10");
- // List<Map<String, String>> newestTop10Posts = serverDAO.queryMulti("select flag from post order by count(_id) desc limit 10");
- //查询Post数据
- posts = commentFMBO.queryPost(newestTop10Posts, "flag", posts, Post.Type.NEWEST);
- //数据验证
- // commentFMBO.verifyData(posts);
- //数据加载
- lvContent.setAdapter(new CommentAdapter(posts));
- }
- private class CommentAdapter extends BaseAdapter {
- private List<Post> posts;
- private CommentAdapter(List<Post> posts) {
- this.posts = posts;
- }
- @Override
- public int getCount() {
- return posts.size();
- }
- @Override
- public Object getItem(int position) {
- return null;
- }
- @Override
- public long getItemId(int position) {
- return 0;
- }
- @Override
- public View getView(int position, View convertView, ViewGroup parent) {
- if (null==convertView){
- convertView = new PostView(getActivity());
- }
- ((PostView)convertView).setPost(posts.get(position));
- return convertView;
- }
- }
- }
该类的代码并不多,主要的无非initData()方法中数据的获取封装,其内部逻辑我们也封装在了对应的业务对象CommentFMBO中,CommentFMBO对外公布的方法也就两个:一个用来查询Post数据的List<Post> queryPost(List<Map<String, String>> postList, String key, List<Post> posts, Post.Type type)方法和一个用来验证数据的verifyData(List<Post> posts)方法,其中验证数据的方法是我们在生成数据后对数据正确性的一个测试,所以真正对我们有用的方法就一个queryPost
- /**
- * 查询Post数据
- *
- * @param postList Post数据源
- */
- public List<Post> queryPost(List<Map<String, String>> postList, String key, List<Post> posts, Post.Type type) {
- for (int i = 0; i < postList.size(); i++) {
- //实例化一个Post对象
- Post post = new Post();
- /*
- 判断帖子的类型是否为最新的或最热的,如果是则将第一条帖子的Type设置为相应类型
- */
- if (type != Post.Type.NORMAL && i == 0) {
- post.setType(type);
- } else {
- post.setType(Post.Type.NORMAL);
- }
- //设置该Post的标识值
- post.setFlag(postList.get(i).get(key));
- //设置该Post的创建时间
- String createAt = serverDAO.queryValue("post", new String[]{"createAt"}, "flag", post.getFlag());
- // String createAt = serverDAO.queryValue("select createAt from post where flag like " + post.getFlag());
- post.setCreateAt(createAt);
- //设置该Post的评论列表
- List<Comment> comments = getComments(postList, i, key);
- post.setComments(comments);
- //设置该Post赞的User列表
- List<User> praises = getUserPraises(postList, i, key);
- post.setUserPraises(praises);
- //设置该Post踩的User列表
- List<User> unPraises = getUserUnPraises(postList, i, key);
- post.setUserUnPraises(unPraises);
- //设置该Post收藏的User列表
- List<User> collects = getUserCollects(postList, i, key);
- post.setUserCollects(collects);
- posts.add(post);
- }
- return posts;
- }
CommentFMBO类中其他的一些实现有兴趣大家可以看我公布的源码这里就不多说了。在拿到Post列表后我们就将其通过CommentAdapter的构造函数注入CommentAdapter,而在CommentAdapter的getView中我们的逻辑也非常简单
- @Override
- public View getView(int position, View convertView, ViewGroup parent) {
- if (null==convertView){
- convertView = new PostView(getActivity());
- }
- ((PostView)convertView).setPost(posts.get(position));
- return convertView;
- }
这段代码相信大家一看就懂,convertView为空时我们才去new一个自定义的PostView控件否则直接调PostView控件中的setPost方法去设置数据
- package com.aigestudio.neteasecommentlistdemo.views;
- import android.annotation.SuppressLint;
- import android.content.Context;
- import android.util.AttributeSet;
- import android.view.LayoutInflater;
- import android.widget.LinearLayout;
- import android.widget.TextView;
- import com.aigestudio.neteasecommentlistdemo.R;
- import com.aigestudio.neteasecommentlistdemo.beans.Comment;
- import com.aigestudio.neteasecommentlistdemo.beans.Post;
- import java.util.List;
- /**
- * 用来显示Post的自定义控件
- *
- * @author Aige
- * @since 2014/11/14
- */
- public class PostView extends LinearLayout {
- private TextView tvType, tvUserName, tvLocation, tvDate, tvPraise, tvContent;//依次为显示类型标签、用户名、地理位置、日期、赞数据和最后一条评论内容的TextView
- private CircleImageView civNick;//用户圆形头像显示控件
- private FloorView floorView;//盖楼控件
- public PostView(Context context) {
- this(context, null);
- }
- public PostView(Context context, AttributeSet attrs) {
- this(context, attrs, 0);
- }
- @SuppressLint("NewApi")
- public PostView(Context context, AttributeSet attrs, int defStyleAttr) {
- super(context, attrs, defStyleAttr);
- //初始化控件
- initWidget(context);
- }
- /**
- * 初始化控件
- *
- * @param context 上下文环境引用
- */
- private void initWidget(Context context) {
- //设置布局
- LayoutInflater.from(context).inflate(R.layout.view_post, this);
- //获取控件
- tvType = (TextView) findViewById(R.id.view_post_type_tv);
- tvUserName = (TextView) findViewById(R.id.view_post_username_tv);
- tvLocation = (TextView) findViewById(R.id.view_post_location_tv);
- tvDate = (TextView) findViewById(R.id.view_post_date_tv);
- tvPraise = (TextView) findViewById(R.id.view_post_praise_tv);
- tvContent = (TextView) findViewById(R.id.view_post_content_tv);
- civNick = (CircleImageView) findViewById(R.id.view_post_nick_civ);
- floorView = (FloorView) findViewById(R.id.view_post_floor_fv);
- }
- /**
- * 为PostView设置数据
- *
- * @param post 数据源
- */
- public void setPost(Post post) {
- //设置Post的类型
- setType(post);
- //设置Post的赞数据
- setPraise(post);
- //获取该条帖子下的评论列表
- List<Comment> comments = post.getComments();
- /*
- 判断评论长度
- 1.如果只有一条评论那么则显示该评论即可并隐藏盖楼布局
- 2.否则我们进行盖楼显示
- */
- if (comments.size() == 1) {
- floorView.setVisibility(GONE);
- Comment comment = comments.get(0);
- //设置控件显示数据
- initUserDate(comment);
- } else {
- //盖楼前我们要把最后一条评论数据提出来显示在Post最外层
- int index = comments.size() - 1;
- Comment comment = comments.get(index);
- //设置控件显示数据
- initUserDate(comment);
- floorView.setComments(comments);
- }
- }
- /**
- * 设置与用户相关的控件数据显示
- *
- * @param comment 评论对象
- */
- private void initUserDate(Comment comment) {
- tvContent.setText(comment.getContent());
- tvDate.setText(comment.getCreateAt());
- tvUserName.setText(comment.getUser().getUserName());
- tvLocation.setText(comment.getUser().getLocation());
- civNick.setImageResource(Integer.parseInt(comment.getUser().getNick()));
- }
- /**
- * 设置Post的赞数据
- *
- * @param post 数据源
- */
- private void setPraise(Post post) {
- tvPraise.setText(post.getUserPraises().size() + "赞");
- }
- /**
- * 设置Post的类型
- *
- * @param post 数据源
- */
- private void setType(Post post) {
- //获取Post类型
- Post.Type type = post.getType();
- /*
- 设置类型显示
- */
- switch (type) {
- case NEWEST:
- tvType.setVisibility(VISIBLE);
- tvType.setText("最新跟帖");
- break;
- case HOTTEST:
- tvType.setVisibility(VISIBLE);
- tvType.setText("热门跟帖");
- break;
- case NORMAL:
- tvType.setVisibility(GONE);
- break;
- }
- }
- }
PostView是一个继承于LinearLayout的复合控件,里面我们设置了一个布局,布局的xml我就不贴出来了,可以给大家看下该布局的效果如下:

在PostView被实例化的时候我们就在initWidget(Context context)方法中初始化其布局,而设置其PostView显示数据的方法我们独立在setPost(Post post)方法中,说白了就是数据和显示的分离,为什么要这样做?很简单,即便我当前的PostView被重用了,我也可以通过setPost(Post post)方法重新设置我们的数据而不需要重新再实例化一个PostView也不用担心PostView在Item中顺序混淆,更不用担心多次地去findView造成的效率问题,因为findView的过程只在实例化的时候才会去做,设置数据不需要再管
在setPost(Post post)方法中除了获取封装的数据并设置PostView上各控件的显示数据外我们还要进行Comment的判断:
- /*
- 判断评论长度
- 1.如果只有一条评论那么则显示该评论即可并隐藏盖楼布局
- 2.否则我们进行盖楼显示
- */
- if (comments.size() == 1) {
- floorView.setVisibility(GONE);
- Comment comment = comments.get(0);
- //设置控件显示数据
- initUserDate(comment);
- } else {
- //盖楼前我们要把最后一条评论数据提出来显示在Post最外层
- int index = comments.size() - 1;
- Comment comment = comments.get(index);
- //设置控件显示数据
- initUserDate(comment);
- floorView.setComments(comments);
- }
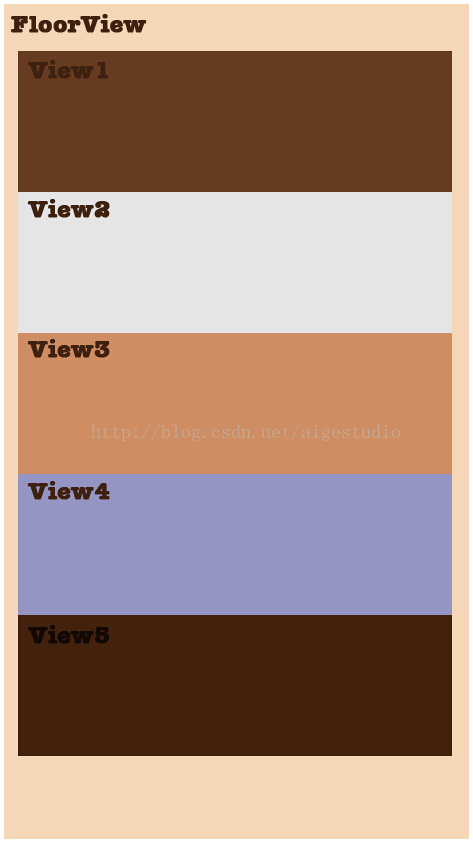
如代码所示,当评论只有一条时我们就不显示盖楼了,如果评论大于一条那么我们就要显示盖楼的FloorView,但是我们会先把评论中最后一条数据提取出来显示在PostView上。盖楼的控件FloorView也是一个复合控件,盖楼的原理很简单,数据我们自上而下按时间顺序(我按的_id,懒得去计算时间了~~)依次显示,FloorView绘制子View前我们先把整个盖楼层叠效果的背景画出来,然后再让FloorView去绘制子View:
- package com.aigestudio.neteasecommentlistdemo.views;
- import android.annotation.SuppressLint;
- import android.content.Context;
- import android.graphics.Canvas;
- import android.graphics.drawable.Drawable;
- import android.util.AttributeSet;
- import android.view.LayoutInflater;
- import android.view.View;
- import android.widget.LinearLayout;
- import android.widget.TextView;
- import com.aigestudio.neteasecommentlistdemo.R;
- import com.aigestudio.neteasecommentlistdemo.beans.Comment;
- import com.aigestudio.neteasecommentlistdemo.beans.User;
- import java.util.List;
- /**
- * 用来显示PostView中盖楼的自定义控件
- *
- * @author Aige
- * @since 2014/11/14
- */
- public class FloorView extends LinearLayout {
- private Context context;//上下文环境引用
- private Drawable drawable;//背景Drawable
- public FloorView(Context context) {
- this(context, null);
- }
- public FloorView(Context context, AttributeSet attrs) {
- this(context, attrs, 0);
- }
- @SuppressLint("NewApi")
- public FloorView(Context context, AttributeSet attrs, int defStyleAttr) {
- super(context, attrs, defStyleAttr);
- this.context = context;
- //获取背景Drawable的资源文件
- drawable = context.getResources().getDrawable(R.drawable.view_post_comment_bg);
- }
- /**
- * 设置Comment数据
- *
- * @param comments Comment数据列表
- */
- public void setComments(List<Comment> comments) {
- //清除子View
- removeAllViews();
- //获取评论数
- int count = comments.size();
- /*
- 如果评论条数小于9条则直接显示,否则我们只显示评论的头两条和最后一条(这里的最后一条是相对于PostView中已经显示的一条评论来说的)
- */
- if (count < 9) {
- initViewWithAll(comments);
- } else {
- initViewWithHide(comments);
- }
- }
- /**
- * 初始化所有的View
- *
- * @param comments 评论数据列表
- */
- private void initViewWithAll(List<Comment> comments) {
- for (int i = 0; i < comments.size() - 1; i++) {
- View commentView = getView(comments.get(i), i, comments.size() - 1, false);
- addView(commentView);
- }
- }
- /**
- * 初始化带有隐藏楼层的View
- *
- * @param comments 评论数据列表
- */
- private void initViewWithHide(final List<Comment> comments) {
- View commentView = null;
- //初始化一楼
- commentView = getView(comments.get(0), 0, comments.size() - 1, false);
- addView(commentView);
- //初始化二楼
- commentView = getView(comments.get(1), 1, comments.size() - 1, false);
- addView(commentView);
- //初始化隐藏楼层标识
- commentView = getView(null, 2, comments.size() - 1, true);
- commentView.setOnClickListener(new OnClickListener() {
- @Override
- public void onClick(View v) {
- initViewWithAll(comments);
- }
- });
- addView(commentView);
- //初始化倒数第二楼
- commentView = getView(comments.get(comments.size() - 2), 3, comments.size() - 1, false);
- addView(commentView);
- }
- /**
- * 获取单个评论子视图
- *
- * @param comment 评论对象
- * @param index 第几个评论
- * @param count 总共有几个评论
- * @param isHide 是否是隐藏显示
- * @return 一个评论子视图
- */
- private View getView(Comment comment, int index, int count, boolean isHide) {
- //获取根布局
- View commentView = LayoutInflater.from(context).inflate(R.layout.view_post_comment, null);
- //获取控件
- TextView tvUserName = (TextView) commentView.findViewById(R.id.view_post_comment_username_tv);
- TextView tvContent = (TextView) commentView.findViewById(R.id.view_post_comment_content_tv);
- TextView tvNum = (TextView) commentView.findViewById(R.id.view_post_comment_num_tv);
- TextView tvHide = (TextView) commentView.findViewById(R.id.view_post_comment_hide_tv);
- /*
- 判断是否是隐藏楼层
- */
- if (isHide) {
- /*
- 是则显示“点击显示隐藏楼层”控件而隐藏其他的不相干控件
- */
- tvUserName.setVisibility(GONE);
- tvContent.setVisibility(GONE);
- tvNum.setVisibility(GONE);
- tvHide.setVisibility(VISIBLE);
- } else {
- /*
- 否则隐藏“点击显示隐藏楼层”控件而显示其他的不相干控件
- */
- tvUserName.setVisibility(VISIBLE);
- tvContent.setVisibility(VISIBLE);
- tvNum.setVisibility(VISIBLE);
- tvHide.setVisibility(GONE);
- //获取用户对象
- User user = comment.getUser();
- //设置显示数据
- tvUserName.setText(user.getUserName());
- tvContent.setText(comment.getContent());
- tvNum.setText(String.valueOf(index + 1));
- }
- //设置布局参数
- LayoutParams params = new LayoutParams(LayoutParams.MATCH_PARENT, LayoutParams.WRAP_CONTENT);
- //计算margin指数,这个指数的意义在于将第一个的margin值设置为最大的,然后依次递减体现层叠效果
- int marginIndex = count - index;
- int margin = marginIndex * 3;
- params.setMargins(margin, 0, margin, 0);
- commentView.setLayoutParams(params);
- return commentView;
- }
- @Override
- protected void dispatchDraw(Canvas canvas) {
- /*
- 在FloorView绘制子控件前先绘制层叠的背景图片
- */
- for (int i = getChildCount() - 1; i >= 0; i--) {
- View view = getChildAt(i);
- drawable.setBounds(view.getLeft(), view.getLeft(), view.getRight(), view.getBottom());
- drawable.draw(canvas);
- }
- super.dispatchDraw(canvas);
- }
- }
是不是很简单呢?
- <?xml version="1.0" encoding="utf-8"?>
- <shape xmlns:android="http://schemas.android.com/apk/res/android">
- <solid android:color="#222225"/>
- <stroke
- android:width="1px"
- android:color="#777775"/>
- </shape>
我依稀记得有个很逗的孩纸问我评论上的边框是怎么画的…………
昨天有个童鞋问这样的框框是如何画的……首先我纠正,这一个框是一张背景Drawable而不是一个“框”,这张背景Drawable的外观样式是我们在xml文件中预先定义好加载的:
- //获取背景Drawable的资源文件
- drawable = context.getResources().getDrawable(R.drawable.view_post_comment_bg);
在一个ViewGroup(比如我们的FloorView extends LinearLayout)中我们通过dispatchDraw(Canvas canvas)方法来绘制子控件,在这之前ViewGroup会分别调用measureXXX和layout方法来分别测量和确定绘制自身和子控件的位置,具体的实现大家可以在网上找到一大堆相关的文章在这就不多说了。而在dispatchDraw方法中我们可以获取到每个子View的大小和位置信息,因为我们的FloorView是一个线性布局,并且我们在xml中设置其排列方式为垂直排列的,每当我们往其中添加一个view这个view就会排列在上一个view下方:
列的,每当我们往其中添加一个view这个view就会排列在上一个view下方:
在父容器measure和layout之后~~所有的子控件大小位置将被确定,我们可以得到子View相对于父控件的left、top、right和bottom:
回到我们的代码:

- @Override
- protected void dispatchDraw(Canvas canvas) {
- /*
- 在FloorView绘制子控件前先绘制层叠的背景图片
- */
- for (int i = getChildCount() - 1; i >= 0; i--) {
- View view = getChildAt(i);
- drawable.setBounds(view.getLeft(), view.getLeft(), view.getRight(), view.getBottom());
- drawable.draw(canvas);
- }
- super.dispatchDraw(canvas);
- }
我们首先获取了最下方的那个子View,而在上面的margin计算中最下面的子View我们的margin=0;如果不考虑父控件的padding的话此时这个位于最下方的子View的getLeft()=0,也就是说其距离父控件左边的距离为0,而倒数第二个子View的margin应该为3,getLeft()=3,倒数第三个子View的margin=6,getLeft()=6………………以此类推直至最上方的子View,我们在绘制背景的时候也是按照这样的顺序:最底层的drawable起始坐标为x=getLeft(),y=getLeft(),也就是(0,0),宽和高分别为view.getRight()和view.getBottom(),依次计算下去直至最后一个View~~~~~UnderStand
这就是整个评论列表的实现过程,源码在此:传送门,IDE为Studio,如果你用Eclipse,做一个代码的搬运工即可~
对于大家来说可能码代码这一过程是最重要的,其实对于我来说,前期对实现的分析才是最重要的,如果分析得不对实现的过程就会巨繁琐,举个栗子如果我们在分析界面的时候得出每个Item中元素的关系为“评论—>回复”结构,那么不但我们的数据设计要繁琐,界面的展示也难以得到我们想要的效果~~~~还是那句话,牛逼的体现不在于用复杂的技术实现复杂的效果,而是用简单的方法得到复杂的效果~~~~
实现过程就是这样,但是依然有一些不足,在这我留给大家两个问题去思考下:
1.我们都知道findView是一个很耗时的过程,因为我们要从xml文档中解析出各个节点,解析xml文档是很废时的,也正基于此,在我们自定义BaseAdapter的时候我们会在getView方法中通过一个ViewHolder对象存储已经find的控件并复用他以此来提高效率。而在我们的FloorView的getView方法中我们会不断地去从xml文档中解析控件:
- private View getView(Comment comment, int index, int count, boolean isHide) {
- //获取根布局
- View commentView = LayoutInflater.from(context).inflate(R.layout.view_post_comment, null);
- //获取控件
- TextView tvUserName = (TextView) commentView.findViewById(R.id.view_post_comment_username_tv);
- TextView tvContent = (TextView) commentView.findViewById(R.id.view_post_comment_content_tv);
- TextView tvNum = (TextView) commentView.findViewById(R.id.view_post_comment_num_tv);
- TextView tvHide = (TextView) commentView.findViewById(R.id.view_post_comment_hide_tv);
- /*………………………………………………………………………………………………………………………………………………………………*/
- return commentView;
- }
2.在dispatchDraw中绘制背景图的时候,我们会根据所有子View的location来绘制drawable,这个过程是again and again并且一层一层地画……事实上有必要吗?
这两问题就交给大家解决了


 1万+
1万+

 被折叠的 条评论
为什么被折叠?
被折叠的 条评论
为什么被折叠?
 到【灌水乐园】发言


