


Activiti核心的骨架是:命令模式+职责链
本文的代码版本:activiti 5.22
一、职责链
1、什么是职责链模式
http://blog.csdn.net/jiankunking/article/details/50443294
2、Activiti中职责链初始化
流程初始化流程引擎的时候会初始化很多信息,具体如下:
protected void init() {
    initConfigurators();
    configuratorsBeforeInit();
    initProcessDiagramGenerator();
    initHistoryLevel();
    initExpressionManager();
    initDataSource();
    initVariableTypes();
    initBeans();
    initFormEngines();
    initFormTypes();
    initScriptingEngines();
    initClock();
    initBusinessCalendarManager();
    initCommandContextFactory();
    initTransactionContextFactory();
    initCommandExecutors();
    initServices();
    initIdGenerator();
    initDeployers();
    initJobHandlers();
    initJobExecutor();
    initAsyncExecutor();
    initTransactionFactory();
    initSqlSessionFactory();
    initSessionFactories();
    initJpa();
    initDelegateInterceptor();
    initEventHandlers();
    initFailedJobCommandFactory();
    initEventDispatcher();
    initProcessValidator();
    initDatabaseEventLogging();
    configuratorsAfterInit();
  }
由于本文主要探究:职责链与命令模式,所以这里只需要关注initCommandExecutors()即可,在该方法中会进行如下初始化:
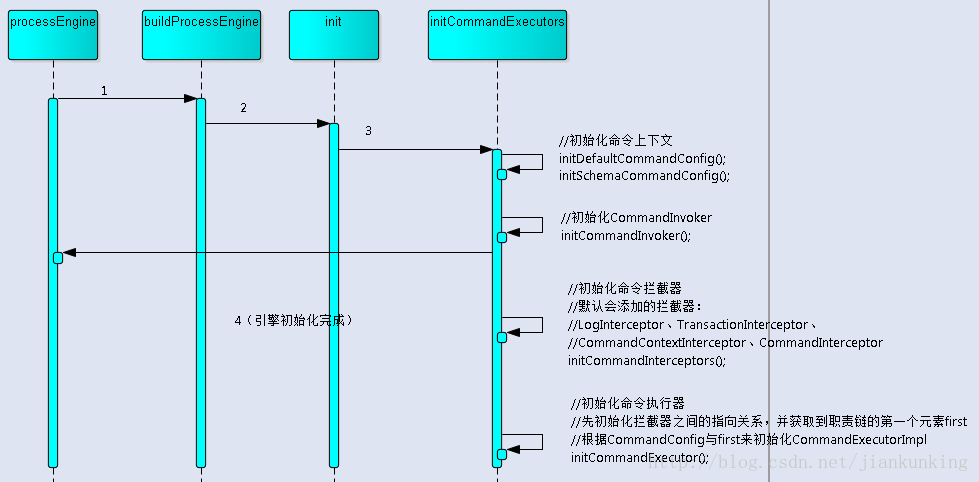
protected void initCommandExecutors() {
    //初始化命令上下文
    initDefaultCommandConfig();
    initSchemaCommandConfig();
    //初始化CommandInvoker
    initCommandInvoker();
    //初始化命令拦截器
    //默认会添加LogInterceptor、TransactionInterceptor、CommandContextInterceptor、CommandInterceptor拦截器
    initCommandInterceptors();
    //初始化命令执行器
    //先初始化拦截器之间的指向关系,并获取到职责链的第一个元素first
    //根据CommandConfig与first来初始化CommandExecutorImpl类的实例
    initCommandExecutor();
  }
后面三个方法具体代码如下:
protected List<CommandInterceptor> customPreCommandInterceptors;
protected List<CommandInterceptor> customPostCommandInterceptors;
protected void initCommandInvoker() {
    if (commandInvoker==null) {
      commandInvoker = new CommandInvoker();
    }
  }
protected void initCommandInterceptors() {
    if (commandInterceptors==null) {
      commandInterceptors = new ArrayList<CommandInterceptor>();
      if (customPreCommandInterceptors!=null) {
        commandInterceptors.addAll(customPreCommandInterceptors);
      }
      commandInterceptors.addAll(getDefaultCommandInterceptors());
      if (customPostCommandInterceptors!=null) {
        commandInterceptors.addAll(customPostCommandInterceptors);
      }
      //命令调用器,拦截器最后的一个,为调用具体的命令
      commandInterceptors.add(commandInvoker);
    }
  }
protected void initCommandExecutor() {
    if (commandExecutor==null) {
      CommandInterceptor first = initInterceptorChain(commandInterceptors);
      commandExecutor = new CommandExecutorImpl(getDefaultCommandConfig(), first);
    }
  }
方法之间的调用关系及初始化了哪些信息如下图所示:
最终命令拦截器链就是:
customPreCommandInterceptors->LogInterceptor->TransactionInterceptor->CommandContextInterceptor->customPostCommandInterceptors->commandInvoker
注意:commandInvoker是CommandInterceptor的实例,即最后拦截的是具体命令的执行。
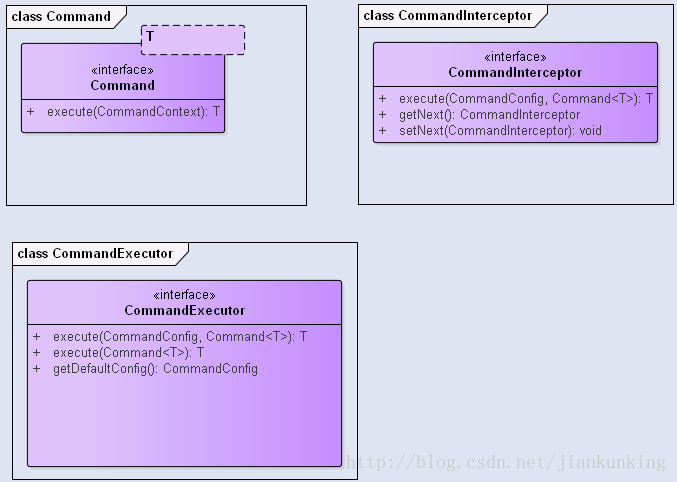
在初始化过程中主要用到几个接口结构如下:
3、自定义Activiti命令拦截器
通过上面两部分大家应该清楚了,activiti职责链:是在哪?如何初始化?这个两个问题了。
那么我们应该如何自定义一个拦截器,并指定其在职责链中的位置呢?
其实,很简单:
1、自定义拦截器
public class InterceptorTest extends AbstractCommandInterceptor {
    @Override
    public <T> T execute(CommandConfig config, Command<T> command) {
        //输出字符串和命令
        System.out.println("this is InterceptorTest----->" + command.getClass().getName());
        //然后让职责链中的下一个请求处理者处理命令
        return next.execute(config, command);
    }
}
2、继承ProcessEngineConfigurationImpl根据需要重写其中的方法
public class MyProcessEngineConfiguration extends ProcessEngineConfigurationImpl {
    @Override
    protected CommandInterceptor createTransactionInterceptor() {
        // 事务拦截器 在activiti默认初始化的时候是空的
        // 此处返回自定义拦截器InterceptorTest2
        return new InterceptorTest2();
    }
    @Override
    protected Collection<? extends CommandInterceptor> getDefaultCommandInterceptors() {
        //通过重写父类ProcessEngineConfigurationImpl中的getDefaultCommandInterceptors方法
        //可以自定义拦截器的位置
        //以及添加哪一些拦截器
        List<CommandInterceptor> interceptors = new ArrayList<>();
        interceptors.add(new LogInterceptor());
        CommandInterceptor transactionInterceptor = createTransactionInterceptor();
        if(transactionInterceptor!=null) {
            interceptors.add(transactionInterceptor);
        }
        interceptors.add(new InterceptorTest());
        interceptors.add(new CommandContextInterceptor(commandContextFactory,this));
        return interceptors;
    }
}
3、在配置文件中注入
<bean id="processEngineConfiguration" class="com.bpm.example.test.MyProcessEngineConfiguration">
<property name="jdbcUrl" value="jdbc:mysql://10.10.10.10:3306/activiti-test?useUnicode=true&characterEncoding=utf8" />
<property name="jdbcDriver" value="com.mysql.jdbc.Driver" />
<property name="jdbcUsername" value="root" />
<property name="jdbcPassword" value="root" />
<property name="databaseSchemaUpdate" value="true" />
<property name="asyncExecutorActivate" value="false" />
<!--<property name="mailServerHost" value="mail.my-corp.com" />-->
<!--<property name="mailServerPort" value="5025" />-->
</bean>二、命令模式
1、什么是命令模式
http://blog.csdn.net/jiankunking/article/details/50767837
2、Activiti中命令模式的使用
1、Command(定义命令的接口,声明执行的方法)
与标准的Command模式不同之处,就是execute方法中增加了CommandContext信息,这个类可以说是执行命令的上下文
public interface Command <T> {
  T execute(CommandContext commandContext);
}
2、CommandExecutor(命令执行器,用于执行命令)
其中CommandConfig是命令的配置
/**
 * The command executor for internal usage.
 *
 * @author Tom Baeyens
 */
public interface CommandExecutor {

  /**
   * @return the default {@link CommandConfig}, used if none is provided.
   */
  CommandConfig getDefaultConfig();

  /**
   * Execute a command with the specified {@link CommandConfig}.
   */
  <T> T execute(CommandConfig config, Command<T> command);

  /**
   * Execute a command with the default {@link CommandConfig}.
   */
  <T> T execute(Command<T> command);

}
3、ServiceImpl类
所有的服务类继承这个,其实就一个作用,持有CommandExecutor类,这个类是命令的发送者(类似于命令模式一文中的:电视遥控器)。
public class ServiceImpl {

    protected ProcessEngineConfigurationImpl processEngineConfiguration;

    public ServiceImpl() {

    }

    public ServiceImpl(ProcessEngineConfigurationImpl processEngineConfiguration) {
        this.processEngineConfiguration = processEngineConfiguration;
    }

  protected CommandExecutor commandExecutor;

  public CommandExecutor getCommandExecutor() {
    return commandExecutor;
  }

  public void setCommandExecutor(CommandExecutor commandExecutor) {
    this.commandExecutor = commandExecutor;
  }
}
简单梳理一下:
Service实现服务的其中一个标准方法是在具体服务中调用commandExecutor.execute(new command())(这里的command是具体的命令)。其执行步骤就是命令执行器commandExecutor.execute调用了其内部变量CommandInterceptor first(第一个命令拦截器)的execute方法(加上了参数commandConfig)。
CommandInterceptor类中包含了一个CommandInterceptor对象next,用于指向下一个CommandInterceptor,在拦截器的execute方法中,只需要完成其对应的相关操作,然后执行一下next.execute(commandConfig,command),就可以很简单的将命令传递给下一个命令拦截器,然后在最后一个拦截器中执行command.execute(),调用这个命令最终要实现的内容就行了。
本文参考:http://www.cnblogs.com/lighten/p/5863102.html
本文demo:https://github.com/jiankunking/bpm_demo
作者:jiankunking 出处:http://blog.csdn.net/jiankunking


 4178
4178


 被折叠的 条评论
为什么被折叠?
被折叠的 条评论
为什么被折叠?
 到【灌水乐园】发言


