


ChuckTableView
达到的效果:
[tableView addModel:@”消息中心”];
[tableView addModel:@”会员中心”];
[tableView addModels:@[@”定时关闭”,@”关于我们”,@”退出登录”]];

tableView多种cell操作达到的效果:
//1、不声明section,默认为0
[self.tableView addModel:@"不声明section,默认为0" cellClass:ChuckCell.class];
//2、自动检测是xib还是class文件,cell里面实现heightFoRow方法的以该方法对高度的优先级最高,xib默认自动计算高度
[self.tableView addModel:@"自动检测是xib还是class文件,cell里面实现heightFoRow方法的以该方法对高度的优先级最高,xib默认自动计算高度" cellClass:XibAutpHeightCell.class];
//3、支持编辑模式简化操作
[self.tableView addModels:@[@"左滑进入删除模式",
@"左滑进入删除模式"]
cellClass:ChuckCell.class editStyle:UITableViewCellEditingStyleDelete];
//4、支持多个model同时导入
[self.tableView addModels:@[
@"左滑进入删除模式,支持多个model同时导入,任意指定section插入不回数组越界",
@"左滑进入删除模式,支持多个model同时导入,任意指定section插入不回数组越界"]
cellClass:XibAutpHeightCell.class section:3 editStyle:UITableViewCellEditingStyleDelete];
//5、指定相应的section,不会数组越界,会自动填充cell满足条件
[self.tableView addModel:@"自动检测是xib还是class文件,cell里面实现heightFoRow方法的以该方法对高度的优先级最高,xib默认自动计算高度" cellClass:ChuckCell.class section:5];
//6、不指定类型,默认为UItableViewCell
[self.tableView addModels:@[@"不指定类型,默认为UItableViewCell",@"不指定类型,默认为UItableViewCell"] section:2];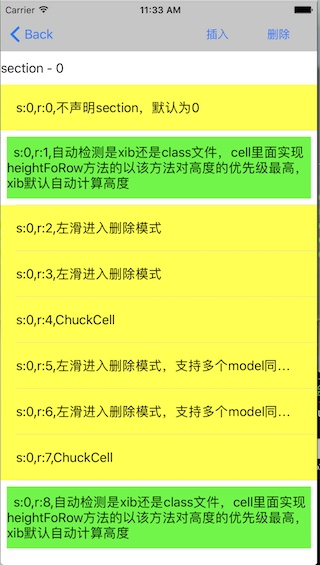
collectvIew不同步布局达到的效果:
[collect addModel:@"" cellClass:CCellTopBar.class];

[collect addModel:@"" cellClass:CCellHomeHeader.class section:1];
[collect addModel:@"cell内容的位置" cellClass:CCellHomeCell.class section:1+1];
[collect addModel:@"cell内容的位置" cellClass:CCellHomeCell.class section:1+1];
[collect addModel:@"cell内容的位置" cellClass:CCellHomeCell.class section:1+1];
[collect addModel:@"cell内容的位置" cellClass:CCellHomeCell.class section:1+1];

[collect addModel:@"" cellClass:CCellHomeHeader.class section:3];

[collect addModel:@"cell内容的位置" cellClass:CCellHomeCell.class section:3+1];
[collect addModel:@"cell内容的位置" cellClass:CCellHomeCell.class section:3+1];
[collect addModel:@"cell内容的位置" cellClass:CCellHomeCell.class section:3+1];
[collect addModel:@"cell内容的位置" cellClass:CCellHomeCell.class section:3+1];

高度封装tableView,简化操作,目的是为了cell可以自由同时存在于不同的UIViewController之中,cell自给自足,cell环境封闭起来
源码浏览git
1、容易操作的cell增删改查
2、滚到最后
3、可以自定义的上拉加载更多
4、编辑模式随意添加,随意插入各种cell
5、cell与tableView解耦,与UIViewController解耦
Pod
pod ‘ChuckTableView’, ‘~> 0.0.8’
例子
初始化
-(id)initWithFrame:(CGRect)frame
style:(UITableViewStyle)style
defaultHeight:(CGFloat)height
vcDelegate:(id)delegate
configureBlock:(CellConfigureBefore)before
cellDidselectConfig:(CellDidselectConfigureBefore)cellDidselectConfigBefore;初始化后,就配置了基础的默认cell高度,cell的UI与model的默认配置和点击配置
SmartTableView* sd = nil;
sd = [[SmartTableView alloc]
    initWithFrame:self.view.bounds
            style:0
    defaultHeight:60
      vcDelegate:self
  configureBlock:^(UITableViewCell* cell, id model, NSIndexPath *indexPath) {
    //默认cell配置
    if (![cell isMemberOfClass:[UITableViewCell class]]) {
    return;
    }
    cell.detailTextLabel.text = model;
    cell.textLabel.text = model;
    } cellDidselectConfig:^(id cell, id model, NSIndexPath *indexPath) {
    //默认点击cell配置
    NSLog(@"点击到了:%@",model);
}];

[sd addModel:@"消息中心"];
[sd addModel:@"会员中心"];
[sd addModels:@[@"定时关闭",@"关于我们",@"退出登录"]];
导入数据model,一个model对应一个cell
1、cell类型,除非专门指定XibAutpHeightCell,不指定就默认采用UITableViewCell
[tableView addModel:@”我是XibAutpHeightCell,在s0,r0”];
[tableView addModel:@”我是XibAutpHeightCell,在s0,r0” cellClass:XibAutpHeightCell.class];
2、随意指定插入的section,不用担心数组越界的问题
- [tableView addModels:@[@”我在预设置里面,s2,r0”,@”因为我是UItableViewCell,s2,r1”] section:2];
3、编辑模式
- [tableView addModels:@[@”我是删除模式,s0,r2”,@”我是删除模式,s0,r3”] cellClass:XibAutpHeightCell.class editStyle:UITableViewCellEditingStyleDelete];
事件逻辑,在cell的m文件中导入#import “UITableViewCell+Smart.h”
a、cellForRow事件,与tableView等同名事件操作一致
- -(void)tableView:(SmartTableView )tableView vcDelegate:(id)vcDelegate cellForRowWithModel:(id)model atIndexPath:(NSIndexPath )indexPath;
b、heightForRow事件,与tableView等同名事件操作一致,不设置在有约束情况下,自动计算高度,没有约束情况下,采用默认高度
- -(CGFloat)tableView:(SmartTableView )tableView vcDelegate:(id)vcDelegate heightForRowWithModel:(id)model atIndexPath:(NSIndexPath )indexPath;
c、didSelectRowWithModel事件,与tableView等同名事件操作一致
- -(void)tableView:(SmartTableView )tableView vcDelegate:(id)vcDelegate didSelectRowWithModel:(id)model atIndexPath:(NSIndexPath )indexPath;
d、编辑事件,与tableView等同名事件操作一致
- -(void)tableView:(SmartTableView )tableView vcDelegate:(id)vcDelegate commitEditingWithModel:(id)model style:(UITableViewCellEditingStyle)editingStyle forRowAtIndexPath:(NSIndexPath )indexPath;
自定义的上拉加载更多
-(UIView *)tableView:(SmartTableView *)tableView viewForFooterRefresh:(UITableViewCell *)cell{
    UIView * v = [[UIView alloc]initWithFrame:CGRectMake(0, 0, self.view.frame.size.width, 50)];
    UILabel *lb = [[UILabel alloc]initWithFrame:CGRectMake(0, 0, self.view.frame.size.width, 50)];
    lb.text = @"下载中";
    lb.textAlignment = NSTextAlignmentCenter;
    [v addSubview:lb];
    UIActivityIndicatorView *indicator = [[UIActivityIndicatorView alloc]initWithActivityIndicatorStyle:UIActivityIndicatorViewStyleGray];
    //设置显示位置
    indicator.center = CGPointMake(v.center.x-50, v.center.y);
    [indicator startAnimating];
    indicator.color = [UIColor redColor];
    //将这个控件加到父容器中。
    [v addSubview:indicator];
    return v;
}
常用APi
//获取元素
- -(id)modelsAtIndexPath:(NSIndexPath *)indexPath;
//获取到smartModel
- -(SmartModel )smartModelAtIndexPath:(NSIndexPath )indexPath;
//清空所有数据
- -(void)clearTableViewCell;
//滚动到最后,动画时间
- -(void)scrollToBottomAnimationTime:(CGFloat)time;
//隐藏上拉加载更多
- -(void)dismissFooterRefresh;
CollectionView
一、流布局
流布局就像流水那样,遇到阻碍就偏下一行,在这个库里面加了一个layout,可以为每个不同的section定义不同的大小布局
二、使用方式
CGFloat mainScreenWidth = [UIScreen mainScreen].bounds.size.width;
    NSInteger per = 3;
    NSInteger perAdd = per+1;
    ChuckLayout * chuckLayout = [[ChuckLayout alloc]initItemSize:^CGSize(id model, NSInteger section) {
         //根据section返回cell大小
        if (section==0) {
            return (CGSize){mainScreenWidth - 10 - 10,50};
        }else if(section==1){
            return (CGSize){((mainScreenWidth - 10 - 10)-10*(per-1))/per,((mainScreenWidth - 10 - 10)-10)/per};
        }else{
            return (CGSize){((mainScreenWidth - 10 - 10)-10*(perAdd-1))/perAdd,((mainScreenWidth - 10 - 10)-10)/perAdd};
        }
    } interitemSpacingIndexPath:^CGFloat(id model, NSInteger section) {
        //根据section返回cell与cell间隔
        return 10;
    } lineSpacingIndexPath:^CGFloat(id model, NSInteger section) {
        //根据section返回行距
        return 10;
    } contentInsetIndexPath:^UIEdgeInsets(id model, NSInteger section) {
        //根据section返回内嵌
        return UIEdgeInsetsMake(10, 10, 10, 10);
    }];

    ChuckCollectionView* collect =
    [[ChuckCollectionView alloc]
     initWithFrame:self.view.bounds
     collectionViewLayout:chuckLayout
     vcDelegate:self
     configureBlock:^(UICollectionViewCell *cell, id model, NSIndexPath *indexPath) {
         cell.backgroundColor = [UIColor redColor];
     } cellDidselectConfig:^(UICollectionViewCell *cell, id model, NSIndexPath *indexPath) {
         NSLog(@"点击到什么:%@",model);
     }];


 238
238

 被折叠的 条评论
为什么被折叠?
被折叠的 条评论
为什么被折叠?
 到【灌水乐园】发言


