


androidannotations(简称aa)是Android开发一个简单易用的annotations库,不同于其他annotations,其优点如下:
- aa的原理是将声明的类在编译时生成其子类,所以不会影响性能
- aa不受proguard影响,无需做特殊优化
- 用aa后,所有的属性及方法尽量都别用private修饰了
下载
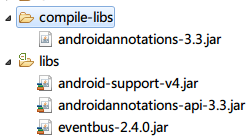
下载地址,解压后有两个jar包,这里只说明Eclipse下的配置,AS下雷同,大家可以去官网看一下,非常简单.
将api-xx.jar包放入libs目录,然后新建一个compile-libs目录,将另一个jar拷贝进去即可.
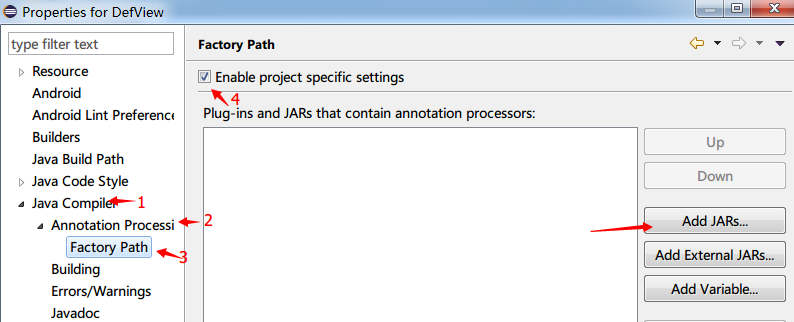
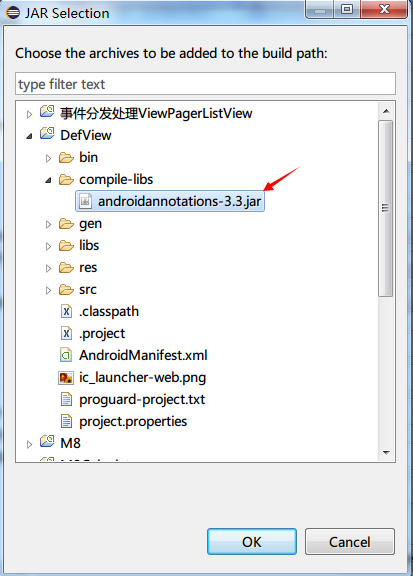
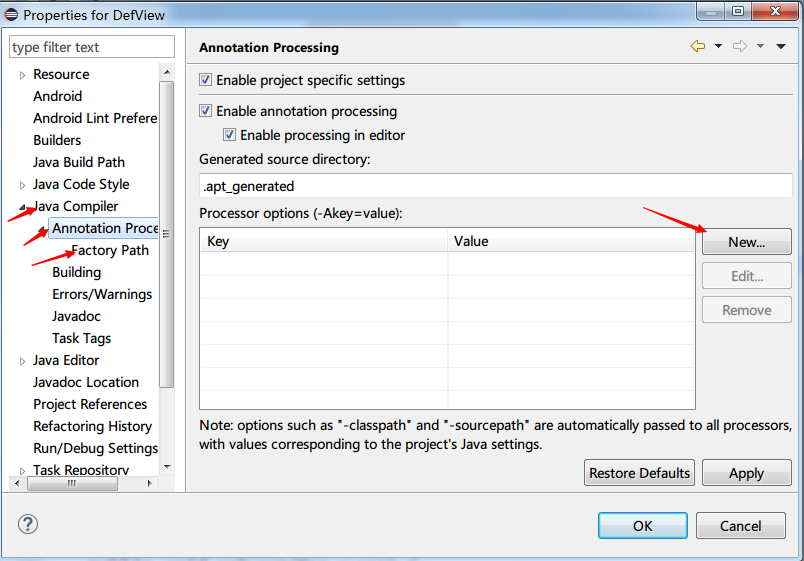
然后右键工程,选择Properties,按照图示选择:
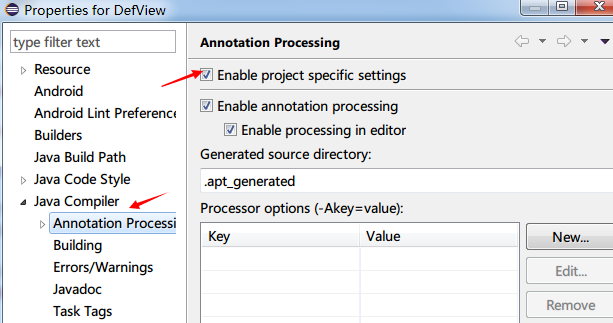
配置完成后,最好clean一下项目.
1.注解Activity
需要注意的是注解过的Activity,使用时要用其生成的子类,(注意其他的也类似,Fragment,Service,BroadcastReceiver)例如:
startActivity(new Intent(this,SecActivity_.class));mainfest中注册:
<activity android:name=".SecActivity_" />下面看下简单的Activity注解:
import org.androidannotations.annotations.EActivity;

import android.app.Activity;
import android.os.Bundle;

@NoTitle
@Fullscreen
@EActivity(R.layout.activity_sec)
// @EActivity 此时需要在onCreate中手动调用setContentView()
public class SecActivity extends Activity {

    @Override
    protected void onCreate(Bundle savedInstanceState) {
        super.onCreate(savedInstanceState);
        //setContentView(R.layout.activity_sec);
    }
}
为了简便起见,aa提供了如下方法:
SecActivity_.intent(this).start();
Intent intent = SecActivity_.intent(this).get();
SecActivity_.intent(this).flags(Intent.FLAG_ACTIVITY_CLEAR_TOP).extra("test", "value").start();
//自版本2.7后
SecActivity_.intent(context).startForResult();
OnActivityResult(since ver2.7)
方法可以包含的参数有:
• 一个Intent表示有前面Activity返回的
• 一个int或Integer类型的参数来表示resultCode.
 @OnActivityResult(REQUEST_CODE)
 void onResult(int resultCode, Intent data) {
 }

 @OnActivityResult(REQUEST_CODE)
 void onResult(int resultCode) {
 }

 @OnActivityResult(ANOTHER_REQUEST_CODE)
 void onResult(Intent data) {
 }

 @OnActivityResult(ANOTHER_REQUEST_CODE)
 void onResult() {
 }
自版本3.2开始 ,如果要传递参数不多,可以这样
@OnActivityResult(REQUEST_CODE)
void onResult(int resultCode, Intent data, @Extra String value) {
}

@OnActivityResult(REQUEST_CODE)
void onResult(int resultCode, @Extra(value = "key") String value) {
}

@OnActivityResult(REQUEST_CODE)
void onResult(@Extra String strVal, @Extra int intVal) {
}
要返回参数的Activity可以这样:
Intent intent = new Intent() ;
intent.putExtra("value", "00") ;
setResult(100, intent);
finish();
注解Intent Extras
@EActivity
public class MyActivity extends Activity {

  @Extra("myStringExtra")
  String myMessage;

  @Extra("myDateExtra")
  Date myDateExtraWithDefaultValue = new Date();

@Extra//自版本2.6开始,不写名称也是可以的,默认名称为myMessage
  String myMessage;
}
使用:
MyActivity_.intent().myMessage("hello").start() ;@EActivity
public class MyClass {
@Extra
String someExtra;
@Extra
int anotherExtra;
@AfterExtras//注意版本3.1后开始
public void doSomethingAfterExtrasInjection() {
// someExtra and anotherExtra are set to the value contained in the incoming intent
// if an intent does not contain one of the extra values the field remains unchanged
}
}处理 onNewIntent()(sincever 2.6)AndroidAnnotations 覆写了 setIntent(),在该方法中会自动注入Intent包含的参数
@EActivity
public class MyActivity extends Activity {

    @Extra("myStringExtra")
    String myMessage;

    @Override
    protected void onNewIntent(Intent intent) {
        setIntent(intent);//接下来aa会完成该做的事
    }
}
另外要注意的是,如果写的是库,而不是应用程序,可能需要这样:
@EActivity(resName="fill_welcome")2.注解Fragment
首先说明使用DialogFragment的注意事项:
如果使用@EFragment注解,不能在onCreateDialog() 创建一个新的窗口,只能这样写:
public Dialog onCreateDialog(Bundle savedInstanceState) {
        Dialog d = super.onCreateDialog(savedInstanceState);
        //do something to the Dialog
        //...
        return d;
    }
然后可以在@AfterViews注解的方法中设置DialogFragment的View。
自版本2.6开始,aa支持注解Fragment(支持支持包中的Fragment),关于使用注解后的Fragment,其余注解后的Activity一样,注意加下划线“_”。
以下两种注解方法都可以:
@EFragment
public class MyFragment extends Fragment {
    public View onCreateView(LayoutInflater inflater, ViewGroup container, Bundle savedInstanceState) {
        View view = inflater.inflate(R.layout.my_fragment_layout, container, false);
        return view;
    }
}@EFragment(R.layout.my_fragment_layout)
public class MyFragment extends Fragment {
}注意如果此时不想覆写onCreateView方法,又想接收其传递的Bundle参数,则覆写的onCreateView方法返回null即可。
@EFragment(R.layout.my_fragment_layout)
public class MyFragment extends Fragment {
    public View onCreateView(LayoutInflater inflater, ViewGroup container, Bundle savedInstanceState) {
        return null;
    }
}
下面看一下注入参数(since ver2.7):
@EFragment(R.layout.activity_sec)
public class MyFragment extends Fragment {

    @FragmentArg("msg")
    String msg ;

    @FragmentArg//相当于@FragmentArg("text")
    String text ;
}
Activity中可以这样使用:
MyFragment_.builder().msg("test_msg").text("test_text").build() ;@FragmentById or @FragmentByTag
注入Fragment,可以在@EActivity, @EFragment, @EView, @EViewGroup, @EBean中使用。
注意aa推荐使用@FragmentById。
请注意这两个注解只能用来注入已经存在的Fragment,而非创建Fragment(所以用该注解定义的Fragment必须在布局中已声明或者在onCreate方法中手动创建)。
注解Application
since ver2.4,用@EApplication即可,示例
@EApplication
public class MyApplication extends Application { }
使用:
@EActivity
public class MyActivity extends Activity {
  @App
  MyApplication application;
}
@EBean
public class MyBean {
@App
MyApplication application;
}注意,从aa3.0开始,application类必须用@EApplication注解。
注解Service
用@EService即可:
@EService
public class MyService extends IntentService {

  @SystemService
  NotificationManager notificationManager;

  public MyService() {
      super(MyService.class.getSimpleName());
  }

  @Override
  protected void onHandleIntent(Intent intent) {
    // Do some stuff...
    showToast();
  }

  @UiThread
  void showToast() {
    Toast.makeText(getApplicationContext(),"Hello World!",Toast.LENGTH_LONG).show();
  }
}
这样启动即可:
MyService_.intent(getApplication()).start();自3.0版本开始,可以用如下方法停止Service
MyService_.intent(getApplication()).stop();关于IntentService
直接看源码吧,很简单:
@EIntentService
public class MyIntentService extends IntentService {

    public MyIntentService() {
        super("MyIntentService");
    }

    @ServiceAction
    void mySimpleAction() {
        // ...
    }

    @ServiceAction
    void myAction(String param) {
        // ...
    }

    @Override
    protected void onHandleIntent(Intent intent) {
        // Do nothing here
    }
}
启动:
MyIntentService_.intent(getApplication())
    .myAction("test")
    .start();
注意这个@ServiceAction,onHandleIntent()方法不是必须的,aa提供了 AbstractIntentService抽象类(aa3.3版本后开始支持),继承它即可,就不需要覆写onHandleIntent()了。
注解广播
很简单,用@EReceiver注解即可
@EReceiver
public class MyReceiver extends BroadcastReceiver { }
注意@ReceiverAction这个注解(since ver3.2),注意其参数:
• android.content.Context :在方法void onReceive(Context context, Intent intent) 中会用到
• android.content.Intent :在方法void onReceive(Context context, Intent intent) 中会用到
• 任何用@ReceiverAction.Extra注解的参数(native, android.os.Parcelable或者java.io.Serializable类型)都将intent的extra,没有@ReceiverAction.Extra(“”)指定名字,默认为参数名称,这是aa的一贯作风。
@EReceiver
public class MyIntentService extends BroadcastReceiver {

    @ReceiverAction("BROADCAST_ACTION_NAME")
    void mySimpleAction(Intent intent) {
        // ...
    }

    @ReceiverAction
    void myAction(@ReceiverAction.Extra String valueString, Context context) {
        // ...
    }

    @ReceiverAction //指定名称specialExtraName的值
    void anotherAction(@ReceiverAction.Extra("specialExtraName") String valueString, @ReceiverAction.Extra long valueLong) {
        // ...
    }

    @Override
    public void onReceive(Context context, Intent intent) {
        // empty, will be overridden in generated subclass
    }
}
你注意到了,又要一个无用的onReceive方法,没关系,aa3.3版本后,增加了AbstractBroadcastReceiver类,只要继承它就可以不用覆写onReceive方法了。
同时可以指定dataSchemes ,例如:
@EReceiver
public class MyIntentService extends BroadcastReceiver {

  @ReceiverAction(actions = android.content.Intent.VIEW, dataSchemes = "http")
  protected void onHttp() {
    // Will be called when an App wants to open a http website but not for https.
  }

  @ReceiverAction(actions = android.content.Intent.VIEW, dataSchemes = {"http", "https"})
  protected void onHttps() {
    // Will be called when an App wants to open a http or https website.
  }

}
使用广播,先看一下官方文档中这个表,很重要,默认为OnCreateOnDestroy:
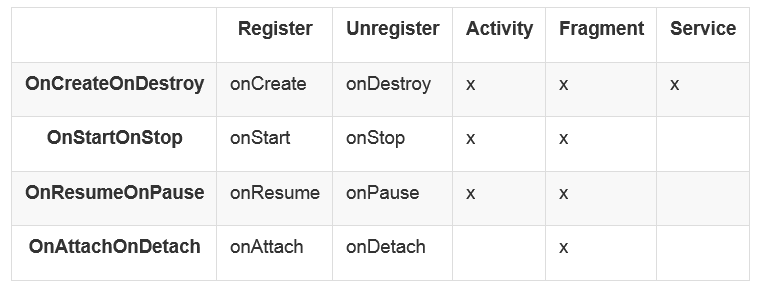
看一下官方的例子即可:
@EFragment
public class MyFragment extends Fragment {

  @Receiver(actions = "org.androidannotations.ACTION_1")
  protected void onAction1RegisteredOnCreateOnDestroy() {
  }

  @Receiver(actions = "org.androidannotations.ACTION_2", registerAt = Receiver.RegisterAt.OnAttachOnDetach)
  protected void onAction2RegisteredOnAttachOnDetach(Intent intent) {
  }

  @Receiver(actions = "org.androidannotations.ACTION_3", registerAt = Receiver.RegisterAt.OnStartOnStop)
  protected void action3RegisteredOnStartOnStop() {
  }

  @Receiver(actions = "org.androidannotations.ACTION_4", registerAt = Receiver.RegisterAt.OnResumeOnPause)
  protected void action4RegisteredOnResumeOnPause(Intent intent) {
  }

}
也可将广播注册为本地的:
@EService
public class MyService extends Service {

  @Receiver(actions = "org.androidannotations.ACTION_1", local = true)//local默认值为false
  protected void onAction1OnCreate() {
  }

  @Override
  public IBinder onBind(Intent intent) {
    return null;
  }
}
注解contentproviders
很简单,用@EProvider即可,与注解其他类相似,不再赘述。
注解自定义的View/ViewGroup
用 @Eview注解即可,看示例:
@EView
public class CustomButton extends Button {

        @App
        MyApplication application;

        @StringRes
        String someStringResource;

    public CustomButton(Context context, AttributeSet attrs) {
        super(context, attrs);
    }
}在布局中引用(千万不要忘记“_”):
<?xml version="1.0" encoding="utf-8"?>
<LinearLayout xmlns:android="http://schemas.android.com/apk/res/android"
    android:layout_width="match_parent"
    android:layout_height="match_parent"
    android:orientation="vertical" >

    <com.androidannotations.view.CustomButton_
        android:layout_width="match_parent"
        android:layout_height="wrap_content" />

    <!-- ... -->

</LinearLayout>
或者在代码中使用:
CustomButton button = CustomButton_.build(context);自定义ViewGroup
先看下布局示例:
<?xml version="1.0" encoding="utf-8"?>
<merge xmlns:android="http://schemas.android.com/apk/res/android" >

    <ImageView
        android:id="@+id/image"
        android:layout_alignParentRight="true"
        android:layout_alignBottom="@+id/title"
        android:layout_width="wrap_content"
        android:layout_height="wrap_content"
        android:src="@drawable/check" />

    <TextView
        android:id="@+id/title"
        android:layout_toLeftOf="@+id/image"
        android:layout_width="match_parent"
        android:layout_height="wrap_content"
        android:textColor="@android:color/white"
        android:textSize="12pt" />

    <TextView
        android:id="@+id/subtitle"
        android:layout_width="match_parent"
        android:layout_height="wrap_content"
        android:layout_below="@+id/title"
        android:textColor="#FFdedede"
        android:textSize="10pt" />

</merge>
看自定义的源码,很简单,不解释:
@EViewGroup(R.layout.title_with_subtitle)
public class TitleWithSubtitle extends RelativeLayout {

    @ViewById
    protected TextView title, subtitle;

    public TitleWithSubtitle(Context context, AttributeSet attrs) {
        super(context, attrs);
    }

    public void setTexts(String titleText, String subTitleText) {
        title.setText(titleText);
        subtitle.setText(subTitleText);
    }

}
接下来使用这个自定义的ViewGroup
<?xml version="1.0" encoding="utf-8"?>
<LinearLayout xmlns:android="http://schemas.android.com/apk/res/android"
    android:layout_width="match_parent"
    android:layout_height="match_parent"
    android:gravity="center"
    android:orientation="vertical" >

    <com.androidannotations.viewgroup.TitleWithSubtitle_//注意别忘“_”
        android:id="@+id/firstTitle"
        android:layout_width="match_parent"
        android:layout_height="wrap_content" />
</LinearLayout>
接下来就可以在Activity或Fragment使用这个自定义的ViewGroup了
@EActivity(R.layout.main)
public class Main extends Activity {

    @ViewById
    protected TitleWithSubtitle firstTitle;

    @AfterViews
    protected void init() {

        firstTitle.setTexts("decouple your code",
                "Hide the component logic from the code using it.");
    }

}
注入View
since ver1.0,用@ViewById,看下例子:
@EActivity
public class MyActivity extends Activity {

  // Injects R.id.myEditText
  @ViewById
  EditText myEditText;

  @ViewById(R.id.myTextView)
  TextView textView;
}
注意当onCreate方法被调用时,用@ViewById注解的变量还没初始化完成,如果用到了view,应该调用 @AfterViews注解的方法,可以声明多个用@AfterViews注解的方法,但是要记住不要再onCreate中调用你的view,例如:
@EActivity(R.layout.main)
public class MyActivity extends Activity {

    @ViewById
    TextView myTextView;

    @AfterViews
    void updateTextWithDate() {
        myTextView.setText("Date: " + new Date());
}重中之重:子类与父类不要用@AfterViews, @AfterInject or @AfterExtras注解相同的方法(假设父类有一个a方法,子类也有一个a方法,它们都注解了,这样的做法是危险的),这样会让aa感到迷惑,千万不要这样用;
aa保证 @AfterViews, -Inject or –Extras注解的方法是顺序执行的,但是不保证同样是@AfterXXX 注解方法的执行顺序。
@ViewsById(since ver3.1)
与 @ViewById雷同, 但是其注入的是一系列view. 看下实例吧,很简单,方便了操作而已。.
@EActivity
public class MyActivity extends Activity {

  @ViewsById({R.id.myTextView1, R.id.myOtherTextView})
  List<TextView> textViews;

  @AfterViews
  void updateTextWithDate() {
    for (TextView textView : textViews) {
      textView.setText("Date: " + new Date());
    }
  }
}
注解资源
看下实例吧,都很简单:
1.@StringRes
@StringRes(R.string.hello)
  String myHelloString;

  @StringRes
  String hello;
2. @ColorRes
 @ColorRes(R.color.backgroundColor)
  int someColor;

  @ColorRes
  int backgroundColor;
3.@AnimationRes
  @AnimationRes(R.anim.fadein)
  XmlResourceParser xmlResAnim;//不常用,知道即可

  @AnimationRes
  Animation fadein;
4.@DimensionRes
  @DimensionRes(R.dimen.fontsize)
  float fontSizeDimension;

  @DimensionRes
  float fontsize;
5.@DimensionPixelOffsetRes
效果同@DimensionRes,不过浮点值会被截断成整数值(像素)。
@EActivity
public class MyActivity extends Activity {

  @DimensionPixelOffsetRes(R.string.fontsize)
  int fontSizeDimension;

  @DimensionPixelOffsetRes
  int fontsize;

}
6.@DimensionPixelSizeRes
这个会直接转换为像素值,没啥用,了解下吧。
@EActivity
public class MyActivity extends Activity {

  @DimensionPixelSizeRes(R.string.fontsize)
  int fontSizeDimension;

  @DimensionPixelSizeRes
  int fontsize;

}
7.Other @XXXRes
• @BooleanRes
• @ColorStateListRes
• @DrawableRes
• @IntArrayRes
• @IntegerRes
• @LayoutRes
• @MovieRes
• @TextRes
• @TextArrayRes
• @StringArrayRes
注入html,先看下实例:
<?xml version="1.0" encoding="utf-8"?>
<resources>
    <string name="hello_html"><![CDATA[Hello <b>World</b>!]]></string>
</resources>
@EActivity
public class MyActivity extends Activity {
// Injects R.string.hello_html
@HtmlRes(R.string.hello_html)
Spanned myHelloString;//Spanned是CharSequence接口子类
// Also injects R.string.hello_html
@HtmlRes
CharSequence helloHtml;
}@EActivity
public class MyActivity extends Activity {
@ViewById(R.id.my_text_view)
@FromHtml(R.string.hello_html)
TextView textView;
// Injects R.string.hello_html into the R.id.hello_html view
@ViewById
@FromHtml
TextView helloHtml;
}注解自定义的类
用@EBean注解,注意类必须只包含一个无参构造或只包含一个Context类型参数构造。
@EBean
public class MyClass { }
用 @Bean:即可引用一个已注解的简单Java类
@EBean
public class MyOtherClass {

  @Bean
  MyClass myClass;
}
用@Bean注解的field总会创建一个新的实例,除非用Singleton将其设为单例模式
@EBean(scope = Scope.Singleton)
public class MySingleton { }注意此时要注意两点:
1. 传入的Context应为app级别(context.getApplicationContext());
2. 不要使用View/View Event注入,避免泄露。
另外要注意的是用@EBean生成的类是final,所以你不能继承生成的Bean。
但是可以通过继承,实现bean的注入,子类会获得父类的注入:
@EActivity
public class MyActivity extends Activity {

  @Bean
  MyOtherClass myOtherClass;

}
@EActivity
public class MyChildActivity extends MyActivity {
//class will also have myOtherClass injected :
}
注入接口实现类:
@EActivity
public class MyActivity extends Activity {

    /*
     * MyImplementation必须用@EBean注解,并且实现了MyInterface.接口
     */
    @Bean(MyImplementation.class)
    MyInterface myInterface;

}
注入View就别看了,没啥用,不如在Activity中干这些事。
注入Context
@EBean
public class MyClass {

  @RootContext
  Context context;

  // Only injected if the root context is an activity
  @RootContext
  Activity activity;

  // Only injected if the root context is a service
  @RootContext
  Service service;

  // Only injected if the root context is an instance of MyActivity
  @RootContext
  MyActivity myActivity;

}
注意以下的例子中,MyClass的service变量将为null
@EActivity
public class MyActivity extends Activity {
  @Bean
  MyClass myClass;
}
由于构造函数执行时,变量还未注入,应该用 @AfterInject做一些逻辑处理
@EBean
public class MyClass {

  @SystemService
  NotificationManager notificationManager;

  @Bean
  MyOtherClass dependency;

  public MyClass() {
    // notificationManager and dependency are null
  }

  @AfterInject
  public void doSomethingAfterInjection() {
    // notificationManager and dependency are set
  }

}
注意,如果子类和父类用了@AfterViews, @AfterInject or @AfterExtras注解相同的方法,那么注意此时的代码是不可靠的(最好用不同的方法名,也最好不要继承)@AfterViews, -Inject or –Extras是顺序执行的。
注解系统服务
忘记 Context.getSystemService() 方法吧!
@EActivity
public class MyActivity extends Activity {

  @SystemService
  NotificationManager notificationManager;

}
事件注解
@Click
例如@Click({R.id.myButton, R.id.myOtherButton}),注意以下几点:
如果id未设置,那么方法名称就是id
方法不能用private修饰,相同的id不能用多个click事件绑定
@Click(R.id.myButton)
void myButtonWasClicked() {
    [...]
}
@Click //相当于@Click(R.id. anotherButton)
void anotherButton() {
    [...]
}
@Click
void yetAnotherButton(View clickedView) {
    [...]
}

@Click({R.id.myButton, R.id.myOtherButton})
void handlesTwoButtons() {
    [...]
}同样支持@LongClick @Touch,用法与@Click类似,不再赘述
AdapterViewEvents
• 点击事件@ItemClick
• 长按事件 @ItemLongClick
• 选择事件 @ItemSelect
用 @ItemClick or @ItemLongClick注解的方法必须要有一个参数,这个参数可以是任何类型的,这个对象可以用 adapter.getItem(position)得到.
用 @ItemSelect 注解的方法可以有1个或2个参数。第一个一定是boolean类型,第二个是从adapter中在选定的位置获得的对象 。
@EActivity(R.layout.my_list)
public class MyListActivity extends Activity {

    @ItemClick
    public void myListItemClicked(MyItem clickedItem) {
    }

    @ItemLongClick
    public void myListItemLongClicked(MyItem clickedItem) {
    }

    @ItemSelect
    public void myListItemSelected(boolean selected, MyItem selectedItem) {
    }
}从aa版本2.4开始, @ItemClick, @ItemLongClick and @ItemSelect, 如果参数类型为int, 那么位置会被传递进去
@EActivity(R.layout.my_list)
public class MyListActivity extends Activity {

    // ...
    @ItemClick
    public void myListItemClicked(int position) {
    }

    @ItemLongClick
    public void myListItemLongClicked(int position) {
    }

    @ItemSelect
    public void myListItemSelected(boolean selected, int position) {
    }
}
SeekBarEvents
since ver2.7,看下示例就行了,很简单,参数根据需要自定:
@SeekBarProgressChange(R.id.seekBar)
 void onProgressChangeOnSeekBar(SeekBar seekBar, int progress, boolean fromUser) {
    // Something Here
 }

 @SeekBarProgressChange(R.id.seekBar)
 void onProgressChangeOnSeekBar(SeekBar seekBar, int progress) {
    // Something Here
 }

 @SeekBarProgressChange({R.id.seekBar1, R.id.seekBar2})
 void onProgressChangeOnSeekBar(SeekBar seekBar) {
    // Something Here
 }

 @SeekBarProgressChange({R.id.seekBar1, R.id.seekBar2})
 void onProgressChangeOnSeekBar() {
    // Something Here
 }
@SeekBarTouchStart and @SeekBarTouchStop用来接收SeekBar的开始拖动以及结束拖动事件,与SeekBar.OnSeekBarChangeListener.onStartTrackingTouch(SeekBar seekBar) andSeekBar.OnSeekBarChangeListener.onStopTrackingTouch(SeekBar seekBar) 相同
注解的方法可以不包含参数或者包含一个SeekBar 类型的参数。
TextChangeEvents
since ver2.6,
@TextChange
用来替换android.text.TextWatcher.onTextChanged(CharSequence s, int start, int before, int count)
这个方法可以包含以下参数::
• android.widget.TextView接收事件的TextView
• java.lang.CharSequence 修改过的Text
• An int parameter named start to get the start position of the modified text.
• An int parameter named before to know the text length before modification.
• An int parameter named count to know the number of modified characters.
看一下示例:
@TextChange(R.id.helloTextView)
 void onTextChangesOnHelloTextView(CharSequence text, TextView hello, int before, int start, int count) {
    // Something Here
 }

 @TextChange
 void helloTextViewTextChanged(TextView hello) {
    // Something Here
 }

 @TextChange({R.id.editText, R.id.helloTextView})
 void onTextChangesOnSomeTextViews(TextView tv, CharSequence text) {
    // Something Here
 }

 @TextChange(R.id.helloTextView)
 void onTextChangesOnHelloTextView() {
    // Something Here
 }
@BeforeTextChange
用来替换android.text.TextWatcher.beforeTextChanged(CharSequence s, int start, int count, int after) .
可以包含如下参数 :
• android.widget.TextView :不必多说,引起事件的View
• java.lang.CharSequence:修改之前的Text
• 一个名称为start的int参数:修改文本的开始位置
•一个名称为count的int参数:修改了多少个字符
•一个名称为after的int参数:修改后的文本长度
示例:
 @BeforeTextChange(R.id.helloTextView)
 void beforeTextChangedOnHelloTextView(TextView hello, CharSequence text, int start, int count, int after) {
    // Something Here
 }

 @BeforeTextChange
 void helloTextViewBeforeTextChanged(TextView hello) {
    // Something Here
 }

 @BeforeTextChange({R.id.editText, R.id.helloTextView})
 void beforeTextChangedOnSomeTextViews(TextView tv, CharSequence text) {
    // Something Here
 }

 @BeforeTextChange(R.id.helloTextView)
 void beforeTextChangedOnHelloTextView() {
    // Something Here
 }
@AfterTextChange
这个注解用来定义android.text.TextWatcher.afterTextChanged(Editable s)事件(适用于TextView或TextView的子类),方法中可以包含以下几个参数:
※ android.widget.TextView:不必多说,引起事件的View
※ android.text.Editable:修改过的文本
示例 :
 @AfterTextChange(R.id.helloTextView)
 void afterTextChangedOnHelloTextView(Editable text, TextView hello) {
    // Something Here
 }

 @AfterTextChange
 void helloTextViewAfterTextChanged(TextView hello) {
    // Something Here
 }

 @AfterTextChange({R.id.editText, R.id.helloTextView})
 void afterTextChangedOnSomeTextViews(TextView tv, Editable text) {
    // Something Here
 }

 @AfterTextChange(R.id.helloTextView)
 void afterTextChangedOnHelloTextView() {
    // Something Here
 }
Since AndroidAnnotations 3.1,个人觉得没啥用,需要时再说吧
@EditorAction
This annotation is intended to be used on methods to receive events defined byandroid.widget.TextView.OnEditorActionListener#onEditorAction(android.widget.TextView, int, android.view.KeyEvent) when an action is performed on the editor.
The annotation value should be one or several R.id.* fields that refers to TextView or subclasses of TextView. If not set, the method name will be used as the R.id.* field name.
The method may have multiple parameters:
• A android.widget.TextView parameter to know which view has targeted this event.
• An int parameter to get the actionId.
• A android.view.KeyEvent parameter.
The return type of the method can be either void or boolean. In case of boolean, the value returned from the annotated method will be returned in the generated listener method (indicating event consumption). If the annotated method is void, always true will be returned in the listener method (so the event is consumed).
示例:
 @EditorAction(R.id.helloTextView)
  void onEditorActionsOnHelloTextView(TextView hello, int actionId, KeyEvent keyEvent) {
    // Something Here
  }

  @EditorAction
  void helloTextViewEditorAction(TextView hello) {
    // Something Here
  }

  @EditorAction({R.id.editText, R.id.helloTextView})
  void onEditorActionsOnSomeTextViews(TextView tv, int actionId) {
    // Something Here
  }

  @EditorAction(R.id.helloTextView)
  void onEditorActionsOnHelloTextView() {
    // Something Here
  }


  @EditorAction(R.id.helloTextView)
  boolean onEditorActionsOnHelloTextView() {
    // Something Here
    return false;
}
线程
忘掉AsyncTasks吧!
void myMethod() {
    someBackgroundWork("hello", 42);
}

@Background//表面该方法会在后台线程中执行,不会在UIThread中
void someBackgroundWork(String aParam, long anotherParam) {
    [...]
}注意:这只是表明这个方法会在后台线程中执行,并不意味着会开启一个新的线程,应为aa自动维护了一个线程池来避免开启过多的线程,这也就意味着两个用@Background的方法可能在一个线程中并行运行。
取消线程(since ver3.0),传入id即可
void myMethod() {
    someCancellableBackground("hello", 42);
    [...]
    boolean mayInterruptIfRunning = true;
    BackgroundExecutor.cancelAll("cancellable_task", mayInterruptIfRunning);//传入id取消线程的执行
}

@Background(id="cancellable_task")
void someCancellableBackground(String aParam, long anotherParam) {
    [...]
}顺序执行(since ver3.0),默认各个线程是并发执行的,如果想要它们按照顺序执行,可以这样:
void myMethod() {
    for (int i = 0; i < 10; i++)
        someSequentialBackgroundMethod(i);
}
@Background(serial = "test")
void someSequentialBackgroundMethod(int i) {
    SystemClock.sleep(new Random().nextInt(2000)+1000);
    Log.d("AA", "value : " + i);
}延时执行(since ver3.0):
@Background(delay=2000)
void doInBackgroundAfterTwoSeconds() {
}
在Ui线程中执行:
void myMethod() {
    doInUiThread("hello", 42);
}

@UiThread
void doInUiThread(String aParam, long anotherParam) {
    [...]
}
@UiThread(delay=2000)
void doInUiThreadAfterTwoSeconds() {
}注意:3.0之前的版本中,用 @Thread注解的方法会被添加到Handler队列中来确保最后它是在ui线程中执行完成的. 3.0版本中为了与之前的版本保持兼容,也这么做了。 但是如果想优化,可以将propagation 的值变为REUSE,在这种配置下,如果当前线程是ui线程,则方法不会添加到Handler中,更加高效。
@UiThread(propagation = Propagation.REUSE)
void runInSameThreadIfOnUiThread() {
}
Note: 如果用来delay, propagation 会被忽略掉,相当于没加。
下面将以下自版本3.1后加入的两个annotation,很有意思,了解下吧
@SupposeBackground
确保方法在后台线程中调用,若不是后台线程调用的该方法,则会抛出一个异常(默认) If you want to override what happens when the method is not called on the supposed thread, pass an instance of BackgroundExecutor.WrongThreadListenertoBackgroundExecutor.setWrongThreadListener(). Its onBgExpected method will be invoked if the annotated method is called on the wrong thread, or its onWrongBgSerial will be invoked if the annotated method called on a background thread but with wrong IDs.
Usage example:
@EBean
public class MyBean {

  @SupposeBackground
  void someMethodThatShouldNotBeCalledFromUiThread() {
  //if this method will be called from the UI-thread an exception will be thrown
  }

  @SupposeBackground(serial = {"serial1", "serial2"})
  void someMethodThatShouldBeCalledFromSerial1OrSerial2() {
  //if this method will be called from another thread then a background thread with a
  //serial "serial1" or "serial2", an exception will be thrown
  }
}
@SupposeUiThread
声明你的方法要在UI线程中调用,如果不是,则默认会抛出IllegalStateException ,如果想要自定义处理逻辑,需要传一个BackgroundExecutor.WrongThreadListenertoBackgroundExecutor.setWrongThreadListener()实例。如果非UI线程调用了方法,那么onUiExpected 就会被调用。
示例:
@EBean
public class MyBean {

  @SupposeUiThread
  void someMethodThatShouldBeCalledOnlyFromUiThread() {
  //if this method will be called from a background thread an exception will be thrown
  }
}
看一下下面的源码,很有用:
@EActivity
public class MyActivity extends Activity {

  // Instances should only be accessed from the UI Thread to guarantee thread safety
  static class ResultHolder {
    ResultA resultA;
    ResultB resultB;
  }

  // Multiple clicks will start multiple distinguished computations
  @Click(R.id.myButton)
  void startForkableComputation() {
    ResultHolder resultHolder = new ResultHolder();
    computeResultA(resultHolder);
    computeResultB(resultHolder);
  }

  @Background
  void computeResultA(ResultHolder resultHolder) {
    ResultA resultA = new ResultA();
    // Do some stuff with resultA
    joinWork(resultHolder, resultA, null);
  }

  @Background
  void computeResultB(ResultHolder resultHolder) {
    ResultB resultB = new ResultB();
    // Do some stuff with resultB
    joinWork(resultHolder, null, resultB);
  }

  @UiThread
  void joinWork(ResultHolder resultHolder, ResultA resultA, ResultB resultB) {
    if (resultA != null)
      resultHolder.resultA = resultA;
    if (resultB != null)
      resultHolder.resultB = resultB;

    if (resultHolder.resultA == null || resultHolder.resultB == null) {
      return;
    }

    // Show the results on the UI Thread
  }
}
BackgroundTasksAndActivityBinding(since ver2.5)
同AsyncTask一样, @Background 不会处理任何Activity生命周期事件。例如你调用了一个@Background 注解的方法,然后设备屏幕旋转了,那么接下来该方法的代码开始执行,如果该方法接下来调用了 @UiThread注解的方法,如果此时设备信息发生了改变,那么@UiThread注解的方法就会引用一个销毁的Activity的实例。
(翻译的不好)在 Android中, 在Loaders之前, 通常的做法是使用AsyncTask, 在onRetainNonConfigurationInstance()中保留任务的相关引用,在Activity重新配置完成后再重新绑定这些引用。aa提供了@NonConfigurationInstance, 可以和@EBean, @Bean and @Background一起使用来达到相同的目的。看一下示例吧:
@EActivity
public class MyActivity extends Activity {

  /* Using @NonConfigurationInstance on a @Bean will automatically
   * update the context ref on configuration changes,
   * if the bean is not a singleton
   */
  @NonConfigurationInstance
  @Bean
  MyBackgroundTask task;

  @Click
  void myButtonClicked() {
    task.doSomethingInBackground();
  }

  void showResult(MyResult result) {
    // do something with result
  }

}
Then the task itself:
@EBean
public class MyBackgroundTask {

  @RootContext
  MyActivity activity;

  @Background
  void doSomethingInBackground() {
    // do something
    MyResult result = XXX;

    updateUI(result);
  }

  // Notice that we manipulate the activity ref only from the UI thread
  @UiThread
  void updateUI(MyResult result) {
    activity.showResult(result);
  }
}
配置改变
NonConfigurationInstance
since ver2.5,当配置改变,例如旋转屏幕是,Activity会被摧毁并重建. 这是重新下载资源是件麻烦的事,看下面的解决方法:
@EActivity
public class MyActivity extends Activity {

  @NonConfigurationInstance
  Bitmap someBitmap;

  @NonConfigurationInstance
  @Bean
  MyBackgroundTask myBackgroundTask;

}
注意: 不要用@NonConfigurationInstance来声明与Activity有关的变量,例如Drawable、Adapter、View 或者任何与Context有关的变量,这有可能会导致内存泄漏,但是可以用@Bean修饰的类,aa会自动关照里面的Context。
保存状态变量
since ver2.5,注意自版本2.7开始后,可以在用 @Efragment注解的Fragment中使用 @InstanceState 了。
@EActivity
public class MyActivity extends Activity {

    @InstanceState
    int someId;

    @InstanceState
    MySerializableBean bean;

}
这些属性会在系统调用onSaveInstanceState(Bundle)时自动保存. 在onCreate(Bundle) 还原。
Sp
@SharedPref//用@SharedPref修饰即可
public interface MyPrefs {

     // The field name will have default value "John"
    @DefaultString("John")
    String name();

    // The field age will have default value 42
    @DefaultInt(42)
    int age();

     // The field lastUpdated will have default value 0
    long lastUpdated();

}
在Activity中使用它:
@EActivity
public class MyActivity extends Activity {

    @Pref
    MyPrefs_ myPrefs; //此处一定要注意,用MyPrefs_ 而不是MyPrefs
    // ...
}
简单使用:
// Simple edit
myPrefs.name().put("John");

// Batch edit
myPrefs.edit()
  .name()
  .put("John")
  .age()
  .put(42)
  .apply();

// Preference clearing:
myPrefs.clear();

// Check if a value exists:
boolean nameExists = myPrefs.name().exists();

// Reading a value
long lastUpdated = myPrefs.lastUpdated().get();

// Reading a value and providing a fallback default value
long now = System.currentTimeMillis();
long lastUpdated = myPrefs.lastUpdated().getOr(now);
自3.0版本开始,允许设定一个默认值,资源名称表示:
@SharedPref
public interface MyPrefs {
    @DefaultRes(R.string.defaultPrefName)
    String resourceName();

    @DefaultRes // uses 'R.string.defaultPrefAge' to set default value
    String defaultPrefAge();
}
范围:value可被设置为以下值
• ACTIVITY, 生成一个MyActivity_MyPrefs命名的sp;
• ACTIVITY_DEFAULT, 生成一个 MyActivity 命名的sp(可通过activity.getPreferences()来获取这个sp);
• APPLICATION_DEFAULT, 生成一个MyPrefs 命名的sp(效果同UNIQUE),整个应用都可以访问到
@SharedPref(value=SharedPref.Scope.UNIQUE)
public interface MyPrefs {
...
}
PreferenceActivity用法
了解下吧,基本上用不到。
@SharedPref()
public interface MyPrefs {
...
}
public class PrefsActivity extends PreferenceActivity {
public static String PREF_NAME = "MyPrefs";
@Override
public void onCreate(Bundle savedInstanceState) {
super.onCreate(savedInstanceState);
// Using your MyPrefs values
this.getPreferenceManager().setSharedPreferencesName(PREF_NAME);
// Opening the layout
addPreferencesFromResource(R.xml.prefs);
}
}SQLiteTransactions
用 @Transactional 注解的方法意味着该方法是访问数据库进行操作的,因此当该方法执行前会开启事务,方法执行完毕后会提交事务。如果中途抛出了异常,整个操作会回滚 ,同时要注意的是方法至少要包含一个SQLiteDatabase类型的参数,且该方法不能用private修饰并且不能抛出任何异常。
@Transactional
void doSomeDbWork(SQLiteDatabase db) {
    db.execSQL("Some SQL");
}
列表
ListView&Adapter
创建一个PersonListActivity来显示所有的人。首先我们需要PersonListAdapter来生成数据,PersonItemView 用来展示每一行的布局。
先新建一个Person的pojo:
public class Person {
    public final String firstName;
    public final String lastName;

    public Person(String firstName, String lastName) {
        this.firstName = firstName;
        this.lastName = lastName;
    }
}
定义查找接口:
public interface PersonFinder {
    List<Person> findAll();
}
定义PersonItemView :
@EViewGroup(R.layout.person_item)
public class PersonItemView extends LinearLayout {

    @ViewById
    TextView firstNameView;

    @ViewById
    TextView lastNameView;

    public PersonItemView(Context context) {
        super(context);
    }

    public void bind(Person person) {
        firstNameView.setText(person.firstName);
        lastNameView.setText(person.lastName);
    }
}
注意就不要用ViewHolder模式了:
有一个PersonFinder的接口实现类, 姑且叫InMemoryPersonFinder吧, 用@EBean注解. 代码先省略吧,懂意思就行。
定义Adapter:
@EBean
public class PersonListAdapter extends BaseAdapter {

    List<Person> persons;

    @Bean(InMemoryPersonFinder.class)
    PersonFinder personFinder;

    @RootContext
    Context context;

    @AfterInject
    void initAdapter() {
        persons = personFinder.findAll();
    }

    @Override
    public View getView(int position, View convertView, ViewGroup parent) {

        PersonItemView personItemView;
        if (convertView == null) {
            personItemView = PersonItemView_.build(context);
        } else {
            personItemView = (PersonItemView) convertView;
        }

        personItemView.bind(getItem(position));

        return personItemView;
    }

    @Override
    public int getCount() {
        return persons.size();
    }

    @Override
    public Person getItem(int position) {
        return persons.get(position);
    }

    @Override
    public long getItemId(int position) {
        return position;
    }
}
Activity中使用:
@EActivity(R.layout.person_list)
public class PersonListActivity extends Activity {
    @ViewById
    ListView personList;

    @Bean
    PersonListAdapter adapter;

    @AfterViews
    void bindAdapter() {
        personList.setAdapter(adapter);
    }

    @ItemClick
    void personListItemClicked(Person person) {
        makeText(this, person.firstName + " " + person.lastName, LENGTH_SHORT).show();
    }
}
RecyclerView and ViewHolder
用RecyclerView 的话,与ListView稍有不同. RecyclerView.Adapter creates ViewHolders, instead of Views. Unfortunately you cannot enhance and inject into ViewHolder classes, but you can easily use@EViewGroup as for ListViews with a help of a modified adapter.
Create a generic class which can be used to wrap all kind of Views into a ViewHolder:
public class ViewWrapper<V extends View> extends RecyclerView.ViewHolder {

    private V view;

    public ViewWrapper(V itemView) {
        super(itemView);
        view = itemView;
    }

    public V getView() {
        return view;
    }
}
Create a common base class for all RecyclerView adapters:
public abstract class RecyclerViewAdapterBase<T, V extends View> extends RecyclerView.Adapter<ViewWrapper<V>> {

    protected List<T> items = new ArrayList<T>();

    @Override
    public int getItemCount() {
        return items.size();
    }

    @Override
    public final ViewWrapper<V> onCreateViewHolder(ViewGroup parent, int viewType) {
        return new ViewWrapper<V>(onCreateItemView(parent, viewType));
    }

    protected abstract V onCreateItemView(ViewGroup parent, int viewType);

    // additional methods to manipulate the items
}
You can utilize the two classes with our Person example as follows:
@EBean
public class PersonAdapter extends RecyclerViewAdapterBase<Person, PersonItemView> {

    @RootContext
    Context context;

    @Override
    protected PersonItemView onCreateItemView(ViewGroup parent, int viewType) {
        return PersonItemView_.build(context);
    }

    @Override
    public void onBindViewHolder(ViewWrapper<PersonItemView> viewHolder, int position) {
        PersonItemView view = viewHolder.getView();
        Person person = items.get(position);

        view.bind(person);
    }

}
If you create an interface for the bind method, you can even move up the implementation of onBindViewHolder to the base class.
追踪代码的执行
since ver2.2,用@Trace,注意方法不能是private的
@Trace
void doWork() {
    // ... Do Work ...
}

@Trace
boolean doMoreWork(String someString) {
    // ... Do more Work ...
}
看一下输出日志(看一下ver3.1的输出日志,更加精细):
I/TracedMethodActivity(  302): Entering [boolean doMoreWork(someString = Hello World)]
I/TracedMethodActivity(  302): Exiting [boolean doMoreWork(String) returning: true], duration in ms: 651
同时可以对输出的日志自定义tag和级别:
@Trace(tag="CustomTag", level=Log.WARN)
void doWork() {
    // ... Do Work ...
}
W/CustomTag( 533): Entering [void doWork() ]
W/CustomTag( 533): Exiting [void doWork() ], duration in ms: 1001禁用掉:右键工程,选择属性
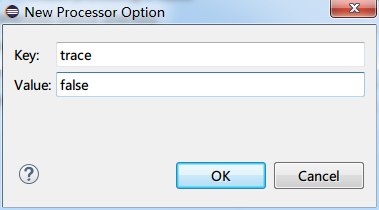
如果使用的是as,可以在build.gradle中配置:
apply plugin: 'android-apt'

dependencies {
    apt "org.androidannotations:androidannotations:$AAVersion"
    compile "org.androidannotations:androidannotations-api:$AAVersion"
}

apt {
    arguments {
        // you can set annotation processing options here
        logLevel 'TRACE'
        logAppenderConsole 'true'
    }
}
引用库的资源
以下笔记只针对于2.7以后的版本
This enables you to specify the resource id name as a String. Please note thatAndroidAnnotations checks that the name exists at compile time.
@EActivity(resName="myLayout")
public class MyActivity extends Activity {

  @Click(resName={"myButton1", "myButton2"})
  public void someButtonClicked() {
  }
}
简单的Https访问
since ver2.6,aa简化了Https访问流程
双向SSL认证,这是一个完整的基于客户端身份验证:
@HttpsClient(trustStore=R.raw.cacerts,
    trustStorePwd="changeit",
    keyStore=R.raw.client,
    keyStorePwd="secret",
    allowAllHostnames=false)
HttpClient httpsClient;
• trustStore: int类型, 信任文件的资源id,例如R.raw.cacerts.bks,通常你的服务器信任这些证书(public key, Root Chain Authority etc)
• trustStorePwd: String类型, 信任库的密码(默认为changeit)
• keyStore: int类型, 私钥的资源id (client certificate)
• keyStorePwd: 你的信任库密码(默认为changeit)
• allowAllHostnames: boolean类型,若为true,运行任何TLS/SSL主机链接(默认为true) ,若为false,主机名(DN)证书必须匹配的URL
注意: 在Android4.0之前, Android接受(密钥|信任 Key|Trust)存储只 使用 BKS格式(Bouncycastle密钥存储库)。
一个简单的 SSL认证:
如果你的服务器使用自签名证书或者私人证书机构颁发的证书,这相当有用。
@HttpsClient(trustStore=R.raw.mycacerts,
    trustStorePwd="changeit")
HttpClient httpsClient;
默认情况下,如果你不指定一个truststore文件,aa会使用默认的Android信任证书(该证书位于/system/etc/security/cacerts.bks),允许你连接到由CA颁发证书的服务器 (Thawte,verisign等)。
@HttpsClient
HttpClient httpsClient;
完整例子:
@EActivity
public class MyActivity extends Activity {

    @HttpsClient(trustStore=R.raw.cacerts,
        trustStorePwd="changeit",
        hostnameVerif=true)
    HttpClient httpsClient;

    @AfterInject
    @Background
    public void securedRequest() {
        try {
            HttpGet httpget = new HttpGet("https://www.verisign.com/");
            HttpResponse response = httpsClient.execute(httpget);
            doSomethingWithResponse(response);
        } catch (Exception e) {
            e.printStackTrace();
        }
    }

    @UiThread
    public void doSomethingWithResponse(HttpResponse resp) {
        Toast.makeText(this, "HTTP status " + resp.getStatusLine().getStatusCode(), Toast.LENGTH_LONG).show();
    }
}
处理菜单
从2.2版本开始,可以使用@OptionsMenu和@OptionsItem在Activity中处理菜单。
• @OptionsMenu 指定要使用菜单的资源
• @OptionsItem 接收菜单点击事件
这两个事件不一定要配合使用,可单独使用。
看一下例子:
@EActivity
@OptionsMenu(R.menu.my_menu)
public class MyActivity extends Activity {

    @OptionsMenuItem
    MenuItem menuSearch;

    @OptionsItem(R.id.menuShare)
    void myMethod() {
      // You can specify the ID in the annotation, or use the naming convention
    }

    @OptionsItem
    void homeSelected() {
      // home was selected in the action bar
      // The "Selected" keyword is optional
    }

    @OptionsItem
    boolean menuSearch() {
      menuSearch.setVisible(false);
      // menuSearch was selected
      // the return type may be void or boolean (false to allow normal menu processing to proceed, true to consume it here)
      return true;
    }

    @OptionsItem({ R.id.menu_search, R.id.menu_delete })
    void multipleMenuItems() {
      // You can specify multiple menu item IDs in @OptionsItem
    }

    @OptionsItem
    void menu_add(MenuItem item) {
      // You can add a MenuItem parameter to access it
    }
}
Injecting Menu items
Since AndroidAnnotations 3.0
@OptionsMenuItem can be used to inject a MenuItem in an attribute.
Be careful : Injected menu items can’t be used in @AfterInject nor @AfterViews annotated methods, because of Android activity lifecycle.
Multiple Options Menu,Since AndroidAnnotations 2.7
You can combine multiple xml menus with @OptionsMenu:
@EActivity
@OptionsMenu({R.menu.my_menu1, R.menu.my_menu2})
public class MyActivity extends Activity {

}
Fragment support,Since AndroidAnnotations 2.7
You can also use @OptionsMenu and @OptionsItem in Fragments:
@EFragment
@OptionsMenu(R.menu.my_fragment_menu)
public class MyFragment extends Fragment {

    @OptionsItem
    void menuRefreshSelected() {
    }

}
补充部分:
@WakeLock
注意:不能用在onCreate方法中。
@WakeLock(tag = "MyTag", level = WakeLock.Level.FULL_WAKE_LOCK, flags = WakeLock.Flag.ACQUIRE_CAUSES_WAKEUP)
void methodWithWakeLock(String aParam, long anotherParam) {
    [...]
}
注意level可取的值有:WakeLock.Level.FULL_WAKE_LOCK、WakeLock.Level.PARTIAL_WAKE_LOCK、WakeLock.Level.SCREEN_BRIGHT_WAKE_LOCK、SCREEN_DIM_WAKE_LOCK,flags可取的值有:WakeLock.Flag.ACQUIRE_CAUSES_WAKEUP、WakeLock.Flag.ON_AFTER_RELEASE,别导错包,是aa中的WakeLock。
@WindowFeature
用法很简单,看下例子就可以,以后就不需要写requestWindowFeature了:
@WindowFeature({ Window.FEATURE_NO_TITLE, Window.FEATURE_INDETERMINATE_PROGRESS })
@EActivity
public class MyActivity extends Activity {
}
@Touch
官方文档没有这个说明,写个例子吧,用起来也很简单:
    @Touch(R.id.img_bg)
    void testTouch(MotionEvent event) {
        switch (event.getAction()) {
        case MotionEvent.ACTION_DOWN:
            System.out.println("start touch");
            break;
        case MotionEvent.ACTION_MOVE:
            System.out.println("touch move");
            break;
        }
    }


 383
383


 被折叠的 条评论
为什么被折叠?
被折叠的 条评论
为什么被折叠?
 到【灌水乐园】发言


