


一、Exception类封装
class
Exception
: public
std::exception
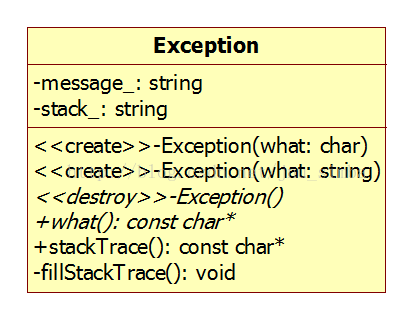
#include <execinfo.h>
int backtrace(void **buffer, int size); // backtrace 栈回溯,保存各个栈帧的地址
char **backtrace_symbols(void *const *buffer, int size); // backtrace_symbols 根据地址,转成相应的函数符号
int backtrace(void **buffer, int size); // backtrace 栈回溯,保存各个栈帧的地址
char **backtrace_symbols(void *const *buffer, int size); // backtrace_symbols 根据地址,转成相应的函数符号
// buffer 是指向一个数组的指针,数组存放的每一项是指向字符串的指针
// backtrace_symbols 内部调用malloc 分配数组空间,需要调用者自己释放,但数组指针指向的字符串不需要调用者去释放。
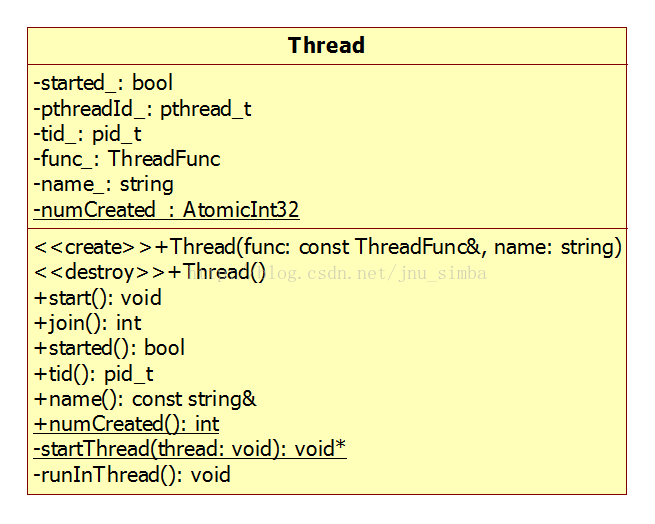
二、Thread类封装
class Thread : boost::noncopyable
typedef boost::function<void ()> ThreadFunc;
具体实现分析见这里。注意:结合CurrentThead.h 一起看,因为CurrentThead命名空间内的一些函数是在
Thead.cc 里面实现的,Thead类的一些成员函数也调用了CurrentThread命名空间的一些函数。
1、获取标识符
pid --> getpid() //进程id
pthread_t --> pthread_self() //线程idtid--> gettid() //线程真实id
(1)、Linux中,每个进程有一个pid,类型pid_t,由getpid()取得。Linux下的POSIX线程也有一个id,类型 pthread_t,由pthread_self()取得,该id由线程库维护,其id空间是各个进程独立的(即不同进程中的线程可能有相同的id)。Linux中的POSIX线程库实现的线程其实也是一个进程(LWP),只是该进程与主进程(启动线程的进程)共享一些资源而已,比如代码段,数据段等。
(2)、有时候我们可能需要知道线程的真实pid。比如进程P1要向另外一个进程P2中的某个线程发送信号时,既不能使用P2的pid,更不能使用线程的pthread id,而只能使用该线程的真实pid,称为tid。
(3)、有一个函数gettid()可以得到tid,但glibc并没有实现该函数,只能通过Linux的系统调用syscall来获取。
return syscall(SYS_gettid)
return syscall(SYS_gettid)
2、__thread,gcc内置的线程局部存储设施(每个线程有一份)
__thread只能修饰POD类型POD类型(plain old data),与C兼容的原始数据,例如,结构体和整型等C语言中的类型是 POD 类型,但带有用户定义的构造函数或虚函数的类则不是
__thread string t_obj1(“simba”); // 错误,不能调用对象的构造函数__thread string* t_obj2 = new string; // 错误,初始化只能是编译期常量若不是POD数据类型,但也想作为线程局部存储,可以使用线程特定数据TSD,参见以前的文章。__thread string* t_obj3 = NULL; // 正确
namespace CurrentThread
{
{
__thread int t_cachedTid = 0; //线程真实pid(tid)的缓存,是减少系统调用::syscall(SYS_gettid),提高获取tid的效率。__thread char t_tidString[32]; // tid 的字符串表示__thread const char* t_threadName = "unknown"; //线程名称const bool sameType = boost::is_same<int, pid_t>::value; //判断类型是否相同BOOST_STATIC_ASSERT(sameType);
}
3、boost::is_same
const bool sameType = boost::is_same<int, pid_t>::value;
4、assert(n == 6); (void) n;
在release 版本下assert语句被忽略,那么n是未使用的变量,由于编译选项会把警告当作错误,导致编译不通过。
5、pthread_atfork()
#include <pthread.h>
int pthread_atfork(void (*prepare)(void), void (*parent)(void), void (*child)(void));
int pthread_atfork(void (*prepare)(void), void (*parent)(void), void (*child)(void));
pthread_atfork()在fork()之前调用,当调用fork时,内部创建子进程前在父进程中会调用prepare,内部创建子进程成功后,父进程会调用parent ,子进程会调用child。
C++ Code
|
1
2 3 4 5 6 7 8 9 10 11 12 13 14 15 16 17 18 19 20 21 22 23 24 25 26 27 28 29 30 31 32 33 34 |
#include <stdio.h>
#include <time.h> #include <pthread.h> #include <unistd.h> void prepare( void) { printf( "pid = %d prepare ...\n", static_cast< int>(getpid())); } void parent( void) { printf( "pid = %d parent ...\n", static_cast< int>(getpid())); } void child( void) { printf( "pid = %d child ...\n", static_cast< int>(getpid())); } int main( void) { printf( "pid = %d Entering main ...\n", static_cast< int>(getpid())); pthread_atfork(prepare, parent, child); fork(); printf( "pid = %d Exiting main ...\n", static_cast< int>(getpid())); return 0; } |
simba@ubuntu:~/Documents/build/debug/bin$ ./pthread_atfork_test
pid = 4791 Entering main ...
pid = 4791 prepare ...
pid = 4791 parent ...
pid = 4791 Exiting main ...
simba@ubuntu:~/Documents/build/debug/bin$ pid = 4792 child ...
pid = 4792 Exiting main ...
simba@ubuntu:~/Documents/build/debug/bin$
pid = 4791 Entering main ...
pid = 4791 prepare ...
pid = 4791 parent ...
pid = 4791 Exiting main ...
simba@ubuntu:~/Documents/build/debug/bin$ pid = 4792 child ...
pid = 4792 Exiting main ...
simba@ubuntu:~/Documents/build/debug/bin$
因为父进程首先退出,故bash提到前台,子进程输出混杂在命令行。
在实际编程中,最好不要多线程多进程,两者择其一,比如在多线程程序中调用fork 容易出现死锁,因为子进程复制父进程的时候包含状态变化,如锁的状态如果被复制的时候是已经加锁,那么子进程想加锁的时候就会死锁,因为不是本进程程序加的锁,解锁就不从谈起,一直处于等待中。看下面的例子:
C++ Code
|
1
2 3 4 5 6 7 8 9 10 11 12 13 14 15 16 17 18 19 20 21 22 23 24 25 26 27 28 29 30 31 32 33 34 35 36 37 38 |
#include <stdio.h> #include <time.h> #include <pthread.h> #include <unistd.h> pthread_mutex_t mutex = PTHREAD_MUTEX_INITIALIZER; void *doit( void *arg) { printf( "pid = %d begin doit ...\n", static_cast< int>(getpid())); pthread_mutex_lock(&mutex); struct timespec ts = { 2, 0}; nanosleep(&ts, NULL); pthread_mutex_unlock(&mutex); printf( "pid = %d end doit ...\n", static_cast< int>(getpid())); return NULL; } int main( void) { printf( "pid = %d Entering main ...\n", static_cast< int>(getpid())); pthread_t tid; pthread_create(&tid, NULL, doit, NULL); struct timespec ts = { 1, 0}; nanosleep(&ts, NULL); if (fork() == 0) { doit( NULL); } pthread_join(tid, NULL); printf( "pid = %d Exiting main ...\n", static_cast< int>(getpid())); return 0; } |
首先主线程先调用pthread_create()创建一个子线程执行doit(),doit()里面先加锁,睡眠2s; 主线程睡眠1s后调用fork(),子进程会复制父进程的内存映像,此时全局变量mutex 处于加锁的状态,所以子进程自己的mutex也是加锁的,此时子进程是独立运行的,也去执行doit(),在里面试图加锁,因为本来mutex已经加锁,而且根本没有人会来解锁,所以子进程就会死锁。
执行结果如下:
simba@ubuntu:~/Documents/build/debug/bin$ ./deadlock_test
pid = 4823 Entering main ...
pid = 4823 begin doit ...
pid = 4825 begin doit ...
pid = 4823 end doit ...
pid = 4823 Exiting main ...
simba@ubuntu:~/Documents/build/debug/bin$ ps aux | grep deadlock_test
simba 4825 0.0 0.0 11684 144 pts/0 S 06:09 0:00 ./deadlock_test
simba 4830 0.0 0.0 4392 848 pts/0 S+ 06:09 0:00 grep --color=auto deadlock_test
simba@ubuntu:~/Documents/build/debug/bin$
可以看到Exiting main 只输出了一次,子进程根本没有从doit()出来,ps 一下可以发现pid=4825 的进程一直没有退出,注意死锁跟僵尸进程是不同的,僵尸进程是退出但占据着资源还没被清理,而死锁是一直没有退出进程。
此时可以用pthread_atfork() 来解决这个问题:
C++ Code
|
1
2 3 4 5 6 7 8 9 10 11 12 13 14 15 16 17 18 19 20 21 22 23 24 25 26 27 28 29 30 31 32 33 34 35 36 37 38 39 40 41 42 43 44 45 46 47 |
#include <stdio.h>
#include <time.h> #include <pthread.h> #include <unistd.h> pthread_mutex_t mutex = PTHREAD_MUTEX_INITIALIZER; void *doit( void *arg) { printf( "pid = %d begin doit ...\n", static_cast< int>(getpid())); pthread_mutex_lock(&mutex); struct timespec ts = { 2, 0}; nanosleep(&ts, NULL); pthread_mutex_unlock(&mutex); printf( "pid = %d end doit ...\n", static_cast< int>(getpid())); return NULL; } void prepare( void) { pthread_mutex_unlock(&mutex); } void parent( void) { pthread_mutex_lock(&mutex); } int main( void) { pthread_atfork(prepare, parent, NULL); printf( "pid = %d Entering main ...\n", static_cast< int>(getpid())); pthread_t tid; pthread_create(&tid, NULL, doit, NULL); struct timespec ts = { 1, 0}; nanosleep(&ts, NULL); if (fork() == 0) { doit( NULL); } pthread_join(tid, NULL); printf( "pid = %d Exiting main ...\n", static_cast< int>(getpid())); return 0; } |
同样的流程,但在执行fork() 创建子进程之前,先执行prepare(), 将子线程加锁的mutex 解锁下,然后为了与doit() 配对,在创建子进程成功后,父进程调用parent() 再次加锁,这时父进程的doit() 就可以接着解锁执行下去。而对于子进程来说,由于在fork() 创建子进程之前,mutex已经被解锁,故复制的状态也是解锁的,所以执行doit()就不会死锁了。
执行结果如下:
simba@ubuntu:~/Documents/build/debug/bin$ ./deadlock_test2
pid = 4905 Entering main ...
pid = 4905 begin doit ...
pid = 4908 begin doit ...
pid = 4905 end doit ...
pid = 4905 Exiting main ...
simba@ubuntu:~/Documents/build/debug/bin$ pid = 4908 end doit ...
pid = 4908 Exiting main ...
simba@ubuntu:~/Documents/build/debug/bin$
pid = 4905 Entering main ...
pid = 4905 begin doit ...
pid = 4908 begin doit ...
pid = 4905 end doit ...
pid = 4905 Exiting main ...
simba@ubuntu:~/Documents/build/debug/bin$ pid = 4908 end doit ...
pid = 4908 Exiting main ...
simba@ubuntu:~/Documents/build/debug/bin$
可以看到子进程也正常退出了。
参考:
muduo manual.pdf
《linux 多线程服务器编程:使用muduo c++网络库》


 6648
6648


 被折叠的 条评论
为什么被折叠?
被折叠的 条评论
为什么被折叠?
 到【灌水乐园】发言


