


Settings Bundle是在自己的程序中建立的一组文件,利用它可以告诉设备中的Settings程序我们写的程序有哪些设置项。用户在Settings程序中设置好相关相关选项后回到我们自己的程序,自己的程序中的对应项也会发生相应的变化。
在iOS程序中,用户默认项,即上面所说的设置项,是用NSUserDefaults类实现的。在NSUserDefaults类中使用关键字来读取和存储设置项的具体数据,就像NSDictionary类一样,不同的是,NSUserDefaults类的数据是存储在文件系统中的,而不是作为一个对象实例放在内存中。
在这篇文章中,我们将创建一个程序,为它添加和配置Settings Bundle,之后可以在Settings程序中显示和配置相关选项。在Settings Bundle中使用plist文件来定义程序中允许的设置项,Settings程序会自动建立接口。Settings Bundle中的plist文件必须遵循特定的格式,不过Xcode会帮助我们遵循这种格式。
1、首先下载初始代码。http://www.oschina.net/code/snippet_164134_10458
由于我们的重点是Settings Bundle的使用,那么建立工程、实现页面跳转等等就不详细说明了。
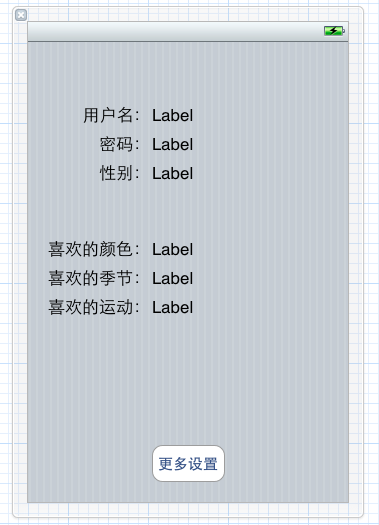
2、解压Settings Bundle Test.zip,使用Xcode 4.3打开此工程,先打开FirstViewController.xib,使用IB向其中添加控件,如下图:
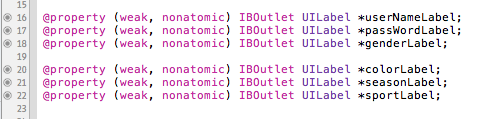
然后为这些标签向FirstViewController.h中建立Outlet映射:
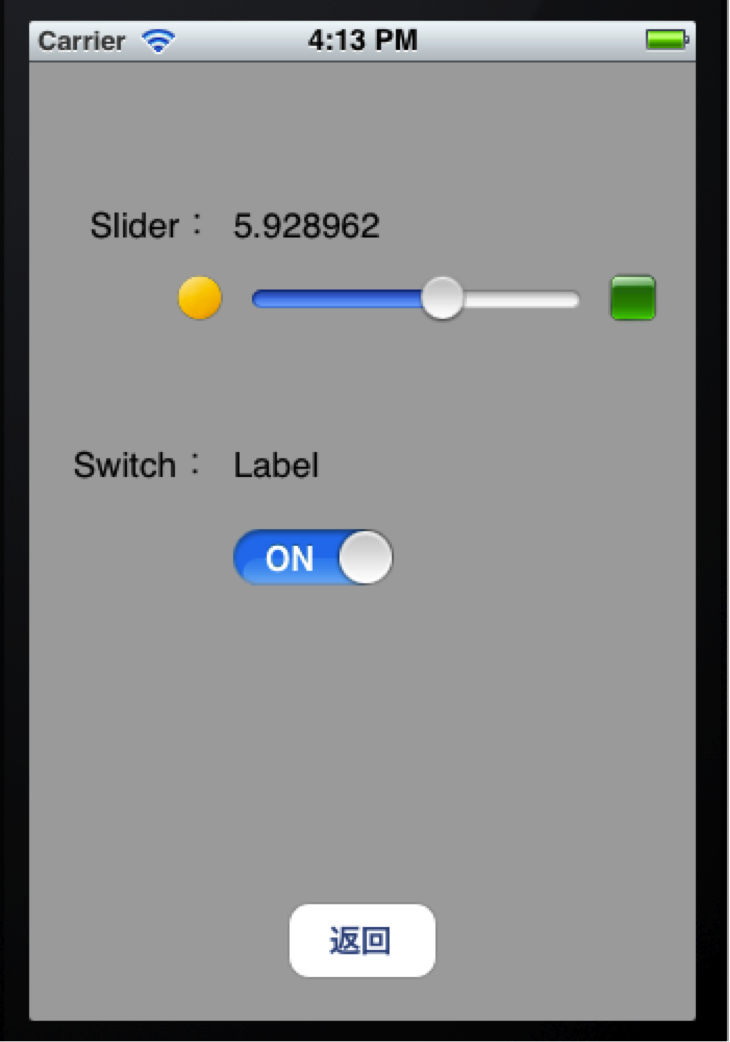
3、打开MoreViewController.xib,向其中添加控件,如下:
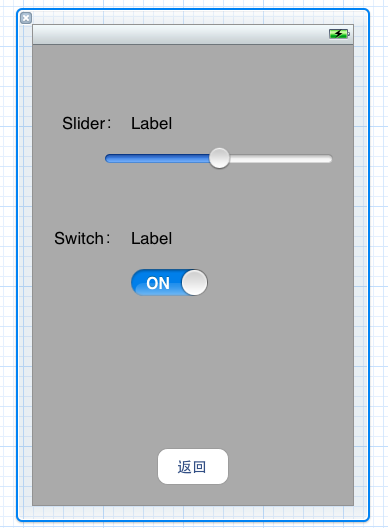
然后,向MoreViewController.h中,为右边的两个Label以及UISlider与UISWitch控件创建Outlet映射,为UISlider与UISWitch控件添加Action映射:

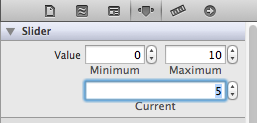
然后在Attribute Insepector中设置UISlider控件最小值、最大值和默认值分别是0、10和5:
将准备好的两张图片添加到工程中,在Attribute Insepector中设置UISlider控件的Min Image与Max Image:
![]()
4、接下来,为程序建立Settings Bundle。依次选择File — New — File…,找到Settings Bundle:
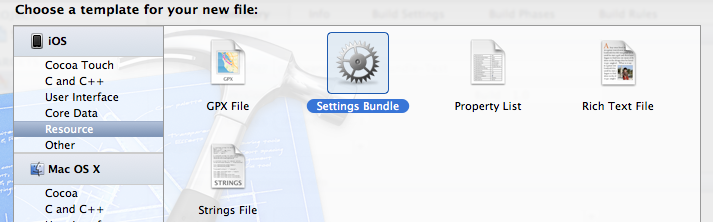
单击Next,设置好名称和分组:
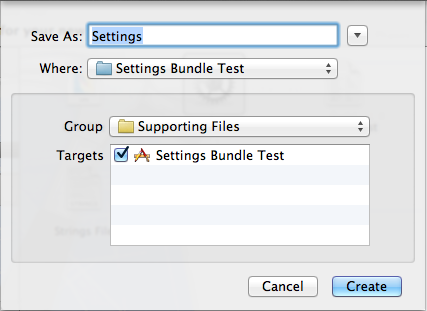
然后单击Create,则创建了Settings.bundle。
5、展开Settings.bundle,其中包含一个Root.plist。Settings程序中的显示项就是从Root.plist中获取的。
单击Root.plist以打开它,在空白处单击,选中Show Raw Keys/Values:
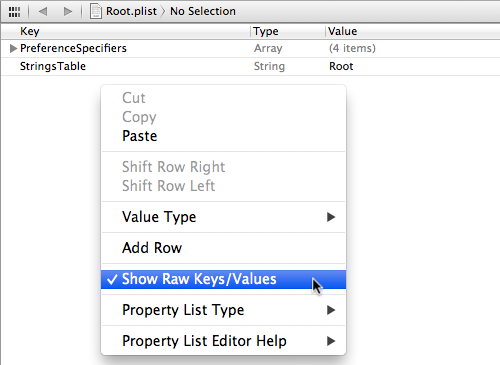
接下来,我们展开PreferenceSpecifiers那一项,删除除了Group之外的其他项。
PreferenceSpecifiers这个对应于刚打开Settings程序时第一页中该应用程序的一个标签,如果此时运行程序,然后在模拟器返回桌面,再打开Settings程序,则其中会出现Settings Bundle Test这一项:
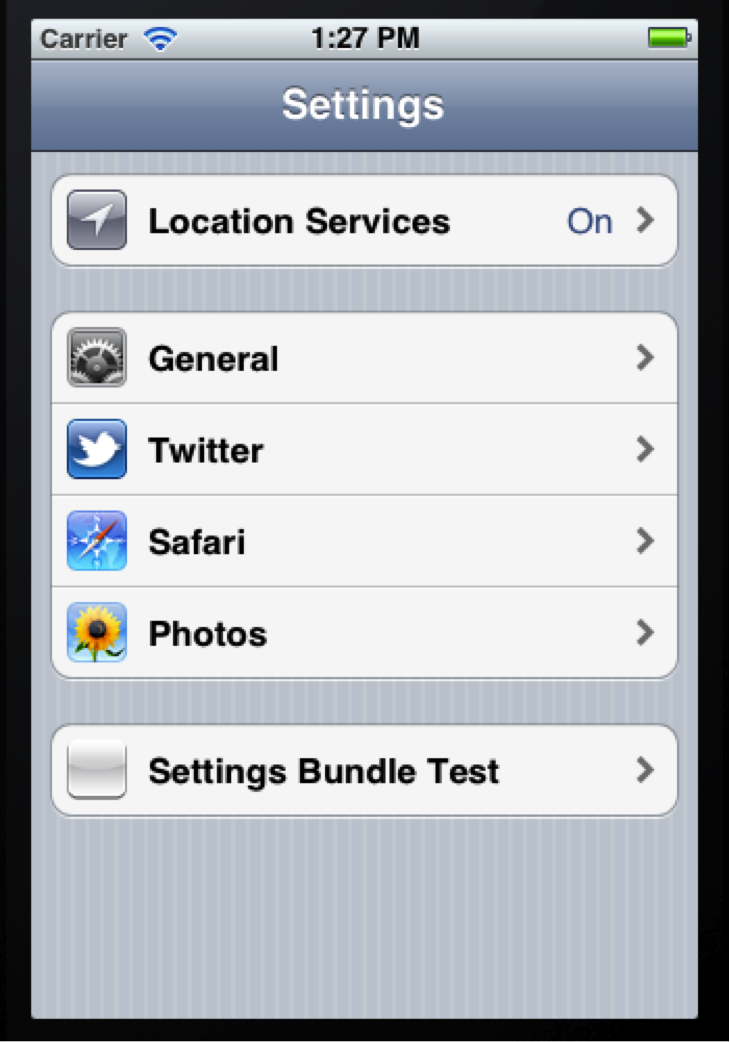
上图中的Settings Bundle Test这一项就可以理解为是从PreferenceSpecifiers获取的。
6、展开PreferenceSpecifiers这一项,先向其中添加三行,每一行的设置如下:

此时运行程序,在Settings程序中单击上图中的Settings Bundle Test那一项,出现的页面如下图:

在Root.plist文件中,Item 0那一项的类型是PSGroupSpecifier,它表示一个分组,则它下面的每Item 1到Item 3都是在这一组,直到下一个PSGroupSpecifier出现。
Item 1与Item 2都是PSTextFieldSpecifier类型的,它们都是文本框,可以通过为其添加子项限制这些文本框的输入。
Item 3是一个多选框,可供选择的值是由Titles与Values决定的,Titles与Values这两项内容是一样的,但是缺一不可。
7、之后,再向其中添加Item 4到Item 7,如下图:

再运行程序,打开Settings程序看看:

8、之后,我们实现在上面左图的下方出现一项“更多设置”,单击此项跳转到新的页面。先创建一个plist文件,名称为MoreSettings.plist,创建方法就不说了吧,参考http://my.oschina.net/plumsoft/blog/42084第二步。注意现在只是创建到工程中而不是Settings.bundle中,想要加到Settings.bundle中还要其他操作,稍后详解。
右击Settings.bundle,选择Show in Finder:

然后在Finder中右击Settings.bundle,选择“显示包含内容”:

在打开的地方将MoreSettings.plist以及上面用到的两张图片拷贝进去。
9、编辑Settings.bundle中的MoreSettings.plist内容如下:
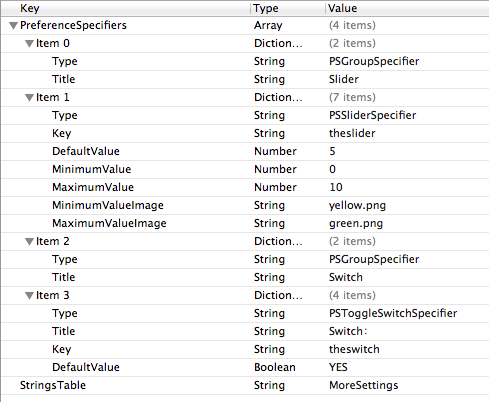
保存后,在Root.plist添加一行:

注意,Item 8的类型是通过选择其子选项Type的类型改变的。
此时运行程序,Settings程序如下:


10、接下来都是代码了。
10.1 在ViewController.h中添加代码:
#define kUserName @"username"
#define kPassWord @"password"
#define kGender @"gender"
#define kFavouriteColor @"favouritecolor"
#define kFavouriteSeason @"favouriteseason"
#define kFavouriteSport @"favouritesport"
#define kTheSlider @"theslider"
#define kTheSwitch @"theswitch"
10.2 在FirstViewController.h与MoreViewController.h中分别声明一个方法,名为
- (void)refreshFields;
在FirstViewController.m中添加代码如下:
- (void)refreshFields {
    NSUserDefaults *defaults = [NSUserDefaults standardUserDefaults];
    self.userNameLabel.text = [defaults objectForKey:kUserName];
    self.passWordLabel.text = [defaults objectForKey:kPassWord];
    self.genderLabel.text = [defaults objectForKey:kGender];
    self.colorLabel.text = [defaults objectForKey:kFavouriteColor];
    self.seasonLabel.text = [defaults objectForKey:kFavouriteSeason];
    self.sportLabel.text = [defaults objectForKey:kFavouriteSport];
}
在MoreViewController.m中添加代码如下:
- (void)refreshFields {
    NSUserDefaults *defaults = [NSUserDefaults standardUserDefaults];
    self.theSwitch.on = [defaults boolForKey:kTheSwitch];
    self.slider.value = [defaults floatForKey:kTheSlider];
    self.sliderValueLabel.text = [[defaults objectForKey:kTheSlider]stringValue];
}
10.3 实现MoreViewController.m中的sliderTapped与switchTapped方法如下:
- (IBAction)sliderTapped:(id)sender {
    NSUserDefaults *defaults = [NSUserDefaults standardUserDefaults];
    [defaults setFloat:self.slider.value forKey:kTheSlider];
    self.sliderValueLabel.text = [[defaults objectForKey:kTheSlider] stringValue];
    [defaults synchronize];
}
- (IBAction)switchTapped:(id)sender {
    NSUserDefaults *defaults = [NSUserDefaults standardUserDefaults];
    [defaults setBool:self.theSwitch.on forKey:kTheSwitch];
    [defaults synchronize];
}
10.4 在FirstViewController.m与MoreViewController.m中@end之前都添加代码:
- (void)applicationWillEnterForeground:(NSNotification *)notification {
    NSUserDefaults *defaults = [NSUserDefaults standardUserDefaults];
    [defaults synchronize];
    [self refreshFields];
}
10.5 在FirstViewController.m与MoreViewController.m的viewDidLoad方法中都添加代码:
[self refreshFields];
UIApplication *app = [UIApplication sharedApplication];
[[NSNotificationCenter defaultCenter] addObserver:self selector:@selector(applicationWillEnterForeground:) name:UIApplicationWillEnterForegroundNotification object:app];
10.6 在FirstViewController.m与MoreViewController.m中的ViewDidUnload方法中都添加代码:
[[NSNotificationCenter defaultCenter] removeObserver:self];
11.7 在ViewController.m的viewDidLoad方法中的[super viewDidLoad];之前添加代码:
//注册默认项
NSDictionary *defaults = [NSDictionary dictionaryWithObjectsAndKeys:
                          [NSNumber numberWithBool:YES], kTheSwitch,
                          [NSNumber numberWithFloat:5.0], kTheSlider,
                          nil];
[[NSUserDefaults standardUserDefaults] registerDefaults:defaults];
11、运行,那么Settings Bundle Test程序中的数据将会随着Settings程序中的选项改变而改变,反过来也是。
例如,在Settings程序中设置如下:
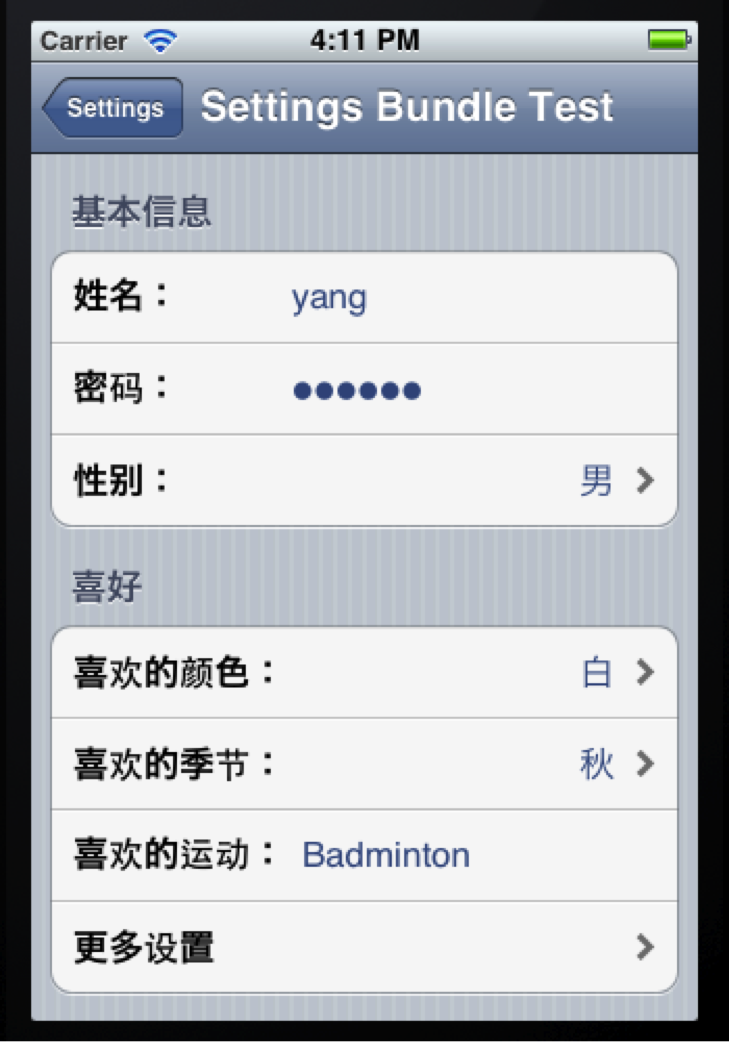

返回Settings Bundle Test程序,显示如下:

不过,第一次运行程序时,单击“更多设置”按钮,Slider与Switch是变形的,然后才会显示正确的值:

真是好事多磨啊。
刚运行程序,第一次单击“更多设置”按钮就会出现上图情况。猜想是因为刚开始ViewController中的moreViewController为空,在页面跳转时才创建它。为此,试试在ViewController.m的viewDidLoad方法的最后一条语句之前添加代码:
self.moreViewController = [[MoreViewController alloc] initWithNibName:@"MoreViewController" bundle:nil];
self.moreViewController.viewController = self;
再运行试试,还是不行。那估计是跟页面跳转时的动态效果有关了。再把ViewController.m的switchViews方法修改如下:
- (void)switchViews {
    if (self.moreViewController.view.superview == nil) {
        if (self.moreViewController == nil) {
            self.moreViewController = [[MoreViewController alloc] initWithNibName:@"MoreViewController" bundle:nil];
            self.moreViewController.viewController = self;
        }
    } else {
        if (self.firstViewController == nil) {
            self.firstViewController = [[FirstViewController alloc] initWithNibName:@"FirstViewController" bundle:nil];
            self.firstViewController.viewController = self;
        }
    }
    [UIView beginAnimations:@"View Flip" context:nil];
    [UIView setAnimationDuration:0.80];
    [UIView setAnimationCurve:UIViewAnimationCurveEaseInOut];
    if (self.moreViewController.view.superview == nil) {
        [UIView setAnimationTransition: UIViewAnimationTransitionFlipFromRight forView:self.view cache:YES];
        [self.firstViewController.view removeFromSuperview];
        [self.view insertSubview:self.moreViewController.view atIndex:0];
    } else {
        [UIView setAnimationTransition: UIViewAnimationTransitionFlipFromRight forView:self.view cache:YES];
        [self.moreViewController.view removeFromSuperview];
        [self.view insertSubview:self.firstViewController.view atIndex:0];
    }
    [UIView commitAnimations];
}
再运行,问题总算解决了。
最终代码:http://www.oschina.net/code/snippet_164134_10484
ref:http://my.oschina.net/plumsoft/blog/56573


 127
127


 被折叠的 条评论
为什么被折叠?
被折叠的 条评论
为什么被折叠?
 到【灌水乐园】发言


