


公司里要求做一个登录注册的界面,要求在两个BUTTON间动态切换界面。当时纠结了半天。于是百度,谷歌之,阅读别人的代码。终于弄出来了。
思想上,可能跟他人的思路一致。但不管如何,自己是把它弄出来了。思路是借鉴他人的,也可以说是抄袭他人的。但代码不是全抄。勉强算是自己的吧。还望各位大人别喷我,骂我。
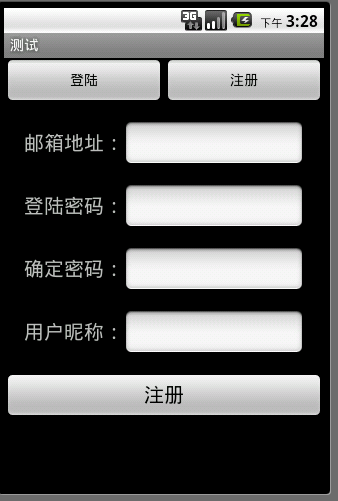
不会做动态的图片。只好截图上传了。

代码如下:
首先设置布局
main.xml,用于首界面的布局
 <?xml version="1.0" encoding="utf-8"?>
<LinearLayout xmlns:android="http://schemas.android.com/apk/res/android"
    android:orientation="vertical"
    android:layout_width="fill_parent"
    android:layout_height="fill_parent">
    <LinearLayout
        android:orientation="horizontal"
        android:layout_width="fill_parent"
        android:layout_height="wrap_content">
        <Button
            android:id="@+id/btn_land"
            android:layout_width="fill_parent"
            android:layout_height="wrap_content"
            android:text="登陆"
            android:layout_weight="1"></Button>
        <Button
            android:id="@+id/btn_regedit"
            android:text="注册"
            android:layout_width="fill_parent"
            android:layout_height="wrap_content"
            android:layout_weight="1"></Button>
        </LinearLayout>
        <LinearLayout
             android:id="@+id/mainLayout"
             android:orientation="vertical"
            android:layout_width="fill_parent"
            android:layout_height="fill_parent"
        ></LinearLayout>
</LinearLayout>
其次是landing.xml,用于登陆界面的布局
<?xml version="1.0" encoding="utf-8"?>
<LinearLayout xmlns:android="http://schemas.android.com/apk/res/android"
    android:orientation="vertical"
    android:id="@+id/lineayLand"
    android:layout_width="fill_parent"
    android:layout_height="fill_parent">
    <LinearLayout
        android:orientation="horizontal"
        android:layout_width="fill_parent"
        android:layout_height="wrap_content">
        <TextView
            android:text="用户名:"
            android:layout_width="wrap_content"
            android:layout_height="wrap_content"></TextView >
        <EditText
            android:id="@+id/et_userName"
            android:layout_width="fill_parent"
            android:inputType="textEmailAddress"
            android:layout_height="wrap_content"></EditText>
        </LinearLayout>
        <LinearLayout
        android:orientation="horizontal"
        android:layout_width="fill_parent"
        android:layout_height="wrap_content">
        <TextView
            android:text="密   码:"
            android:layout_width="wrap_content"
            android:layout_height="wrap_content"></TextView >
        <EditText
            android:id="@+id/et_userPass"
            android:inputType="textPassword"
            android:layout_width="fill_parent"
            android:layout_height="wrap_content"></EditText>
        </LinearLayout>
        <Button
            android:id="@+id/btn_subland"
            android:layout_width="fill_parent"
            android:layout_height="wrap_content"
            android:text="登     陆"></Button>
            <TextView
                android:layout_width="wrap_content"
                android:layout_height="wrap_content"
                android:text="随便看看>>"
            ></TextView>
</LinearLayout>
再次是regedit.xml 用于注册界面的布局
<?xml version="1.0" encoding="utf-8"?>
<LinearLayout xmlns:android="http://schemas.android.com/apk/res/android"
    android:orientation="vertical"
     android:id="@+id/lineayRegeidt"
    android:layout_width="fill_parent"
    android:layout_height="fill_parent">
    <LinearLayout
            android:orientation="horizontal"
            android:layout_width="fill_parent"
            android:layout_marginLeft="20dip"
                android:layout_marginTop="15dip"
            android:layout_marginRight="20dip"
            android:layout_height="wrap_content">
            <TextView
                android:text="邮箱地址:"
                android:textSize="20sp"
                android:layout_width="wrap_content"
                android:layout_height="wrap_content"></TextView>
            <EditText
                android:id="@+id/et_ruserEmailName"
                android:layout_width="fill_parent"
                android:layout_height="wrap_content"
                android:inputType="textEmailAddress"></EditText>
        </LinearLayout>
        <LinearLayout
            android:orientation="horizontal"
            android:layout_width="fill_parent"
            android:layout_marginLeft="20dip"
            android:layout_marginTop="15dip"
            android:layout_marginRight="20dip"
            android:layout_height="wrap_content">
        <TextView
                android:text="登陆密码:"
                android:textSize="20sp"
                android:layout_width="wrap_content"
                android:layout_height="wrap_content"></TextView>
            <EditText
                android:id="@+id/et_rRegistPass"
                android:layout_width="fill_parent"
                android:layout_height="wrap_content"
                android:inputType="textEmailAddress"></EditText>
        </LinearLayout>
        <LinearLayout
            android:orientation="horizontal"
            android:layout_width="fill_parent"
            android:layout_marginLeft="20dip"
                android:layout_marginTop="15dip"
            android:layout_marginRight="20dip"
            android:layout_height="wrap_content">
        <TextView
                android:text="确定密码:"
                android:textSize="20sp"
                android:layout_width="wrap_content"
                android:layout_height="wrap_content"></TextView>
            <EditText
                android:id="@+id/et_rotherPass"
                android:layout_width="fill_parent"
                android:layout_height="wrap_content"
                android:inputType="textEmailAddress"></EditText>
        </LinearLayout>
        <LinearLayout
            android:orientation="horizontal"
            android:layout_width="fill_parent"
            android:layout_marginTop="15dip"
            android:layout_marginLeft="20dip"
            android:layout_marginRight="20dip"
            android:layout_height="wrap_content">
        <TextView
                android:text="用户昵称:"
                android:textSize="20sp"
                android:layout_width="wrap_content"
                android:layout_height="wrap_content"></TextView>
            <EditText
                android:id="@+id/et_ruserOtherName"
                android:layout_width="fill_parent"
                android:layout_height="wrap_content"
                android:inputType="textEmailAddress"></EditText>
        </LinearLayout>
        <LinearLayout
            android:orientation="horizontal"
            android:layout_width="fill_parent"
            android:layout_marginTop="15dip"
            android:layout_height="wrap_content">
            <Button
                android:id="@+id/btn_subRegist"
                android:text="注册"
                android:textSize="20sp"
                android:layout_width="fill_parent"
                android:layout_height="wrap_content"
                android:layout_weight="1"></Button>
        </LinearLayout>
</LinearLayout>
然后再写activity类。
package com.kazeik;

import android.app.Activity;
import android.os.Bundle;
import android.view.LayoutInflater;
import android.view.View;
import android.view.View.OnClickListener;
import android.widget.Button;
import android.widget.EditText;
import android.widget.LinearLayout;
import android.widget.Toast;

public class testActivity extends Activity {
    private LayoutInflater mainLayout = null;
    private LinearLayout landLayout = null;
    private LinearLayout regeditLayout = null;
    LinearLayout mian = null;
    private Button btn_land = null;
    private Button btn_regedit = null;

    /** Called when the activity is first created. */
    @Override
    public void onCreate(Bundle savedInstanceState) {
        super.onCreate(savedInstanceState);
        setContentView(R.layout.main);
        init();
    }

    private void init() {
        mainLayout = LayoutInflater.from(this);
        mian = (LinearLayout) findViewById(R.id.mainLayout);
        showLandinfo();
        btn_land = (Button) findViewById(R.id.btn_land);
        btn_land.setOnClickListener(new OnClickListener() {

            @Override
            public void onClick(View v) {
                showLandinfo();
            }
        });

        btn_regedit = (Button) findViewById(R.id.btn_regedit);
        btn_regedit.setOnClickListener(new OnClickListener() {

            @Override
            public void onClick(View v) {
                // TODO Auto-generated method stub
                showRegeditInfo();
            }
        });
    }

    private void showLandinfo() {
            landLayout = (LinearLayout) mainLayout.inflate(R.layout.landing,
                    null).findViewById(R.id.lineayLand);
            final EditText userName = (EditText) landLayout.getChildAt(0)
                    .findViewById(R.id.et_userName);
            final EditText user = (EditText) landLayout.getChildAt(1)
                    .findViewById(R.id.et_userPass);
            Button btn = (Button) landLayout.getChildAt(2).findViewById(
                    R.id.btn_subland);
            btn.setOnClickListener(new OnClickListener() {

                @Override
                public void onClick(View v) {
                    // TODO Auto-generated method stub
                    System.out.println(userName.getText().toString());
                    System.out.println(user.getText().toString());
                    Toast.makeText(testActivity.this,
                            userName.getText().toString(), Toast.LENGTH_SHORT)
                            .show();
                }
            });
            mian.removeAllViews();
        mian.addView(landLayout);
    }

    private void showRegeditInfo() {
        regeditLayout = (LinearLayout) mainLayout.inflate(R.layout.regedit,
                null).findViewById(R.id.lineayRegeidt);
        // EditText regeUesrName = (EditText) regeditLayout.getChildAt(0);
        mian.removeAllViews();
        mian.addView(regeditLayout);
    }
}
这样便完成了界面的动态切换。写得不好,思路上也是源自于网络。将就着看吧。第一次写这博客。代码都不知道如何上传。


 1125
1125


 被折叠的 条评论
为什么被折叠?
被折叠的 条评论
为什么被折叠?
 到【灌水乐园】发言


