


来自:candycat1992
http://blog.csdn.net/candycat1992/article/details/52067975
写在前面
Unity最强大的地方之一是它扩展性非常强的编辑器。Unite Europe 2016上有一个视频专门讲编辑器编程的:
这里大概记录一下里面的关键点。
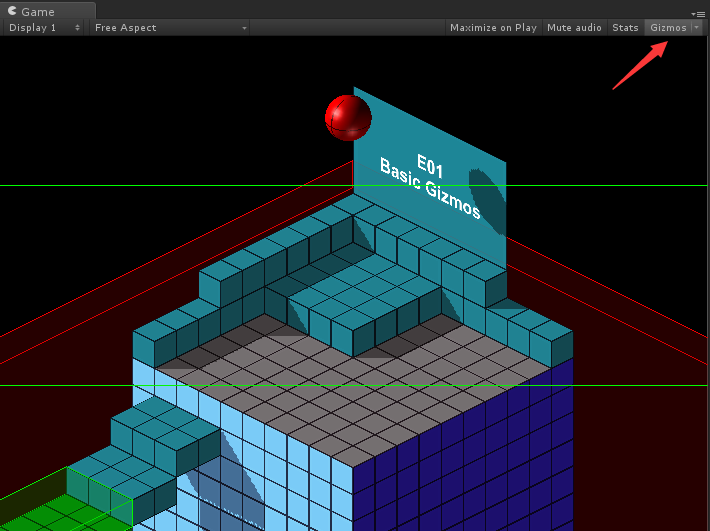
场景一
关注点:
- 绘制重要区域,Gizmos.DrawXXX
- OnDrawGizmos和OnDrawGizmosSelected回调函数
- 点击Gizmos按钮就可以在Game视图也看到线框了
    // OnDrawGizmos()会在编辑器的Scene视图刷新的时候被调用
    // 我们可以在这里绘制一些用于Debug的数据
    void OnDrawGizmos()
    {
        Gizmos.color = new Color( 1f, 0f, 0f, 1f );
        Gizmos.DrawWireCube( transform.position + BoxCollider.center, BoxCollider.size );

        Gizmos.color = new Color( 1f, 0f, 0f, 0.3f );
        Gizmos.DrawCube( transform.position + BoxCollider.center, BoxCollider.size );
    }

    // OnDrawGizmosSelect()类似于OnDrawGizmos(),它会在当该组件所属的物体被选中时被调用
    void OnDrawGizmosSelected()
    {
        Gizmos.color = new Color( 1f, 1f, 0f, 1f );
        Gizmos.DrawWireCube( transform.position + BoxCollider.center, BoxCollider.size );

        Gizmos.color = new Color( 1f, 1f, 0f, 0.3f );
        Gizmos.DrawCube( transform.position + BoxCollider.center, BoxCollider.size );
    }
- 1
- 2
- 3
- 4
- 5
- 6
- 7
- 8
- 9
- 10
- 11
- 12
- 13
- 14
- 15
- 16
- 17
- 18
- 19
- 20
场景二
关注点:
- 组织面板上的参数,添加滑动条、Header、空白等

    [Space( 10 )]
    public float MaximumHeight;
    public float MinimumHeight;

    [Header( "Safe Frame" )]
    [Range( 0f, 1f )]
    public float SafeFrameTop;
    [Range( 0f, 1f )]
    public float SafeFrameBottom;
- 1
- 2
- 3
- 4
- 5
- 6
- 7
- 8
- 9
注意到上面面板的最小面有个Camera Height,调节它可以改变摄像机的高度。这个改变是可以发生在编辑器模式下的,而且也不需要脚本添加ExecuteInEditor。这是通过实现自定义的Editor脚本来实现的:
using UnityEngine;
using UnityEditor;
using System.Collections;

// 我们可以通过为一个类定义它的Editor类型的[CustomEditor]来自定义该类的绘制界面
// 这需要把这个文件放在Editor目录下
[CustomEditor( typeof( GameCamera ) )]
public class GameCameraEditor : Editor
{
    GameCamera m_Target;

    // 重载OnInspectorGUI()来绘制自己的编辑器
    public override void OnInspectorGUI()
    {
        // target可以让我们得到当前绘制的Component对象
        m_Target = (GameCamera)target;

        // DrawDefaultInspector告诉Unity按照默认的方式绘制面板,这种方法在我们仅仅想要自定义某几个属性的时候会很有用
        DrawDefaultInspector();
        DrawCameraHeightPreviewSlider();
    }

    void DrawCameraHeightPreviewSlider()
    {
        GUILayout.Space( 10 );

        Vector3 cameraPosition = m_Target.transform.position;
        cameraPosition.y = EditorGUILayout.Slider( "Camera Height", cameraPosition.y, m_Target.MinimumHeight, m_Target.MaximumHeight );

        if( cameraPosition.y != m_Target.transform.position.y )
        {
            // 改变状态前,使用该方法来记录操作,以便之后Undo
            Undo.RecordObject( m_Target, "Change Camera Height" );
            m_Target.transform.position = cameraPosition;
        }
    }
}
- 1
- 2
- 3
- 4
- 5
- 6
- 7
- 8
- 9
- 10
- 11
- 12
- 13
- 14
- 15
- 16
- 17
- 18
- 19
- 20
- 21
- 22
- 23
- 24
- 25
- 26
- 27
- 28
- 29
- 30
- 31
- 32
- 33
- 34
- 35
- 36
- 37
场景三
关注点:
- 自定义绘制List对象
- 使用serializedObject来修改参数的话Unity会自动有各种帮助函数,例如自动添加Undo功能
- 如果直接修改参数的话,需要使用EditorUtility.SetDirty来告诉Unity需要保存数据
- BeginChangeCheck()和EndChangeCheck()会检测它们之间的GUI有没有被修改,如果修改了的话可以据此修改参数
- Undo.RecordObject可以为下一步修改添加Undo/Redo
- EditorUtility.DisplayDialog可以打开内置对话框
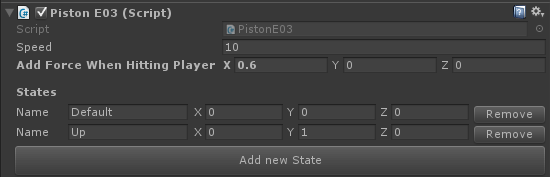
-
首先在面板上隐藏默认的List绘制方法,使用HideInInspector隐藏属性:
public class PistonE03 : MonoBehaviour { public float Speed; public Vector3 AddForceWhenHittingPlayer; //We are hiding this in the inspector because we want to draw our own custom //inspector for it. [HideInInspector] public List<PistonState> States = new List<PistonState>(); ......- 1
- 2
- 3
- 4
- 5
- 6
- 7
- 8
- 9
- 10
-
为了让PistonState可以显示在面板上,需要序列化PistonState:
//[System.Serializable] tells unity to serialize this class if //it's used in a public array or as a public variable in a component [System.Serializable] public class PistonState { public string Name; public Vector3 Position; }- 1
- 2
- 3
- 4
- 5
- 6
- 7
- 8
-
实现自定义的绘制方程:
[CustomEditor( typeof( PistonE03 ) )] public class PistonE03Editor : Editor { PistonE03 m_Target; public override void OnInspectorGUI() { m_Target = (PistonE03)target; DrawDefaultInspector(); DrawStatesInspector(); } //Draw a beautiful and useful custom inspector for our states array void DrawStatesInspector() { GUILayout.Space( 5 ); GUILayout.Label( "States", EditorStyles.boldLabel ); for( int i = 0; i < m_Target.States.Count; ++i ) { DrawState( i ); } DrawAddStateButton(); }- 1
- 2
- 3
- 4
- 5
- 6
- 7
- 8
- 9
- 10
- 11
- 12
- 13
- 14
- 15
- 16
- 17
- 18
- 19
- 20
- 21
- 22
- 23
- 24
- 25
- 26
DrawDefaultInspector:先绘制默认的,DrawStatesInspector:自定义绘制面板函数。- 1
- 2
-
DrawState函数:
void DrawState( int index ) { if( index < 0 || index >= m_Target.States.Count ) { return; } // 在我们的serializedObject中找到States变量 // serializedObject允许我们方便地访问和修改参数,Unity会提供一系列帮助函数。例如,我们可以通过serializedObject来修改组件值,而不是直接修改,Unity会自动创建Undo和Redo功能 SerializedProperty listIterator = serializedObject.FindProperty( "States" ); GUILayout.BeginHorizontal(); { // 如果是在实例化的prefab上修改参数,我们可以模仿Unity默认的途径来让修改过的而且未被Apply的值显示成粗体 if( listIterator.isInstantiatedPrefab == true ) { //The SetBoldDefaultFont functionality is usually hidden from us but we can use some tricks to //access the method anyways. See the implementation of our own EditorGUIHelper.SetBoldDefaultFont //for more info EditorGUIHelper.SetBoldDefaultFont( listIterator.GetArrayElementAtIndex( index ).prefabOverride ); } GUILayout.Label( "Name", EditorStyles.label, GUILayout.Width( 50 ) ); // BeginChangeCheck()和EndChangeCheck()会检测它们之间的GUI有没有被修改 EditorGUI.BeginChangeCheck(); string newName = GUILayout.TextField( m_Target.States[ index ].Name, GUILayout.Width( 120 ) ); Vector3 newPosition = EditorGUILayout.Vector3Field( "", m_Target.States[ index ].Position ); // 如果修改了的话EndChangeCheck()就会返回true,此时我们就可以进行一些操作例如存储变化的数值 if( EditorGUI.EndChangeCheck() ) { //Create an Undo/Redo step for this modification Undo.RecordObject( m_Target, "Modify State" ); m_Target.States[ index ].Name = newName; m_Target.States[ index ].Position = newPosition; // 如果我们直接修改属性,而没有通过serializedObject,那么Unity并不会保存这些数据,Unity只会保存那些标识为dirty的属性 EditorUtility.SetDirty( m_Target ); } EditorGUIHelper.SetBoldDefaultFont( false ); if( GUILayout.Button( "Remove" ) ) { EditorApplication.Beep(); // 可以很方便的显示一个包含特定按钮的对话框,例如是否同意删除 if( EditorUtility.DisplayDialog( "Really?", "Do you really want to remove the state '" + m_Target.States[ index ].Name + "'?", "Yes", "No" ) == true ) { Undo.RecordObject( m_Target, "Delete State" ); m_Target.States.RemoveAt( index ); EditorUtility.SetDirty( m_Target ); } } } GUILayout.EndHorizontal();- 1
- 2
- 3
- 4
- 5
- 6
- 7
- 8
- 9
- 10
- 11
- 12
- 13
- 14
- 15
- 16
- 17
- 18
- 19
- 20
- 21
- 22
- 23
- 24
- 25
- 26
- 27
- 28
- 29
- 30
- 31
- 32
- 33
- 34
- 35
- 36
- 37
- 38
- 39
- 40
- 41
- 42
- 43
- 44
- 45
- 46
- 47
- 48
- 49
- 50
- 51
- 52
- 53
- 54
- 55
- 56
- 57
- 58
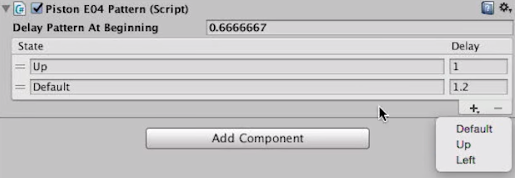
场景四
关注点:
- 可排序的数组面板,通过使用ReorderableList来实现的,以及它的各个回调函数
using UnityEngine;
using UnityEditor;
// UnityEditorInternal是Unity内部使用、还未开放给用用户的一些库,可能有一些很有意思的类,例如ReorderableList,但注意可能会随着新版本发生变化
using UnityEditorInternal;
using System.Collections;

// CanEditMultipleObjects告诉Unity,当我们选择同一种类型的多个组件时,我们自定义的面板是可以支持同时修改所有选中的组件的
// 如果我们在修改参数时使用的是serializedObject,那么这个功能Unity会自动完成的
// 但如果我们是直接使用"target"来访问和修改参数的话,这个变量只能访问到选中的第一个组件
// 此时我们可以使用"targets"来得到所有选中的相同组件
[CanEditMultipleObjects]
[CustomEditor( typeof( PistonE04Pattern ) )]
public class PistonE04PatternEditor : Editor
{
    // UnityEditorInternal中提供了一种可排序的列表面板显示类
    ReorderableList m_List;
    PistonE03 m_Piston;

    // OnEnable会在自定义面板被打开的时候调用,例如当选中一个包含了PistonE04Pattern的gameobject时
    void OnEnable()
    {
        if( target == null )
        {
            return;
        }

        FindPistonComponent();
        CreateReorderableList();
        SetupReoirderableListHeaderDrawer();
        SetupReorderableListElementDrawer();
        SetupReorderableListOnAddDropdownCallback();
    }

    void FindPistonComponent()
    {
        m_Piston = ( target as PistonE04Pattern ).GetComponent<PistonE03>();
    }

    void CreateReorderableList()
    {
        // ReorderableList是一个非常棒的查看数组类型变量的实现类。它位于UnityEditorInternal中,这意味着Unity并没有觉得该类足够好到可以开放给公众
        // 更多关于ReorderableLists的内容可参考:
        // http://va.lent.in/unity-make-your-lists-functional-with-reorderablelist/
        m_List = new ReorderableList(
                        serializedObject,
                        serializedObject.FindProperty( "Pattern" ),
                        true, true, true, true );
    }

    void SetupReoirderableListHeaderDrawer()
    {
        // ReorderableList有一系列回调函数来让我们重载绘制这些数组
        // 这里我们使用drawHeaderCallback来绘制表格的头headers
        // 每个回调会接受一个Rect变量,它包含了该元素绘制的位置
        // 因此我们可以使用这个变量来决定我们把当前的元素绘制在哪里
        m_List.drawHeaderCallback =
            ( Rect rect ) =>
        {
            EditorGUI.LabelField(
                new Rect( rect.x, rect.y, rect.width - 60, rect.height ),
                "State" );
            EditorGUI.LabelField(
                new Rect( rect.x + rect.width - 60, rect.y, 60, rect.height ),
                "Delay" );
        };
    }

    void SetupReorderableListElementDrawer()
    {
        // drawElementCallback会定义列表中的每个元素是如何被绘制的
        // 同样,保证我们绘制的元素是相对于Rect参数绘制的
        m_List.drawElementCallback =
            ( Rect rect, int index, bool isActive, bool isFocused ) =>
        {
            var element = m_List.serializedProperty.GetArrayElementAtIndex( index );
            rect.y += 2;

            float delayWidth = 60;
            float nameWidth = rect.width - delayWidth;

            EditorGUI.PropertyField(
                new Rect( rect.x, rect.y, nameWidth - 5, EditorGUIUtility.singleLineHeight ),
                element.FindPropertyRelative( "Name" ), GUIContent.none );

            EditorGUI.PropertyField(
                new Rect( rect.x + nameWidth, rect.y, delayWidth, EditorGUIUtility.singleLineHeight ),
                element.FindPropertyRelative( "DelayAfterwards" ), GUIContent.none );
        };
    }

    void SetupReorderableListOnAddDropdownCallback()
    {
        // onAddDropdownCallback定义当我们点击列表下面的[+]按钮时发生的事件
        // 在本例里,我们想要显示一个下拉菜单来给出预定义的一些States
        m_List.onAddDropdownCallback =
            ( Rect buttonRect, ReorderableList l ) =>
        {
            if( m_Piston.States == null || m_Piston.States.Count == 0 )
            {
                EditorApplication.Beep();
                EditorUtility.DisplayDialog( "Error", "You don't have any states defined in the PistonE03 component", "Ok" );
                return;
            }

            var menu = new GenericMenu();

            foreach( PistonState state in m_Piston.States )
            {
                menu.AddItem( new GUIContent( state.Name ),
                              false,
                              OnReorderableListAddDropdownClick,
                              state );
            }

            menu.ShowAsContext();
        };
    }

    // 这个回调函数会在用户选择了[+]下拉菜单中的某一项后调用
    void OnReorderableListAddDropdownClick( object target )
    {
        PistonState state = (PistonState)target;

        int index = m_List.serializedProperty.arraySize;
        m_List.serializedProperty.arraySize++;
        m_List.index = index;

        SerializedProperty element = m_List.serializedProperty.GetArrayElementAtIndex( index );
        element.FindPropertyRelative( "Name" ).stringValue = state.Name;
        element.FindPropertyRelative( "DelayAfterwards" ).floatValue = 0f;

        serializedObject.ApplyModifiedProperties();
    }

    public override void OnInspectorGUI()
    {
        GUILayout.Space( 5 );

        EditorGUILayout.PropertyField( serializedObject.FindProperty( "DelayPatternAtBeginning" ) );

        serializedObject.ApplyModifiedProperties();
        serializedObject.Update();

        m_List.DoLayoutList();
        serializedObject.ApplyModifiedProperties();
    }
}
- 1
- 2
- 3
- 4
- 5
- 6
- 7
- 8
- 9
- 10
- 11
- 12
- 13
- 14
- 15
- 16
- 17
- 18
- 19
- 20
- 21
- 22
- 23
- 24
- 25
- 26
- 27
- 28
- 29
- 30
- 31
- 32
- 33
- 34
- 35
- 36
- 37
- 38
- 39
- 40
- 41
- 42
- 43
- 44
- 45
- 46
- 47
- 48
- 49
- 50
- 51
- 52
- 53
- 54
- 55
- 56
- 57
- 58
- 59
- 60
- 61
- 62
- 63
- 64
- 65
- 66
- 67
- 68
- 69
- 70
- 71
- 72
- 73
- 74
- 75
- 76
- 77
- 78
- 79
- 80
- 81
- 82
- 83
- 84
- 85
- 86
- 87
- 88
- 89
- 90
- 91
- 92
- 93
- 94
- 95
- 96
- 97
- 98
- 99
- 100
- 101
- 102
- 103
- 104
- 105
- 106
- 107
- 108
- 109
- 110
- 111
- 112
- 113
- 114
- 115
- 116
- 117
- 118
- 119
- 120
- 121
- 122
- 123
- 124
- 125
- 126
- 127
- 128
- 129
- 130
- 131
- 132
- 133
- 134
- 135
- 136
- 137
- 138
- 139
- 140
- 141
- 142
- 143
- 144
- 145
- 146
- 147
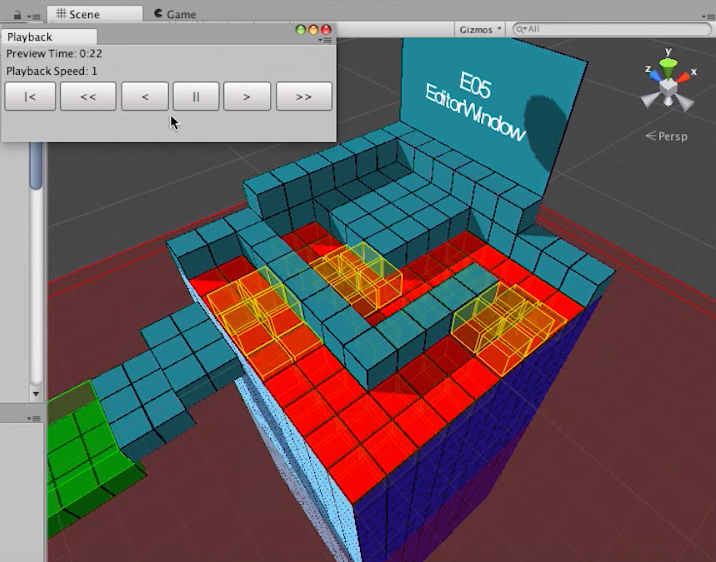
场景五
关注点:
- 实现了一个可以在编辑器状态下预览效果的编辑器窗口
using UnityEngine;
// 要实现自定义窗口需要包含进来UnityEditor
using UnityEditor;
using System.Collections;

// EditorWindow是另一个非常有用的Editor类。我们可以靠它来定义自己的窗口
public class PreviewPlaybackWindow : EditorWindow
{
    // MenuItem可以让我们在菜单栏中打开这个窗口
    [MenuItem( "Window/Preview Playback Window" )]
    static void OpenPreviewPlaybackWindow()
    {
        EditorWindow.GetWindow<PreviewPlaybackWindow>( false, "Playback" );
        // 另一个有用的写法是下面这样
        // 可以让我们访问到窗口的属性,例如定义最小尺寸等
        //EditorWindow window = EditorWindow.GetWindow<PreviewPlaybackWindow>( false, "Playback" );
        //window.minSize = new Vector2(100.0f, 100.0f);
    }

    float m_PlaybackModifier;
    float m_LastTime;

    void OnEnable()
    {
        // Update函数会每秒调用30次来刷新编辑器界面
        // 我们可以据此来注册自己的编辑器Update函数
        EditorApplication.update -= OnUpdate;
        EditorApplication.update += OnUpdate;
    }

    void OnDisable()
    {
        EditorApplication.update -= OnUpdate;
    }

    void OnUpdate()
    {
        if( m_PlaybackModifier != 0f )
        {
            // PreviewTime是自定义的一个类:
            //public class PreviewTime
            //{
            //    public static float Time
            //    {
            //        get
            //        {
            //            if( Application.isPlaying == true )
            //            {
            //                return UnityEngine.Time.timeSinceLevelLoad;
            //            }

            //            // EditorPrefsle类似于PlayerPrefs但只在编辑器状态下工作
            //            // 我们可以据此来存储变量,基本我们关闭了编辑器该变量也可以长久保存
            //            return EditorPrefs.GetFloat( "PreviewTime", 0f );
            //        }
            //        set
            //        {
            //            EditorPrefs.SetFloat( "PreviewTime", value );
            //        }
            //    }
            //}

            // m_PlaybackModifier是用于控制预览播放速率的变量
            // 当它不为0的时候,说明需要刷新界面,更新时间
            PreviewTime.Time += ( Time.realtimeSinceStartup - m_LastTime ) * m_PlaybackModifier;

            // 当预览时间改变时,我们需要确保重绘这个窗口以便我们可以立即看到它的更新
            // 而Unity只会在它认为该窗口需要重绘时(例如我们移动了窗口)才会重绘
            // 因此我们可以调用Repaint函数来强制马上重绘
            Repaint();

            // 由于预览时间发生了变化,我们也希望可以立刻重绘Scene视图的界面
            SceneView.RepaintAll();
        }

        m_LastTime = Time.realtimeSinceStartup;
    }

    void OnGUI()
    {
        // 绘制各个按钮来控制预览时间
        float seconds = Mathf.Floor( PreviewTime.Time % 60 );
        float minutes = Mathf.Floor( PreviewTime.Time / 60 );

        GUILayout.Label( "Preview Time: " + minutes + ":" + seconds.ToString( "00" ) );
        GUILayout.Label( "Playback Speed: " + m_PlaybackModifier );

        GUILayout.BeginHorizontal();
        {
            if( GUILayout.Button( "|<", GUILayout.Height( 30 ) ) )
            {
                PreviewTime.Time = 0f;
                SceneView.RepaintAll();
            }

            if( GUILayout.Button( "<<", GUILayout.Height( 30 ) ) )
            {
                m_PlaybackModifier = -5f;
            }

            if( GUILayout.Button( "<", GUILayout.Height( 30 ) ) )
            {
                m_PlaybackModifier = -1f;
            }

            if( GUILayout.Button( "||", GUILayout.Height( 30 ) ) )
            {
                m_PlaybackModifier = 0f;
            }

            if( GUILayout.Button( ">", GUILayout.Height( 30 ) ) )
            {
                m_PlaybackModifier = 1f;
            }

            if( GUILayout.Button( ">>", GUILayout.Height( 30 ) ) )
            {
                m_PlaybackModifier = 5f;
            }
        }
        GUILayout.EndHorizontal();
    }
}
- 1
- 2
- 3
- 4
- 5
- 6
- 7
- 8
- 9
- 10
- 11
- 12
- 13
- 14
- 15
- 16
- 17
- 18
- 19
- 20
- 21
- 22
- 23
- 24
- 25
- 26
- 27
- 28
- 29
- 30
- 31
- 32
- 33
- 34
- 35
- 36
- 37
- 38
- 39
- 40
- 41
- 42
- 43
- 44
- 45
- 46
- 47
- 48
- 49
- 50
- 51
- 52
- 53
- 54
- 55
- 56
- 57
- 58
- 59
- 60
- 61
- 62
- 63
- 64
- 65
- 66
- 67
- 68
- 69
- 70
- 71
- 72
- 73
- 74
- 75
- 76
- 77
- 78
- 79
- 80
- 81
- 82
- 83
- 84
- 85
- 86
- 87
- 88
- 89
- 90
- 91
- 92
- 93
- 94
- 95
- 96
- 97
- 98
- 99
- 100
- 101
- 102
- 103
- 104
- 105
- 106
- 107
- 108
- 109
- 110
- 111
- 112
- 113
- 114
- 115
- 116
- 117
- 118
- 119
- 120
- 121
- 122
- 123
为了在编辑器状态下可以查看到cube的运动,我们还需要实现OnDrawGizmos来绘制一些线框表示运动。原理就是使用PreviewTime.Time来控制运动。
场景六
关注点:
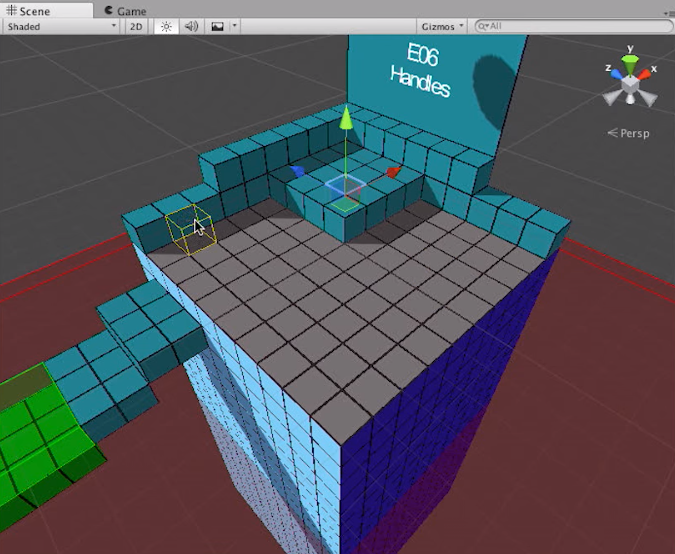
- 在Scene视图中,鼠标的位置绘制特定的Handle
using UnityEngine;
using UnityEditor;
using System.Collections;

// [InitializeOnLoad]可以确保这个类的构造器在编辑器加载时就被调用
[InitializeOnLoad]
public class LevelEditorE06CubeHandle : Editor
{
    public static Vector3 CurrentHandlePosition = Vector3.zero;
    public static bool IsMouseInValidArea = false;

    static Vector3 m_OldHandlePosition = Vector3.zero;

    static LevelEditorE06CubeHandle()
    {
        //The OnSceneGUI delegate is called every time the SceneView is redrawn and allows you
        //to draw GUI elements into the SceneView to create in editor functionality
        // OnSceneGUI委托在Scene视图每次被重绘时被调用
        // 这允许我们可以在Scene视图绘制自定义的GUI元素
        SceneView.onSceneGUIDelegate -= OnSceneGUI;
        SceneView.onSceneGUIDelegate += OnSceneGUI;
    }

    void OnDestroy()
    {
        SceneView.onSceneGUIDelegate -= OnSceneGUI;
    }

    static void OnSceneGUI( SceneView sceneView )
    {
        if( IsInCorrectLevel() == false )
        {
            return;
        }

        bool isLevelEditorEnabled = EditorPrefs.GetBool( "IsLevelEditorEnabled", true );

        //Ignore this. I am using this because when the scene GameE06 is opened we haven't yet defined any On/Off buttons
        //for the cube handles. That comes later in E07. This way we are forcing the cube handles state to On in this scene
        {
            if( UnityEditor.SceneManagement.EditorSceneManager.GetActiveScene().name == "GameE06" )
            {
                isLevelEditorEnabled = true;
            }
        }

        if( isLevelEditorEnabled == false )
        {
            return;
        }

        // 更新Handle的位置
        UpdateHandlePosition();
        // 检查鼠标所在的位置是否有效
        UpdateIsMouseInValidArea( sceneView.position );
        // 检测是否需要重新绘制Handle
        UpdateRepaint();

        DrawCubeDrawPreview();
    }

    //I will use this type of function in many different classes. Basically this is useful to
    //be able to draw different types of the editor only when you are in the correct scene so we
    //can have an easy to follow progression of the editor while hoping between the different scenes
    static bool IsInCorrectLevel()
    {
        return UnityEditor.SceneManagement.EditorSceneManager.GetActiveScene().name == "GameE06"
            || UnityEditor.SceneManagement.EditorSceneManager.GetActiveScene().name == "GameE07"
            || UnityEditor.SceneManagement.EditorSceneManager.GetActiveScene().name == "GameE08"
            || UnityEditor.SceneManagement.EditorSceneManager.GetActiveScene().name == "GameE09";
    }

    static void UpdateIsMouseInValidArea( Rect sceneViewRect )
    {
        // 确保cube handle只在需要的区域内绘制
        // 在本例我们就是当鼠标移动到自定义的GUI上或更低的位置上时,就简单地隐藏掉handle
        bool isInValidArea = Event.current.mousePosition.y < sceneViewRect.height - 35;

        if( isInValidArea != IsMouseInValidArea )
        {
            IsMouseInValidArea = isInValidArea;
            SceneView.RepaintAll();
        }
    }

    static void UpdateHandlePosition()
    {
        if( Event.current == null )
        {
            return;
        }

        Vector2 mousePosition = new Vector2( Event.current.mousePosition.x, Event.current.mousePosition.y );

        Ray ray = HandleUtility.GUIPointToWorldRay( mousePosition );
        RaycastHit hit;

        if( Physics.Raycast( ray, out hit, Mathf.Infinity, 1 << LayerMask.NameToLayer( "Level" ) ) == true )
        {
            Vector3 offset = Vector3.zero;

            if( EditorPrefs.GetBool( "SelectBlockNextToMousePosition", true ) == true )
            {
                offset = hit.normal;
            }

            CurrentHandlePosition.x = Mathf.Floor( hit.point.x - hit.normal.x * 0.001f + offset.x );
            CurrentHandlePosition.y = Mathf.Floor( hit.point.y - hit.normal.y * 0.001f + offset.y );
            CurrentHandlePosition.z = Mathf.Floor( hit.point.z - hit.normal.z * 0.001f + offset.z );

            CurrentHandlePosition += new Vector3( 0.5f, 0.5f, 0.5f );
        }
    }

    static void UpdateRepaint()
    {
        //If the cube handle position has changed, repaint the scene
        if( CurrentHandlePosition != m_OldHandlePosition )
        {
            SceneView.RepaintAll();
            m_OldHandlePosition = CurrentHandlePosition;
        }
    }

    static void DrawCubeDrawPreview()
    {
        if( IsMouseInValidArea == false )
        {
            return;
        }

        Handles.color = new Color( EditorPrefs.GetFloat( "CubeHandleColorR", 1f ), EditorPrefs.GetFloat( "CubeHandleColorG", 1f ), EditorPrefs.GetFloat( "CubeHandleColorB", 0f ) );

        DrawHandlesCube( CurrentHandlePosition );
    }

    static void DrawHandlesCube( Vector3 center )
    {
        Vector3 p1 = center + Vector3.up * 0.5f + Vector3.right * 0.5f + Vector3.forward * 0.5f;
        Vector3 p2 = center + Vector3.up * 0.5f + Vector3.right * 0.5f - Vector3.forward * 0.5f;
        Vector3 p3 = center + Vector3.up * 0.5f - Vector3.right * 0.5f - Vector3.forward * 0.5f;
        Vector3 p4 = center + Vector3.up * 0.5f - Vector3.right * 0.5f + Vector3.forward * 0.5f;

        Vector3 p5 = center - Vector3.up * 0.5f + Vector3.right * 0.5f + Vector3.forward * 0.5f;
        Vector3 p6 = center - Vector3.up * 0.5f + Vector3.right * 0.5f - Vector3.forward * 0.5f;
        Vector3 p7 = center - Vector3.up * 0.5f - Vector3.right * 0.5f - Vector3.forward * 0.5f;
        Vector3 p8 = center - Vector3.up * 0.5f - Vector3.right * 0.5f + Vector3.forward * 0.5f;

        // 我们可以使用Handles类来在Scene视图绘制3D物体
        // 如果实现恰当的话,我们甚至可以和handles进行交互,例如Unity的移动工具
        Handles.DrawLine( p1, p2 );
        Handles.DrawLine( p2, p3 );
        Handles.DrawLine( p3, p4 );
        Handles.DrawLine( p4, p1 );

        Handles.DrawLine( p5, p6 );
        Handles.DrawLine( p6, p7 );
        Handles.DrawLine( p7, p8 );
        Handles.DrawLine( p8, p5 );

        Handles.DrawLine( p1, p5 );
        Handles.DrawLine( p2, p6 );
        Handles.DrawLine( p3, p7 );
        Handles.DrawLine( p4, p8 );
    }
}
- 1
- 2
- 3
- 4
- 5
- 6
- 7
- 8
- 9
- 10
- 11
- 12
- 13
- 14
- 15
- 16
- 17
- 18
- 19
- 20
- 21
- 22
- 23
- 24
- 25
- 26
- 27
- 28
- 29
- 30
- 31
- 32
- 33
- 34
- 35
- 36
- 37
- 38
- 39
- 40
- 41
- 42
- 43
- 44
- 45
- 46
- 47
- 48
- 49
- 50
- 51
- 52
- 53
- 54
- 55
- 56
- 57
- 58
- 59
- 60
- 61
- 62
- 63
- 64
- 65
- 66
- 67
- 68
- 69
- 70
- 71
- 72
- 73
- 74
- 75
- 76
- 77
- 78
- 79
- 80
- 81
- 82
- 83
- 84
- 85
- 86
- 87
- 88
- 89
- 90
- 91
- 92
- 93
- 94
- 95
- 96
- 97
- 98
- 99
- 100
- 101
- 102
- 103
- 104
- 105
- 106
- 107
- 108
- 109
- 110
- 111
- 112
- 113
- 114
- 115
- 116
- 117
- 118
- 119
- 120
- 121
- 122
- 123
- 124
- 125
- 126
- 127
- 128
- 129
- 130
- 131
- 132
- 133
- 134
- 135
- 136
- 137
- 138
- 139
- 140
- 141
- 142
- 143
- 144
- 145
- 146
- 147
- 148
- 149
- 150
- 151
- 152
- 153
- 154
- 155
- 156
- 157
- 158
- 159
- 160
- 161
- 162
- 163
- 164
- 165
- 166
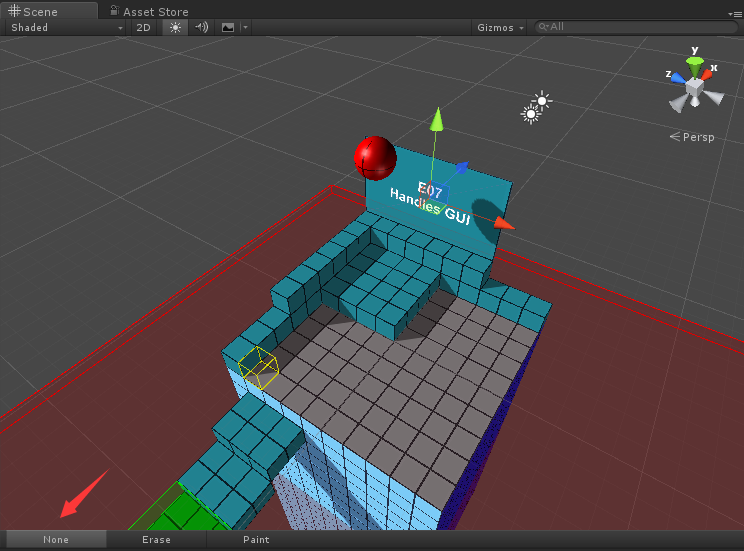
场景七
关注点:
- 在Scene视图绘制自定义的工具条
using UnityEngine;
using UnityEditor;
using System.Collections;

[InitializeOnLoad]
public class LevelEditorE07ToolsMenu : Editor
{
    //This is a public variable that gets or sets which of our custom tools we are currently using
    //0 - No tool selected
    //1 - The block eraser tool is selected
    //2 - The "Add block" tool is selected
    public static int SelectedTool
    {
        get
        {
            return EditorPrefs.GetInt( "SelectedEditorTool", 0 );
        }
        set
        {
            if( value == SelectedTool )
            {
                return;
            }

            EditorPrefs.SetInt( "SelectedEditorTool", value );

            switch( value )
            {
            case 0:
                EditorPrefs.SetBool( "IsLevelEditorEnabled", false );

                Tools.hidden = false;
                break;
            case 1:
                EditorPrefs.SetBool( "IsLevelEditorEnabled", true );
                EditorPrefs.SetBool( "SelectBlockNextToMousePosition", false );
                EditorPrefs.SetFloat( "CubeHandleColorR", Color.magenta.r );
                EditorPrefs.SetFloat( "CubeHandleColorG", Color.magenta.g );
                EditorPrefs.SetFloat( "CubeHandleColorB", Color.magenta.b );

                //Hide Unitys Tool handles (like the move tool) while we draw our own stuff
                Tools.hidden = true;
                break;
            default:
                EditorPrefs.SetBool( "IsLevelEditorEnabled", true );
                EditorPrefs.SetBool( "SelectBlockNextToMousePosition", true );
                EditorPrefs.SetFloat( "CubeHandleColorR", Color.yellow.r );
                EditorPrefs.SetFloat( "CubeHandleColorG", Color.yellow.g );
                EditorPrefs.SetFloat( "CubeHandleColorB", Color.yellow.b );

                //Hide Unitys Tool handles (like the move tool) while we draw our own stuff
                Tools.hidden = true;
                break;
            }
        }
    }

    static LevelEditorE07ToolsMenu()
    {
        SceneView.onSceneGUIDelegate -= OnSceneGUI;
        SceneView.onSceneGUIDelegate += OnSceneGUI;

        // EditorApplication.hierarchyWindowChanged可以让我们知道是否在编辑器加载了一个新的场景
        EditorApplication.hierarchyWindowChanged -= OnSceneChanged;
        EditorApplication.hierarchyWindowChanged += OnSceneChanged;
    }

    void OnDestroy()
    {
        SceneView.onSceneGUIDelegate -= OnSceneGUI;

        EditorApplication.hierarchyWindowChanged -= OnSceneChanged;
    }

    static void OnSceneChanged()
    {
        if( IsInCorrectLevel() == true )
        {
            Tools.hidden = LevelEditorE07ToolsMenu.SelectedTool != 0;
        }
        else
        {
            Tools.hidden = false;
        }
    }

    static void OnSceneGUI( SceneView sceneView )
    {
        if( IsInCorrectLevel() == false )
        {
            return;
        }

        DrawToolsMenu( sceneView.position );
    }

    static bool IsInCorrectLevel()
    {
        return UnityEditor.SceneManagement.EditorSceneManager.GetActiveScene().name == "GameE07"
            || UnityEditor.SceneManagement.EditorSceneManager.GetActiveScene().name == "GameE08"
            || UnityEditor.SceneManagement.EditorSceneManager.GetActiveScene().name == "GameE09";
    }

    static void DrawToolsMenu( Rect position )
    {
        // 通过使用Handles.BeginGUI(),我们可以开启绘制Scene视图的GUI元素
        Handles.BeginGUI();

        //Here we draw a toolbar at the bottom edge of the SceneView
        // 这里我们在Scene视图的底部绘制了一个工具条
        GUILayout.BeginArea( new Rect( 0, position.height - 35, position.width, 20 ), EditorStyles.toolbar );
        {
            string[] buttonLabels = new string[] { "None", "Erase", "Paint" };

            // GUILayout.SelectionGrid提供了一个按钮工具条
            // 通过把它的返回值存储在SelectedTool里可以让我们根据不同的按钮来实现不同的行为
            SelectedTool = GUILayout.SelectionGrid(
                SelectedTool,
                buttonLabels,
                3,
                EditorStyles.toolbarButton,
                GUILayout.Width( 300 ) );
        }
        GUILayout.EndArea();

        Handles.EndGUI();
    }
}
- 1
- 2
- 3
- 4
- 5
- 6
- 7
- 8
- 9
- 10
- 11
- 12
- 13
- 14
- 15
- 16
- 17
- 18
- 19
- 20
- 21
- 22
- 23
- 24
- 25
- 26
- 27
- 28
- 29
- 30
- 31
- 32
- 33
- 34
- 35
- 36
- 37
- 38
- 39
- 40
- 41
- 42
- 43
- 44
- 45
- 46
- 47
- 48
- 49
- 50
- 51
- 52
- 53
- 54
- 55
- 56
- 57
- 58
- 59
- 60
- 61
- 62
- 63
- 64
- 65
- 66
- 67
- 68
- 69
- 70
- 71
- 72
- 73
- 74
- 75
- 76
- 77
- 78
- 79
- 80
- 81
- 82
- 83
- 84
- 85
- 86
- 87
- 88
- 89
- 90
- 91
- 92
- 93
- 94
- 95
- 96
- 97
- 98
- 99
- 100
- 101
- 102
- 103
- 104
- 105
- 106
- 107
- 108
- 109
- 110
- 111
- 112
- 113
- 114
- 115
- 116
- 117
- 118
- 119
- 120
- 121
- 122
- 123
- 124
- 125
- 126
- 127
- 128
场景八
关注点:
- 可以在场景七的基础上,点击相应按钮后增加或删除Cube
新的编辑器脚本逻辑和场景七类似,重点在于回调函数OnSceneGUI:
static void OnSceneGUI(SceneView sceneView)
{
    if (IsInCorrectLevel() == false)
    {
        return;
    }

    if (LevelEditorE07ToolsMenu.SelectedTool == 0)
    {
        return;
    }

    // 通过创建一个新的ControlID我们可以把鼠标输入的Scene视图反应权从Unity默认的行为中抢过来
    // FocusType.Passive意味着这个控制权不会接受键盘输入而只关心鼠标输入
    int controlId = GUIUtility.GetControlID(FocusType.Passive);

    // 如果是鼠标左键被点击同时没有其他特定按键按下的话
    if (Event.current.type == EventType.mouseDown &&
        Event.current.button == 0 &&
        Event.current.alt == false &&
        Event.current.shift == false &&
        Event.current.control == false)
    {
        if (LevelEditorE06CubeHandle.IsMouseInValidArea == true)
        {
            if (LevelEditorE07ToolsMenu.SelectedTool == 1)
            {
                // 如果选择的是erase按键(从场景七的静态变量SelectedTool判断得到),移除Cube
                RemoveBlock(LevelEditorE06CubeHandle.CurrentHandlePosition);
            }

            if (LevelEditorE07ToolsMenu.SelectedTool == 2)
            {
                /// 如果选择的是add按键(从场景七的静态变量SelectedTool判断得到),添加Cube
                AddBlock(LevelEditorE06CubeHandle.CurrentHandlePosition);
            }
        }
    }

    // 如果按下了Escape,我们就自动取消选择当前的按钮
    if (Event.current.type == EventType.keyDown &&
        Event.current.keyCode == KeyCode.Escape)
    {
        LevelEditorE07ToolsMenu.SelectedTool = 0;
    }

    // 把我们自己的controlId添加到默认的control里,这样Unity就会选择我们的控制权而非Unity默认的Scene视图行为
    HandleUtility.AddDefaultControl(controlId);
}
- 1
- 2
- 3
- 4
- 5
- 6
- 7
- 8
- 9
- 10
- 11
- 12
- 13
- 14
- 15
- 16
- 17
- 18
- 19
- 20
- 21
- 22
- 23
- 24
- 25
- 26
- 27
- 28
- 29
- 30
- 31
- 32
- 33
- 34
- 35
- 36
- 37
- 38
- 39
- 40
- 41
- 42
- 43
- 44
- 45
- 46
- 47
- 48
- 49
场景九
关注点:
- 使用Scriptable Object把一些Prefab预览在Scene视图上
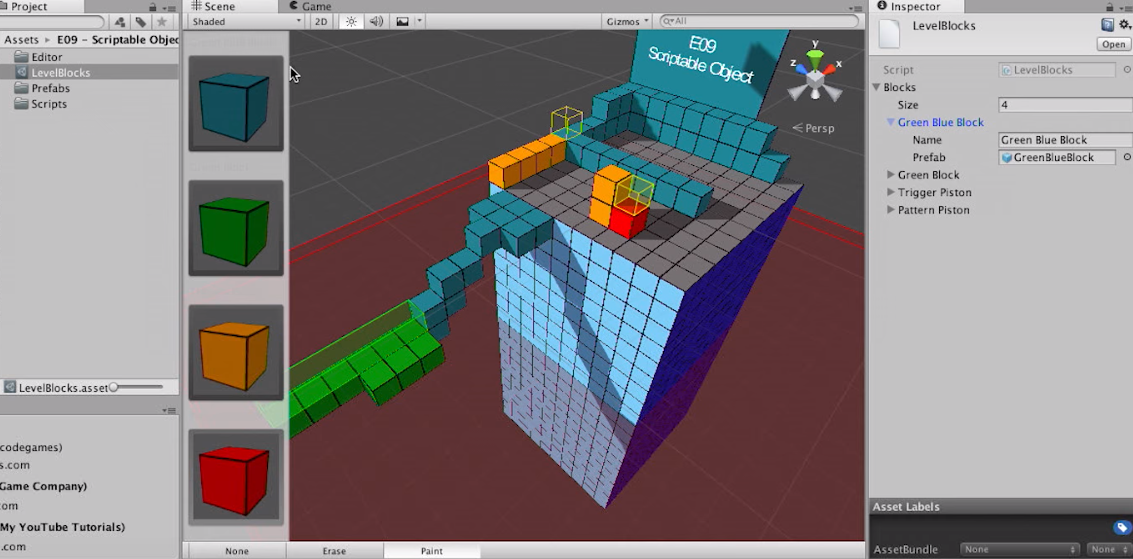
Scriptable Object是一个相当于自定义Assets对象的类。下面是LevelBlocks的定义。它包含了一个LevelBlockData的数组来存储可选的Prefab对象。
using UnityEngine;
using System.Collections;
using System.Collections.Generic;

//[System.Serializable] tells unity to serialize this class if
//it's used in a public array or as a public variable in a component
[System.Serializable]
public class LevelBlockData
{
    public string Name;
    public GameObject Prefab;
}

//[CreateAssetMenu] creates an entry in the default Create menu of the ProjectView so you can easily create an instance of this ScriptableObject
[CreateAssetMenu]
public class LevelBlocks : ScriptableObject
{
    //This ScriptableObject simply stores a list of blocks. It kind of acts like a database in that it stores rows of data
    public List<LevelBlockData> Blocks = new List<LevelBlockData>();
}
- 1
- 2
- 3
- 4
- 5
- 6
- 7
- 8
- 9
- 10
- 11
- 12
- 13
- 14
- 15
- 16
- 17
- 18
- 19
- 20
我们之后就可以在Hierency视图创建一个LevelBlock资源,Editor类则会加载这个资源来得到相应的数据。
static LevelEditorE09ScriptableObject()
{
    SceneView.onSceneGUIDelegate -= OnSceneGUI;
    SceneView.onSceneGUIDelegate += OnSceneGUI;

    //Make sure we load our block database. Notice the path here, which means the block database has to be in this specific location so we can find it
    //LoadAssetAtPath is a great way to load an asset from the project
    m_LevelBlocks = AssetDatabase.LoadAssetAtPath<LevelBlocks>( "Assets/E09 - Scriptable Object/LevelBlocks.asset" );
}
- 1
- 2
- 3
- 4
- 5
- 6
- 7
- 8
- 9
Unite 2016上还有另一个专门讲Scriptable Object的视频,强烈建议看一下:


 3万+
3万+


 被折叠的 条评论
为什么被折叠?
被折叠的 条评论
为什么被折叠?
 到【灌水乐园】发言


