


由于前段时间项目中使用到了自动换行的线性布局,本来打算用表格布局在里面一个个的用Java代码添加ImageView的,但是添加的View控件是不确定的,因为得靠服务器的数据返回,就这样手动用Java代码画布局的方式就这样夭折了,因为在表哥布局中我无法确定一行显示多少个ImageView的数目,所以无法动态添加,最后自能自己去看看那种能够换行的线性布局了,线性布局比较不好的是不能自动换行,也就是当设置LinearLayout的orentation 设置为vertical 为竖直方向也就是只有一列,每行只能显示一个View或者View的子类,当设置LinearLayout的orentitation为Horizontal,LinearLayout的只能显示为一行,横向显示,当屏幕满了的时候,View控件并不会自动换行,所以我们要做的就是在LinearLayout满的时候自动换行。
需要了解的是怎么样绘制根据子控件的长宽绘制父控件的宽度与高度,所以需要传入的参数控件的高度,视图分为两种一种是View类型的,代表控件有TextView,Button,EditText 等等,还有一种是装视图的容器控件继承自ViewGroup的控件,如LinearLayout,RelativeLayout,TabHost等等控件,需要自动换行的线性布局的话,就需要根据子控件的高度与宽度,来动态加载父控件的高度与宽度,所以需要在构造函数中传入每一个子控件的固定的高度,或者是动态设置子控件的高度与宽度。
将自定义的LinearLayout 也继承自ViewGroup 并且重写抽象类ViewGrouop的几个方法:onMeasure(),onLayout(),dispathDraw() 三个方法的意思分别是:第一个onMeasure()是用来计算控件以及子控件所占用的区域,第二个onLayout()是控制子控件的换行,第三个可写可不写,主要是用来绘制控件的边框,
自定义LinearLayout的代码如下:
- package com.huanglong.mylinearlayout;
- import android.content.Context;
- import android.graphics.Canvas;
- import android.graphics.Color;
- import android.graphics.Paint;
- import android.graphics.Rect;
- import android.util.AttributeSet;
- import android.view.View;
- import android.view.ViewGroup;
- /**
- * @author huanglong 2013-5-28 自定义自动换行LinearLayout
- */
- public class FixGridLayout extends ViewGroup {
- private int mCellWidth;
- private int mCellHeight;
- public FixGridLayout(Context context) {
- super(context);
- }
- public FixGridLayout(Context context, AttributeSet attrs) {
- super(context, attrs);
- }
- public FixGridLayout(Context context, AttributeSet attrs, int defStyle) {
- super(context, attrs, defStyle);
- }
- public void setmCellWidth(int w) {
- mCellWidth = w;
- requestLayout();
- }
- public void setmCellHeight(int h) {
- mCellHeight = h;
- requestLayout();
- }
- /**
- * 控制子控件的换行
- */
- @Override
- protected void onLayout(boolean changed, int l, int t, int r, int b) {
- int cellWidth = mCellWidth;
- int cellHeight = mCellHeight;
- int columns = (r - l) / cellWidth;
- if (columns < 0) {
- columns = 1;
- }
- int x = 0;
- int y = 0;
- int i = 0;
- int count = getChildCount();
- for (int j = 0; j < count; j++) {
- final View childView = getChildAt(j);
- // 获取子控件Child的宽高
- int w = childView.getMeasuredWidth();
- int h = childView.getMeasuredHeight();
- // 计算子控件的顶点坐标
- int left = x + ((cellWidth - w) / 2);
- int top = y + ((cellHeight - h) / 2);
- // int left = x;
- // int top = y;
- // 布局子控件
- childView.layout(left, top, left + w, top + h);
- if (i >= (columns - 1)) {
- i = 0;
- x = 0;
- y += cellHeight;
- } else {
- i++;
- x += cellWidth;
- }
- }
- }
- /**
- * 计算控件及子控件所占区域
- */
- @Override
- protected void onMeasure(int widthMeasureSpec, int heightMeasureSpec) {
- // 创建测量参数
- int cellWidthSpec = MeasureSpec.makeMeasureSpec(mCellWidth, MeasureSpec.AT_MOST);
- int cellHeightSpec = MeasureSpec.makeMeasureSpec(mCellHeight, MeasureSpec.AT_MOST);
- // 记录ViewGroup中Child的总个数
- int count = getChildCount();
- // 设置子空间Child的宽高
- for (int i = 0; i < count; i++) {
- View childView = getChildAt(i);
- /*
- * 090 This is called to find out how big a view should be. 091 The
- * parent supplies constraint information in the width and height
- * parameters. 092 The actual mesurement work of a view is performed
- * in onMeasure(int, int), 093 called by this method. 094 Therefore,
- * only onMeasure(int, int) can and must be overriden by subclasses.
- * 095
- */
- childView.measure(cellWidthSpec, cellHeightSpec);
- }
- // 设置容器控件所占区域大小
- // 注意setMeasuredDimension和resolveSize的用法
- setMeasuredDimension(resolveSize(mCellWidth * count, widthMeasureSpec),
- resolveSize(mCellHeight * count, heightMeasureSpec));
- // setMeasuredDimension(widthMeasureSpec, heightMeasureSpec);
- // 不需要调用父类的方法
- // super.onMeasure(widthMeasureSpec, heightMeasureSpec);
- }
- /**
- * 为控件添加边框
- */
- @Override
- protected void dispatchDraw(Canvas canvas) {
- // 获取布局控件宽高
- int width = getWidth();
- int height = getHeight();
- // 创建画笔
- Paint mPaint = new Paint();
- // 设置画笔的各个属性
- mPaint.setColor(Color.BLUE);
- mPaint.setStyle(Paint.Style.STROKE);
- mPaint.setStrokeWidth(10);
- mPaint.setAntiAlias(true);
- // 创建矩形框
- Rect mRect = new Rect(0, 0, width, height);
- // 绘制边框
- canvas.drawRect(mRect, mPaint);
- // 最后必须调用父类的方法
- super.dispatchDraw(canvas);
- }
- }
- package com.huanglong.mylinearlayout;
- import android.os.Bundle;
- import android.app.Activity;
- import android.view.Menu;
- import android.view.MenuItem;
- import android.widget.CheckBox;
- import android.widget.SimpleAdapter;
- import android.support.v4.app.NavUtils;
- public class MainActivity extends Activity {
- private SimpleAdapter adapter;
- @Override
- public void onCreate(Bundle savedInstanceState) {
- super.onCreate(savedInstanceState);
- setContentView(R.layout.activity_main);
- FixGridLayout fixGridLayout = (FixGridLayout) findViewById(R.id.ll);
- fixGridLayout.setmCellHeight(30);
- fixGridLayout.setmCellWidth(100);
- for (int i = 0; i < 7; i++) {
- CheckBox box = new CheckBox(MainActivity.this);
- box.setText("第"+i+"个");
- fixGridLayout.addView(box);
- }
- }
- @Override
- public boolean onCreateOptionsMenu(Menu menu) {
- getMenuInflater().inflate(R.menu.activity_main, menu);
- return true;
- }
- }
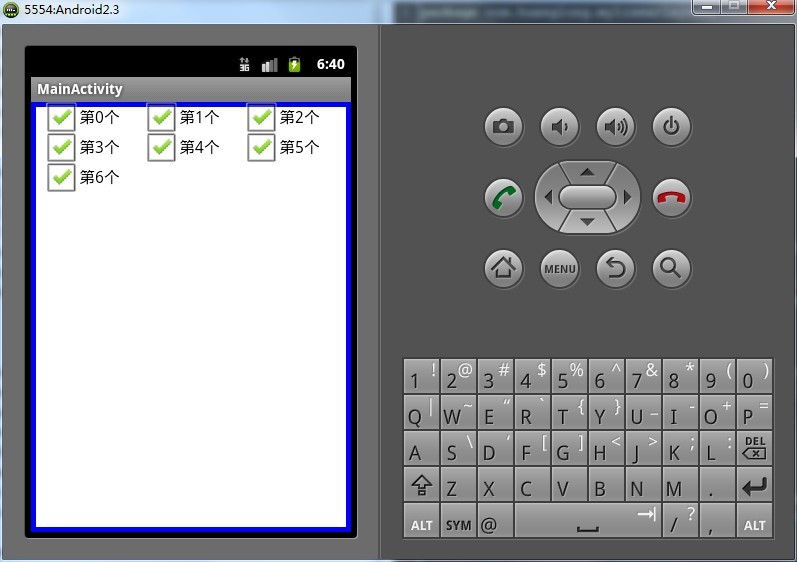
效果截图:


 230
230


 被折叠的 条评论
为什么被折叠?
被折叠的 条评论
为什么被折叠?
 到【灌水乐园】发言


