


原文:UICollectionView Tutorial: Reusable Views, Selection, and Reordering
作者:Bradley Johnson
译者:kmyhy注:本文由 Bardley Johnson 升级至 Swift 和 iOS 9,原文作者是 Brandon Trebitowski。
在第一部分教程中,你学习了如何用 UICollectionView 以网格的形式显示图片。
在第二部分,你将继续学习如何与 UICollectionView 交互以及定制它的 header。我们将继续利用第一部分教程中的项目。打开你的项目或者上节课中的 FlickrSearch 然后开始。 你还是需要使用上节课中用到新的 API key。如果你学习上节课的时候已经隔了一段时间了,那么你还需要重新获得一个 API key。
添加 header
这个 app 每搜索一次就添加一个 section。最好将每个搜索的结果集放在单独的 section 里展示。让用户更加清楚这些照片都是关于什么的。
我们将使用 UICollectionReusableView 来创建 header。这个类就像 Collection View Cell(事实上,cell 也继承了这个类),但它是用来表示别的东西比如 header 或 footer。
这个 View 可以通过故事板创建,然后连接到某个自定义类上。打开 File\New\File… 菜单,选择 iOS\Source\Cocoa Touch Class 模板,然后点 Next,类名命名为 FlickrPhotoHeaderView ,继承自 UICollectionReusableView。点击 Next、Create ,保存文件。
打开 MainStoryboard.storyboard ,从左边的 Scene 面板中点击 collection view ( 可能需要从根视图往下展开若干层级)。打开属性面板,勾选 Accessories 下面的 Section Header:
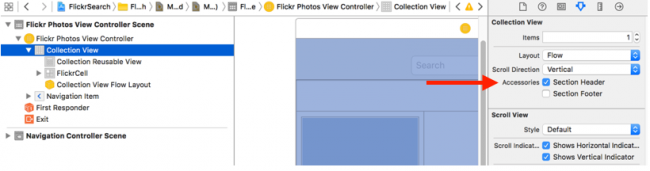
查看左边 Scene 面板,你会发现在 Collection View 下方增加了一个 “Collection Reusable View” 。点击这个 Collection Reusable View ,你就可以在里面添加 subview 了。
现在扩大一下它的空间,点击底部的白色拉柄向下拉,让它有 90 像素高。(或者在 Size 面板中修改大小)。
拖一个 Label 到 header上,将它居中对齐到导线。字体修改为 System 32.0,然后使用 Alignment 菜单,将它和 container view 水平和垂直对齐并 update frame:

选中 header,打开 Identity 面板,将 Class 设为 FlickrPhotoHeaderView。
打开属性面板,背景色设为 Group Table View Background Color,将 Identifier 设为 FlickrPhotoHeaderView。这个Identity 将在重用 Header View 时用到。
打开助手编辑器,源代码窗口中打开 FlickrPhotoHeaderView.swift ,右键从 label 拖一条线到源文件中,创建一个 IBOutlet,命名为 label:
class FlickrPhotoHeaderView: UICollectionReusableView {
  @IBOutlet weak var label: UILabel!
}
如果你这时运行程序,你还看不见 header(它仅仅是空白的一条,上面写着“Label”)。你还需要实现另外一个数据源方法。打开 FlickrPhotosViewController.swift 在 UICollectionViewDataSource 扩展的collectionView(_:numberOfItemsInSection:) 方法下加入这个方法:
override func collectionView(collectionView: UICollectionView,
                             viewForSupplementaryElementOfKind kind: String,
                             atIndexPath indexPath: NSIndexPath) -> UICollectionReusableView {
  //1
  switch kind {
  //2
  case UICollectionElementKindSectionHeader:
    //3
    let headerView = collectionView.dequeueReusableSupplementaryViewOfKind(kind,
                       withReuseIdentifier: "FlickrPhotoHeaderView",
                       forIndexPath: indexPath) as! FlickrPhotoHeaderView
    headerView.label.text = searches[indexPath.section].searchTerm
    return headerView
  default:
    //4
    assert(false, "Unexpected element kind")
  }
}
这个方法和 cellForItemAtIndexPath 方法相似,只不过是用在补充视图上。代码解释如下:
- layout 对象 kind 参数表明这个方法是针对哪一种类型的补充视图。
- UICollectionElementKindSectionHeader 是属于流式布局的一种补充视图。通过勾选故事版编辑器中的选项,我们增加了这种类型的补充视图——section header,同时流式布局就知道需要去请求哪一种类型的视图。还有一种补充视图是 UICollectionElementKindSectionFooter, 但是我们现在没有用到。如果你采用的不是流式布局,那你可以不用 header 和 footer。
- header 视图通过在故事板中指定的 identifier 进行重用。这种机制类似于 cell。标签上的文本会被搜索关键字替代。
- 用一个断言告诉其它开发者(包括以后的你)除了 header view 之外,你不会提供别的视图了。
运行程序。你会看到你的 UI 接近完成了。如果你进行多次搜索,你会发现每个结果集都有一个漂亮的 section header。另外当你旋转屏幕——注意看布局,包括 header,都会自适应,不需要进行额外的工作。

和 cell 进行交互
在本课的最后一部分,你将学习与 cell 的交互。有 3 种不同的方式。第一种是显示一个大图。第二种是通过多选进行分享。第三种是允许用户通过拖动重排图片。
单选
Collection View 可以动态修改它们的布局。你的第一个任务是当 item 被点击时显示大图。
首先,要加一个属性,保存当前被点击的 cell。打开 FlickrPhotosViewController.swift ,在 itemPerRow 之下添加属性:
//1
var largePhotoIndexPath: NSIndexPath? {
  didSet {
    //2
    var indexPaths = [NSIndexPath]()
    if let largePhotoIndexPath = largePhotoIndexPath {
      indexPaths.append(largePhotoIndexPath)
    }
    if let oldValue = oldValue {
      indexPaths.append(oldValue)
    }
    //3
    collectionView?.performBatchUpdates({
      self.collectionView?.reloadItemsAtIndexPaths(indexPaths)
    }) { completed in
      //4
      if let largePhotoIndexPath = self.largePhotoIndexPath {
        self.collectionView?.scrollToItemAtIndexPath(
          largePhotoIndexPath,
          atScrollPosition: .CenteredVertically,
          animated: true)
      }
    }
  }
}
代码解释如下:
- largePhotoIndexPath 是一个可空变量,保存了当前点击到的图片的 Index Path,如果它存在的话。
- 当这个属性改变,Collection View 需要刷新。利用 didSet 属性观察器能被很方便地做到这一点。这里有两个 cell 需要改变,用户当前点击的 cell 和之前点击过另一个 cell,或者用户是再次点击第一次点击的 cell,这些 cell 的大小需要改变。
- performBatchUpdates 能够以动画块的方式改变 Collection View。 在动画块中,你刷新受影响的 cell。
- 当动画结束,将变大的 cell 滚动到屏幕中央。
你也许会问,怎样让 cell 变大?请稍等一分钟!
点击 cell 时会让 Cellection View 去调用 cell 选中方法。你想知道是哪个 cell 被点击,可以修改 largeIndexPath 属性,当然你并不想真的选择这个 cell,因为之后我们要做多选,那会让我们混淆。UICollectionViewDelegate 为你想到了这一点。Collection View 会询问 delegate 某个 cell 是否能够被选中。打开 FlickrPhotosViewController.swift, 在 UICollectionViewDataSource 扩展中新增方法:
// MARK: - UICollectionViewDelegate
extension FlickrPhotosViewController {

  override func collectionView(collectionView: UICollectionView,
                               shouldSelectItemAtIndexPath indexPath: NSIndexPath) -> Bool {

    largePhotoIndexPath = largePhotoIndexPath == indexPath ? nil : indexPath
    return false
  }
}
这个方法非常简单。如果点击的 cell 已经是一个大图,设置 largePhotoIndexPath 属性为 nil,否则设置为所点的 cell 的 IndexPath。这将调用这个属性的属性观察器,在这个方法中刷新受影响的 cell。
要让点击的 cell 变大,你需要修改 sizeForItemAtIndexPath 委托方法。在这个方法中使用如下代码:
// 新增代码
if indexPath == largePhotoIndexPath {
  let flickrPhoto = photoForIndexPath(indexPath)
  var size = collectionView.bounds.size
  size.height -= topLayoutGuide.length
  size.height -= (sectionInsets.top + sectionInsets.right)
  size.width -= (sectionInsets.left + sectionInsets.right)
  return flickrPhoto.sizeToFillWidthOfSize(size)
}
这里将 cell 的大小设置为尽可能占据整个 Collection View 大小,同时保持它的宽高比。除非你要显示更大的图片,否则没必要将 cell 弄得很大。
打开 Main.storyboard,拖入一个 Activity Indicator 到 cell 的 Image View 上。在属性面板中,将 Style 设置为 Large White 并勾选 Hides When Stopped 。将 Indicator 拖在 cell 的中央(这时导线出现),然后使用 Alignment 菜单,选择水平和垂直居中于 Container。

打开助手编辑器,右键,从 Activity Indicator 拖一条线到 FlickrPhotoCell.swift,创建一个 Outlet,命名为 activitIndicator:
@IBOutlet weak var activityIndicator: UIActivityIndicatorView!
同样在 FlickrPhotoCell.swift 中,添加下一个属性观察器,指定 cell 的背景色,然后调用属性观察器:
// MARK: - Properties
override var selected: Bool {
  didSet {
    imageView.layer.borderWidth = selected ? 10 : 0
  }
}

// MARK: - View Life Cycle
override func awakeFromNib() {
  super.awakeFromNib()
  imageView.layer.borderColor = themeColor.CGColor
  selected = false
}
然后,打开 FlickrPhotosViewController.swift 修改 collectionView(_:cellForItemAtIndexPath:) 方法为:
override func collectionView(collectionView: UICollectionView,
                             cellForItemAtIndexPath indexPath: NSIndexPath) -> UICollectionViewCell {

  let cell = collectionView.dequeueReusableCellWithReuseIdentifier(
               reuseIdentifier, forIndexPath: indexPath) as! FlickrPhotoCell
  var flickrPhoto = photoForIndexPath(indexPath)

  //1
  cell.activityIndicator.stopAnimating()

  //2
  guard indexPath == largePhotoIndexPath else {
    cell.imageView.image = flickrPhoto.thumbnail
    return cell
  }

  //3
  guard flickrPhoto.largeImage == nil else {
    cell.imageView.image = flickrPhoto.largeImage
    return cell
  }

  //4
  cell.imageView.image = flickrPhoto.thumbnail
  cell.activityIndicator.startAnimating()

  //5
  flickrPhoto.loadLargeImage { loadedFlickrPhoto, error in

    //6
    cell.activityIndicator.stopAnimating()

    //7
    guard loadedFlickrPhoto.largeImage != nil && error == nil else {
      return
    }

    //8
    if let cell = collectionView.cellForItemAtIndexPath(indexPath) as? FlickrPhotoCell
                  where indexPath == self.largePhotoIndexPath  {
      cell.imageView.image = loadedFlickrPhoto.largeImage
    }
  }

  return cell
}
代码有点长,我们分别解释如下:
- 停止 Activity 的旋转——以便重用先前正在加载图片的 cell。
- 这部分和之前的一样。如果没有找到当前 cell 的大图,那么将它设置为缩略图并返回。
- 如果已经加载到大图,设置它为大图并返回。
- 如果执行到这一步,说明你想要查看大图,但它还没下载。先使用缩略图,然后让 Activity 开始旋转。缩略图会被拉大显示,直到大图下载完成后。
- 从 Flickr 请求大图。通过异步方式加载大图,并提供一个完成块。
- 当下载完成,让小菊花停止旋转。
- 如果发生错误或者图片未能下载,什么也不做。
- 当下载完成时,根据 Index Path 来判断用户是否选择了另一个的 cell(如果视图发生过滚动,则很可能这个 cell 已经不是原来的 cell 了),如果还是原来那个 cell,设置它的 image 为下载到的大图。
运行程序,进行一次搜索,然后选一张图片——它会被拉伸到整个屏幕,其他 cell 会自动移开以挪出足够的空间。
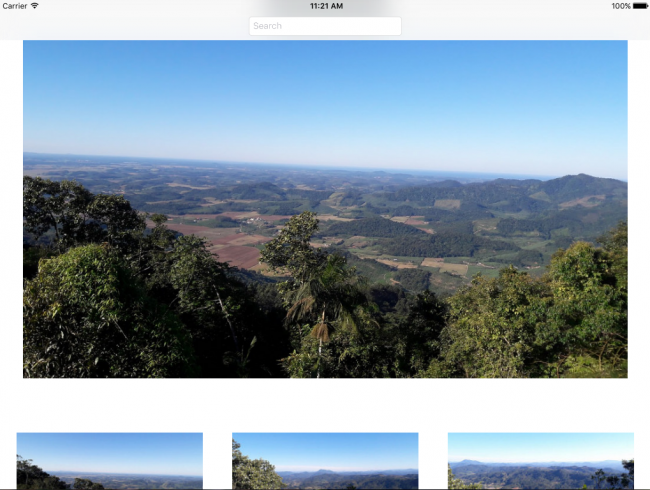
再次点击 cell,或者开始滚动或点击其它 cell。你不需要写任何一句移动或让这些 cell 移动的代码,Collection View 和它的 layout 对象为你完成剩下的所有事情。
多选
你接下来的任务是允许用户选择多张图片,并和朋友分享。在 Collection View 中进行多选非常类似于 Table View。唯一的一点是告诉 Collection View 启用多选。
这个过程分为几个步骤进行:
- 用户点击 Share 按钮告诉 UICollectionView 开启多选模式——并将 sharing 属性标记为 YES。
- 用户选择多张图片,将它们添加到一个数组中。
- 用户再次点击分享按钮,打开分享界面。
- 用户或者完成分享,或者点击取消,选中的图片和 Collection View 又恢复单选模式。
首先打开 FlickrPhotosViewController.swift 在 itemsPerRow 属性下添加:
private var selectedPhotos = [FlickrPhoto]()
private let shareTextLabel = UILabel()
然后,在私有扩展的 photoForIndexPath(_:) 方法下添加方法:
func updateSharedPhotoCount() {
  shareTextLabel.textColor = themeColor
  shareTextLabel.text = "\(selectedPhotos.count) photos selected"
  shareTextLabel.sizeToFit()
}
selectedPhotos 数组会保存住用户所选的图片,shareTextLabel 则用于显示用户选择了几张图片。你会调用 updateSharedPhotoCount 来更新 shareTextLabel 的显示。
然后在 largePhotoIndexPath 属性下添加下列属性:
var sharing: Bool = false {
  didSet {
    collectionView?.allowsMultipleSelection = sharing
    collectionView?.selectItemAtIndexPath(nil, animated: true, scrollPosition: .None)
    selectedPhotos.removeAll(keepCapacity: false)

    guard let shareButton = self.navigationItem.rightBarButtonItems?.first else {
      return
    }

    guard sharing else {
      navigationItem.setRightBarButtonItems([shareButton], animated: true)
      return
    }

    if let _ = largePhotoIndexPath  {
      largePhotoIndexPath = nil
    }

    updateSharedPhotoCount()
    let sharingDetailItem = UIBarButtonItem(customView: shareTextLabel)
    navigationItem.setRightBarButtonItems([shareButton,sharingDetailItem], animated: true)
  }
}
sharing 是一个 Bool 属性,我们为它定义了另一个属性观察器,和前面的 largePhotoIndexPath 类似。在这个属性观察器中,你会切换 Collection View 的多选状态,清空所选的 cell 和照片数组。同时,你还要在导航栏中加入和刷新 shareTextLabel 和 UIBarButtonItem。
打开 Main.storyboard ,拖一个 UIBarButtonItem 到 Collectoin View 上面的导航栏的右边。 在属性面板中,将 System Item 设置为 Action,并选择一个常见的分享图标。打开助手编辑器,确认源代码窗口中打开的是 FlickrPhotosViewController.swift ,然后用右键从 bar button 拖一条线到源代码中,创建一个 IBAction 叫做 share:,sender 类型设置为 UIBarButtonItem。
实现这个 IBAction 方法:
@IBAction func share(sender: UIBarButtonItem) {
  guard !searches.isEmpty else {
    return
  }

  guard !selectedPhotos.isEmpty else {
    sharing = !sharing
    return
  }

  guard sharing else  {
    return
  }
  //TODO actually share photos!
}
这个方法仅仅判断用户是否搜索结果是否为空,如果不为空,分享所选照片。
现在开始允许用户选择 cell。在 collectionView(_:shouldSelectItemAtIndexPath:) method: 顶部加入:
guard !sharing else {
  return true
}
这段代码只允许用户在分享模式下选择 cell.
然后,在 UICollectionViewDelegate 扩展的 collectionView(_:shouldSelectItemAtIndexPath:) 方法后面加入:
override func collectionView(collectionView: UICollectionView,
                             didSelectItemAtIndexPath indexPath: NSIndexPath) {
  guard sharing else {
    return
  }

  let photo = photoForIndexPath(indexPath)
  selectedPhotos.append(photo)
  updateSharedPhotoCount()
}
这个方法将选中的图片添加到要分享的照片数组中,然后刷新 shareTextLabel 标签。
最后,在 collectionView(_:didSelectItemAtIndexPath:) 方法下面添加:
override func collectionView(collectionView: UICollectionView,
                             didDeselectItemAtIndexPath indexPath: NSIndexPath) {

  guard sharing else {
    return
  }

  let photo = photoForIndexPath(indexPath)

  if let index = selectedPhotos.indexOf(photo) {
    selectedPhotos.removeAtIndex(index)
    updateSharedPhotoCount()
  }
}
这个方法将照片从要分享的照片数组中删除,并刷新 shareTextLabel 标签。
允许程序,进行一个搜索。点击分享按钮,切换到分享模式,选择几张图片。标签会实时发生变化,选到的照片会有一个 Wenderlich 绿的加亮边框。
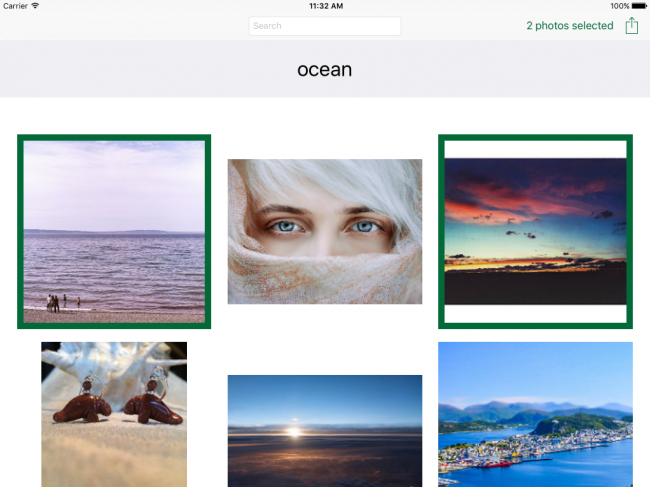
再次点击 Share 按钮,所有 cell 恢复未选中状态,你又会回到非分享模式,这时你点击 cell 会显示大图。
当然,现在分享按钮还没有任何意义,因为我们还没有真正做到图片的分享!
在 share(_:) 方法中,将 TODO 注释替换为如下代码:
var imageArray = [UIImage]()
for selectedPhoto in selectedPhotos {
if let thumbnail = selectedPhoto.thumbnail {
imageArray.append(thumbnail)
}
}
if !imageArray.isEmpty {
let shareScreen = UIActivityViewController(activityItems: imageArray, applicationActivities: nil)
shareScreen.completionWithItemsHandler = { _ in
self.sharing = false
}
let popoverPresentationController = shareScreen.popoverPresentationController
popoverPresentationController?.barButtonItem = sender
popoverPresentationController?.permittedArrowDirections = .Any
presentViewController(shareScreen, animated: true, completion: nil)
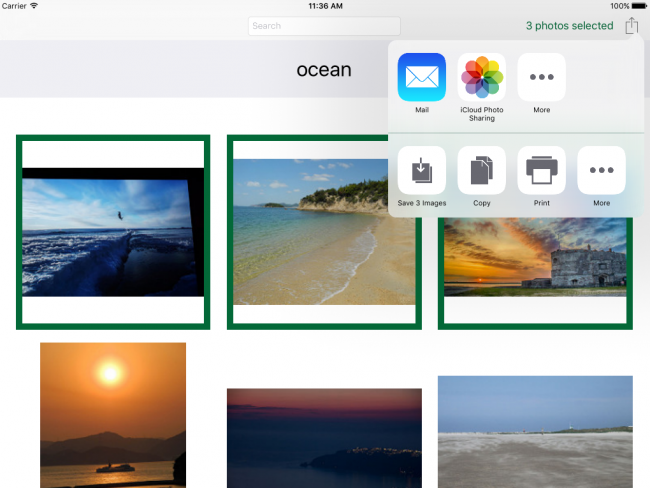
}首先,创建了一个 UIImage 数组,将缩略图放入。这个 UIImage 数组可以很方便地传给 UIActivityViewController。而 UIActivityViewController 会显示要手机上所有存在的分享程序或动作:iMessage、Mail、打印机扥等。你只需将 UIActivity以 Popover 方式呈现(因为这是一个 iPad App),剩下的就是用户的事情了。
运行程序,进入分享模式,选择几张图片,再次点击分享按钮。分享对话框会出现!
注:如果你用模拟器进行测试,你会发现模拟器中的分享选项要比设备中更少。如果你不能确定分享界面能否正常分享照片,请使用保存图片选项。无论设备还是模拟器,这都会将照片保存进照片程序,你可以通过这种方式确认分享功能是正常的。
渲染 cell
在 iOS 9 之前,Collection View 和它的近亲 Table View 相比缺少一个重要的功能:即很容易对 cell 进行重排。幸运的是,这种情况得到改变,在这个项目中你能够很容易地实现它,因为你使用的是 Collection View Controller。
现在, Collection View Controller 有一个 installsStandardGestureForInteractiveMovement 属性,它默认是 true。这个属性决定是否可以在 Collection View 上通过一个手势来重排 cell。你唯一需要做的事情就是重写 UICollectionViewDataSource 协议中的某个方法。打开 FlickrPhotosViewController.swift, 在 UICollectionViewDataSource 扩展的 collectionView(_:cellForItemAtIndexPath:) 方法后加入这个方法 :
override func collectionView(collectionView: UICollectionView,
                             moveItemAtIndexPath sourceIndexPath: NSIndexPath,
                             toIndexPath destinationIndexPath: NSIndexPath) {

  var sourceResults = searches[sourceIndexPath.section].searchResults
  let flickrPhoto = sourceResults.removeAtIndex(sourceIndexPath.row)

  var destinationResults = searches[destinationIndexPath.section].searchResults
  destinationResults.insert(flickrPhoto, atIndex: destinationIndexPath.row)
}
实现这个方法很简单。你只需要将要移动的 cell 从结果集数组中删除,然后重新放到数组的新位置即可。
运行程序,选择一张照片,移动到另外一个位置:
太好了,只需要短短 4 行代码!
结束
完整项目在这里下载。
恭喜你,你创建了一个非常定制化的 Flickr 照片浏览程序,使用了一个非常酷网格式的 UICollectionView。
在本教程中,你学习了如何定制 UICollectionView,通过 UICollectionReusableView 创建 header,监听 cell 的点击,支持多选等等。
如果你有问题或建议,请留言。


 992
992


 被折叠的 条评论
为什么被折叠?
被折叠的 条评论
为什么被折叠?
 到【灌水乐园】发言


