


从Android 4.4开始,Android系统加入了一个比较酷的功能,就是我们可以设置状态栏的的颜色了,有个这个功能,状态栏就不再是黑乎乎的了,我们就可以根据我们应用的主色去设置状态栏的颜色,使得应用体验变得好一些,所以我们通过如下方式设置状态栏透明。
window.setFlags(WindowManager.LayoutParams.FLAG_TRANSLUCENT_STATUS, WindowManager.LayoutParams.FLAG_TRANSLUCENT_STATUS);
window.setFlags(WindowManager.LayoutParams.FLAG_TRANSLUCENT_NAVIGATION, WindowManager.LayoutParams.FLAG_TRANSLUCENT_NAVIGATION);但是设置了状态栏和导航栏透明之后,发现Activity的contentView超出了ActionBar,那么我们就要使用fitSystemWindws来解决这个问题,关于具体如何解决这个问题,在Android4.4新的特性,在应用内开启透明状态栏和透明虚拟按钮这篇博客中有详细介绍。
那么android:fitSystemWindows到底是什么东西啊,它是怎样计算的?
在Android Framework的源代码中查看View.java,有这几个重要方法,如下:
- dispatchApplyWindowInsets
- onApplyWindowInsets
- fitSystemWindows
是一个自定义的View,并且覆盖View的这三个方法,打印出Log,可以发现这三个方法的调用顺序是
- dispatchApplyWindowInsets
- onApplyWindowInsets
- fitSystemWindows
这里我们通过代码调试的方法来查看Android Framework的方法调用堆栈,如图:
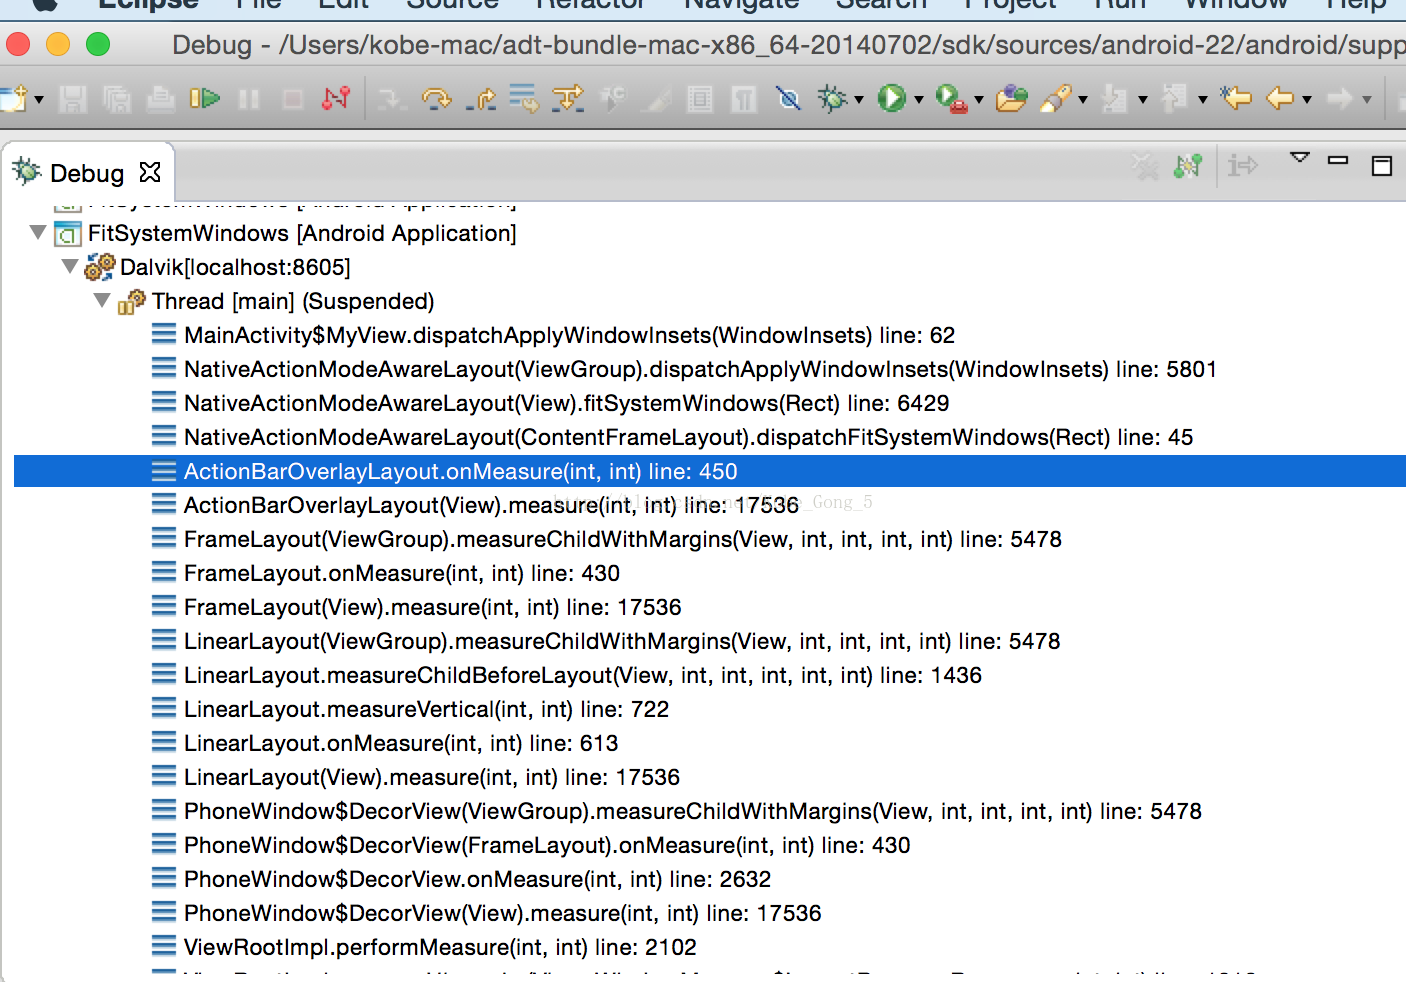
根据堆栈可以发现,dispatchApplyWindowInsets方法是在ViewRootImpl.performMeasure(int,int)方法中调用的。也就是说,dispatchApplyWindowInsets是在整个View Hierarchy的measure过程中调用的。
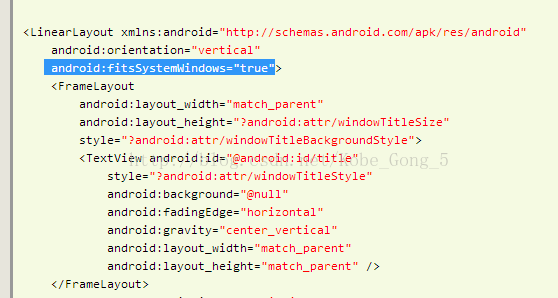
在从layout文件中解释到fitSystemWindows为true设置标志位。那这个标志为在什么时候起的作用。
case com.android.internal.R.styleable.View_fitsSystemWindows:
                    if (a.getBoolean(attr, false)) {
                        viewFlagValues |= FITS_SYSTEM_WINDOWS;
                        viewFlagMasks |= FITS_SYSTEM_WINDOWS;
                    }
                    break;
再看上面那幅堆栈图,在ActionBarOverlayLayout.measure()中开始调用fitSystemWindows的相关方法,进入ActionBarOverlayLayout的源码。
protected void onMeasure(int widthMeasureSpec, int heightMeasureSpec) {
        //通过findViewById方法,得到布局文件中的view
        pullChildren();

        int maxHeight = 0;
        int maxWidth = 0;
        int childState = 0;

        int topInset = 0;
        int bottomInset = 0;
        //测量ActionBar的高度和宽度
        measureChildWithMargins(mActionBarTop, widthMeasureSpec, 0, heightMeasureSpec, 0);
        LayoutParams lp = (LayoutParams) mActionBarTop.getLayoutParams();
        maxWidth = Math.max(maxWidth,
                mActionBarTop.getMeasuredWidth() + lp.leftMargin + lp.rightMargin);
        maxHeight = Math.max(maxHeight,
                mActionBarTop.getMeasuredHeight() + lp.topMargin + lp.bottomMargin);
        childState = ViewUtils.combineMeasuredStates(childState,
                ViewCompat.getMeasuredState(mActionBarTop));

        // xlarge screen layout doesn't have bottom action bar.
        //测量ActionBar底部区域的高度和宽度
        if (mActionBarBottom != null) {
            measureChildWithMargins(mActionBarBottom, widthMeasureSpec, 0, heightMeasureSpec, 0);
            lp = (LayoutParams) mActionBarBottom.getLayoutParams();
            maxWidth = Math.max(maxWidth,
                    mActionBarBottom.getMeasuredWidth() + lp.leftMargin + lp.rightMargin);
            maxHeight = Math.max(maxHeight,
                    mActionBarBottom.getMeasuredHeight() + lp.topMargin + lp.bottomMargin);
            childState = ViewUtils.combineMeasuredStates(childState,
                    ViewCompat.getMeasuredState(mActionBarBottom));
        }

        final int vis = ViewCompat.getWindowSystemUiVisibility(this);
        final boolean stable = (vis & SYSTEM_UI_FLAG_LAYOUT_STABLE) != 0;

        if (stable) {
            // This is the standard space needed for the action bar.  For stable measurement,
            // we can't depend on the size currently reported by it -- this must remain constant.
            topInset = mActionBarHeight;
            //考虑到ActionbarTab的高度,计算topInset
            if (mHasNonEmbeddedTabs) {
                final View tabs = mActionBarTop.getTabContainer();
                if (tabs != null) {
                    // If tabs are not embedded, increase space on top to account for them.
                    topInset += mActionBarHeight;
                }
            }
        } else if (mActionBarTop.getVisibility() != GONE) {
            // This is the space needed on top of the window for all of the action bar
            // and tabs.
            topInset = mActionBarTop.getMeasuredHeight();
        }
        //如果ActionBar是split模式,考虑底部的高度,计算insetBottom
        if (mDecorToolbar.isSplit()) {
            // If action bar is split, adjust bottom insets for it.
            if (mActionBarBottom != null) {
                if (stable) {
                    bottomInset = mActionBarHeight;
                } else {
                    bottomInset = mActionBarBottom.getMeasuredHeight();
                }
            }
        }

        // If the window has not requested system UI layout flags, we need to
        // make sure its content is not being covered by system UI...  though it
        // will still be covered by the action bar if they have requested it to
        // overlay.
        mContentInsets.set(mBaseContentInsets);
        mInnerInsets.set(mBaseInnerInsets);
        if (!mOverlayMode && !stable) {
            mContentInsets.top += topInset;
            mContentInsets.bottom += bottomInset;
        } else {
            mInnerInsets.top += topInset;
            mInnerInsets.bottom += bottomInset;
        }
        //在ActionBar为非Overlay模式下,应用计算好的ContentInsets
        applyInsets(mContent, mContentInsets, true, true, true, true);
        //
        if (!mLastInnerInsets.equals(mInnerInsets)) {
            // If the inner insets have changed, we need to dispatch this down to
            // the app's fitSystemWindows().  We do this before measuring the content
            // view to keep the same semantics as the normal fitSystemWindows() call.
            mLastInnerInsets.set(mInnerInsets);

//Overlay模式下,将InnerInsets分发到子View中。            mContent.dispatchFitSystemWindows(mInnerInsets);
        }

        measureChildWithMargins(mContent, widthMeasureSpec, 0, heightMeasureSpec, 0);
        lp = (LayoutParams) mContent.getLayoutParams();
        maxWidth = Math.max(maxWidth,
                mContent.getMeasuredWidth() + lp.leftMargin + lp.rightMargin);
        maxHeight = Math.max(maxHeight,
                mContent.getMeasuredHeight() + lp.topMargin + lp.bottomMargin);
        childState = ViewUtils.combineMeasuredStates(childState,
                ViewCompat.getMeasuredState(mContent));

        // Account for padding too
        maxWidth += getPaddingLeft() + getPaddingRight();
        maxHeight += getPaddingTop() + getPaddingBottom();

        // Check against our minimum height and width
        maxHeight = Math.max(maxHeight, getSuggestedMinimumHeight());
        maxWidth = Math.max(maxWidth, getSuggestedMinimumWidth());

        setMeasuredDimension(
                ViewCompat.resolveSizeAndState(maxWidth, widthMeasureSpec, childState),
                ViewCompat.resolveSizeAndState(maxHeight, heightMeasureSpec,
                        childState << MEASURED_HEIGHT_STATE_SHIFT));
    }
根据上面的堆栈图知道mContent是NativeActionModeAwareLayout类型,而NativeActionModeAwareLayout,没有dispatchFitSystemWindows方法,那么查看其父类的dispatchFitSystemWindows方法。NativeActionModeAwareLayout的父类是ContentFrameLayout类型,看它的dispatchFitSystemWindows方法。
public void dispatchFitSystemWindows(Rect insets) {
        fitSystemWindows(insets);
    }
它直接调用View的fitSystemWindows方法。看View的fitSystemWindows方法。
protected boolean fitSystemWindows(Rect insets) {
        if ((mPrivateFlags3 & PFLAG3_APPLYING_INSETS) == 0) {
            if (insets == null) {
                // Null insets by definition have already been consumed.
                // This call cannot apply insets since there are none to apply,
                // so return false.
                return false;
            }

            try {
                mPrivateFlags3 |= PFLAG3_FITTING_SYSTEM_WINDOWS;
                return dispatchApplyWindowInsets(new WindowInsets(insets)).isConsumed();
            } finally {
                mPrivateFlags3 &= ~PFLAG3_FITTING_SYSTEM_WINDOWS;
            }
        } else {
            return fitSystemWindowsInt(insets);
        }
    }
由于第一次调用,这里的mPrivateFlags3 的PFLAG3_APPLYING_INSETS标志为不为1,所以进入if条件。进入dispatchApplyWindowInsets方法。并将mPrivateFlags3 的PFLAG3_APPLYING_INSETS标志为置为1。由于ContentFrameLayout继承了Framelayout ,所以进入了ViewGroup的dispatchApplyWindowInsets方法。
@Override
    public WindowInsets dispatchApplyWindowInsets(WindowInsets insets) {
        insets = super.dispatchApplyWindowInsets(insets);
        if (!insets.isConsumed()) {
            final int count = getChildCount();
            for (int i = 0; i < count; i++) {
                insets = getChildAt(i).dispatchApplyWindowInsets(insets);
                if (insets.isConsumed()) {
                    break;
                }
            }
        }
        return insets;
    }
首先调用了 super.dispatchApplyWindowInsets方法,也就是View的 dispatchApplyWindowInsets,
然后如果insets没有被消费掉的话,分别调用每个view child的dispatchApplyWindowInsets方法,让子view去消费它,如果子view消费了,那么到此结束。先执行 super.dispatchApplyWindowInsets方法。
下面是View.dispatchApplyWindowInsets方法。
 public WindowInsets dispatchApplyWindowInsets(WindowInsets insets) {
        try {
            mPrivateFlags3 |= PFLAG3_APPLYING_INSETS;
            if (mListenerInfo != null && mListenerInfo.mOnApplyWindowInsetsListener != null) {
                return mListenerInfo.mOnApplyWindowInsetsListener.onApplyWindowInsets(this, insets);
            } else {
                return onApplyWindowInsets(insets);
            }
        } finally {
            mPrivateFlags3 &= ~PFLAG3_APPLYING_INSETS;
        }
    }
在此方法中首先将mPrivateFlags3 的PFLAG3_APPLYING_INSETS标志位置为1,然后如果开发者设置了listener的话就调用listener,否则调用onApplyWindowInsets方法。
public WindowInsets onApplyWindowInsets(WindowInsets insets) {
        if ((mPrivateFlags3 & PFLAG3_FITTING_SYSTEM_WINDOWS) == 0) {
            if (fitSystemWindows(insets.getSystemWindowInsets())) {
                return insets.consumeSystemWindowInsets();
            }
        } else {
            if (fitSystemWindowsInt(insets.getSystemWindowInsets())) {
                return insets.consumeSystemWindowInsets();
            }
        }
        return insets;
    }
在第一次调用fitSystemWindows方法后,mPrivateFlags3 得 PFLAG3_FITTING_SYSTEM_WINDOWS标志为被置位1了,所以进入fitSystemWindowsInt方法。
private boolean fitSystemWindowsInt(Rect insets) {
        if ((mViewFlags & FITS_SYSTEM_WINDOWS) == FITS_SYSTEM_WINDOWS) {
            mUserPaddingStart = UNDEFINED_PADDING;
            mUserPaddingEnd = UNDEFINED_PADDING;
            Rect localInsets = sThreadLocal.get();
            if (localInsets == null) {
                localInsets = new Rect();
                sThreadLocal.set(localInsets);
            }
            boolean res = computeFitSystemWindows(insets, localInsets);
            mUserPaddingLeftInitial = localInsets.left;
            mUserPaddingRightInitial = localInsets.right;
            internalSetPadding(localInsets.left, localInsets.top,
                    localInsets.right, localInsets.bottom);
            return res;
        }
        return false;
    }
在这个方法中,两个关键函数
- computeFitSystemWindows
- internalSetPadding
先看computeFitSystemWindows。官方解释是,计算insets应该被此view消费掉还是继续传递。
protected boolean computeFitSystemWindows(Rect inoutInsets, Rect outLocalInsets) {
        if ((mViewFlags & OPTIONAL_FITS_SYSTEM_WINDOWS) == 0
                || mAttachInfo == null
                || ((mAttachInfo.mSystemUiVisibility & SYSTEM_UI_LAYOUT_FLAGS) == 0
                        && !mAttachInfo.mOverscanRequested)) {
            outLocalInsets.set(inoutInsets);
            inoutInsets.set(0, 0, 0, 0);
            return true;
        } else {
            // The application wants to take care of fitting system window for
            // the content...  however we still need to take care of any overscan here.
            final Rect overscan = mAttachInfo.mOverscanInsets;
            outLocalInsets.set(overscan);
            inoutInsets.left -= overscan.left;
            inoutInsets.top -= overscan.top;
            inoutInsets.right -= overscan.right;
            inoutInsets.bottom -= overscan.bottom;
            return false;
        }
    }
再看internalSetPadding
此方法是设置view的padding。
 protected void internalSetPadding(int left, int top, int right, int bottom) {
        mUserPaddingLeft = left;
        mUserPaddingRight = right;
        mUserPaddingBottom = bottom;

        final int viewFlags = mViewFlags;
        boolean changed = false;

        // Common case is there are no scroll bars.
        if ((viewFlags & (SCROLLBARS_VERTICAL|SCROLLBARS_HORIZONTAL)) != 0) {
            if ((viewFlags & SCROLLBARS_VERTICAL) != 0) {
                final int offset = (viewFlags & SCROLLBARS_INSET_MASK) == 0
                        ? 0 : getVerticalScrollbarWidth();
                switch (mVerticalScrollbarPosition) {
                    case SCROLLBAR_POSITION_DEFAULT:
                        if (isLayoutRtl()) {
                            left += offset;
                        } else {
                            right += offset;
                        }
                        break;
                    case SCROLLBAR_POSITION_RIGHT:
                        right += offset;
                        break;
                    case SCROLLBAR_POSITION_LEFT:
                        left += offset;
                        break;
                }
            }
            if ((viewFlags & SCROLLBARS_HORIZONTAL) != 0) {
                bottom += (viewFlags & SCROLLBARS_INSET_MASK) == 0
                        ? 0 : getHorizontalScrollbarHeight();
            }
        }

        if (mPaddingLeft != left) {
            changed = true;
            mPaddingLeft = left;
        }
        if (mPaddingTop != top) {
            changed = true;
            mPaddingTop = top;
        }
        if (mPaddingRight != right) {
            changed = true;
            mPaddingRight = right;
        }
        if (mPaddingBottom != bottom) {
            changed = true;
            mPaddingBottom = bottom;
        }

        if (changed) {
            requestLayout();
        }
    }


 671
671


 被折叠的 条评论
为什么被折叠?
被折叠的 条评论
为什么被折叠?
 到【灌水乐园】发言


