


关于绘图,加入数据大到需要统计学的话,就迫切的需要html5这样的新技术,需要绘图,其中有canvas,svg,vml等技术规范(这里我喜欢这么叫规范)。
关于学习的地方有很多:
推荐的是:火狐的MDN(很专业,很深入),w3schools(简单入门)的中文网站比较不错,还有两个这里就不说了,感觉不怎么样。火狐的最棒了。
-------------------------------------------------------------------------------------w3school.com.cn------------------------------------------------------------------
canvas 元素用于在网页上绘制图形。
什么是 Canvas?
HTML5 的 canvas 元素使用 JavaScript 在网页上绘制图像。
画布是一个矩形区域,您可以控制其每一像素。
canvas 拥有多种绘制路径、矩形、圆形、字符以及添加图像的方法。
创建 Canvas 元素
向 HTML5 页面添加 canvas 元素。
规定元素的 id、宽度和高度:
<canvas id="myCanvas" width="200" height="100"></canvas>
通过 JavaScript 来绘制
canvas 元素本身是没有绘图能力的。所有的绘制工作必须在 JavaScript 内部完成:
<script type="text/javascript">
var c=document.getElementById("myCanvas");
var cxt=c.getContext("2d");
cxt.fillStyle="#FF0000";
cxt.fillRect(0,0,150,75);
</script>
JavaScript 使用 id 来寻找 canvas 元素:
var c=document.getElementById("myCanvas");
然后,创建 context 对象:
var cxt=c.getContext("2d");
getContext("2d") 对象是内建的 HTML5 对象,拥有多种绘制路径、矩形、圆形、字符以及添加图像的方法。
下面的两行代码绘制一个红色的矩形:
cxt.fillStyle="#FF0000";
cxt.fillRect(0,0,150,75);
fillStyle 方法将其染成红色,fillRect 方法规定了形状、位置和尺寸。
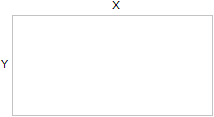
理解坐标
上面的 fillRect 方法拥有参数 (0,0,150,75)。
意思是:在画布上绘制 150x75 的矩形,从左上角开始 (0,0)。
如下图所示,画布的 X 和 Y 坐标用于在画布上对绘画进行定位。
更多 Canvas 实例
下面的在 canvas 元素上进行绘画的更多实例:
实例 - 线条
通过指定从何处开始,在何处结束,来绘制一条线:
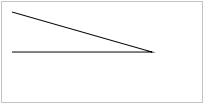
JavaScript 代码:
<script type="text/javascript">

var c=document.getElementById("myCanvas");
var cxt=c.getContext("2d");
cxt.moveTo(10,10);
cxt.lineTo(150,50);
cxt.lineTo(10,50);
cxt.stroke();

</script>
canvas 元素:
<canvas id="myCanvas" width="200" height="100" style="border:1px solid #c3c3c3;">
Your browser does not support the canvas element.
</canvas>
实例 - 圆形
通过规定尺寸、颜色和位置,来绘制一个圆:
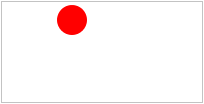
JavaScript 代码:
<script type="text/javascript">

var c=document.getElementById("myCanvas");
var cxt=c.getContext("2d");
cxt.fillStyle="#FF0000";
cxt.beginPath();
cxt.arc(70,18,15,0,Math.PI*2,true);
cxt.closePath();
cxt.fill();

</script>
canvas 元素:
<canvas id="myCanvas" width="200" height="100" style="border:1px solid #c3c3c3;">
Your browser does not support the canvas element.
</canvas>
实例 - 渐变
使用您指定的颜色来绘制渐变背景:

JavaScript 代码:
<script type="text/javascript">

var c=document.getElementById("myCanvas");
var cxt=c.getContext("2d");
var grd=cxt.createLinearGradient(0,0,175,50);
grd.addColorStop(0,"#FF0000");
grd.addColorStop(1,"#00FF00");
cxt.fillStyle=grd;
cxt.fillRect(0,0,175,50);

</script>
canvas 元素:
<canvas id="myCanvas" width="200" height="100" style="border:1px solid #c3c3c3;">
Your browser does not support the canvas element.
</canvas>
实例 - 图像
把一幅图像放置到画布上:

JavaScript 代码:
<script type="text/javascript">

var c=document.getElementById("myCanvas");
var cxt=c.getContext("2d");
var img=new Image()
img.src="flower.png"
cxt.drawImage(img,0,0);

</script>
canvas 元素:
<canvas id="myCanvas" width="200" height="100" style="border:1px solid #c3c3c3;">
Your browser does not support the canvas element.
</canvas>
-----------------------------------------------------------------------------------------------------mozilla----------------------------------------------------------------------------------------
Basic usage
<canvas>元素
让我们从<canvas>元素的定义开始吧。
<canvas id="tutorial" width="150" height="150"></canvas>
<canvas>看起来很像<img>,唯一不同就是它不含 src 和 alt 属性。它只有两个属性,width 和 height,两个都是可选的,并且都可以用 DOM 属性或者 CSS 规则来设置。如果不指定width 和 height,默认的是宽300像素,高150像素。虽然可以通过 CSS 来调整canvas的大小,但渲染图像会缩放来适应布局的(如果你发现渲染结果看上去变形了,不必一味依赖CSS,可以尝试显式指定canvas的width 和 height 属性值)。
id 属性不是<canvas>专享的,就像标准的HTML标签一样,任何一个HTML元素都可以指定其 id 值。一般,为元素指定 id 是个不错的主意,这样使得在脚本中应用更加方便。
<canvas>元素可以像普通图片一样指定其样式(边距,边框,背景等等)。然而这些样式并不会对canvas实际生成的图像产生什么影响。下面我们会看到如何应用样式。如果不指定样式,canvas默认是全透明的。
替用内容
因为 <canvas> 相对较新,有些浏览器并没实现,如Firefox 1.0 和 Internet Explorer 9 以下版本,所以我们需要为那些不支持canvas的浏览器提供替用显示内容。
我们只需要直接在 canvas 元素内插入替用内容即可。不支持 canvas 的浏览器会忽略canvas元素而直接渲染替用内容,而支持的浏览器则会正常地渲染 canvas 。例如,我们可以把一些文字或图片填入 canvas 内,作为替用内容:
<canvas id="stockGraph" width="150" height="150">
  current stock price: $3.15 +0.15
</canvas>

<canvas id="clock" width="150" height="150">
  <img src="images/clock.png" width="150" height="150"/>
</canvas>
结束标签 </canvas> 是必须的
在Apple Safari里,<canvas>的实现跟<img>很相似,它没有结束标签。然而,为了使 <canvas> 能在web的世界里广泛适用,需要给替用内容提供一个容身之所,因此,在Mozilla的实现里结束标签(</canvas>)是必须的。
如果没有替用内容,<canvas id="foo" ...></canvas> 对 Safari 和 Mozilla 是完全兼容的—— Safari 会简单地忽略结束标签。
如果有替用内容,那么可以用一些 CSS 技巧来为并且仅为 Safari 隐藏替用内容,因为那些替用内容是需要在 IE 里显示但不需要在 Safari 里显示。
渲染上下文(Rendering Context)
<canvas> 创建的固定尺寸的绘图画面开放了一个或多个渲染上下文(rendering context),我们可以通过它们来控制要显示的内容。我们专注于2D 渲染上,这也是目前唯一的选择,可能在将来会添加基于OpenGL ES 的 3D 上下文。
<canvas> 初始化是空白的,要在上面用脚本画图首先需要其渲染上下文(rendering context),它可以通过 canvas 元素对象的 getContext 方法来获取,同时得到的还有一些画图用的函数。getContext() 接受一个用于描述其类型的值作为参数。
var canvas = document.getElementById('tutorial');
var ctx = canvas.getContext('2d');
上面第一行通过 getElementById 方法取得 canvas 对象的 DOM 节点。然后通过其 getContext 方法取得其画图操作上下文。
检查浏览器的支持
除了在那些不支持 canvas 的浏览器上显示替用内容,还可以通过脚本的方式来检查浏览器是否支持 canvas 。方法很简单,判断 getContext 是否存在即可。
var canvas = document.getElementById('tutorial');
if (canvas.getContext){
  var ctx = canvas.getContext('2d');
  // drawing code here
} else {
  // canvas-unsupported code here
}
代码模板
我们会用下面这个最简化的代码模板来(后续的示例需要用到)作为开始,你可以 下载文件 到本地备用。
<html>
  <head>
    <title>Canvas tutorial</title>
    <script type="text/javascript">
      function draw(){
        var canvas = document.getElementById('tutorial');
        if (canvas.getContext){
          var ctx = canvas.getContext('2d');
        }
      }
    </script>
    <style type="text/css">
      canvas { border: 1px solid black; }
    </style>
  </head>
  <body οnlοad="draw();">
    <canvas id="tutorial" width="150" height="150"></canvas>
  </body>
</html>
细心的你会发现我准备了一个名为 draw 的函数,它会在页面装载完毕之后执行一次(通过设置 body 标签的 onload 属性),它当然也可以在 setTimeout,setInterval,或者其他事件处理函数中被调用。
一个简单的例子
作为开始,来一个简单的吧——绘制两个交错的矩形,其中一个是有alpha透明效果。我们会在后面的示例中详细的让你了解它是如何运作的。

<html>
 <head>
  <script type="application/x-javascript">
    function draw() {
      var canvas = document.getElementById("canvas");
      if (canvas.getContext) {
        var ctx = canvas.getContext("2d");

        ctx.fillStyle = "rgb(200,0,0)";
        ctx.fillRect (10, 10, 55, 50);

        ctx.fillStyle = "rgba(0, 0, 200, 0.5)";
        ctx.fillRect (30, 30, 55, 50);
      }
    }
  </script>
 </head>
 <body οnlοad="draw();">
   <canvas id="canvas" width="150" height="150"></canvas>
 </body>
</html>
Drawing shapes 绘制图形
Redirected from Canvas tutorial:Drawing shapes
网格 The grid
 Before we can start drawing, we need to talk about the canvas grid or coordinate space. The HTML template on the previous page had a canvas element 150 pixels wide and 150 pixels high. I've drawn this image with the default grid overlayed. Normally 1 unit in the grid corresponds to 1 pixel on the canvas. The origin of this grid is positioned in the top left corner (coordinate (0,0)). All elements are placed relative to this origin. So the position of the top left corner of the blue square becomes x pixels from the left and y pixels from the top (coordinate (x,y)). Later in this tutorial we'll see how we can translate the origin to a different position, rotate the grid and even scale it. For now we'll stick to the default.
在真正开始之前,我们需要先探讨 canvas 的网格(grid)或者坐标空间(coordinate space)。在前一页的HTML模板里有一个150像素宽, 150像素高的 canvas 对象。我在画面上叠加上默认网格,如右图。通常网格的1个单元对应 canvas 上的1个像素。网格的原点是定位在左上角(坐标(0,0))。画面里的所有物体的位置都是相对这个原点。这样,左上角的蓝色方块的位置就是距左边x像素和距上边Y像素(坐标(x, y))。后面的教程中我们将学会如何把移动原点,旋转以及缩放网格。不过现在我们会使用默认的状态。
绘制图形 Drawing shapes
Unlike SVG, canvas only supports one primitive shape - rectangles. All other shapes must be created by combining one or more paths. Luckily, we have a collection of path drawing functions which make it possible to compose very complex shapes.
不像 SVG,canvas 只支持一种基本形状——矩形,所以其它形状都是有一个或多个路径组合而成。还好,有一组路径绘制函数让我们可以绘制相当复杂的形状。
矩形 Rectangles
First let's look at the rectangle. There are three functions that draw rectangles on the canvas:
我们首先看看矩形吧,有三个函数用于绘制矩形的:
fillRect(x,y,width,height) : Draws a filled rectangle
strokeRect(x,y,width,height) : Draws a rectangular outline
clearRect(x,y,width,height) : Clears the specified area and makes it fully transparent
Each of these three functions takes the same parameters. x and y specify the position on the canvas (relative to the origin) of the top-left corner of the rectangle. width and height are pretty obvious. Let's see these functions in action.
它们都接受四个参数, x 和 y 指定矩形左上角(相对于原点)的位置,width 和 height 是矩形的宽和高。好,实战一下吧。
Below is the draw() function from the previous page, but now I've added the three functions above.
下面就是上页模板里的 draw() 函数,但添加了上面的三个函数。
绘制矩形的例子 Rectangular shape example
function draw(){
  var canvas = document.getElementById('tutorial');
  if (canvas.getContext){
    var ctx = canvas.getContext('2d');

    ctx.fillRect(25,25,100,100);
    ctx.clearRect(45,45,60,60);
    ctx.strokeRect(50,50,50,50);
  }
}
 The result should look something like the image on the right. The
 fillRect function draws a large black square 100x100 pixels. The clearRect function removes a 60x60 pixels square from the center and finally the strokeRect draws a rectangular outline 50x50 pixels inside the cleared square. In the following pages we'll see two alternative methods for the clearRect function and we'll also see how to change the color and stroke style of the rendered shapes.
出来的结果应该和右边的是一样的。fillRect 函数画了一个大的黑色矩形(100x100),clearRect 函数清空了中间 60x60 大小的方块,然后strokeRect 函数又在清空了的空间内勾勒出一个 50x50 的矩形边框。在接下去的页面里,我们会看到和 clearRect 函数差不多另外两个方法,以及如何去改变图形的填充和边框颜色。
Unlike the path functions we'll see in the next section, all three rectangle functions draw immediately to the canvas.
与下一节的路径函数不一样,这三个函数的效果会立刻在 canvas 上反映出来。
绘制路径 Drawing paths
To make shapes using paths, we need a couple of extra steps.
不像画矩形那样的直截了当,绘制路径是需要一些额外的步骤的。
beginPath()
 closePath()
 stroke()
 fill()
The first step to create a path is calling the beginPath method. Internally, paths are stored as a list of sub-paths (lines, arcs, etc) which together form a shape. Every time this method is called, the list is reset and we can start drawing new shapes.
第一步是用 beginPath 创建一个路径。在内存里,路径是以一组子路径(直线,弧线等)的形式储存的,它们共同构成一个图形。每次调用 beginPath,子路径组都会被重置,然后可以绘制新的图形。
The second step is calling the methods that actually specify the paths to be drawn. We'll see these shortly.
第二步就是实际绘制路径的部分,很快我们就会看到。
The third, and an optional step, would be to call the closePath method. This method tries to close the shape by drawing a straight line from the current point to the start. If the shape has already been closed or there's only one point in the list, this function does nothing.
第三步是调用 closePath 方法,它会尝试用直线连接当前端点与起始端点来关闭路径,但如果图形已经关闭或者只有一个点,它会什么都不做。这一步不是必须的。
The final step will be calling the stroke and/or fill methods. Calling one of these will actually draw the shape to the canvas. stroke is used to draw an outlined shape, while fill is used to paint a solid shape.
最后一步是调用 stroke 或 fill 方法,这时,图形才是实际的绘制到 canvas 上去。stroke 是绘制图形的边框,fill 会用填充出一个实心图形。
Note: When calling the fill method any open shapes will be closed automatically and it isn't necessary to use the closePath method.
注意:当调用 fill 时,开放的路径会自动闭合,而无须调用 closePath 。
The code for a drawing simple shape (a triangle) would look something like this.
画一个简单图形(如三角形)的代码如下。
ctx.beginPath();
ctx.moveTo(75,50);
ctx.lineTo(100,75);
ctx.lineTo(100,25);
ctx.fill();
moveTo
One very useful function, which doesn't actually draw anything, but is part of the path list described above, is the moveTo function. You can probably best think of this as lifting a pen or pencil from one spot on a piece of paper and placing it on the next.
moveTo 是一个十分有用的方法,虽然并不能用它来画什么,但却是绘制路径的实用方法的一部分。你可以把它想象成是把笔提起,并从一个点移动到另一个点的过程。
moveTo(x, y)
The moveTo function takes two arguments - x and y, - which are the coordinates of the new starting point.
它接受 x 和 y (新的坐标位置)作为参数。
 When the canvas is initialized or the
 beginPath method is called, the starting point is set to the coordinate (0,0). In most cases we would use the moveTo method to place the starting point somewhere else. We could also use the moveTo method to draw unconnected paths. Take a look at the smiley face on the right. I've marked the places where I used the moveTo method (the red lines).
当 canvas 初始化或者调用 beginPath 的时候,起始坐标设置就是原点(0,0)。大多数情况下,我们用 moveTo 方法将起始坐标移至其它地方,或者用于绘制不连续的路径。看看右边的笑脸,红线就是使用 moveTo 移动的轨迹。
To try this for yourself, you can use the code snippet below. Just paste it into the draw function we saw earlier.
试一试下面的代码,粘贴到之前用过的 draw 函数内在看看效果吧。
moveTo 的使用示例
ctx.beginPath();
ctx.arc(75,75,50,0,Math.PI*2,true); // Outer circle
ctx.moveTo(110,75);
ctx.arc(75,75,35,0,Math.PI,false);   // Mouth (clockwise)
ctx.moveTo(65,65);
ctx.arc(60,65,5,0,Math.PI*2,true);  // Left eye
ctx.moveTo(95,65);
ctx.arc(90,65,5,0,Math.PI*2,true);  // Right eye
ctx.stroke();

//thegoneheart 完整例子

ctx.beginPath();
ctx.arc(75,75,50,0,Math.PI*2,true); // Outer circle
ctx.moveTo(110,75);
ctx.arc(75,75,35,0,Math.PI,false);   // Mouth (clockwise)
ctx.moveTo(65,65);
ctx.arc(60,65,5,0,Math.PI*2,true);  // Left eye
ctx.moveTo(95,65);
ctx.arc(90,65,5,0,Math.PI*2,true);  // Right eye
ctx.stroke();

ctx.beginPath();
ctx.moveTo(40,75);
ctx.lineTo(60,65);
ctx.lineTo(90,65);
ctx.moveTo(110,75);
ctx.lineTo(125,75);
ctx.stroke();
Note: remove the moveTo methods to see the connecting lines.
Note: For a description of the arc function and its parameters look below.
注意:你可以注释 moveTo 方法来观察那些连接起来的线。
注意:arc 方法的用法见下面。
绘制各种线条 Lines
For drawing straight lines we use the lineTo method.
我们用 lineTo 方法来画直线。
lineTo(x, y)
This method takes two arguments - x and y, - which are the coordinates of the line's end point. The starting point is dependent on previous drawn paths, where the end point of the previous path is the starting point for the following, etc. The starting point can also be changed by using the moveTo method.
lineTo 方法接受终点的坐标(x,y)作为参数。起始坐标取决于前一路径,前一路径的终点即当前路径的起点,起始坐标也可以通过 moveTo 方法来设置。
lineTo 的使用示例
 In the example below two triangles are drawn, one filled and one outlined. (The result can be seen in the image on the right). First the
 beginPath method is called to begin a new shape path. We then use the moveTo method to move the starting point to the desired position. Below this two lines are drawn which make up two sides of the triangle.
示例(如右图)画的是两个三角形,一个实色填充,一个勾边。首先调用 beginPath 方法创建一个新路径,然后用moveTo 方法将起始坐标移至想要的位置,然后画两条直线来构成三角形的两条边。
You'll notice the difference between the filled and stroked triangle. This is, as mentioned above, because shapes are automatically closed when a path is filled. If we would have done this for the stroked triangle only two lines would have been drawn, not a complete triangle.
可以注意到 fill 和 strok 绘三角形的区别,上面也提到过,使用 fill 路径会自动闭合,但使用 stroke 不会,如果不关闭路径,勾画出来的只有两边。
// 填充三角形
ctx.beginPath();
ctx.moveTo(25,25);
ctx.lineTo(105,25);
ctx.lineTo(25,105);
ctx.fill();

// 勾边三角形
ctx.beginPath();
ctx.moveTo(125,125);
ctx.lineTo(125,45);
ctx.lineTo(45,125);
ctx.closePath();
ctx.stroke();
弧线 Arcs
For drawing arcs or circles we use the arc method. The specification also describes the arcTo method, which is supported by Safari but hasn't been implemented in the current Gecko browsers.
我们用 arc 方法来绘制弧线或圆。标准说明中还包含 arcTo 方法,当前 Safari 是支持的,但基于 Gecko 的浏览器还未实现。
arc(x, y, radius, startAngle, endAngle, anticlockwise)
This method takes five parameters: x and y are the coordinates of the circle's center. Radius is self explanatory. The startAngle and endAngle parameters define the start and end points of the arc in radians. The starting and closing angle are measured from the x axis. The anticlockwise parameter is a boolean value which when true draws the arc anticlockwise, otherwise in a clockwise direction.
方法接受五个参数:x,y 是圆心坐标,radius 是半径,startAngle 和 endAngle 分别是起末弧度(以 x 轴为基准),anticlockwise 为 true 表示逆时针,反之顺时针。
Warning: In the Firefox beta builds, the last parameter is clockwise. The final release will support the function as described above. All scripts that use this method in its current form will need to be updated once the final version is released.
警告:在 Firefox 的 beta 版本里,最后一个参数是 clockwise,而最终版本不是。因此如果是从 beta 升级至发行版需要做相应修改。
Note: Angles in the arc function are measured in radians, not degrees. To convert degrees to radians you can use the following JavaScript expression: var radians = (Math.PI/180)*degrees.
注意:arc 方法里用到的角度是以弧度为单位而不是度。度和弧度直接的转换可以用这个表达式:var radians = (Math.PI/180)*degrees;。
arc 的使用示例
 The following example is a little more complex than the ones we've seen above. I've drawn 12 different arcs all with different angles and fills. If I would have written this example just like the smiley face above, firstly this would have become a very long list of statements and secondly, when drawing arcs, I would need to know every single starting point. For arcs of 90, 180 and 270 degrees, like the ones I used here, this wouldn't be to much of a problem, but for more complex ones this becomes way too difficult.
这个示例比之前见到过的要复杂一些,画了12个不同的弧形,有不同夹角和填充状态的。如果我用上面画笑脸的方式来画这些弧形,那会是一大段的代码,而且,画每一个弧形时我都需要知道其圆心位置。像我这里画 90,180 和 270 度的弧形看起来不是很麻烦,但是如果图形更复杂一些,则实现起来会越来越困难。
The two for loops are for looping through the rows and columns of arcs. For every arc I start a new path using beginPath. Below this I've written out all the parameters as variables, so it's easier to read what's going on. Normally this would be just one statement. The x and y coordinates should be clear enough. radius and startAngle are fixed. The endAngle starts of as 180 degrees (first column) and is increased with steps of 90 degrees to form a complete circle (last column). The statement for the clockwise parameter results in the first and third row being drawn as clockwise arcs and the second and fourth row as counterclockwise arcs. Finally, the if statement makes the top half stroked arcs and the bottom half filled arcs.
这里使用两个 for 循环来画多行多列的弧形。每一个弧形都用 beginPath 方法创建一个新路径。然后为了方便阅读和理解,我把所有参数都写成变量形式。显而易见,x 和 y 作为圆心坐标。 radius 和 startAngle 都是固定,endAngle 从 180 度半圆开始,以 90 度方式递增至圆。anticlockwise 则取决于奇偶行数。最后,通过 if 语句判断使前两行表现为勾边,而后两行为填充效果。
for (i=0;i<4;i++){
   for(j=0;j<3;j++){    //chinese_xu 原始代码
    ctx.beginPath();
    var x              = 25+j*50;               // x coordinate
    var y              = 25+i*50;               // y coordinate
    var radius         = 20;                    // Arc radius
    var startAngle     = 0;                     // Starting point on circle
    var endAngle       = Math.PI+(Math.PI*j)/2;  // End point on circle ---//修复错误标点
    var anticlockwise  = i%2==0 ? false : true; // clockwise or anticlockwise

    ctx.arc(x,y,radius,startAngle,endAngle, anticlockwise);

    if (i>1){
      ctx.fill();
    } else {
      ctx.stroke();
    }
  }
}
//chinese_xu 原始代码并没有按照1/4圆递增来画。
//修改后输出4行4列,要把画布扩大到200*200观看
for (i=0;i<4;i++){
   for(j=0;j<4;j++){
    ctx.beginPath();
    var x              = 25+j*50;               // x coordinate
    var y              = 25+i*50;               // y coordinate
    var radius         = 20;                    // Arc radius
    var startAngle     = 0;                     // Starting point on circle
    var endAngle       = Math.PI*(2-j/2);   // End point on circle
    var anticlockwise  = i%2==0 ? false : true; // clockwise or anticlockwise

    ctx.arc(x,y,radius,startAngle,endAngle, anticlockwise);

    if (i>1){
      ctx.fill();
    } else {
      ctx.stroke();
    }
  }
}
贝塞尔和二次方曲线 Bezier and quadratic curves
The next type of paths available are Bézier curves, available in the cubic and quadratic varieties. These are generally used to draw complex organic shapes.
接下来要介绍的路径是 贝塞尔曲线 ,它可以是二次和三次方的形式,一般用于绘制复杂而有规律的形状。
quadraticCurveTo(cp1x, cp1y, x, y) // BROKEN in Firefox 1.5 (see work around below)
bezierCurveTo(cp1x, cp1y, cp2x, cp2y, x, y)
 The difference between these can best be described using the image on the right. A quadratic Bézier curve has a start and an end point (blue dots) and just one control point (red dot) while a cubic Bézier curve uses two control points.
上面两行代码的区别见右图。它们都有一个起点一个终点(图中的蓝点),但二次方贝塞尔曲线只有一个(红色)控制点点)而三次方贝塞尔曲线有两个。
The x and y parameters in both these methods are the coordinates of the end point. cp1x and cp1y are the coordinates of the first control point, and cp2x and cp2y are the coordinates of the second control point.
参数 x 和 y 是终点坐标,cp1x 和 cp1y 是第一个控制点的坐标,cp2x 和 cp2y 是第二个的。
Using quadratic and cubic Bézier curves can be quite challenging, because unlike vector drawing software like Adobe Illustrator, we don't have direct visual feedback as to what we're doing. This makes it pretty hard to draw complex shapes. In the following example, we'll be drawing some simple organic shapes, but if you have the time and, most of all, the patience, much more complex shapes can be created.
使用二次方和三次方的贝塞尔曲线是相当有挑战的,因为不像在矢量绘图软件 Adobe Illustrator 里那样有即时的视觉反馈。因为用它来画复杂图形是比较麻烦的。但如果你有时间,并且最重要是有耐心,再复杂的图形都可以绘制出来的。下面我们来画一个简单而又规律的图形。
There's nothing very difficult in these examples. In both cases we see a succession of curves being drawn which finally result in a complete shape.
这些例子都比较简单。我们绘制的都是完整的图形。
quadraticCurveTo 的使用示例

// Quadratric curves example
ctx.beginPath();
ctx.moveTo(75,25);
ctx.quadraticCurveTo(25,25,25,62.5);
ctx.quadraticCurveTo(25,100,50,100);
ctx.quadraticCurveTo(50,120,30,125);
ctx.quadraticCurveTo(60,120,65,100);
ctx.quadraticCurveTo(125,100,125,62.5);
ctx.quadraticCurveTo(125,25,75,25);
ctx.stroke();
It is possible to convert any quadratic Bézier curve to a cubic Bézier curve by correctly computing both cubic Bézier control points from the single quadratic Bézier control point, although the reverse is NOT true. An exact conversion of a cubic Bézier curve to a quadratic Bézier curve is only possible if the cubic term is zero, more commonly a subdivision method is used to approximate a cubic Bézier using multiple quadratic Bézier curves.
通过计算,可以由二次曲线的单个控制点得出相应三次方曲线的两个控制点,因此二次方转三次方是可能的,但是反之不然。仅当三次方程中的三次项为零是才可能转换为二次的贝塞尔曲线。通常地可以用多条二次方曲线通过细分算法来近似模拟三次方贝塞尔曲线。
bezierCurveTo 的使用示例

// Bezier curves example
ctx.beginPath();
ctx.moveTo(75,40);
ctx.bezierCurveTo(75,37,70,25,50,25);
ctx.bezierCurveTo(20,25,20,62.5,20,62.5);
ctx.bezierCurveTo(20,80,40,102,75,120);
ctx.bezierCurveTo(110,102,130,80,130,62.5);
ctx.bezierCurveTo(130,62.5,130,25,100,25);
ctx.bezierCurveTo(85,25,75,37,75,40);
ctx.fill();
Firefox 1.5 quadraticCurveTo() bug 的应对方案
There is a bug in the Firefox 1.5 implementation of quadatricCurveTo(). It does NOT draw a quadratic curve, as it is just calling the same cubic curve function bezierCurveTo() calls, and repeating the single quadratic control point (x,y) coordinate twice. For this reason quadraticCurveTo() will yield incorrect results. If you require the use of quadraticCurveTo() you must convert your quadratic Bézier curve to a cubic Bézier curve yourself, so you can use the working bezierCurveTo() method.
在 Firefox 1.5 里,quadatricCurveTo() 的实现是有 bug 的,它不是直接绘制二次方曲线,而是调用 bezierCurveTo() ,其中两个控制点都是二次方曲线的那个单控制点。因此,它会绘制出不正确的曲线。如果必须使用到 quadraticCurveTo(),你需要自行去将二次方曲线转换成三次方的,这样就可以用 bezierCurveTo() 方法了。
var currentX, currentY;  // set to last x,y sent to lineTo/moveTo/bezierCurveTo or quadraticCurveToFixed()

function quadraticCurveToFixed( cpx, cpy, x, y ) {
  /*
   For the equations below the following variable name prefixes are used:
     qp0 is the quadratic curve starting point (you must keep this from your last point sent to moveTo(), lineTo(), or bezierCurveTo() ).
     qp1 is the quadatric curve control point (this is the cpx,cpy you would have sent to quadraticCurveTo() ).
     qp2 is the quadratic curve ending point (this is the x,y arguments you would have sent to quadraticCurveTo() ).
   We will convert these points to compute the two needed cubic control points (the starting/ending points are the same for both
   the quadratic and cubic curves.

   The equations for the two cubic control points are:
     cp0=qp0 and cp3=qp2
     cp1 = qp0 + 2/3 *(qp1-qp0)
     cp2 = cp1 + 1/3 *(qp2-qp0)

   In the code below, we must compute both the x and y terms for each point separately.

    cp1x = qp0x + 2.0/3.0*(qp1x - qp0x);
    cp1y = qp0y + 2.0/3.0*(qp1y - qp0y);
    cp2x = cp1x + (qp2x - qp0x)/3.0;
    cp2y = cp1y + (qp2y - qp0y)/3.0;

   We will now
     a) replace the qp0x and qp0y variables with currentX and currentY (which *you* must store for each moveTo/lineTo/bezierCurveTo)
     b) replace the qp1x and qp1y variables with cpx and cpy (which we would have passed to quadraticCurveTo)
     c) replace the qp2x and qp2y variables with x and y.
   which leaves us with:
  */
  var cp1x = currentX + 2.0/3.0*(cpx - currentX);
  var cp1y = currentY + 2.0/3.0*(cpy - currentY);
  var cp2x = cp1x + (x - currentX)/3.0;
  var cp2y = cp1y + (y - currentY)/3.0;

  // and now call cubic Bezier curve to function
  bezierCurveTo( cp1x, cp1y, cp2x, cp2y, x, y );

  currentX = x;
  currentY = y;
}
矩形路径 Rectangles
Besides the three methods we saw above which draw rectangular shapes directly to the canvas, we also have a method rect which adds a rectangular path to the path list.
除了上面提到的三个方法可以直接绘制矩形之外,我们还有一个 rect 方法是用于绘制矩形路径的。
rect(x, y, width, height)
This method takes four arguments. The x and y parameters define the coordinate of the top left corner of the new rectangular path. width and height define the width and the height of the rectangle.
它接受四个参数,x 和 y 是其左上角坐标,width 和 height 是其宽和高。
When this method is executed, the moveTo method is automatically called with the parameters (0,0) (i.e. it resets the starting point to its default location).
当它被调用时,moveTo 方法会自动被调用,参数为(0,0),于是起始坐标又恢复成初始原点了。
综合 Making combinations
In all examples on this page I've only used one type of path function per shape. However there's absolutely no limitation to the amount or type of paths you can use to create a shape. So in this last example I've tried to combine all of the path functions to make a set of very famous game characters.
上面所用到的例子都只用到了一种类型的路径,当然 canvas 不会限制所使用的路径类型的多少。所以,我们来看一个路径大杂烩。
综合样例
I'm not going to run through this complete script, but the most important things to note are the function roundedRect and the use of the fillStyle property. It can be very usefull and time saving to define your own functions to draw more complex shapes. In this script it would have taken me twice as many lines of code as I have now.
We will look at the fillStyle property in greater depth later in this tutorial. Here I'm using it to change the fill color from the default black, to white, and back again.
在整个例子里,最值得注意的是 roundedRect 函数的使用和 fillStyle 属性的设置。自定义函数对于封装复杂图形的绘制是非常有用的。在这个例子里使用自定义函数就省掉了大约一半的代码。
在接下来的例子里会深入探讨 fillStyle 属性的使用。这里是用它来改变填充颜色,从默认的黑色,到白色,然后再回到黑色。
function draw() {
  var ctx = document.getElementById('canvas').getContext('2d');
  roundedRect(ctx,12,12,150,150,15);
  roundedRect(ctx,19,19,150,150,9);
  roundedRect(ctx,53,53,49,33,10);
  roundedRect(ctx,53,119,49,16,6);
  roundedRect(ctx,135,53,49,33,10);
  roundedRect(ctx,135,119,25,49,10);

  ctx.beginPath();
  ctx.arc(37,37,13,Math.PI/7,-Math.PI/7,false); //chiensexu  本来是true呵呵,反了
  ctx.lineTo(31,37);
  ctx.fill();
  for(i=0;i<8;i++){
    ctx.fillRect(51+i*16,35,4,4);
  }
  for(i=0;i<6;i++){
    ctx.fillRect(115,51+i*16,4,4);
  }
  for(i=0;i<8;i++){
    ctx.fillRect(51+i*16,99,4,4);
  }
  ctx.beginPath();
  ctx.moveTo(83,116);
  ctx.lineTo(83,102);
  ctx.bezierCurveTo(83,94,89,88,97,88);
  ctx.bezierCurveTo(105,88,111,94,111,102);
  ctx.lineTo(111,116);
  ctx.lineTo(106.333,111.333);
  ctx.lineTo(101.666,116);
  ctx.lineTo(97,111.333);
  ctx.lineTo(92.333,116);
  ctx.lineTo(87.666,111.333);
  ctx.lineTo(83,116);
  ctx.fill();
  ctx.fillStyle = "white";
  ctx.beginPath();
  ctx.moveTo(91,96);
  ctx.bezierCurveTo(88,96,87,99,87,101);
  ctx.bezierCurveTo(87,103,88,106,91,106);
  ctx.bezierCurveTo(94,106,95,103,95,101);
  ctx.bezierCurveTo(95,99,94,96,91,96);
  ctx.moveTo(103,96);
  ctx.bezierCurveTo(100,96,99,99,99,101);
  ctx.bezierCurveTo(99,103,100,106,103,106);
  ctx.bezierCurveTo(106,106,107,103,107,101);
  ctx.bezierCurveTo(107,99,106,96,103,96);
  ctx.fill();
  ctx.fillStyle = "black";
  ctx.beginPath();
  ctx.arc(101,102,2,0,Math.PI*2,true);
  ctx.fill();
  ctx.beginPath();
  ctx.arc(89,102,2,0,Math.PI*2,true);
  ctx.fill();
}
function roundedRect(ctx,x,y,width,height,radius){
  ctx.beginPath();
  ctx.moveTo(x,y+radius);
  ctx.lineTo(x,y+height-radius);
  ctx.quadraticCurveTo(x,y+height,x+radius,y+height);
  ctx.lineTo(x+width-radius,y+height);
  ctx.quadraticCurveTo(x+width,y+height,x+width,y+height-radius);
  ctx.lineTo(x+width,y+radius);
  ctx.quadraticCurveTo(x+width,y,x+width-radius,y);
  ctx.lineTo(x+radius,y);
  ctx.quadraticCurveTo(x,y,x,y+radius);
  ctx.stroke();
}
应用图像 Using images
Redirected from Canvas tutorial:Using images
There were scripting errors on this page. While those are being addressed by site editors, you can view partial content below.
One of the more fun features of the canvas is the abillity to use images. These can be used to do dynamic photo compositing or used as backdrops of graphs etc. It's currently also the only way to add text to them (The specification does not contain any functions to draw text). External images can be used in any format supported by Gecko (e.g. PNG, GIF or JPEG format). Other canvas elements on the same page can also be used as the source.
Canvas 相当有趣的一项功能就是可以引入图像,它可以用于图片合成或者制作背景等。而目前仅可以在图像中加入文字(标准说明中并没有包含绘制文字的功能)。只要是 Gecko 支持的图像(如 PNG,GIF,JPEG等)都可以引入到 canvas 中,而且其它的 canvas 元素也可以作为图像的来源。
引入图像 Importing images
Importing images is basically a two step process:
引入图像只需要简单的两步:
- Firstly we need a reference to a JavaScript Image object or other canvas element as a source. It isn't possible to use images by simply providing a URL/path to them.
- Secondly we draw the image on the canvas using the
drawImagefunction. - 第一当然是来源图片,不是简单的 URL 路径,但可以是一个 JavaScript 的 Image 对象引用,又或者其它的 canvas 元素。
- 然后用
drawImage方法将图像插入到 canvas 中。
Let's look at step one first. There are basically four options available:
先来看看第一步,基本上有四种可选方式:
引用页面内的图片 Using images which are on the same page
We can access all images on a page by using either the document.images collection, the document.getElementsByTagName method, or if we know the ID attribute of the image, the document.getElementById method.
我们可以通过 document.images 集合、document.getElementsByTagName 方法又或者 document.getElementById 方法来获取页面内的图片(如果已知图片元素的 ID。
使用其它 canvas 元素 Using other canvas elements
Just as with normal images we access other canvas elements using either the document.getElementsByTagName method or the document.getElementById method. Make sure you've drawn something to the source canvas before using it in your target canvas.
和引用页面内的图片类似地,用 document.getElementsByTagName 或 document.getElementById 方法来获取其它 canvas 元素。但你引入的应该是已经准备好的 canvas。
One of the more practical uses of this would be to use a second canvas element as a thumbnail view of the other larger canvas.
一个常用的应用就是为另一个大的 canvas 做缩略图。
由零开始创建图像 Creating an image from scratch
Another option is to create new Image objects in our script. The main disadvantage of this approach is that if we don't want our script to halt in the middle because it needs to wait for an image to load, we need some form of image preloading.
另外,我们可以用脚本创建一个新的 Image 对象,但这种方法的主要缺点是如果不希望脚本因为等待图片装置而暂停,还得需要突破预装载。
Basically to create a new image object we do this:
我们可以通过下面简单的方法来创建图片:
var img = new Image();   // Create new Image object
img.src = 'myImage.png'; // Set source path
When this script gets executed, the image starts loading. If loading isn't finished when a drawImage statement gets executed, the script halts until the image is finished loading. If you don't want this to happen, use an onload event handler:
当脚本执行后,图片开始装载。若调用 drawImage 时,图片没装载完,脚本会等待直至装载完毕。如果不希望这样,可以使用 onload 事件:
var img = new Image();   // Create new Image object
img.onload = function(){
  // execute drawImage statements here
}
img.src = 'myImage.png'; // Set source path
If you're only using one external image this can be a good approach but once you need to track more than one we need to resort to something more cunning. It's beyond the scope of this tutorial to look at image preloading tactics but you can check out JavaScript Image Preloader for a complete solution.
如果你只用到一张图片的话,这已经够了。但一旦需要不止一张图片,那就需要更加复杂的处理方法,但图片预装载策略超出本教程的范围,感兴趣的话可以参考JavaScript Image Preloader。
通过 data: url 方式嵌入图像 Embedding an image via data: url
Another possible way to include images is via the data: url. Data urls allow you to completely define an image as a Base64 encoded string of characters directly in your code. One advantage of data urls is that the resulting image is available immediately without another round trip to the server. ( Another advantage is that it is then possible to encapsulate in one file all of your CSS, Javascript, HTML, and images, making it more portable to other locations. ) Some disadvantages of this method are that your image is not cached, and for larger images the encoded url can become quite long:
我们还可以通过 data: url 方式来引用图像。Data urls 允许用一串 Base64 编码的字符串的方式来定义一个图片。其优点就是图片内容即时可用,无须再到服务器兜一圈。(还有一个优点是,可以将 CSS,JavaScript,HTML 和 图片全部封装在一起,迁移起来十分方便。)缺点就是图像没法缓存,图片大的话内嵌的 url 数据会相当的长:
var img_src = 'data:image/gif;base64,R0lGODlhCwALAIAAAAAA3pn/ZiH5BAEAAAEALAAAAAALAAsAAAIUhA+hkcuO4lmNVindo7qyrIXiGBYAOw==';drawImage
Once we have a reference to our source image object we can use the drawImage method to render it to the canvas. As we we'll see later the drawImage method is overloaded and has three different variants. In its most basic form it looks like this.
一旦获得了源图对象,我们就可以使用 drawImage 方法将它渲染到 canvas 里。drawImage 方法有三种形态,下面是最基础的一种。
drawImage(image, x, y)
Where image is a reference to our image or canvas object. x and y form the coordinate on the target canvas where our image should be placed.
其中 image 是 image 或者 canvas 对象,x 和 y 是其在目标 canvas 里的起始坐标。
drawImage 示例 1
 In the following example I will be using an external image as the backdrop of a small line graph. Using backdrops can make your script considerably smaller because we don't need to draw an elaborate background. I'm only using one image here so I use the image object's
 onload event handler to execute the drawing statements. The drawImage method places the backdrop on the coordinate (0,0) which is the top left corner of the canvas.
下面一个例子我用一个外部图像作为一线性图的背景。用背景图我们就不需要绘制负责的背景,省下不少代码。这里只用到一个 image 对象,于是就在它的 onload 事件响应函数中触发绘制动作。drawImage 方法将背景图放置在 canvas 的左上角 (0,0) 处。
function draw() {
    var ctx = document.getElementById('canvas').getContext('2d');
    var img = new Image();
    img.onload = function(){
      ctx.drawImage(img,0,0);
      ctx.beginPath();
      ctx.moveTo(30,96);
      ctx.lineTo(70,66);
      ctx.lineTo(103,76);
      ctx.lineTo(170,15);
      ctx.stroke();
    }
    img.src = 'images/backdrop.png';
  }
缩放 Scaling
The second variant of the drawImage method adds two new parameters and it allows us to place scaled images on the canvas.
drawImage 方法的又一变种是增加了两个用于控制图像在 canvas 中缩放的参数。
drawImage(image, x, y, width, height)
Where width and height is the image's size on the target canvas. 当中 width 和 height 分别是图像在 canvas 中显示大小。
drawImage 示例 2
 In this example I'm going to use an image as a wallpaper and repeat it several times on the canvas. This is done simply by looping and placing the scaled images at different positions. In the code below the first
 for loops through the rows the second for loop the columns. The image is scaled one third of its original size which is 50x38 pixels. We'll see how this could also have been achieved, by creating a custom pattern, later in this tutorial.
在这个例子里,我会用一张图片像背景一样在 canvas 中以重复平铺开来。实现起来也很简单,只需要循环铺开经过缩放的图片即可。见下面的代码,第一层 for 循环是做行重复,第二层是做列重复的。图像大小被缩放至原来的三分之一,50x38 px。这种方法可以用来很好的达到背景图案的效果,在下面的教程中会看到。
Note: Images can become blurry when scaling up or grainy if they're scaled down too much. Scaling is probably best not done if you've got some text in it which needs to remain legible.
注意:图像可能会因为大幅度的缩放而变得起杂点或者模糊。如果您的图像里面有文字,那么最好还是不要进行缩放,因为那样处理之后很可能图像里的文字就会变得无法辨认了。

function draw() {
    var ctx = document.getElementById('canvas').getContext('2d');
    var img = new Image();
    img.onload = function(){
      for (i=0;i<4;i++){
        for (j=0;j<3;j++){
          ctx.drawImage(img,j*50,i*38,50,38);
        }
      }
    }
    img.src = 'images/rhino.jpg';
  }
切片 Slicing
The third and last variant of the drawImage method has eight new parameters. We can use this method to slice parts of a source image and draw them to the canvas.
drawImage 方法的第三个也是最后一个变种有8个新参数,用于控制做切片显示的。
drawImage(image, sx, sy, sWidth, sHeight, dx, dy, dWidth, dHeight)
 The first parameter
 image, just as with the other variants, is either a reference to an image object or a reference to a different canvas element. For the other eight parametes it's best to look at the image on the right. The first four parameters define the location and size of the slice on the source image. The last four parameters define the position and size on the destination canvas.
第一个参数和其它的是相同的,都是一个图像或者另一个 canvas 的引用。其它8个参数最好是参照右边的图解,前4个是定义图像源的切片位置和大小,后4个则是定义切片的目标显示位置和大小。
Slicing can be a useful tool when you want to make compositions. You could have all elements in a single image file and use this method to composite a complete drawing. For instance, if you want to make a chart you could have a PNG image containing all the necessary text in a single file and depending on your data could change the scale of your chart without very much diffculty. Another advantage is that you don't need to load every image individually.
切片是个做图像合成的强大工具。假设有一张包含了所有元素的图像,那么你可以用这个方法来合成一个完整图像。例如,你想画一张图表,而手上有一个包含所有必需的文字的 PNG 文件,那么你可以很轻易的根据实际数据的需要来改变最终显示的图表。这方法的另一个好处就是你不需要单独装载每一个图像。
drawImage 示例 3
 In this example I'm going to use the same rhino as we've seen above, but now I'm going to slice its head out and composite it into a picture frame. The image of the picture frame includes a dropshadow which has been saved as a 24-bit PNG image. Because 24-bit PNG images include a full 8-bit alpha channel, unlike GIF and 8-bit PNG images, I can place it onto any background and don't have to worry about a matte color.
在这个例子里面我用到上面已经用过的犀牛图像,不过这次我要给犀牛头做个切片特写,然后合成到一个相框里面去。相框带有阴影效果,是一个以 24-bit PNG 格式保存的图像。因为 24-bit PNG 图像带有一个完整的 8-bit alpha 通道,与 GIF 和 8-bit PNG 不同,我可以将它放成背景而不必担心底色的问题。
I took a different approach to the loading of the images than the example above. I just placed the images directly in my HTML document and used a CSS rule to hide them from view (display:none). I assigned both images an id attribute to make them easier to select. The script itself is very simple. I first draw the sliced and scaled image on the canvas (first drawImage statement), and then place the frame on top (second drawImage statement).
我用一个与上面用到的不同的方法来装载图像,直接将图像插入到 HTML 里面,然后通过 CSS 隐藏(display:none)它。两个图像我都赋了 id ,方便后面使用。看下面的脚本,相当简单,首先对犀牛头做好切片(第一个 drawImage )放在 canvas 上,然后再上面套个相框(第二个 drawImage )。

function draw() {
  var canvas = document.getElementById('canvas');
  var ctx = canvas.getContext('2d');

  // Draw slice
  ctx.drawImage(document.getElementById('source'),
                33,71,104,124,21,20,87,104);

  // Draw frame
  ctx.drawImage(document.getElementById('frame'),0,0);
}
示例:画廊 Art gallery example
 In the final example of this chapter I've made a little art gallery. The gallery consists of a table containing several images. When the page is loaded, for each image in the page a canvas element is inserted and a frame is drawn arround it.
我这一章最后的示例是弄一个小画廊。画廊由挂着几张画作的格子组成。当页面装载好之后,为每张画创建一个 canvas 元素并用加上画框然后插入到画廊中去。
In my case, all images have a fixed width and height, and so does the frame that's drawn around it. You could enhance the script so that it uses the image's width and height to make the frame fit perfectly around it.
在我这个例子里面,所有“画”都是固定宽高的,画框也是。你可以做些改进,通过脚本用画的宽高来准确控制围绕它的画框的大小。
The code below should be self-explanatory. We loop through the images array and add new canvas elements accordingly. Probably the only thing to note, for those not so familar with the DOM, is the use of the insertBefore method. insertBefore is a method of the parent node (a table cell) of the element (the image) before which we want to insert our new node (the canvas element).
下面的代码应该是蛮自我解释的了。就是遍历图像对象数组,依次创建新的 canvas 元素并添加进去。可能唯一需要注意的,对于那些并不熟悉 DOM 的朋友来说,是 insertBefore 方法的用法。insertBefore 是父节点(单元格)的方法,用于将新节点(canvas 元素)插入到我们想要插入的节点之前。
function draw() {

  // Loop through all images
  for (i=0;i<document.images.length;i++){

    // Don't add a canvas for the frame image
    if (document.images[i].getAttribute('id')!='frame'){

      // Create canvas element
      canvas = document.createElement('CANVAS');
      canvas.setAttribute('width',132);
      canvas.setAttribute('height',150);

      // Insert before the image
      document.images[i].parentNode.insertBefore(canvas,document.images[i]);

      ctx = canvas.getContext('2d');

      // Draw image to canvas
      ctx.drawImage(document.images[i],15,20);

      // Add frame
      ctx.drawImage(document.getElementById('frame'),0,0);
    }
  }
}
控制图像的缩放行为 Controlling image scaling behavior
{{ gecko_minversion_header("1.9.2") }}
Gecko 1.9.2 introduced the mozImageSmoothingEnabled property to the canvas element; if this Boolean value is false, images won't be smoothed when scaled. This property is true by default.
Gecko 1.9.2 引入了 mozImageSmoothingEnabled 属性,值为 false 时,图像不会平滑地缩放。默认是 true 。
cx.mozImageSmoothingEnabled = false;{{ PreviousNext("Canvas tutorial/Drawing shapes", "Canvas tutorial/Applying styles and colors") }}
{{ languages( { "zh-tw": "zh_tw/Canvas_教學/使用影像", "fr": "fr/Tutoriel_canvas/Utilisation_d\'images", "ja": "ja/Canvas_tutorial/Using_images", "pl": "pl/Przewodnik_po_canvas/Zastosowanie_obrazk\u00f3w", "zh-cn": "cn/Canvas_tutorial/Using_images", "ru": "ru/\u041e\u0431\u0443\u0447\u0435\u043d\u0438\u0435_canvas/\u0418\u0441\u043f\u043e\u043b\u044c\u0437\u043e\u0432\u0430\u043d\u0438\u0435_\u043a\u0430\u0440\u0442\u0438\u043d\u043e\u043a" } ) }}


 2783
2783


 被折叠的 条评论
为什么被折叠?
被折叠的 条评论
为什么被折叠?
 到【灌水乐园】发言


