


 目录视图
目录视图 摘要视图
摘要视图 订阅
订阅版权声明:本文为博主原创文章,未经博主允许不得转载。
尊重原创,欢迎转载,转载请注明: FROM GA_studio http://blog.csdn.net/tianjian4592
前面说Canvas大致可以分为三类:
1. save、restore 等与层的保存和回滚相关的方法;
2. scale、rotate、clipXXX 等对画布进行操作的方法;
3. drawXXX 等一系列绘画相关的方法;
前面主要讲了drawBitmap方法,并举了一个星球浮动的栗子,在那个例子中,星球有大有小,需要移动,有时候可能需求上还需要旋转或错切,有了这些需求,我们就需要使用到与Canvas相关的translate、scale、rotate、skew这几个方法,平移、缩放、旋转、错切,这四个词听起来是如此的熟悉,我们在做一些基本动画的时候经常会与这几个词打交道,现在我们一个个看下当把这几个家伙和Canvas(画布)结合能产生什么效果;
当然在看之前得先明确两个基本概念:
1.Canvas 的左上角是(0,0);
2.基于左上角往右 X 为正,往下 Y 为正,反之为负;
一、canvas.translate() - 画布的平移:
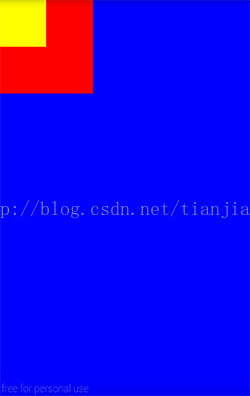
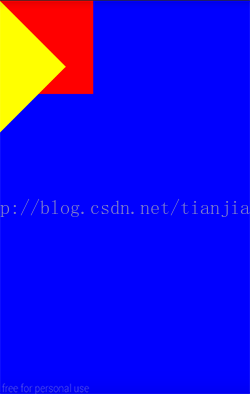
首先咱们在画布上画一个400 X 400 红色的矩形
canvas.drawRect(new Rect(0, 0, 400, 400), mPaint);此时整个画布的左上角出现了一个红色的矩形(为了更清楚,蓝色打个底)该矩形大小为400 X 400 ,效果如下:
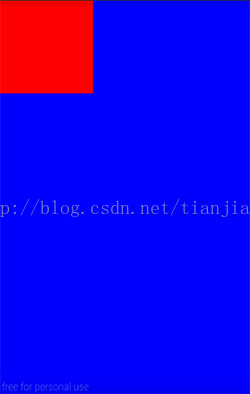
接下来我们canvas.translate( )玩玩
- @Override
- protected void onDraw(Canvas canvas) {
- super.onDraw(canvas);
- canvas.drawColor(Color.BLUE);
- canvas.translate(100, 100);
- canvas.drawRect(new Rect(0, 0, 400, 400), mPaint);
- }

    @Override
    protected void onDraw(Canvas canvas) {
        super.onDraw(canvas);
        canvas.drawColor(Color.BLUE);
        canvas.translate(100, 100);
        canvas.drawRect(new Rect(0, 0, 400, 400), mPaint);
    }
看下效果:

此时可以看到,虽然是绘制同样的矩形,但矩形在画布上的位置已经向右和向下各移动了100px;
既然如此,这个时候如果我们再将canvas 平移(translate)(100,100),再绘制一个同样的矩形会出现什么情况呢?会与之前的矩形重叠吗?咱们拭目以待:- @Override
- protected void onDraw(Canvas canvas) {
- super.onDraw(canvas);
- canvas.drawColor(Color.BLUE);
- canvas.translate(100, 100);
- canvas.drawRect(new Rect(0, 0, 400, 400), mPaint);
- canvas.translate(100, 100);
- canvas.drawRect(new Rect(0, 0, 400, 400), mPaint);
- }
    @Override
    protected void onDraw(Canvas canvas) {
        super.onDraw(canvas);
        canvas.drawColor(Color.BLUE);
        canvas.translate(100, 100);
        canvas.drawRect(new Rect(0, 0, 400, 400), mPaint);
        canvas.translate(100, 100);
        canvas.drawRect(new Rect(0, 0, 400, 400), mPaint);
    }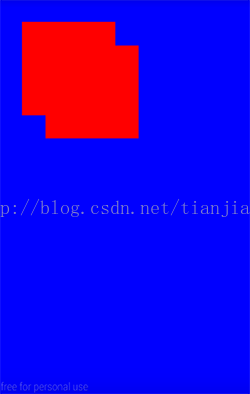
从效果上看,两次translate 进行了叠加,绘制第二个矩形的时候画布已经偏移了(200,200);
好了,了解到这里,咱们利用canvas.translate( )一起来做个小栗子,绘制一个生活中比较常用的刻度尺;
咱们先从网上找个用于参考的刻度尺图片:
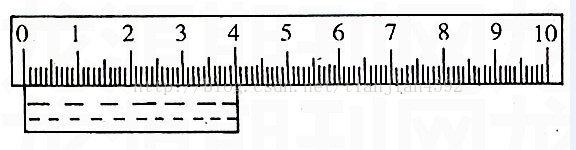
从图上看,刻度尺的元素有:外框、刻度线(不同的数值刻度线长短不一)、数字
所以我们所要做的就是对上面的元素在onDraw里分别绘制:
- @Override
- protected void onDraw(Canvas canvas) {
- super.onDraw(canvas);
- // 绘制外框
- drawOuter(canvas);
- // 绘制刻度线
- drawLines(canvas);
- // 绘制数字
- drawNumbers(canvas);
- }
    @Override
    protected void onDraw(Canvas canvas) {
        super.onDraw(canvas);
        // 绘制外框
        drawOuter(canvas);
        // 绘制刻度线
        drawLines(canvas);
        // 绘制数字
        drawNumbers(canvas);
}有了上面的分析,咱们一个一个来,先绘制外框,外框也就是一个矩形,只需要确定边框的位置和大小,然后使用canvas.drawRect( )绘制即可:
咱们先定义几个需要的数据,为了屏幕适配,数据均为dp:
- // 刻度尺高度
- private static final int DIVIDING_RULE_HEIGHT = 70;
- // 距离左右间
- private static final int DIVIDING_RULE_MARGIN_LEFT_RIGHT = 10;
- // 第一条线距离边框距离
- private static final int FIRST_LINE_MARGIN = 5;
- // 打算绘制的厘米数
- private static final int DEFAULT_COUNT = 9;
    // 刻度尺高度
    private static final int DIVIDING_RULE_HEIGHT = 70;
    // 距离左右间
    private static final int DIVIDING_RULE_MARGIN_LEFT_RIGHT = 10;

    // 第一条线距离边框距离
    private static final int FIRST_LINE_MARGIN = 5;
    // 打算绘制的厘米数
private static final int DEFAULT_COUNT = 9;- private void initData() {
- mDividRuleHeight = (int) TypedValue.applyDimension(TypedValue.COMPLEX_UNIT_DIP,
- DIVIDING_RULE_HEIGHT, mResources.getDisplayMetrics());
- mHalfRuleHeight = mDividRuleHeight / 2;
- mDividRuleLeftMargin = (int) TypedValue.applyDimension(TypedValue.COMPLEX_UNIT_DIP,
- DIVIDING_RULE_MARGIN_LEFT_RIGHT, mResources.getDisplayMetrics());
- mFirstLineMargin = (int) TypedValue.applyDimension(TypedValue.COMPLEX_UNIT_DIP,
- FIRST_LINE_MARGIN, mResources.getDisplayMetrics());
- }
    private void initData() {
        mDividRuleHeight = (int) TypedValue.applyDimension(TypedValue.COMPLEX_UNIT_DIP,
                DIVIDING_RULE_HEIGHT, mResources.getDisplayMetrics());
        mHalfRuleHeight = mDividRuleHeight / 2;

        mDividRuleLeftMargin = (int) TypedValue.applyDimension(TypedValue.COMPLEX_UNIT_DIP,
                DIVIDING_RULE_MARGIN_LEFT_RIGHT, mResources.getDisplayMetrics());
        mFirstLineMargin = (int) TypedValue.applyDimension(TypedValue.COMPLEX_UNIT_DIP,
                FIRST_LINE_MARGIN, mResources.getDisplayMetrics());

    }
- mOutRect = new Rect(mDividRuleLeftMargin, top, mTotalWidth - mDividRuleLeftMargin,
- mRuleBottom);
mOutRect = new Rect(mDividRuleLeftMargin, top, mTotalWidth - mDividRuleLeftMargin,
                mRuleBottom);
接下来看刻度线的绘制,根据厘米可以计算出中间的格数,根据厘米占用屏幕宽度和所占格数可以计算出每一格所占屏幕宽度:
- mLineInterval = (mTotalWidth - 2 * mDividRuleLeftMargin - 2 * mFirstLineMargin)
- / (DEFAULT_COUNT * 10 - 1);
mLineInterval = (mTotalWidth - 2 * mDividRuleLeftMargin - 2 * mFirstLineMargin)
                / (DEFAULT_COUNT * 10 - 1);
有了每一格所占宽度,我们只需要在绘制刻度线的时候不断将画布右移对应宽度即可:
- /**
- * 绘制刻度线
- * @param canvas
- */
- private void drawLines(Canvas canvas) {
- canvas.save();
- canvas.translate(mLineStartX, 0);
- int top = mMaxLineTop;
- for (int i = 0; i <= DEFAULT_COUNT * 10; i++) {
- if (i % 10 == 0) {
- top = mMaxLineTop;
- } else if (i % 5 == 0) {
- top = mMiddleLineTop;
- } else {
- top = mMinLineTop;
- }
- canvas.drawLine(0, mRuleBottom, 0, top, mLinePaint);
- canvas.translate(mLineInterval, 0);
- }
- canvas.restore();
- }
    /**
     * 绘制刻度线
     * @param canvas
     */
    private void drawLines(Canvas canvas) {
        canvas.save();
        canvas.translate(mLineStartX, 0);
        int top = mMaxLineTop;
        for (int i = 0; i <= DEFAULT_COUNT * 10; i++) {
            if (i % 10 == 0) {
                top = mMaxLineTop;
            } else if (i % 5 == 0) {
                top = mMiddleLineTop;
            } else {
                top = mMinLineTop;
            }

            canvas.drawLine(0, mRuleBottom, 0, top, mLinePaint);
            canvas.translate(mLineInterval, 0);

        }
        canvas.restore();

}此时绘制出的刻度尺效果为:
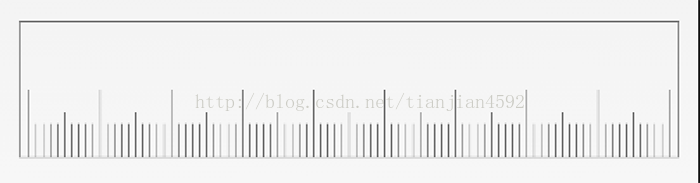
此时刻度尺的基本样子就出来了,对应文字大家有兴趣可以自己加上;
俗话说,条条大路通罗马,我们除了使用canvas.translate ,还能不能使用别的方式进行实现呢,答案当然是可以,比如在绘制的时候根据for循环里的 i 值也可以直接计算出每一根刻度线的位置,然后直接进行绘制,相比之下,这两种方式的优劣大家也可以自行比较一下,好了,canvas.translate() 就说这么多;
二、canvas.scale( ) - 画布的缩放:
关于scale,Android 提供了以下两个接口:
- /**
- * Preconcat the current matrix with the specified scale.
- *
- * @param sx The amount to scale in X
- * @param sy The amount to scale in Y
- */
- public native void scale(float sx, float sy);
- /**
- * Preconcat the current matrix with the specified scale.
- *
- * @param sx The amount to scale in X
- * @param sy The amount to scale in Y
- * @param px The x-coord for the pivot point (unchanged by the scale)
- * @param py The y-coord for the pivot point (unchanged by the scale)
- */
- public final void scale(float sx, float sy, float px, float py) {
- translate(px, py);
- scale(sx, sy);
- translate(-px, -py);
- }
    /**
     * Preconcat the current matrix with the specified scale.
     *
     * @param sx The amount to scale in X
     * @param sy The amount to scale in Y
     */
    public native void scale(float sx, float sy);

    /**
     * Preconcat the current matrix with the specified scale.
     *
     * @param sx The amount to scale in X
     * @param sy The amount to scale in Y
     * @param px The x-coord for the pivot point (unchanged by the scale)
     * @param py The y-coord for the pivot point (unchanged by the scale)
     */
    public final void scale(float sx, float sy, float px, float py) {
        translate(px, py);
        scale(sx, sy);
        translate(-px, -py);
    }
- @Override
- protected void onDraw(Canvas canvas) {
- super.onDraw(canvas);
- canvas.drawColor(Color.BLUE);
- canvas.drawRect(new Rect(0, 0, 400, 400), mPaint);
- canvas.scale(0.5f, 0.5f);
- mPaint.setColor(Color.YELLOW);
- canvas.drawRect(new Rect(0, 0, 400, 400), mPaint);
- }
    @Override
    protected void onDraw(Canvas canvas) {
        super.onDraw(canvas);
        canvas.drawColor(Color.BLUE);
        canvas.drawRect(new Rect(0, 0, 400, 400), mPaint);
        canvas.scale(0.5f, 0.5f);
        mPaint.setColor(Color.YELLOW);
        canvas.drawRect(new Rect(0, 0, 400, 400), mPaint);
    }
效果就相当于用个钉子钉在(0,0)处,然后把矩形的x,y缩放为一半,我们再来看看第二个接口scale(float sx , float sy, float px,float py):
前两个参数为将画布在x、y方向上缩放的倍数,而px和py 分别为缩放的基准点,从源码上可以非常清楚的看出和scale(float sx , float sy)的差别:
translate(px, py);
scale(sx, sy);
translate(-px, -py);我们再在之前的基础上绘制一个同样的矩形,x , y 均缩放为 0.5 倍,缩放中心为矩形的中心:
- @Override
- protected void onDraw(Canvas canvas) {
- super.onDraw(canvas);
- canvas.drawColor(Color.BLUE);
- canvas.drawRect(new Rect(0, 0, 400, 400), mPaint);
- // 保存画布状态
- canvas.save();
- canvas.scale(0.5f, 0.5f);
- mPaint.setColor(Color.YELLOW);
- canvas.drawRect(new Rect(0, 0, 400, 400), mPaint);
- // 画布状态回滚
- canvas.restore();
- canvas.scale(0.5f, 0.5f, 200, 200);
- mPaint.setColor(Color.BLACK);
- canvas.drawRect(new Rect(0, 0, 400, 400), mPaint);
- }
    @Override
    protected void onDraw(Canvas canvas) {
        super.onDraw(canvas);
        canvas.drawColor(Color.BLUE);
        canvas.drawRect(new Rect(0, 0, 400, 400), mPaint);

        // 保存画布状态
        canvas.save();
        canvas.scale(0.5f, 0.5f);
        mPaint.setColor(Color.YELLOW);
        canvas.drawRect(new Rect(0, 0, 400, 400), mPaint);
        // 画布状态回滚
        canvas.restore();

        canvas.scale(0.5f, 0.5f, 200, 200);
        mPaint.setColor(Color.BLACK);
        canvas.drawRect(new Rect(0, 0, 400, 400), mPaint);
    }
一起来看下效果:
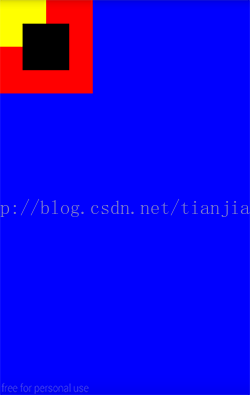
效果就相当于用个钉子钉在矩形的中心,然后进行缩放;
根据上面android 的实现,我们其实可以使用以下代码实现同样的效果:
- // 先将画布平移到矩形的中心
- canvas.translate(200, 200);
- // 将画布进行缩放
- canvas.scale(0.5f, 0.5f);
- // 将画布移回原基准点
- canvas.translate(-200, -200);
- mPaint.setColor(Color.BLACK);
- canvas.drawRect(new Rect(0, 0, 400, 400), mPaint);
        // 先将画布平移到矩形的中心
        canvas.translate(200, 200);
        // 将画布进行缩放
        canvas.scale(0.5f, 0.5f);
        // 将画布移回原基准点
        canvas.translate(-200, -200);
        mPaint.setColor(Color.BLACK);
        canvas.drawRect(new Rect(0, 0, 400, 400), mPaint);
到此为止,我们也就了解了对画布的缩放,基于canvas.scale(),我们一起完成一个小例子:
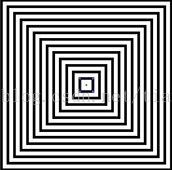
上面是网络上找的一张让人产生视觉误差的静态图,我们模拟绘制出上面的效果;
思路非常的简单:
1. 绘制一个和屏幕等宽的正方形;
2. 将画布以正方形中心为基准点进行缩放;
3. 在缩放的过程中绘制原正方形;
注:每次绘制都得使用canvas.save() 和 canvas.restore()进行画布的锁定和回滚,以免除对后面绘制的影响(后面会单独讲)
先初始化画笔,注意此时画笔需要设置成空心:
- /**
- * 初始化画笔
- */
- private void initPaint() {
- mPaint = new Paint(Paint.ANTI_ALIAS_FLAG);
- // 将画笔设置为空心
- mPaint.setStyle(Style.STROKE);
- // 设置画笔颜色
- mPaint.setColor(Color.BLACK);
- // 设置画笔宽度
- mPaint.setStrokeWidth(mLineWidth);
- }
    /**
     * 初始化画笔
     */
    private void initPaint() {
        mPaint = new Paint(Paint.ANTI_ALIAS_FLAG);
        // 将画笔设置为空心
        mPaint.setStyle(Style.STROKE);
        // 设置画笔颜色
        mPaint.setColor(Color.BLACK);
        // 设置画笔宽度
        mPaint.setStrokeWidth(mLineWidth);
    }
- /**
- * 绘制正方形
- *
- * @param canvas
- */
- private void drawSquare(Canvas canvas) {
- for (int i = 0; i < TOTAL_SQUARE_COUNT; i++) {
- // 保存画布
- canvas.save();
- float fraction = (float) i / TOTAL_SQUARE_COUNT;
- // 将画布以正方形中心进行缩放
- canvas.scale(fraction, fraction, mHalfWidth, mHalfHeight);
- canvas.drawRect(mSquareRect, mPaint);
- // 画布回滚
- canvas.restore();
- }
- }
    /**
     * 绘制正方形
     *
     * @param canvas
     */
    private void drawSquare(Canvas canvas) {
        for (int i = 0; i < TOTAL_SQUARE_COUNT; i++) {
            // 保存画布
            canvas.save();
            float fraction = (float) i / TOTAL_SQUARE_COUNT;
            // 将画布以正方形中心进行缩放
            canvas.scale(fraction, fraction, mHalfWidth, mHalfHeight);
            canvas.drawRect(mSquareRect, mPaint);
            // 画布回滚
            canvas.restore();
        }
    }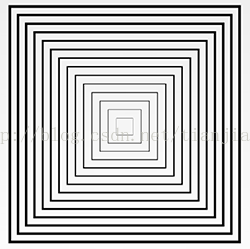
其实最终效果和网上找的还是有点小差别的,由于画布的缩放,越小的时候画笔宽度越细,而原图是所有的都一样宽度,但似乎画笔宽度缩放之后效果更佳,哈哈 ... ...
三、canvas.rotate( ) - 画布的旋转:
canvas.rotate( )和canvas.scale()可以类比起来看,如果理解了canvas.scale( ),那么canvas.rotate( )将会非常简单实用;
简单来讲,canvas.rotate( )即是将画布进行旋转,和canvas.scale( )类似的是,它也有两个可以使用的方法:
- /**
- * Preconcat the current matrix with the specified rotation.
- *
- * @param degrees The amount to rotate, in degrees
- */
- public native void rotate(float degrees);
- /**
- * Preconcat the current matrix with the specified rotation.
- *
- * @param degrees The amount to rotate, in degrees
- * @param px The x-coord for the pivot point (unchanged by the rotation)
- * @param py The y-coord for the pivot point (unchanged by the rotation)
- */
- public final void rotate(float degrees, float px, float py) {
- translate(px, py);
- rotate(degrees);
- translate(-px, -py);
- }
    /**
     * Preconcat the current matrix with the specified rotation.
     *
     * @param degrees The amount to rotate, in degrees
     */
    public native void rotate(float degrees);

    /**
     * Preconcat the current matrix with the specified rotation.
     *
     * @param degrees The amount to rotate, in degrees
     * @param px The x-coord for the pivot point (unchanged by the rotation)
     * @param py The y-coord for the pivot point (unchanged by the rotation)
     */
    public final void rotate(float degrees, float px, float py) {
        translate(px, py);
        rotate(degrees);
        translate(-px, -py);
    }
两个方法的区别也是在于基准点的选取,默认是以原点作为基准点,另一个则是以传入的x,y 作为基准点,是不是和scale 一模一样,咱们一起来rotate一下:
咱们先转转左上角的矩形,转多少度呢?先来个90度玩玩吧;
- @Override
- protected void onDraw(Canvas canvas) {
- super.onDraw(canvas);
- canvas.drawColor(Color.BLUE);
- canvas.drawRect(new Rect(0, 0, 400, 400), mPaint);
- mPaint.setColor(Color.YELLOW);
- canvas.rotate(90);
- canvas.drawRect(new Rect(0, 0, 400, 400), mPaint);
- }
    @Override
    protected void onDraw(Canvas canvas) {
        super.onDraw(canvas);
        canvas.drawColor(Color.BLUE);
        canvas.drawRect(new Rect(0, 0, 400, 400), mPaint);
        mPaint.setColor(Color.YELLOW);
        canvas.rotate(90);
        canvas.drawRect(new Rect(0, 0, 400, 400), mPaint);
    }

擦,黄色的矩形呢?
由于基准点是原点,我们直接旋转了90 度,所以已经将矩形旋转出屏幕,当然看不到了,我们将角度调小一点,改为45 度:
- @Override
- protected void onDraw(Canvas canvas) {
- super.onDraw(canvas);
- canvas.drawColor(Color.BLUE);
- canvas.drawRect(new Rect(0, 0, 400, 400), mPaint);
- mPaint.setColor(Color.YELLOW);
- canvas.rotate(45);
- canvas.drawRect(new Rect(0, 0, 400, 400), mPaint);
- }
    @Override
    protected void onDraw(Canvas canvas) {
        super.onDraw(canvas);
        canvas.drawColor(Color.BLUE);
        canvas.drawRect(new Rect(0, 0, 400, 400), mPaint);
        mPaint.setColor(Color.YELLOW);
        canvas.rotate(45);
        canvas.drawRect(new Rect(0, 0, 400, 400), mPaint);
    }
此时我们可以可以清楚的看到黄色的矩形是红色矩形绕原点(0,0)旋转45度之后的结果;
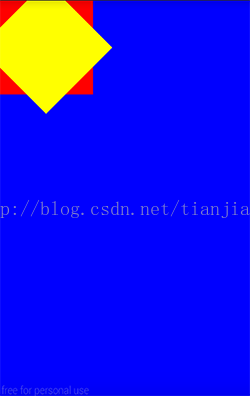
我们再将旋转基准点改为矩形中心看看:
canvas.rotate(45,200,200);
可以看到现在黄色矩形是红色矩形绕着中心旋转后的结果:
到这里,我们已经了解了canvas.rotate(float degrees)和 canvas.rotate(float degrees,float px , float py)的使用,同样也应该清楚后者的实现如下:
translate(px, py);
rotate(degrees);
translate(-px, -py);
好了,我们再利用canvas.rotate()完成个闹钟表盘的小例子:
闹钟表盘其实和刻度尺类似,只是一个是在一条直线上绘制,一个是在一个圆周上绘制,说到底都是确定一个位置绘制刻度线;
既然是圆周,最简单的方式莫过于在闹钟的12点钟处划线,通过canvas的旋转绘制到对应圆周处,我们一起实现一下:
整个圆周是360 度,每隔 30 度为一个整时间刻度,整刻度与刻度之间有四个短刻度,划分出5个小段,每个段为6度,有了这些分析,我们则可以采用如下代码进行绘制:
- /**
- * 绘制刻度
- *
- * @param canvas
- */
- private void drawLines(Canvas canvas) {
- for (int i = 0; i <= 360; i++) {
- if (i % 30 == 0) {
- mLineBottom = mLineTop + mLongLineHeight;
- mLinePaint.setStrokeWidth(mLineWidth);
- } else {
- mLineBottom = mLineTop + mShortLineHeight;
- mLinePaint.setStrokeWidth(mHalfLineWidth);
- }
- if (i % 6 == 0) {
- canvas.save();
- canvas.rotate(i, mHalfWidth, mHalfHeight);
- canvas.drawLine(mLineLeft, mLineTop, mLineLeft, mLineBottom, mLinePaint);
- canvas.restore();
- }
- }
- }
    /**
     * 绘制刻度
     *
     * @param canvas
     */
    private void drawLines(Canvas canvas) {
        for (int i = 0; i <= 360; i++) {
            if (i % 30 == 0) {
                mLineBottom = mLineTop + mLongLineHeight;
                mLinePaint.setStrokeWidth(mLineWidth);
            } else {
                mLineBottom = mLineTop + mShortLineHeight;
                mLinePaint.setStrokeWidth(mHalfLineWidth);
            }

            if (i % 6 == 0) {
                canvas.save();
                canvas.rotate(i, mHalfWidth, mHalfHeight);
                canvas.drawLine(mLineLeft, mLineTop, mLineLeft, mLineBottom, mLinePaint);
                canvas.restore();
            }
        }
    }
此时效果如下:
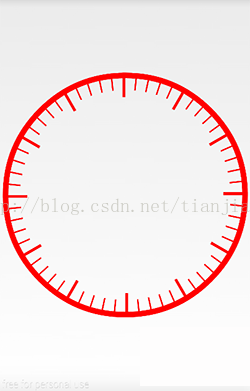
整体代码如下:
- /**
- * 闹钟表盘
- *
- * @author AJian
- */
- public class RotateClockView extends View {
- private static final int LONG_LINE_HEIGHT = 35;
- private static final int SHORT_LINE_HEIGHT = 25;
- private Paint mCirclePaint, mLinePaint;
- private DrawFilter mDrawFilter;
- private int mHalfWidth, mHalfHeight;
- // 圆环线宽度
- private int mCircleLineWidth, mHalfCircleLineWidth;
- // 直线刻度线宽度
- private int mLineWidth, mHalfLineWidth;
- // 长线长度
- private int mLongLineHeight;
- // 短线长度
- private int mShortLineHeight;
- // 刻度线的左、上位置
- private int mLineLeft, mLineTop;
- // 刻度线的下边位置
- private int mLineBottom;
- // 用于控制刻度线位置
- private int mFixLineHeight;
- public RotateClockView(Context context) {
- super(context);
- mDrawFilter = new PaintFlagsDrawFilter(0, Paint.ANTI_ALIAS_FLAG
- | Paint.FILTER_BITMAP_FLAG);
- mCircleLineWidth = (int) TypedValue.applyDimension(TypedValue.COMPLEX_UNIT_DIP, 8,
- getResources().getDisplayMetrics());
- mHalfCircleLineWidth = mCircleLineWidth;
- mLineWidth = (int) TypedValue.applyDimension(TypedValue.COMPLEX_UNIT_DIP, 4,
- getResources().getDisplayMetrics());
- mHalfLineWidth = mLineWidth / 2;
- mFixLineHeight = (int) TypedValue.applyDimension(TypedValue.COMPLEX_UNIT_DIP, 4,
- getResources().getDisplayMetrics());
- mLongLineHeight = (int) TypedValue.applyDimension(TypedValue.COMPLEX_UNIT_DIP,
- LONG_LINE_HEIGHT,
- getResources().getDisplayMetrics());
- mShortLineHeight = (int) TypedValue.applyDimension(TypedValue.COMPLEX_UNIT_DIP,
- SHORT_LINE_HEIGHT,
- getResources().getDisplayMetrics());
- initPaint();
- }
- private void initPaint() {
- mCirclePaint = new Paint(Paint.ANTI_ALIAS_FLAG);
- mCirclePaint.setColor(Color.RED);
- // 将画笔设置为空心
- mCirclePaint.setStyle(Style.STROKE);
- // 设置画笔宽度
- mCirclePaint.setStrokeWidth(mCircleLineWidth);
- mLinePaint = new Paint(Paint.ANTI_ALIAS_FLAG);
- mLinePaint.setColor(Color.RED);
- mLinePaint.setStyle(Style.FILL_AND_STROKE);
- // 设置画笔宽度
- mLinePaint.setStrokeWidth(mLineWidth);
- }
- @Override
- protected void onMeasure(int widthMeasureSpec, int heightMeasureSpec) {
- super.onMeasure(widthMeasureSpec, heightMeasureSpec);
- }
- @Override
- protected void onDraw(Canvas canvas) {
- canvas.setDrawFilter(mDrawFilter);
- super.onDraw(canvas);
- // 绘制表盘
- drawCircle(canvas);
- // 绘制刻度
- drawLines(canvas);
- }
- /**
- * 绘制刻度
- *
- * @param canvas
- */
- private void drawLines(Canvas canvas) {
- for (int i = 0; i <= 360; i++) {
- if (i % 30 == 0) {
- mLineBottom = mLineTop + mLongLineHeight;
- mLinePaint.setStrokeWidth(mLineWidth);
- } else {
- mLineBottom = mLineTop + mShortLineHeight;
- mLinePaint.setStrokeWidth(mHalfLineWidth);
- }
- if (i % 6 == 0) {
- canvas.save();
- canvas.rotate(i, mHalfWidth, mHalfHeight);
- canvas.drawLine(mLineLeft, mLineTop, mLineLeft, mLineBottom, mLinePaint);
- canvas.restore();
- }
- }
- }
- /**
- * 绘制表盘
- *
- * @param canvas
- */
- private void drawCircle(Canvas canvas) {
- canvas.drawCircle(mHalfWidth, mHalfHeight, mHalfWidth - mHalfCircleLineWidth, mCirclePaint);
- }
- @Override
- protected void onSizeChanged(int w, int h, int oldw, int oldh) {
- super.onSizeChanged(w, h, oldw, oldh);
- mHalfWidth = w / 2;
- mHalfHeight = h / 2;
- mLineLeft = mHalfWidth - mHalfLineWidth;
- mLineTop = mHalfHeight - mHalfWidth + mFixLineHeight;
- }
- }
/**
 * 闹钟表盘
 *
 * @author AJian
 */
public class RotateClockView extends View {

    private static final int LONG_LINE_HEIGHT = 35;
    private static final int SHORT_LINE_HEIGHT = 25;
    private Paint mCirclePaint, mLinePaint;
    private DrawFilter mDrawFilter;
    private int mHalfWidth, mHalfHeight;

    // 圆环线宽度
    private int mCircleLineWidth, mHalfCircleLineWidth;
    // 直线刻度线宽度
    private int mLineWidth, mHalfLineWidth;
    // 长线长度
    private int mLongLineHeight;
    // 短线长度
    private int mShortLineHeight;
    // 刻度线的左、上位置
    private int mLineLeft, mLineTop;

    // 刻度线的下边位置
    private int mLineBottom;
    // 用于控制刻度线位置
    private int mFixLineHeight;

    public RotateClockView(Context context) {
        super(context);
        mDrawFilter = new PaintFlagsDrawFilter(0, Paint.ANTI_ALIAS_FLAG
                | Paint.FILTER_BITMAP_FLAG);

        mCircleLineWidth = (int) TypedValue.applyDimension(TypedValue.COMPLEX_UNIT_DIP, 8,
                getResources().getDisplayMetrics());
        mHalfCircleLineWidth = mCircleLineWidth;
        mLineWidth = (int) TypedValue.applyDimension(TypedValue.COMPLEX_UNIT_DIP, 4,
                getResources().getDisplayMetrics());
        mHalfLineWidth = mLineWidth / 2;

        mFixLineHeight = (int) TypedValue.applyDimension(TypedValue.COMPLEX_UNIT_DIP, 4,
                getResources().getDisplayMetrics());

        mLongLineHeight = (int) TypedValue.applyDimension(TypedValue.COMPLEX_UNIT_DIP,
                LONG_LINE_HEIGHT,
                getResources().getDisplayMetrics());
        mShortLineHeight = (int) TypedValue.applyDimension(TypedValue.COMPLEX_UNIT_DIP,
                SHORT_LINE_HEIGHT,
                getResources().getDisplayMetrics());
        initPaint();
    }

    private void initPaint() {
        mCirclePaint = new Paint(Paint.ANTI_ALIAS_FLAG);
        mCirclePaint.setColor(Color.RED);
        // 将画笔设置为空心
        mCirclePaint.setStyle(Style.STROKE);
        // 设置画笔宽度
        mCirclePaint.setStrokeWidth(mCircleLineWidth);

        mLinePaint = new Paint(Paint.ANTI_ALIAS_FLAG);
        mLinePaint.setColor(Color.RED);
        mLinePaint.setStyle(Style.FILL_AND_STROKE);
        // 设置画笔宽度
        mLinePaint.setStrokeWidth(mLineWidth);
    }

    @Override
    protected void onMeasure(int widthMeasureSpec, int heightMeasureSpec) {
        super.onMeasure(widthMeasureSpec, heightMeasureSpec);
    }

    @Override
    protected void onDraw(Canvas canvas) {
        canvas.setDrawFilter(mDrawFilter);
        super.onDraw(canvas);
        // 绘制表盘
        drawCircle(canvas);
        // 绘制刻度
        drawLines(canvas);
    }

    /**
     * 绘制刻度
     *
     * @param canvas
     */
    private void drawLines(Canvas canvas) {
        for (int i = 0; i <= 360; i++) {
            if (i % 30 == 0) {
                mLineBottom = mLineTop + mLongLineHeight;
                mLinePaint.setStrokeWidth(mLineWidth);
            } else {
                mLineBottom = mLineTop + mShortLineHeight;
                mLinePaint.setStrokeWidth(mHalfLineWidth);
            }

            if (i % 6 == 0) {
                canvas.save();
                canvas.rotate(i, mHalfWidth, mHalfHeight);
                canvas.drawLine(mLineLeft, mLineTop, mLineLeft, mLineBottom, mLinePaint);
                canvas.restore();
            }
        }
    }

    /**
     * 绘制表盘
     *
     * @param canvas
     */
    private void drawCircle(Canvas canvas) {
        canvas.drawCircle(mHalfWidth, mHalfHeight, mHalfWidth - mHalfCircleLineWidth, mCirclePaint);
    }

    @Override
    protected void onSizeChanged(int w, int h, int oldw, int oldh) {
        super.onSizeChanged(w, h, oldw, oldh);
        mHalfWidth = w / 2;
        mHalfHeight = h / 2;

        mLineLeft = mHalfWidth - mHalfLineWidth;
        mLineTop = mHalfHeight - mHalfWidth + mFixLineHeight;
    }
}
同样的,有兴趣的同学可以自己补上文字;
四、canvas.skew( ) - 画布的错切:
- /**
- * Preconcat the current matrix with the specified skew.
- *
- * @param sx The amount to skew in X
- * @param sy The amount to skew in Y
- */
- public native void skew(float sx, float sy);
    /**
     * Preconcat the current matrix with the specified skew.
     *
     * @param sx The amount to skew in X
     * @param sy The amount to skew in Y
     */
    public native void skew(float sx, float sy);
这个方法只要理解了两个参数即可:
float sx:将画布在x方向上倾斜相应的角度,sx为倾斜角度的tan值;
float sy:将画布在y轴方向上倾斜相应的角度,sy为倾斜角度的tan值;
注意,这里全是倾斜角度的tan值,比如我们打算在X轴方向上倾斜45度,tan45=1;
先在X 轴上倾斜45 度,我们一起看看:- @Override
- protected void onDraw(Canvas canvas) {
- super.onDraw(canvas);
- canvas.drawColor(Color.BLUE);
- canvas.drawRect(new Rect(0, 0, 400, 400), mPaint);
- // x 方向上倾斜45 度
- canvas.skew(1, 0);
- mPaint.setColor(0x8800ff00);
- canvas.drawRect(new Rect(0, 0, 400, 400), mPaint);
- }
    @Override
    protected void onDraw(Canvas canvas) {
        super.onDraw(canvas);
        canvas.drawColor(Color.BLUE);
        canvas.drawRect(new Rect(0, 0, 400, 400), mPaint);

        // x 方向上倾斜45 度
        canvas.skew(1, 0);
        mPaint.setColor(0x8800ff00);
        canvas.drawRect(new Rect(0, 0, 400, 400), mPaint);
    }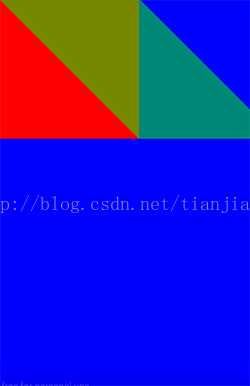
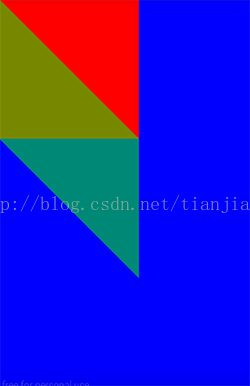
再在y轴上倾斜45度看看:
- @Override
- protected void onDraw(Canvas canvas) {
- super.onDraw(canvas);
- canvas.drawColor(Color.BLUE);
- canvas.drawRect(new Rect(0, 0, 400, 400), mPaint);
- // y 方向上倾斜45 度
- canvas.skew(0, 1);
- mPaint.setColor(0x8800ff00);
- canvas.drawRect(new Rect(0, 0, 400, 400), mPaint);
- }
    @Override
    protected void onDraw(Canvas canvas) {
        super.onDraw(canvas);
        canvas.drawColor(Color.BLUE);
        canvas.drawRect(new Rect(0, 0, 400, 400), mPaint);

        // y 方向上倾斜45 度
        canvas.skew(0, 1);
        mPaint.setColor(0x8800ff00);
        canvas.drawRect(new Rect(0, 0, 400, 400), mPaint);
    }
关于Canvas(画布)的translate(平移)、scale(缩放) 、rotate(旋转) 、skew(错切)就说这么多,这些方法都不复杂,而灵活的使用往往能解决绘制中很多看似复杂的问题,所以重在理解,并在看到与之相关的效果时能够及时恰当的进行关联。
当然对Canvas的操作往往使用Matrix(后面会单独讲)也能达到同样的效果,想看例子可参考 一个绚丽的loading动效分析与实现!
-
顶
- 15
-
踩
- 2
我的同类文章
- •Path特效之PathMeasure打造万能路径动效2015-07-26
- •Path相关方法讲解(一)2015-06-15
- •Canvas开篇之drawBitmap方法讲解2015-04-14
- •Android使用SVG矢量图打造酷炫动效!2015-03-31
- •Paint、Canvas、Matrix使用讲解(一、Paint)2015-03-18
- •Path相关方法讲解(二)2015-07-19
- •Android 漂浮类动效的分析与实现!2015-04-22
- •Android Paint之 setXfermode PorterDuffXfermode 讲解2015-04-07
- •一个绚丽的loading动效分析与实现!2015-03-23
- •自定义view实现水波纹效果2015-03-12
参考知识库


-
猜你在找

核心技术类目
- 个人资料
-

- 访问:242632次
- 积分:2709
- 等级:

- 排名:第10054名
- 原创:56篇
- 转载:0篇
- 译文:0篇
- 评论:340条

- 文章搜索
- 文章分类
- android动效篇(13)
- 性能优化(0)
- 反编译(0)
- android常见问题(2)
- 基础总结(20)
- javascript(5)
- javaweb(11)
- JDBC(3)
- AJAX(1)
- 心路历程(0)
- 文章存档
- 阅读排行
- Android使用SVG矢量图打造酷炫动效!(36738)
- 一个绚丽的loading动效分析与实现!(30684)
- Canvas开篇之drawBitmap方法讲解(22260)
- 自定义view实现水波纹效果(14259)
- Android Paint之 setXfermode PorterDuffXfermode 讲解(13369)
- Paint、Canvas、Matrix使用讲解(一、Paint)(11889)
- Canvas之translate、scale、rotate、skew方法讲解!(8984)
- 关于引入第三方jar包引发的java.lang.NoClassDefFoundError解决(8766)
- Path特效之PathMeasure打造万能路径动效(8404)
- android动效开篇(8335)
- 评论排行
- 一个绚丽的loading动效分析与实现!(177)
- 自定义view实现水波纹效果(33)
- Paint、Canvas、Matrix使用讲解(一、Paint)(25)
- Android Paint之 setXfermode PorterDuffXfermode 讲解(21)
- Android使用SVG矢量图打造酷炫动效!(20)
- Canvas开篇之drawBitmap方法讲解(15)
- Canvas之translate、scale、rotate、skew方法讲解!(11)
- Animation & Property Animation 使用(9)
- android动效开篇(8)
- Android 漂浮类动效的分析与实现!(7)
- 最新评论
- 一个绚丽的loading动效分析与实现!
碧海银剑:@fanshouyizhi:大神,你这个demo很棒,不过进度会突然100%,不是平滑过渡的,而且到...
- Android Paint之 setXfermode PorterDuffXfermode 讲解
george_zyf:顶楼主,开阔眼界了
- Paint、Canvas、Matrix使用讲解(一、Paint)
Lgd_东:相恨见晚
- 关于引入第三方jar包引发的java.lang.NoClassDefFoundError解决
聆听璇律:studio怎么弄啊
- 一个绚丽的loading动效分析与实现!
jiong103:mOrangeRectF.right = mCurrentProgressPosition+mLef...
- 一个绚丽的loading动效分析与实现!
Liming4Android:好像demo中没有加载到100%的时候那个风扇缩小和100%放大的那个代码吧
- 一个绚丽的loading动效分析与实现!
Hebe_fans:这叫不难。。。我操
- 自定义view实现水波纹效果
随手就是一巴掌叫你丫的做程序员:Bitmap too large to be uploaded into a texture (默认...
- Android Paint之 setXfermode PorterDuffXfermode 讲解
随手就是一巴掌叫你丫的做程序员:学习了,楼主辛苦!!!!
- Android Paint之 setXfermode PorterDuffXfermode 讲解
W伟V:mark
- 网站客服 杂志客服 微博客服 webmaster@csdn.net 400-600-2320 | 北京创新乐知信息技术有限公司 版权所有 | 江苏知之为计算机有限公司 | 江苏乐知网络技术有限公司
-
京 ICP 证 09002463 号
|
Copyright © 1999-2016, CSDN.NET, All Rights Reserved

保存代码片
整理和分享保存的代码片,请访问代码笔记- *标题
- *描述
- 标签


 1万+
1万+


 被折叠的 条评论
为什么被折叠?
被折叠的 条评论
为什么被折叠?
 到【灌水乐园】发言


10楼 又是美好一天 2016-09-07 21:03发表 [回复]-

-
“scale(float sx , float sy, float px,float py):先将画布平移px,py,然后scale,scale结束之后再将画布平移回原基准点;我们再在之前的基础上绘制一个同样的矩形,x , y 均缩放为 0.5 倍,缩放中心为矩形的中心;”这句话的意思是缩放中心为矩形中心,那为什么canvas.scale(0.5f, 0.5f);画布在x,y方向上均缩放为 0.5 倍,使用默认基准点(原点 0,0),而不是矩形中心呢?
9楼 code_river 2016-07-07 15:15发表 [回复]-

-
感谢楼主分享
8楼 nailsoul 2016-03-29 23:30发表 [回复]-

-
赞一个 通过该栗子搞懂了save和restore的意思了 谢谢楼主了
唉名字取的有奇异啊 xxState因该好理解点
7楼 FionaRyan 2016-03-25 17:11发表 [回复]-

-
# 2016一线互联网名企集结号# #实习#
“简寻”联合阿里、搜狗、百度音乐、小米、蘑菇街、凤凰网等 20+ 一线互联网公司举办2016技术实习专场活动, 200+技术实习岗,通过审核的可获5-10 次名企面试推荐。
【报名方式】
1.活动报名地址:https://h5.jianxun.io开启一键求职
2.搜索微信公众号:jianxun-fuwu
【面向群体】
1. 实习生:2017 年及以后毕业的本科生/研究生,寻找技术类的 春季 / 暑期 实习
2. 应届生:2016 年应届毕业生 , 技术类工作
【活动时间】
3月15日 - 5月15日
注:春季/暑期实习皆可,具体事宜可与企业单独商议
【简寻提供】
1. 直接面试机会
一线企业:阿里B2B、搜狗、蘑菇街、小米、豌豆荚 等
实力大牌:果壳网、人人、百度作业帮、凤凰网、么么嗖 等
新锐团队:长亭科技、酷家乐、云校、野糖、海智网聚 等
2. 活动福利
最优秀的三名学生将获活动协办方—— 包子IT 免费提供得北美顶尖 IT公司(Microsoft、google、facebook、Linkedin、amazon等)工程师进行一对一的全英模拟面试+指导,面试优异者可直接获得北美名企的内推机会。
其他优秀学生,包子IT 还将提供免费针对北美 CS 方向的模拟试题;顶尖公司和明星创业公司的多位老师们,将为大家讲解 题目+背后线索,认真阅读每一份考卷、每一行代码,帮助大家提高代码结构和质量。
【活动流程】
1. 报名注册 → 2. 简历审核 → 3. 电话面试 → 4. 企业推荐 → 5. 企业复面 → 6. 发放offer
6楼 yubaoma 2016-03-16 09:51发表 [回复]-

-
mark
5楼 xiaomingi07 2016-02-26 15:41发表 [回复]-

-
介绍的东西太实用了,而且栗子也容易理解,一定要踩一下!
4楼 mr_gang1992 2016-01-21 16:54发表 [回复]-

-
楼主在上面写文字的时候,遇到一个问题,就是文字跟着画布旋转了,如何才能保证文字,文字不旋转...望楼主解答啊。。。
Re: 学问积年而成 2016-01-21 17:37发表 [回复]-

-
回复mr_gang1992:使用
canvas.save();
XXXX;
canvas.restore();
3楼 gongyong2008 2015-06-03 13:16发表 [回复]-

-
大神带我飞啊
2楼 kangGe_studio 2015-05-10 16:34发表 [回复]-

-
赞一个
1楼 LFy_Yu 2015-05-08 09:10发表 [回复]-

-
给力