


Spring’s Impact on Application Portability
Bean Life-Cycle Management
In general, two life-cycle events are particularly relevant to a bean: postinitialization and pre-destruction
the post-initialization event is raised as soon as Spring finishes setting all the property values on the bean and finishes any dependency checks that you configured it to perform.
The pre-destruction event is fired just before Spring destroys the bean instance
for beans with prototype scope, the pre-destruction event will not be fired by Spring.
Spring provides three mechanisms a bean can use to hook into each of these events and
perform some additional processing: interface-based, method-based, and annotation-based mechanisms.
perform some additional processing: interface-based, method-based, and annotation-based mechanisms.
Using the interface-based mechanism, your bean implements an interface specific to the type of notification it
wants to receive, and Spring notifies the bean via a callback method defined in the interface. For the method-based
mechanism, Spring allows you to specify, in your ApplicationContext configuration, the name of a method to call when
the bean is initialized and the name of a method to call when the bean is destroyed. For the annotation mechanism, you
can use JSR-250 annotations to specify the method that Spring should call after construction or before destruction.

Hooking into Bean Creation
The initialization callback in Spring is called after Spring finishes
providing the dependencies that it can and performs any dependency checks that you ask of it.
providing the dependencies that it can and performs any dependency checks that you ask of it.
Executing a Method When a Bean Is Created
the <bean> tag has an
init-method attribute that tells Spring that
it should invoke the init() method as soon as it finishes configuring the bean
it should invoke the init() method as soon as it finishes configuring the bean
但是,不能有参数。
Implementing the InitializingBean Interface
The
InitializingBean interface defines a single method,
afterPropertiesSet(), that serves
the same purpose as the init() method
the same purpose as the init() method
Using JSR-250 @PostConstruct Annotation
@PostConstruct
In terms of configuration, since we are using annotations, we need to add the <context:annotation-driven> tag
from the context namespace into the configuration file:
from the context namespace into the configuration file:
<?xml version="1.0" encoding="UTF-8"?>
<beans xmlns="http://www.springframework.org/schema/beans"
	xmlns:xsi="http://www.w3.org/2001/XMLSchema-instance" xmlns:context="http://www.springframework.org/schema/context"   /
	xmlns:p="http://www.springframework.org/schema/p"
	xsi:schemaLocation="http://www.springframework.org/schema/beans
http://www.springframework.org/schema/beans/spring-beans.xsd
http://www.springframework.org/schema/context                                       <span style="white-space:pre">					</span>/
http://www.springframework.org/schema/context/spring-context.xsd"
	default-lazy-init="true">
	<context:annotation-config /><span style="white-space:pre">											</span>//
	<bean id="simpleBean1" class="com.apress.prospring4.ch4.SimpleBeanWithJSR250"
		p:name="Chris Schaefer" p:age="32" />
	<bean id="simpleBean2" class="com.apress.prospring4.ch4.SimpleBeanWithJSR250"
		p:age="32" />
	<bean id="simpleBean3" class="com.apress.prospring4.ch4.SimpleBeanWithJSR250"
		p:name="Chris Schaefer" />
</beans>
Using an initialization method, you have the benefit of keeping your application decoupled from Spring, but you have to remember to configure the initialization method
for every bean that needs it.
Using InitializingBean interface, you have the benefit of being able to specify the
initialization callback once for all instances of your bean class, but you have to couple your application to do so.
initialization callback once for all instances of your bean class, but you have to couple your application to do so.
Using annotations, you need to apply the annotation to the method and make sure that the IoC container supports JSR-250.
Hooking into Bean Destruction
When using an ApplicationContext implementation that wraps the DefaultListableBeanFactory interface
(such as GenericXmlApplicationContext, via the getDefaultListableBeanFactory() method), you can
signal to BeanFactory that you want to destroy all singleton instances with a call to ConfigurableBeanFactory.
destroySingletons().
(such as GenericXmlApplicationContext, via the getDefaultListableBeanFactory() method), you can
signal to BeanFactory that you want to destroy all singleton instances with a call to ConfigurableBeanFactory.
destroySingletons().
Executing a Method When a Bean Is Destroyed
simply specify the name of the method in the
destroy-method attribute of the bean’s <bean> tag
destroy-method attribute of the bean’s <bean> tag
Spring calls it just before it destroys the singleton instance of the
bean (Spring w ill not call this method for those beans with prototype scope).
bean (Spring w ill not call this method for those beans with prototype scope).
Implementing the DisposableBean Interface
The DisposableBean interface defines a single
method, destroy(), which is called just before the bean is destroyed.
method, destroy(), which is called just before the bean is destroyed.
Using JSR-250 @PreDestroy Annotation
Using a Shutdown Hook
The only drawback of the destruction callbacks in Spring is that they are not fired automatically; you need to remember
to call AbstractApplicationContext.destroy() before your application is closed
to call AbstractApplicationContext.destroy() before your application is closed
When your application runs as
a servlet, you can simply call destroy() in the servlet’s destroy() method.
a servlet, you can simply call destroy() in the servlet’s destroy() method.
Java allows you to create a shutdown hook, a thread that is executed just before the application shuts
down. This is the perfect way to invoke the destroy() method of your AbstractApplicationContext
down. This is the perfect way to invoke the destroy() method of your AbstractApplicationContext
The easiest way to take advantage of this mechanism
is to use the AbstractApplicationContext’s
registerShutdownHook() method
Making Your Beans “Spring Aware”
Using the BeanNameAware Interface
The BeanNameAware interface, which can be implemented by a bean that wants to obtain its own name, has a single
method: setBeanName(String).
method: setBeanName(String).
Using the ApplicationContextAware Interface
Using the ApplicationContextAware interface, it is possible for your beans to get a reference to the
ApplicationContext that configured them. The main reason this interface was created was to allow a bean to access
Spring’s ApplicationContext in your application—for example, to acquire other Spring beans programmatically,
using getBean(). You should, however, avoid this practice and use Dependency Injection to provide your beans
with their collaborators.
Use of FactoryBeans
Spring provides the FactoryBean interface
that acts as an adaptor for objects that cannot be created and managed using the standard Spring semantics.
that acts as an adaptor for objects that cannot be created and managed using the standard Spring semantics.
a FactoryBean is a bean that
acts as a factory for other beans. FactoryBeans are configured within your ApplicationContext like any normal
bean, but when Spring uses the FactoryBean interface to satisfy a dependency or lookup request, it does not return
FactoryBean; instead, it invokes the FactoryBean.getObject() method and returns the result of that invocation.
FactoryBean Example: The MessageDigestFactoryBean
MessageDigest md5 = MessageDigest.getInstance("MD5");
If we want to use Spring to manage the creation of the MessageDigest object, the best we can do without
a FactoryBean is have a property, algorithmName, on our bean and then use an initialization callback to call
MessageDigest.getInstance(). Using a FactoryBean, we can encapsulate this logic inside a bean. Then any beans
that require a MessageDigest instance can simply declare a property, messageDigest, and use the FactoryBean to
obtain the instance.
Listing 4-19. The MessageDigestFactoryBean Class
package com.apress.prospring4.ch4;
import java.security.MessageDigest;
import org.springframework.beans.factory.FactoryBean;
import org.springframework.beans.factory.InitializingBean;
public class MessageDigestFactoryBean implements
FactoryBean<MessageDigest>, InitializingBean {
private String algorithmName = "MD5";
private MessageDigest messageDigest = null;
@Override
public MessageDigest getObject() throws Exception {
return messageDigest;
}
@Override
public Class<MessageDigest> getObjectType() {
return MessageDigest.class;
}
@Override
public Class<MessageDigest> getObjectType() {
return MessageDigest.class;
}
@Override
public boolean isSingleton() {
return true;
}
@Override
public void afterPropertiesSet() throws Exception {
messageDigest = MessageDigest.getInstance(algorithmName);
}
public void setAlgorithmName(String algorithmName) {
this.algorithmName = algorithmName;
}
}
Listing 4-20. The MessageDigester Class
package com.apress.prospring4.ch4;
import java.security.MessageDigest;
public class MessageDigester {
private MessageDigest digest1;
private MessageDigest digest2;
public void setDigest1(MessageDigest digest1) {
this.digest1 = digest1;
}
public void setDigest2(MessageDigest digest2) {
this.digest2 = digest2;
}
public void digest(String msg) {
System.out.println("Using digest1");
digest(msg, digest1);
System.out.println("Using digest2");
digest(msg, digest2);
}
private void digest(String msg, MessageDigest digest) {
System.out.println("Using alogrithm: " + digest.getAlgorithm());
digest.reset();
byte[] bytes = msg.getBytes();
byte[] out = digest.digest(bytes);
System.out.println(out);
}
}
Listing 4-21. Configuring FactoryBeans
<?xml version="1.0" encoding="UTF-8"?>
<beans xmlns="http://www.springframework.org/schema/beans"
	xmlns:xsi="http://www.w3.org/2001/XMLSchema-instance" xmlns:p="http://www.springframework.org/schema/p"
	xsi:schemaLocation="http://www.springframework.org/schema/beans
http://www.springframework.org/schema/beans/spring-beans.xsd">
	<bean id="shaDigest" class="com.apress.prospring4.ch4.MessageDigestFactoryBean"
		p:algorithmName="SHA1" />
	<bean id="defaultDigest" class="com.apress.prospring4.ch4.MessageDigestFactoryBean" />
	<bean id="digester" class="com.apress.prospring4.ch4.MessageDigester"
		p:digest1-ref="shaDigest" p:digest2-ref="defaultDigest" />
</beans>
The isSingleton() property allows you to inform Spring whether the FactoryBean is managing a singleton
instance. Remember that by setting the singleton attribute of the FactoryBean’s <bean> tag, you tell Spring about the
singleton status of the FactoryBean itself, not the objects it is returning.
instance. Remember that by setting the singleton attribute of the FactoryBean’s <bean> tag, you tell Spring about the
singleton status of the FactoryBean itself, not the objects it is returning.
Accessing a FactoryBean Directly
Accessing FactoryBean is simple: you prefix the bean name with an ampersand in the call to getBean(),&
Using the factory-bean and factory-method Attributes
Sometimes you need to instantiate JavaBeans that were provided by a non-Spring-powered third-party application.
You don’t know how to instantiate that class, but you know that the third-party application provides a class that can be
used to get an instance of the JavaBean that your Spring application needs. In this case, Spring bean’s factory-bean
and factory-method attributes in the <bean> tag can be used.
You don’t know how to instantiate that class, but you know that the third-party application provides a class that can be
used to get an instance of the JavaBean that your Spring application needs. In this case, Spring bean’s factory-bean
and factory-method attributes in the <bean> tag can be used.
Listing 4-24. The MessageDigestFactory Class
package com.apress.prospring4.ch4;
import java.security.MessageDigest;
public class MessageDigestFactory {
private String algorithmName = "MD5";
public MessageDigest createInstance() throws Exception {
return MessageDigest.getInstance(algorithmName);
}
public void setAlgorithmName(String algorithmName) {
this.algorithmName = algorithmName;
}
}
Listing 4-25. Configuring MessageDigestFactory
<?xml version="1.0" encoding="UTF-8"?>
<beans xmlns="http://www.springframework.org/schema/beans"
xmlns:xsi="http://www.w3.org/2001/XMLSchema-instance" xmlns:p="http://www.springframework.org/schema/p"
xsi:schemaLocation="http://www.springframework.org/schema/beans
http://www.springframework.org/schema/beans/spring-beans.xsd">
<bean id="shaDigestFactory" class="com.apress.prospring4.ch4.MessageDigestFactory"
p:algorithmName="SHA1" />
<bean id="defaultDigestFactory" class="com.apress.prospring4.ch4.MessageDigestFactory" />
<span style="white-space:pre">	</span><bean id="shaDigest" factory-bean="shaDigestFactory"
		factory-method="createInstance">
	</bean>
<span style="white-space:pre">	</span><bean id="defaultDigest" factory-bean="defaultDigestFactory"
		factory-method="createInstance" />
<span style="white-space:pre"> </span><bean id="digester" class="com.apress.prospring4.ch4.MessageDigester"
p:digest1-ref="shaDigest" p:digest2-ref="defaultDigest" />
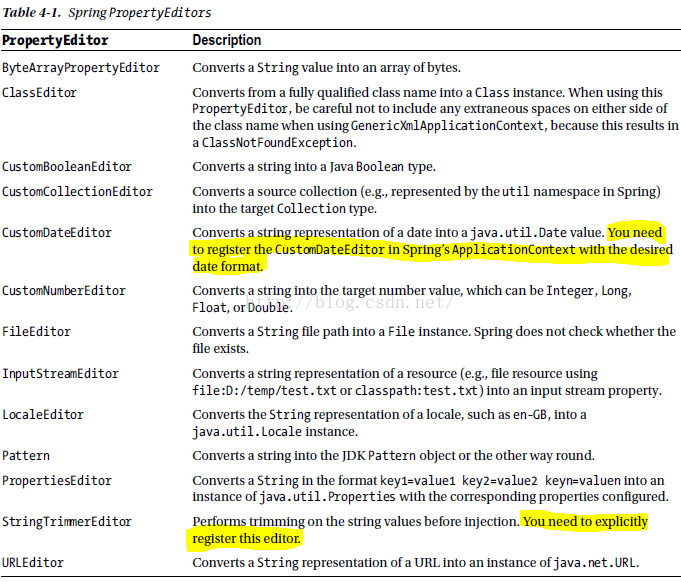
</beans>JavaBeans PropertyEditors
a PropertyEditor is an interface that converts a property’s
value to and from its native type representation into a String
value to and from its native type representation into a String
Spring allows you to
define PropertyEditors to manage the conversion of String-based property values into the correct types.
define PropertyEditors to manage the conversion of String-based property values into the correct types.
Using the Built-in PropertyEditors
Listing 4-27. Using the Built-in PropertyEditors
package com.apress.prospring4.ch4;
import java.io.File;
import java.io.InputStream;
import java.net.URL;
import java.util.Date;
import java.util.List;
import java.util.Locale;
import java.util.Properties;
import java.util.regex.Pattern;
import java.text.SimpleDateFormat;
import org.springframework.beans.PropertyEditorRegistrar;
import org.springframework.beans.PropertyEditorRegistry;
import org.springframework.beans.propertyeditors.CustomDateEditor;
import org.springframework.beans.propertyeditors.StringTrimmerEditor;
import org.springframework.context.support.GenericXmlApplicationContext;
public class PropertyEditorBean {
private byte[] bytes; // ByteArrayPropertyEditor
private Class cls; // ClassEditor
private Boolean trueOrFalse; // CustomBooleanEditor
private List<String> stringList; // CustomCollectionEditor
private Date date; // CustomDateEditor
private Float floatValue; // CustomNumberEditor
private File file; // FileEditor
private InputStream stream; // InputStreamEditor
private Locale locale; // LocaleEditor
private Pattern pattern; // PatternEditor
private Properties properties; // PropertiesEditor
private String trimString; // StringTrimmerEditor
private URL url; // URLEditor
set get...</pre><pre name="code" class="html">public static class CustomPropertyEditorRegistrar implements PropertyEditorRegistrar {
@Override
public void registerCustomEditors(PropertyEditorRegistry registry) {
SimpleDateFormat dateFormatter = new SimpleDateFormat("MM/dd/yyyy");
registry.registerCustomEditor(Date.class,
new CustomDateEditor(dateFormatter, true));
registry.registerCustomEditor(String.class, new StringTrimmerEditor(true));
}
}
public static void main(String[] args) throws Exception {
File file = File.createTempFile("test", "txt");
file.deleteOnExit();
GenericXmlApplicationContext ctx = new GenericXmlApplicationContext();
ctx.load("classpath:META-INF/spring/app-context-xml.xml");
ctx.refresh();
PropertyEditorBean bean =
(PropertyEditorBean) ctx.getBean("builtInSample");
}
}Listing 4-28. Configuration Using PropertyEditors
<?xml version="1.0" encoding="UTF-8"?>
<beans xmlns="http://www.springframework.org/schema/beans"
xmlns:xsi="http://www.w3.org/2001/XMLSchema-instance" xmlns:util="http://www.springframework.org/schema/util"
xmlns:p="http://www.springframework.org/schema/p"
xsi:schemaLocation="http://www.springframework.org/schema/beans
http://www.springframework.org/schema/beans/spring-beans.xsd
http://www.springframework.org/schema/util
http://www.springframework.org/schema/util/spring-util.xsd">
<bean id="customEditorConfigurer"
class="org.springframework.beans.factory.config.CustomEditorConfigurer"
p:propertyEditorRegistrars-ref="propertyEditorRegistrarsList" />
<util:list id="propertyEditorRegistrarsList">
<bean
class="com.apress.prospring4.ch4.PropertyEditorBean$CustomPropertyEditorRegistrar" /><span style="white-space:pre"> </span>//使用了内部类
</util:list> <bean id="builtInSample" class="com.apress.prospring4.ch4.PropertyEditorBean"
p:bytes="Hello World" p:cls="java.lang.String" p:trueOrFalse="true"
p:stringList-ref="stringList" p:stream="test.txt" p:floatValue="123.45678"
p:date="05/03/13"
p:file="#{systemProperties['java.io.tmpdir']}#{systemProperties['file.separator']}test.txt"
p:locale="en_US" p:pattern="a*b" p:properties="name=Chris age=32"
p:trimString=" String need trimming " p:url="http://www.springframework.org" />
<util:list id="stringList">
<value>String member 1</value>
<value>String member 2</value>
</util:list>
</beans>
>
Creating a Custom PropertyEditor
JDK 5 or newer provides the
PropertyEditorSupport class, which your own
PropertyEditors can extend, leaving you to implement only a single method: setAsText().
PropertyEditors can extend, leaving you to implement only a single method: setAsText().
Listing 4-29. The Name Class
package com.apress.prospring4.ch4;
public class Name {
private String firstName;
private String lastName;
public Name(String firstName, String lastName) {
this.firstName = firstName;
this.lastName = lastName;
}
set get ...}</pre><pre name="code" class="html">Listing 4-30. The NamePropertyEditor Class
package com.apress.prospring4.ch4;
import java.beans.PropertyEditorSupport;
public class NamePropertyEditor extends PropertyEditorSupport {
@Override
public void setAsText(String text) throws IllegalArgumentException {
String[] name = text.split("\\s");
setValue(new Name(name[0], name[1]));
}
}
Listing 4-31. Using CustomEditorConfigurer
<?xml version="1.0" encoding="UTF-8"?>
<beans xmlns="http://www.springframework.org/schema/beans"
	xmlns:xsi="http://www.w3.org/2001/XMLSchema-instance" xmlns:p="http://www.springframework.org/schema/p"
	xsi:schemaLocation="http://www.springframework.org/schema/beans
http://www.springframework.org/schema/beans/spring-beans.xsd">
	<bean name="customEditorConfigurer"
		class="org.springframework.beans.factory.config.CustomEditorConfigurer">
		<property name="customEditors">
			<map>
				<entry key="com.apress.prospring4.ch4.Name" value="com.apress.prospring4.ch4.NamePropertyEditor" />   //自定义的类,和值
			</map>
		</property>
	</bean>
	<bean id="exampleBean" class="com.apress.prospring4.ch4.CustomEditorExample"    //测试中的name
		p:name="Chris Schaefer" />
</beans>
You should notice two points in this configuration. First, custom PropertyEditors get injected into the
CustomEditorConfigurer class by using the Map-typed customEditors property. Second, each entry in the
Map represents a single PropertyEditor, with the key of the entry being the name of the class for which the
PropertyEditor is used. As you can see, the key for the NamePropertyEditor is com.apress.prospring4.ch4.Name,
which signifies that this is the class for which the editor should be used.
类型转换与数据校验 第十章
More Spring ApplicationContext Configuration
The biggest benefit of using ApplicationContext is that it allows you to configure and manage Spring and
Spring-managed resources in a completely declarative way.This means that wherever possible, Spring provides
support classes to load ApplicationContext into your application automatically, thus removing the need for
you to write any code to access ApplicationContext. In practice, this feature is currently available only when
you are building web applications with Spring, which allows you to initialize Spring’s ApplicationContext in the
web application deployment descriptor.
ApplicationContext supports the following features:
- Internationalization
- Event publication
- Resource management and access
- Additional life-cycle interfaces
- Improved automatic configuration of infrastructure components
Internationalization with the MessageSource
The automatic loading of messages is available in any environment, but automatic
access is provided only in certain Spring-managed scenarios,
access is provided only in certain Spring-managed scenarios,
Using ApplicationContext and MessageSource
Aside from ApplicationContext, Spring provides three MessageSource implementations:
ResourceBundleMessageSource, ReloadableResourceBundleMessageSource, and StaticMessageSource.
ResourceBundleMessageSource, ReloadableResourceBundleMessageSource, and StaticMessageSource.
The StaticMessageSource implementation should not be used in a production application because you can’t
configure it externally, and this is generally one of the main requirements when you are adding i18n capabilities
to your application.
configure it externally, and this is generally one of the main requirements when you are adding i18n capabilities
to your application.
ResourceBundleMessageSource loads messages by using a Java
ResourceBundle.
ReloadableResourceBundleMessageSource is essentially the same, except it supports scheduled reloading of the underlying source files.
ReloadableResourceBundleMessageSource is essentially the same, except it supports scheduled reloading of the underlying source files.
All three MessageSource implementations also implement another interface called
HierarchicalMessageSource, which allows for many MessageSource instances to be nested
To take advantage of ApplicationContext’s support for MessageSource, you must define a bean in your
configuration of type MessageSource and with the name messageSource.
configuration of type MessageSource and with the name messageSource.
Listing 4-33. Exploring MessageSource Usage
package com.apress.prospring4.ch4;
import java.util.Locale;
import org.springframework.context.support.GenericXmlApplicationContext;
public class MessageSourceDemo {
public static void main(String[] args) {
GenericXmlApplicationContext ctx = new GenericXmlApplicationContext();
ctx.load("classpath:META-INF/spring/app-context-xml.xml");
ctx.refresh();
Locale english = Locale.ENGLISH;
Locale czech = new Locale("cs", "CZ");System.out.println(ctx.getMessage("msg", null, english));
System.out.println(ctx.getMessage("msg", null, czech));
System.out.println(ctx.getMessage("nameMsg", new Object[] { "Chris",
"Schaefer" }, english));
}
}Listing 4-34. Configuring a MessageSource Bean
<?xml version="1.0" encoding="UTF-8"?>
<beans xmlns="http://www.springframework.org/schema/beans"
xmlns:xsi="http://www.w3.org/2001/XMLSchema-instance" xmlns:p="http://www.springframework.org/schema/p"
xmlns:util="http://www.springframework.org/schema/util"
xsi:schemaLocation="http://www.springframework.org/schema/beans
http://www.springframework.org/schema/beans/spring-beans.xsd
http://www.springframework.org/schema/util
http://www.springframework.org/schema/util/spring-util.xsd"> <bean id="messageSource"
class="org.springframework.context.support.ResourceBundleMessageSource"
p:basenames-ref="basenames" />
<util:list id="basenames">
<value>buttons</value>
<value>labels</value>
</util:list>
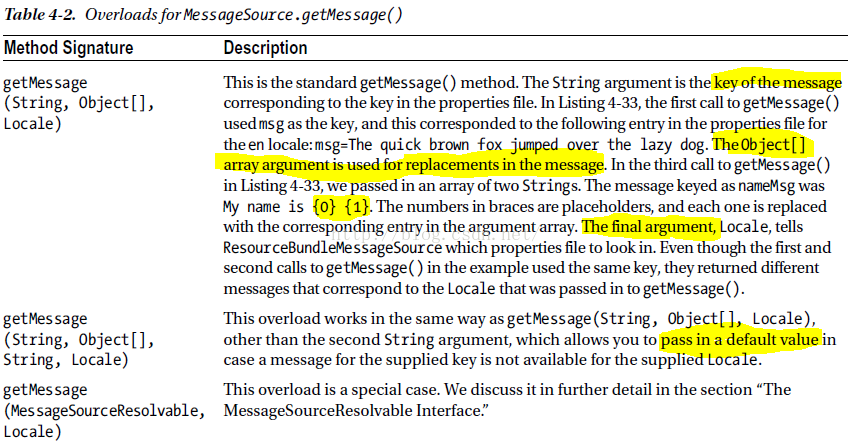
</beans>Using the getMessage( ) Method
Why Use ApplicationContext As a MessageSource?
you shouldn’t use ApplicationContext as a MessageSource because doing so couples
your bean to ApplicationContext unnecessarily You should use
ApplicationContext when you are building a web application by using Spring’s MVC framework.
your bean to ApplicationContext unnecessarily You should use
ApplicationContext when you are building a web application by using Spring’s MVC framework.
Remember that in a web application setting, ApplicationContext is loaded automatically.
ApplicationObjectSupport accesses this ApplicationContext, wraps it in a MessageSourceAccessor
object, and makes that available to your controller via the protected getMessageSourceAccessor() method.
ApplicationObjectSupport accesses this ApplicationContext, wraps it in a MessageSourceAccessor
object, and makes that available to your controller via the protected getMessageSourceAccessor() method.
The main reason to use ApplicationContext
Spring expose ApplicationContext, as a MessageSource, to the view tier.
<spring:message> tag
Using MessageSource in Stand-Alone Applications
When you are using MessageSource in stand-alone applications, where Spring offers no additional support other than
to nest the MessageSource bean automatically in ApplicationContext, it is best to make the MessageSource available
by using Dependency Injection. You can opt to make your bean ApplicationContextAware, but doing so precludes
its use in a BeanFactory context. Add to this that you complicate testing without any discernible benefit, and it is clear
that you should stick to using Dependency Injection to access MessageSource objects in a stand-alone setting.
The MessageSourceResolvable Interface
You can use an object that implements MessageSourceResolvable in place of a key and a set of arguments when you
are looking up a message from a MessageSource. This interface is most widely used in the Spring validation libraries to
link Error objects to their internationalized error messages.
are looking up a message from a MessageSource. This interface is most widely used in the Spring validation libraries to
link Error objects to their internationalized error messages.
Application Events
Another feature of ApplicationContext not present in BeanFactory is the ability to publish and receive events by
using ApplicationContext as a broker.
using ApplicationContext as a broker.
Using Application Events
An event is class-derived from ApplicationEvent, which itself derives from java.util.EventObject. Any bean
can listen for events by implementing the ApplicationListener<T> interface;ApplicationContext automatically
registers any bean that implements this interface as a listener when it is configured.
can listen for events by implementing the ApplicationListener<T> interface;ApplicationContext automatically
registers any bean that implements this interface as a listener when it is configured.
Events are published using
the ApplicationEventPublisher.publishEvent() method, so the publishing class must have knowledge of
ApplicationContext (which extends the ApplicationEventPublisher interface).
the ApplicationEventPublisher.publishEvent() method, so the publishing class must have knowledge of
ApplicationContext (which extends the ApplicationEventPublisher interface).
Listing 4-37. Creating an Event Class
package com.apress.prospring4.ch4;
import org.springframework.context.ApplicationEvent;
public class MessageEvent extends ApplicationEvent {
private String msg;
public MessageEvent(Object source, String msg) {
super(source);
this.msg = msg;
}
public String getMessage() {
return msg;
}
}
Listing 4-38. The MessageEventListener Class
package com.apress.prospring4.ch4;
import org.springframework.context.ApplicationListener;
public class MessageEventListener implements ApplicationListener<MessageEvent> {
@Override
public void onApplicationEvent(MessageEvent event) {
MessageEvent msgEvt = (MessageEvent) event;
System.out.println("Received: " + msgEvt.getMessage());
}
}Listing 4-39. Publishing an Event
package com.apress.prospring4.ch4;
import org.springframework.beans.BeansException;
import org.springframework.context.ApplicationContext;
import org.springframework.context.ApplicationContextAware;
import org.springframework.context.support.ClassPathXmlApplicationContext;
public class Publisher implements ApplicationContextAware {
private ApplicationContext ctx;
@Override
public void setApplicationContext(ApplicationContext applicationContext)
throws BeansException {
this.ctx = applicationContext;
}
public void publish(String message) {
ctx.publishEvent(new MessageEvent(this, message));
}
public static void main(String[] args) {
ApplicationContext ctx = new ClassPathXmlApplicationContext(
"classpath:META-INF/spring/app-context-xml.xml");
Publisher pub = (Publisher) ctx.getBean("publisher");
pub.publish("Hello World!");
pub.publish("The quick brown fox jumped over the lazy dog");
}
}Listing 4-40. Configuring ApplicationListener Beans
<?xml version="1.0" encoding="UTF-8"?>
<beans xmlns="http://www.springframework.org/schema/beans"
xmlns:xsi="http://www.w3.org/2001/XMLSchema-instance"
xsi:schemaLocation="http://www.springframework.org/schema/beans
http://www.springframework.org/schema/beans/spring-beans.xsd">
<bean id="publisher" class="com.apress.prospring4.ch4.Publisher" />
<bean id="messageEventListener" class="com.apress.prospring4.ch4.MessageEventListener" />
</beans>Considerations for Event Usage
Accessing Resources
Spring provides a unified mechanism for accessing resources in a protocolindependent way.
the core of Spring’s resource support is the org.springframework.core.io.Resource interface. The Resource
interface defines ten self-explanatory methods: contentLength(), exists(), getDescription(), getFile(),
getFileName(), getURI(), getURL(), isOpen(), isReadable(), and lastModified().
interface defines ten self-explanatory methods: contentLength(), exists(), getDescription(), getFile(),
getFileName(), getURI(), getURL(), isOpen(), isReadable(), and lastModified().
In addition to these ten
methods, there is one that is not quite so self-explanatory: createRelative(). The createRelative() method creates
a new Resource instance by using a path that is relative to the instance on which it is invoked
methods, there is one that is not quite so self-explanatory: createRelative(). The createRelative() method creates
a new Resource instance by using a path that is relative to the instance on which it is invoked
Internally, Spring uses another interface, ResourceLoader, and the default implementation,
DefaultResourceLoader, to locate and create Resource instances. However, you generally won’t interact with
DefaultResourceLoader, instead using another ResourceLoader implementation—ApplicationContext.
DefaultResourceLoader, to locate and create Resource instances. However, you generally won’t interact with
DefaultResourceLoader, instead using another ResourceLoader implementation—ApplicationContext.
Configuration Using Java Classes
ApplicationContext Configuration in Java
When using a Java class instead of XML to configure the previous message provider and renderer, we just need to
implement a normal JavaBean as usual, with the appropriate annotations for Spring’s Java configuration
In the AppConfig class, you can see that we first use the @Configuration annotation to inform Spring that
this is a Java-based configuration file. Afterward, the @Bean annotation is used to declare a Spring bean and the
DI requirements. The @Bean annotation is equivalent to the <bean> tag, the method name is equivalent to the id
attribute within the <bean> tag, and when instantiating the MessageRender bean, setter injection is achieved by calling
the corresponding method to get the message provider, which is the same as using the <ref> attribute in the XML
configuration.
implement a normal JavaBean as usual, with the appropriate annotations for Spring’s Java configuration
Listing 4-46. Java Configuration
package com.apress.prospring4.ch4;
import org.springframework.context.annotation.Bean;
import org.springframework.context.annotation.Configuration;
@Configuration
public class AppConfig {
@Bean
public MessageProvider messageProvider() {
return new ConfigurableMessageProvider();
}
</pre><pre name="code" class="html">@Bean
public MessageRenderer messageRenderer() {
MessageRenderer renderer = new StandardOutMessageRenderer();
renderer.setMessageProvider(messageProvider());
return renderer;
}
}
In the AppConfig class, you can see that we first use the @Configuration annotation to inform Spring that
this is a Java-based configuration file. Afterward, the @Bean annotation is used to declare a Spring bean and the
DI requirements. The @Bean annotation is equivalent to the <bean> tag, the method name is equivalent to the id
attribute within the <bean> tag, and when instantiating the MessageRender bean, setter injection is achieved by calling
the corresponding method to get the message provider, which is the same as using the <ref> attribute in the XML
configuration.
Listing 4-47. Java Configuration Testing
package com.apress.prospring4.ch4;
import org.springframework.context.ApplicationContext;
import org.springframework.context.annotation.AnnotationConfigApplicationContext;
public class JavaConfigSimpleExample {
public static void main(String[] args) {
ApplicationContext ctx = new
AnnotationConfigApplicationContext(AppConfig.class);
MessageRenderer renderer =
ctx.getBean("messageRenderer", MessageRenderer.class);
renderer.render();
}
}
we use the AnnotationConfigApplicationContext class, passing in the configuration
class as the constructor argument
Table 4-3. Dependency for Spring Transaction Support
Group ID Artifact ID Version Description
org.springframework spring-tx 4.0.2.RELEASE Spring module for transaction support
Group ID Artifact ID Version Description
org.springframework spring-tx 4.0.2.RELEASE Spring module for transaction support
Listing 4-48. Java Configuration Class AppConfig (Revised)
package com.apress.prospring4.ch4;
import org.springframework.beans.factory.annotation.Autowired;
import org.springframework.context.annotation.Bean;
import org.springframework.context.annotation.ComponentScan;
import org.springframework.context.annotation.Configuration;
import org.springframework.context.annotation.DependsOn;
import org.springframework.context.annotation.Import;
import org.springframework.context.annotation.ImportResource;
import org.springframework.context.annotation.Lazy;
import org.springframework.context.annotation.PropertySource;
import org.springframework.context.annotation.Scope;
import org.springframework.core.env.Environment;
import org.springframework.transaction.annotation.EnableTransactionManagement;
@Configuration
@ImportResource(value="classpath:META-INF/spring/app-context-xml.xml")
@PropertySource(value="classpath:message.properties")
@ComponentScan(basePackages={"com.apress.prospring4.ch4"})
@EnableTransactionManagement
public class AppConfig {
@Autowired
Environment env;
@Bean
@Lazy(value=true)
public MessageProvider messageProvider() {
return new ConfigurableMessageProvider(env.getProperty("message"));
}
@Bean(name="messageRenderer")
@Scope(value="prototype")
@DependsOn(value="messageProvider")
public MessageRenderer messageRenderer() {
MessageRenderer renderer = new StandardOutMessageRenderer();
renderer.setMessageProvider(messageProvider());
return renderer;
}
}
The @PropertySource annotation is used to load properties files into the Spring For XML, <context:property-placeholder> serves the same purpose
@ImportResource can also be used to import configuration from XML files
@Import annotation can import other configuration classes,
which means you can also have multiple Java configuration classes for various configurations
which means you can also have multiple Java configuration classes for various configurations
@ComponentScan defines the packages that Spring should scan for annotations for bean
definitions. It’s the same as the <context:component-scan> tag in the XML configuration.
definitions. It’s the same as the <context:component-scan> tag in the XML configuration.
@Lazy annotation instructs Spring to
instantiate the bean only when requested (same as lazy-init="true" in XML),
instantiate the bean only when requested (same as lazy-init="true" in XML),
@DependsOn tells Spring that a certain bean depends on some other beans
@Scope annotation is to define the bean’s scope
@EnableTransactionManagement defines that we will use Spring’s transaction management
Profiles
An Example of Using the Spring Profiles Feature
Listing 4-49. The Food Class
package com.apress.prospring4.ch4;
public class Food {
private String name;
public Food() {
}
public Food(String name) {
this.name = name;
}
public String getName() {
return name;
}
public void setName(String name) {
this.name = name;
}
}
Listing 4-50. The FoodProviderService Interface
package com.apress.prospring4.ch4;
import java.util.List;
public interface FoodProviderService {
List<Food> provideLunchSet();
}Listing 4-51. The Kindergarten FoodProviderService Implementation
package com.apress.prospring4.ch4.kindergarten;
import java.util.ArrayList;
import java.util.List;
import com.apress.prospring4.ch4.Food;
import com.apress.prospring4.ch4.FoodProviderService;
public class FoodProviderServiceImpl implements FoodProviderService {
@Override
public List<Food> provideLunchSet() {
List<Food> lunchSet = new ArrayList<Food>();
lunchSet.add(new Food("Milk"));
lunchSet.add(new Food("Biscuits"));
return lunchSet;
}
}Listing 4-52. The High-School FoodProviderService Implementation
package com.apress.prospring4.ch4.highschool;
import java.util.ArrayList;
import java.util.List;
import com.apress.prospring4.ch4.Food;
import com.apress.prospring4.ch4.FoodProviderService;
public class FoodProviderServiceImpl implements FoodProviderService {
@Override
public List<Food> provideLunchSet() {
List<Food> lunchSet = new ArrayList<Food>();
lunchSet.add(new Food("Coke"));
lunchSet.add(new Food("Hamburger"));
lunchSet.add(new Food("French Fries"));
return lunchSet;
}
}Listing 4-53. XML Configuration for Kindergarten
(kindergarten-config.xml)
<?xml version="1.0" encoding="UTF-8"?>
<beans xmlns="http://www.springframework.org/schema/beans"
xmlns:xsi="http://www.w3.org/2001/XMLSchema-instance"
xsi:schemaLocation="http://www.springframework.org/schema/beans
http://www.springframework.org/schema/beans/spring-beans.xsd"
profile="kindergarten"><span style="white-space:pre"> </span>/
<bean id="foodProviderService"
class="com.apress.prospring4.ch4.kindergarten.FoodProviderServiceImpl" />
</beans>Listing 4-54. XML Configuration for High School (highschool-config.xml)
<?xml version="1.0" encoding="UTF-8"?>
<beans xmlns="http://www.springframework.org/schema/beans"
xmlns:xsi="http://www.w3.org/2001/XMLSchema-instance"
xsi:schemaLocation="http://www.springframework.org/schema/beans
http://www.springframework.org/schema/beans/spring-beans.xsd"
profile="highschool"><span style="white-space:pre"> </span>/
<bean id="foodProviderService"
class="com.apress.prospring4.ch4.highschool.FoodProviderServiceImpl" />
</beans>Listing 4-55. Profile XML Configuration Example
package com.apress.prospring4.ch4;
import java.util.List;
import org.springframework.context.support.GenericXmlApplicationContext;
public class ProfileXmlConfigExample {
public static void main(String[] args) {
GenericXmlApplicationContext ctx = new GenericXmlApplicationContext();
ctx.load("classpath:META-INF/spring/*-config.xml"); /// 使用了通配符
ctx.refresh();
FoodProviderService foodProviderService =
ctx.getBean("foodProviderService", FoodProviderService.class);
List<Food> lunchSet = foodProviderService.provideLunchSet();for (Food food: lunchSet) {
System.out.println("Food: " + food.getName());
}
}
}
In this example, only the beans in the file kindergarten-config.xml will
be instantiated by the Spring base on the profile attribute, which is activated by passing the JVM argument
-Dspring.profiles.active="kindergarten".
You can also programmatically set the profile to use in your code by calling
ctx.getEnvironment().setActiveProfiles("kindergarten"). Additionally you can also register classes to be
enabled by profiles using JavaConfig by simply adding the @Profile annotation to your class.
ctx.getEnvironment().setActiveProfiles("kindergarten"). Additionally you can also register classes to be
enabled by profiles using JavaConfig by simply adding the @Profile annotation to your class.
The profiles feature in Spring creates another way for developers to manage the application’s running configuration,
which used to be done in build tools
which used to be done in build tools
Environment and PropertySource Abstraction
The Environment interface is an abstraction
layer that serves to encapsulate the environment of the running Spring application
layer that serves to encapsulate the environment of the running Spring application
Properties are used to store the application’s underlying environment configuration, such as the location of the
application folder, database connection information, and so on.
application folder, database connection information, and so on.
Listing 4-56. Spring Environment Abstraction Example
package com.apress.prospring4.ch4;
import java.util.HashMap;
import java.util.Map;
import org.springframework.context.support.GenericXmlApplicationContext;
import org.springframework.core.env.ConfigurableEnvironment;
import org.springframework.core.env.MapPropertySource;
import org.springframework.core.env.MutablePropertySources;
public class EnvironmentSample {
public static void main(String[] args) {
GenericXmlApplicationContext ctx = new GenericXmlApplicationContext();
ctx.refresh();
ConfigurableEnvironment env = ctx.getEnvironment();<span style="white-space:pre">				</span>、、、、、、
MutablePropertySources propertySources = env.getPropertySources();<span style="white-space:pre">		</span>、、、、、、
Map appMap = new HashMap();
appMap.put("application.home", "application_home");
propertySources.addLast(new MapPropertySource("PROSPRING4_MAP", appMap));
System.out.println("user.home: " + System.getProperty("user.home"));
System.out.println("JAVA_HOME: " + System.getenv("JAVA_HOME"));
System.out.println("user.home: " + env.getProperty("user.home"));
System.out.println("JAVA_HOME: " + env.getProperty("JAVA_HOME"));
System.out.println("application.home: " + env.getProperty("application.home"));
}
}
For the PropertySource abstraction, Spring will access the properties in the following default order:
• System properties for the running JVM
• Environment variables
• Application-defined properties
However, Spring allows you to control the order in which Environment retrieves
the properties.
the properties.
Listing 4-57. Spring Environment Abstraction Example (Revised)
package com.apress.prospring4.ch4;
import java.util.HashMap;
import java.util.Map;
import org.springframework.context.support.GenericXmlApplicationContext;
import org.springframework.core.env.ConfigurableEnvironment;
import org.springframework.core.env.MapPropertySource;
import org.springframework.core.env.MutablePropertySources;
public class EnvironmentSample {
public static void main(String[] args) {
GenericXmlApplicationContext ctx = new GenericXmlApplicationContext();
ctx.refresh();
ConfigurableEnvironment env = ctx.getEnvironment();
MutablePropertySources propertySources = env.getPropertySources();
Map appMap = new HashMap();
appMap.put("user.home", "application_home");
propertySources.addFirst(new MapPropertySource("PROSPRING4_MAP", appMap));<span style="white-space:pre">		</span>、、、、、、
System.out.println("user.home: " + System.getProperty("user.home"));
System.out.println("JAVA_HOME: " + System.getenv("JAVA_HOME"));
Listing 4-60. Spring Property Placeholder Configuration
<?xml version="1.0" encoding="UTF-8"?>
<beans xmlns="http://www.springframework.org/schema/beans"
xmlns:xsi="http://www.w3.org/2001/XMLSchema-instance" xmlns:context="http://www.springframework.org/schema/context"
xsi:schemaLocation="http://www.springframework.org/schema/beans
http://www.springframework.org/schema/beans/spring-beans.xsd
http://www.springframework.org/schema/context
http://www.springframework.org/schema/context/spring-context.xsd">
<context:property-placeholder location="classpath:application.properties" />
<bean id="appProperty" class="com.apress.prospring4.ch4.AppProperty">
<property name="applicationHome" value="${application.home}" />
<property name="userHome" value="${user.home}"></property>
</bean>
</beans>We use the <context:property-placeholder> tag to load the properties into Spring’s Environment, which
is wrapped into the ApplicationContext interface. We also use the placeholders to inject the values into the
AppProperty bean.
Configuration Using JSR-330 Annotations
Table 4-4. Dependency for JSR-330 Support
Group ID Artifact ID Version Description
javax.inject j avax.inject 1 JSR-330 standard library
Group ID Artifact ID Version Description
javax.inject j avax.inject 1 JSR-330 standard library
Listing 4-62. ConfigurableMessageProvider (JSR-330)
package com.apress.prospring4.ch4;
public interface MessageProvider {
String getMessage();
}
package com.apress.prospring4.ch4;
import javax.inject.Inject;
import javax.inject.Named;
@Named("messageProvider")
public class ConfigurableMessageProvider implements MessageProvider {
private String message = "Default message";
public ConfigurableMessageProvider() {
}
@Inject
@Named("message")
public ConfigurableMessageProvider(String message) {
this.message = message;
}
public void setMessage(String message) {
this.message = message;
}
@Override
public String getMessage() {
return message;
}
}
Thisclass used @Named in two places.
First, it can be used to declare an injectable bean (the same as the @Component
or @Service annotation in Spring).In the listing, the @Named("messageProvider") annotation specifies that the
ConfigurableMessageProvider is an injectable bean and gives it the name messageProvider, which is the same as the
name attribute in Spring’s <bean> tag.
or @Service annotation in Spring).In the listing, the @Named("messageProvider") annotation specifies that the
ConfigurableMessageProvider is an injectable bean and gives it the name messageProvider, which is the same as the
name attribute in Spring’s <bean> tag.
Second, we use constructor injection by using the @Inject annotation before
the constructor that accepts a string value.Then, we use @Named to specify that we want to inject the value that had
the name message assigned
the constructor that accepts a string value.Then, we use @Named to specify that we want to inject the value that had
the name message assigned
Listing 4-63. StandardOutMessageRenderer (JSR-330)
package com.apress.prospring4.ch4;
public interface MessageRenderer {
void render();
void setMessageProvider(MessageProvider provider);
MessageProvider getMessageProvider();
}
package com.apress.prospring4.ch4;
import javax.inject.Inject;
import javax.inject.Named;
import javax.inject.Singleton;
@Named("messageRenderer")
@Singleton
public class StandardOutMessageRenderer implements MessageRenderer {
@Inject
@Named("messageProvider")
private MessageProvider messageProvider = null;
@Override
public void render() {
if (messageProvider == null) {
throw new RuntimeException(
"You must set the property messageProvider of class:"
+ StandardOutMessageRenderer.class.getName());
}
System.out.println(messageProvider.getMessage());
}
@Override
public void setMessageProvider(MessageProvider provider) {
this.messageProvider = provider;
}
@Override
public MessageProvider getMessageProvider() {
return this.messageProvider;
}
}
Notice the @Singleton annotation. It’s worth
noting that in the JSR-330 standard, a bean’s default scope is nonsingleton, which is like Spring’s prototype scope
However, using this annotation in Spring actually doesn’t have any effect, because Spring’s default scope for bean
instantiation is already singleton. We just put it here for a demonstration, and it’s worth noting the difference between
Spring and other JSR-330-compatible containers.
instantiation is already singleton. We just put it here for a demonstration, and it’s worth noting the difference between
Spring and other JSR-330-compatible containers.
Listing 4-64. Spring XML Configuration (JSR-330)
<?xml version="1.0" encoding="UTF-8"?>
<beans xmlns="http://www.springframework.org/schema/beans"
	xmlns:xsi="http://www.w3.org/2001/XMLSchema-instance" xmlns:context="http://www.springframework.org/schema/context"
	xsi:schemaLocation="http://www.springframework.org/schema/beans
http://www.springframework.org/schema/beans/spring-beans.xsd
http://www.springframework.org/schema/context
http://www.springframework.org/schema/context/spring-context.xsd">
	<context:component-scan base-package="com.apress.prospring4.ch4" />
	<bean id="message" class="java.lang.String">
		<constructor-arg value="You are running JSR330!" />
	</bean>
</beans>
Spring’s annotations
are much more feature rich and flexible than JSR-330 annotations. Some main differences are highlighted here:
• When using Spring’s @Autowired annotation, you can specify a required attribute to indicate
that the DI must be fulfilled (you can also use Spring’s @Required annotation to declare this
requirement), while for JSR-330’s @Inject annotation, there is no such equivalent. Moreover,
Spring provides the @Qualifier annotation, which allows more fine-grained control for Spring
to perform autowiring of dependencies based on qualifier name.
• JSR-330 supports only singleton and nonsingleton bean scopes, while Spring supports more
scopes, which is very useful for web applications.
• In Spring, you can use the @Lazy annotation to instruct Spring to instantiate the bean only
when requested by the application. There’s no such equivalent in JSR-330.
Configuration Using Groovy
A Spring ApplicationContext can be created directly in a Groovy script
or loaded from Java, both by way of the GenericGroovyApplicationContext class.
or loaded from Java, both by way of the GenericGroovyApplicationContext class.
beans.groovy
Listing 4-67. External Groovy Bean Configuration Script
package com.apress.prospring4.ch4
beans {
contact(Contact, firstName: 'Chris', lastName: 'Schaefer', age: 32)
}
specify the bean name (contact), and then as arguments we provide the class type (Contact) followed by the property
names and values that we would like to set.
使用GenericGroovyApplicationContext(加载脚本文件
Listing 4-68. Loading Groovy Bean Definitions from Java
package com.apress.prospring4.ch4;
import org.springframework.context.ApplicationContext;
import org.springframework.context.support.GenericGroovyApplicationContext;
public class GroovyBeansFromJava {
public static void main(String[] args) {
ApplicationContext context = new GenericGroovyApplicationContext("classpath:beans.groovy");
Contact contact = context.getBean("contact", Contact.class);
System.out.println(contact);
}
}
Table 4-5. Dependency for Groovy Support
Group ID Artifact ID Version Description
org.codehaus.groovy groovy-all 2.2.2 The Groovy library
Listing 4-69. Creating ApplicationContext and Bean Definitions in Groovy
package com.apress.prospring4.ch4
import org.springframework.context.support.GenericApplicationContext
import org.springframework.beans.factory.groovy.GroovyBeanDefinitionReader
def ctx = new GenericApplicationContext()
def reader = new GroovyBeanDefinitionReader(ctx)
reader.beans {
contact(Contact, firstName: 'Chris', lastName: 'Schaefer', age: 32)
}
ctx.refresh()
println ctx.getBean("contact")


 被折叠的 条评论
为什么被折叠?
被折叠的 条评论
为什么被折叠?
 到【灌水乐园】发言


