


内容概要
为了有效的利用资源(CPU,内存),我们使用分布式解决方案来满足这一需求,企业JavaBeans(EJB) 3.1通过服务器端的EJB为开发分布式的,事务控制的,安全的,便捷的Java企业应用提供接口。在实际生产环境中我们经常需要EJB调运,JBoss 系列四演示演示两种模式的EJB调运:JBoss服务器之间的EJB调运和Java客户端和JBoss服务器之间的EJB调运,如下图:
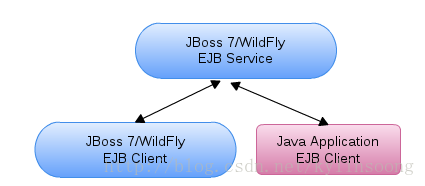
图中蓝色表示JBoss服务器,分别运行着EJB服务端程序和EJB客户端程序;红色表示Java客户端程序,运行EJB客户端程序,EJB客户端程序调运EJB服务端返回相关结果。另外,JBoss 系列四参照JBoss社区文档 【1】和【2】,也是对【1】和【2】的要点的抽取,读者也可以参照原文档完成配置。
【1】Java 程序与JBoss服务器之间EJB调运(JBoss社区文档链接)
【2】JBoss服务器之间的EJB调运(JBoss社区文档链接)
示例代码明细
我们需要下载系列4示例代码(参照系列一github客户端安装部分),下载完成进入到系列四目录,目录显示如下:
[kylin@localhost project]$ cd csdn/4
[kylin@localhost 4]$ ls
pom.xml remote server service- service - 部署在JBoss上的EJB服务器端代码
- server - 部署在JBoss上的EJB客户端代码
- remote - EJB客户端Java程序
使用Maven命令
[kylin@localhost 4]$ mvn clean installEJB服务器端代码
该部分包括两个类,Greeter接口和GreeterBean实现类,代码明细如下:
public interface Greeter {
	String greet(String user);
}
@Stateless
@Remote (Greeter.class)
public class GreeterBean implements Greeter {
public String greet(String user) {
System.out.println("GreeterBean invoked");
return "Hello " + user + ", have a pleasant day!";
}
}部署在JBoss上的EJB客户端代码
该部分包括一个类,JSF bean,当前段发送http请求setName方法被调运,setName方法中调运部署在另一台JBoss中EJB服务,代码明细如下:
@Named("greeter")
@SessionScoped
public class Greeter implements Serializable {

	private static final long serialVersionUID = 3330810482989501410L;

	private String message;

	public void setName(String name) {

		try {
			final Hashtable props = new Hashtable();
			props.put(Context.URL_PKG_PREFIXES, "org.jboss.ejb.client.naming");
			final Context context = new javax.naming.InitialContext(props);
			String jndiName = "ejb:/ejb-invocation-service/GreeterBean!" + com.kylin.ejb.invocation.service.Greeter.class.getName() ;
			com.kylin.ejb.invocation.service.Greeter greeter = (com.kylin.ejb.invocation.service.Greeter) context.lookup(jndiName);
			message = greeter.greet(name);
		} catch (Exception e) {
			message = e.getMessage();
		}

	}

	public String getMessage() {
		return message;
	}

}
EJB客户端Java程序
包括一个简单Main方法的类,运行Main方法执行EJB远程调运,代码明细如下:
public class GreeterClient extends ClientBase {

	public void test() throws Exception {
		String jndiName = "ejb:/ejb-invocation-service/GreeterBean!" + Greeter.class.getName() ;
		Greeter greeter = (com.kylin.ejb.invocation.service.Greeter) getContext().lookup(jndiName);
		System.out.println(greeter.greet("Tester"));
	}

	public static void main(String[] args) throws Exception {
		new GreeterClient().test();
	}

}
JBoss之间的EJB调运
我分两步说明如何配置完成JBoss之间的EJB调运,即EJB服务端JBoss配置和EJB客户端JBoss配置。
EJB服务端JBoss配置
1. 添加一个Application User,如【3】.注意,我们创建用户名为ejb,密码为dGVzdA==(test加密后)
2. 部署ejb-invocation-service.jar到EJB服务端JBoss
3. 启动EJB服务端JBoss,如下:
./standalone.sh -Djboss.node.name=node1EJB客户端JBoss配置
1. 创建一个security-realm,具体编辑standalone.xml <security-realms>部分,添加ejb-security-realm,添加完成配置文件如下:
     <security-realms>
            ...
            <security-realm name="ejb-security-realm">
                <server-identities>
                    <secret value="dGVzdA=="/>
                </server-identities>
            </security-realm>
        </security-realms>
2. 创建一个outbound-socket-binding,具体编辑standalone.xml <socket-binding-group 部分,添加outbound-socket-binding remote-ejb,添加完成配置文件如下:
     <socket-binding-group name="standard-sockets" default-interface="public" port-offset="${jboss.socket.binding.port-offset:0}">
        ...
        <outbound-socket-binding name="remote-ejb">
            <remote-destination host="localhost" port="4447"/>
        </outbound-socket-binding>
     </socket-binding-group>
3. 创建一个remote-outbound-connection,具体编辑standalone.xml urn:jboss:domain:remoting:1.1 部分,添加remote-outbound-connection,添加完成后该部分配置文件如下:
     <subsystem xmlns="urn:jboss:domain:remoting:1.1">
            <connector name="remoting-connector" socket-binding="remoting" security-realm="ApplicationRealm"/>
                <outbound-connections>
                <remote-outbound-connection name="remote-ejb-connection" outbound-socket-binding-ref="remote-ejb" security-realm="ejb-security-realm" username="ejb">
                    <properties>
                        <property name="SASL_POLICY_NOANONYMOUS" value="false"/>
                        <property name="SSL_ENABLED" value="false"/>
                    </properties>
                </remote-outbound-connection>
            </outbound-connections>
        </subsystem>
4. 部署ejb-invocation-client-server.war到EJB客户端JBoss
注意WEB-INF下的jboss-ejb-client.xml中outbound-connection-ref需要指向步骤三中定义的outbound-connection名字,内容如下:
<jboss-ejb-client xmlns="urn:jboss:ejb-client:1.0">
    <client-context>
        <ejb-receivers>
            <remoting-ejb-receiver outbound-connection-ref="remote-ejb-connection"/>
        </ejb-receivers>
    </client-context>
</jboss-ejb-client>
5. 启动EJB客户端JBoss,如下:
./standalone.sh -Djboss.socket.binding.port-offset=1006. 测试,访问http://localhost:8180/ejb-invocation-client-server,在出现界面中输入任何字符串,点击Greet按钮,返回类似“Hello ***, have a pleasant day!”,则证明调运成功。
说明:
1. 以上配置中我是通过直接修改配置文件完成配置,但是不建议直接这样做,推荐使用JBoss提供的管理界面或CLI进行配置
2. 以上我是在同一台机器上使用localhost和端口偏移来模拟两台JBoss
Java程序和JBoss服务器之间的EJB调运
我分两步说明如何配置完成Java程序和JBoss服务器之间的EJB调运,即EJB服务端JBoss配置和Java程序端的配置。
EJB服务端JBoss配置
1. 添加一个Application User,如【3】.注意,我们创建用户名为ejb,密码为dGVzdA==(test加密后)
2. 部署ejb-invocation-service.jar到EJB服务端JBoss
3. 启动EJB服务端JBoss,如下:
./standalone.sh -Djboss.node.name=node1Java程序端的配置
1. 修改jboss-ejb-client.properties文件,确保配置指向EJB服务器端配置的IP和相关用户名,如下:
endpoint.name=client-endpoint
remote.connectionprovider.create.options.org.xnio.Options.SSL_ENABLED=false

remote.connections=default

#remote.connection.default.host=10.66.193.129
remote.connection.default.host=localhost
remote.connection.default.port = 4447
remote.connection.default.connect.options.org.xnio.Options.SASL_POLICY_NOANONYMOUS=false
remote.connection.default.username=ejb
remote.connection.default.password=test
2. 添加jboss-client.jar(JBOSS_HOME/bin/client目录下)到当前classpath
3. 运行GreeterClient类,“Hello ***, have a pleasant day!”输出,则证明调运成功。
【3】add application user
---
[kylin@localhost bin]$ ./add-user.sh
What type of user do you wish to add?
a) Management User (mgmt-users.properties)
b) Application User (application-users.properties)
(a): b
Enter the details of the new user to add.
Realm (ApplicationRealm) :
Username : ejb
Password :
Re-enter Password :
What roles do you want this user to belong to? (Please enter a comma separated list, or leave blank for none)[ ]:
About to add user 'ejb' for realm 'ApplicationRealm'
Is this correct yes/no? yes
Added user 'ejb' to file '/.../standalone/configuration/application-users.properties'
Added user 'ejb' to file '/.../domain/configuration/application-users.properties'
Added user 'ejb' with roles to file '/.../standalone/configuration/application-roles.properties'
Added user 'ejb' with roles to file '/.../domain/configuration/application-roles.properties'
Is this new user going to be used for one AS process to connect to another AS process?
e.g. for a slave host controller connecting to the master or for a Remoting connection for server to server EJB calls.
yes/no? yes
To represent the user add the following to the server-identities definition <secret value="dGVzdA==" />


 527
527


 被折叠的 条评论
为什么被折叠?
被折叠的 条评论
为什么被折叠?
 到【灌水乐园】发言


