


背景
这里不要背景,就是因为懒,还想高大上!
hexo博客搭建先看文章 : 基于windows的实现 !
声明
本文如果你在windwos进行自动化部署的话,请绕道!
windows下加密SSH key 的 id_rsa ,生成的文件解密不了,解密不了,解密不了!
上文,基于windows下进行hexo的实现,可以在本地测试与实现,但不适合于自动部署实现,原因上面已经说了。
环境
(1)平台环境
VirtualBox 安装 Ubuntu Server 16.04
(2)Ruby 安装其中的 坑,坑,坑
官方安装配置文档:
按照这里配置就完蛋了 : https://github.com/travis-ci/travis.rb
这里也不是完蛋了,毕竟平台都不一样,我的是Ubuntu Server16.04 !!! 安装Ruby成功 ,使用 Gem安装Travis 报错,折腾了一天!
报错如下:
root@ubuntu:~# gem install travis
Building native extensions.  This could take a while...
ERROR:  Error installing travis:
    ERROR: Failed to build gem native extension.

    current directory: /var/lib/gems/2.1.0/gems/ffi-1.9.14/ext/ffi_c
/usr/bin/ruby2.1 -r ./siteconf20160911-20807-1ijumtw.rb extconf.rb
checking for ffi.h... *** extconf.rb failed ***
Could not create Makefile due to some reason, probably lack of necessary
libraries and/or headers.  Check the mkmf.log file for more details.  You may
need configuration options.

Provided configuration options:
    --with-opt-dir
    --without-opt-dir
    --with-opt-include
    --without-opt-include=${opt-dir}/include
    --with-opt-lib
    --without-opt-lib=${opt-dir}/lib
    --with-make-prog
    --without-make-prog
    --srcdir=.
    --curdir
    --ruby=/usr/bin/ruby2.1
    --with-ffi_c-dir
    --without-ffi_c-dir
    --with-ffi_c-include
    --without-ffi_c-include=${ffi_c-dir}/include
    --with-ffi_c-lib
    --without-ffi_c-lib=${ffi_c-dir}/lib
    --with-libffi-config
    --without-libffi-config
    --with-pkg-config
    --without-pkg-config
/usr/lib/ruby/2.1.0/mkmf.rb:456:in `try_do': The compiler failed to generate an executable file. (RuntimeError)
You have to install development tools first.
    from /usr/lib/ruby/2.1.0/mkmf.rb:587:in `try_cpp'
    from /usr/lib/ruby/2.1.0/mkmf.rb:1061:in `block in have_header'
    from /usr/lib/ruby/2.1.0/mkmf.rb:912:in `block in checking_for'
    from /usr/lib/ruby/2.1.0/mkmf.rb:351:in `block (2 levels) in postpone'
    from /usr/lib/ruby/2.1.0/mkmf.rb:321:in `open'
    from /usr/lib/ruby/2.1.0/mkmf.rb:351:in `block in postpone'
    from /usr/lib/ruby/2.1.0/mkmf.rb:321:in `open'
    from /usr/lib/ruby/2.1.0/mkmf.rb:347:in `postpone'
    from /usr/lib/ruby/2.1.0/mkmf.rb:911:in `checking_for'
    from /usr/lib/ruby/2.1.0/mkmf.rb:1060:in `have_header'
    from extconf.rb:16:in `<main>'

To see why this extension failed to compile, please check the mkmf.log which can be found here:

  /var/lib/gems/2.1.0/extensions/x86_64-linux/2.1.0/ffi-1.9.14/mkmf.log

extconf failed, exit code 1

Gem files will remain installed in /var/lib/gems/2.1.0/gems/ffi-1.9.14 for inspection.
Results logged to /var/lib/gems/2.1.0/extensions/x86_64-linux/2.1.0/ffi-1.9.14/gem_make.out
root@ubuntu:~# cat /var/lib/gems/2.1.0/extensions/x86_64-linux/2.1.0/ffi-1.9.14/mkmf.log
package configuration for libffi is not found
"gcc -o conftest -I/usr/include/x86_64-linux-gnu/ruby-2.1.0 -I/usr/include/ruby-2.1.0/ruby/backward -I/usr/include/ruby-2.1.0 -I. -Wdate-time -D_FORTIFY_SOURCE=2   -g -O2 -fstack-protector-strong -Wformat -Werror=format-security -fPIC conftest.c  -L. -L/usr/lib/x86_64-linux-gnu -L. -Wl,-Bsymbolic-functions -Wl,-z,relro -L/build/ruby2.1-zsMOW6/ruby2.1-2.1.9/debian/lib -fstack-protector -rdynamic -Wl,-export-dynamic     -lruby-2.1  -lpthread -lgmp -ldl -lcrypt -lm   -lc"
checked program was:
/* begin */
1: #include "ruby.h"
2:
3: int main(int argc, char **argv)
4: {
5:   return 0;
6: }
/* end */
(3)Ruby 安装推荐 - Ubuntu Server
Ruby相关环境安装脚本:
Batch scripts for Ruby production environment install on Ubuntu Server.
怎样安装就自己看上面的文档吧!提醒一点,测试下是否已经安装过curl 了!
测试是否成功 :
yuan@ubuntu:~$ ruby -v
ruby 2.3.1p112 (2016-04-26) [x86_64-linux-gnu]
yuan@ubuntu:~$ gem -v
2.5.1
(4)安装 travis
成功如下:
yuan@ubuntu:~$ sudo gem install travis
[sudo] password for yuan:
Building native extensions.  This could take a while...
Successfully installed ffi-1.9.14
Fetching: ethon-0.9.0.gem (100%)
Successfully installed ethon-0.9.0
Fetching: typhoeus-0.8.0.gem (100%)
Successfully installed typhoeus-0.8.0
Fetching: websocket-1.2.3.gem (100%)
Successfully installed websocket-1.2.3
Fetching: pusher-client-0.6.2.gem (100%)
Successfully installed pusher-client-0.6.2
Fetching: travis-1.8.2.gem (100%)
Successfully installed travis-1.8.2
Parsing documentation for ffi-1.9.14
Installing ri documentation for ffi-1.9.14
Parsing documentation for ethon-0.9.0
Installing ri documentation for ethon-0.9.0
Parsing documentation for typhoeus-0.8.0
Installing ri documentation for typhoeus-0.8.0
Parsing documentation for websocket-1.2.3
Installing ri documentation for websocket-1.2.3
Parsing documentation for pusher-client-0.6.2
Installing ri documentation for pusher-client-0.6.2
Parsing documentation for travis-1.8.2
Installing ri documentation for travis-1.8.2
Done installing documentation for ffi, ethon, typhoeus, websocket, pusher-client, travis after 14 seconds
6 gems installed
(5)Hexo 配置安装 - 自己安装咯,步骤一样
重温 :
- 下载node.js 配置环境变量;
- 安装hexo : npm install -g hexo-cli
配置Travis
(1)接入Travis CI
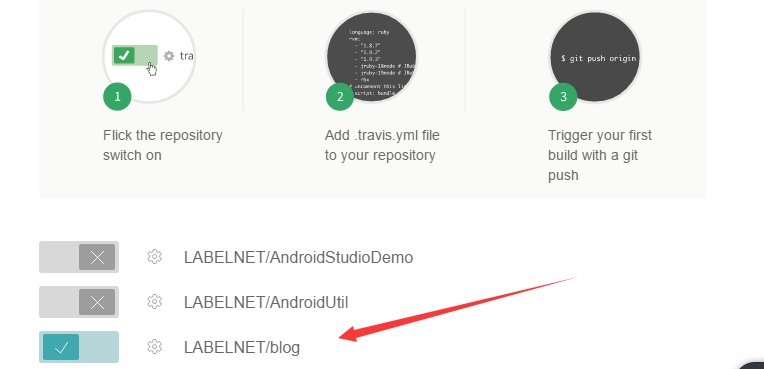
打开 Travis CI 网站,使用Github账号登录。将鼠标放在右上角的用户名上,点击Account选项,会显示github的项目。找到博客项目,点击前面带有 X 符号的按钮,开启travis支持。
(2)新建配置文件
首先打开博客项目文件夹,在项目根目录新建.travis.yml配置文件。
$ cd 博客项目文件夹根目录
$ touch .travis.yml
(3)新建文件夹 .travis : 确保已经开启travis支持
yuan@ubuntu:~/doc/hexo/.travis$ mkdir .travis
yuan@ubuntu:~/doc/hexo/.travis$ cd .travis
(4)复制id_rsa 和 创建 ssh_config文件
yuan@ubuntu:~/doc/hexo/.travis$ cp ~/.ssh/id_rsa ./创建 ssh_config 文件 :
yuan@ubuntu:~/doc/hexo/.travis$ sudo vim ssh_config
[sudo] password for yuan:

Host github.com
User git
StrictHostKeyChecking no
IdentityFile ~/.ssh/id_rsa
IdentitiesOnly yes
(5)travis 登陆
yuan@ubuntu:~/doc/hexo/.travis$ travis login --auto
We need your GitHub login to identify you.
This information will not be sent to Travis CI, only to api.github.com.
The password will not be displayed.

Try running with --github-token or --auto if you don't want to enter your password anyway.

Username: LABELNET
Password for LABELNET: ************
Successfully logged in as LABELNET!
(6)加密操作
加密操作
在博客项目文件夹下对ssh的私钥进行加密
yuan@ubuntu:~/doc/hexo/.travis$ travis encrypt-file id_rsa --add
encrypting id_rsa for LABELNET/blog
storing result as id_rsa.enc
storing secure env variables for decryption

Make sure to add id_rsa.enc to the git repository.
Make sure not to add id_rsa to the git repository.
Commit all changes to your .travis.yml.
此操作会生成加密之后的秘钥文件 id_rsa.enc,删除id_rsa密钥文件(私钥不能随便泄露)。
你的travis 目前上已经出现了下面加密解密key :
(7)我的 .travis.yml文件
yuan@ubuntu:~/doc/hexo$ cat .travis.yml
language: node_js

node_js:
  - '4'

branches:
  only:
  - master

cache:
  directories:
  - node_modules

before_install:
- openssl aes-256-cbc -K $encrypted_xxxxxxx_key -iv $encrypted_xxxxxxxx_iv
  -in .travis/id_rsa.enc -out ~/.ssh/id_rsa -d
- chmod 600 ~/.ssh/id_rsa
- eval $(ssh-agent)
- ssh-add ~/.ssh/id_rsa
- cp .travis/ssh_config ~/.ssh/config
- git config --global user.name "LABELNET"
- git config --global user.email "1406046087@qq.com"

install:
- npm install hexo-cli -g
- npm install hexo-deployer-git --save
- npm install

script:
- hexo clean
- hexo g
- hexo g

after_success:
- hexo deploy
基本架构
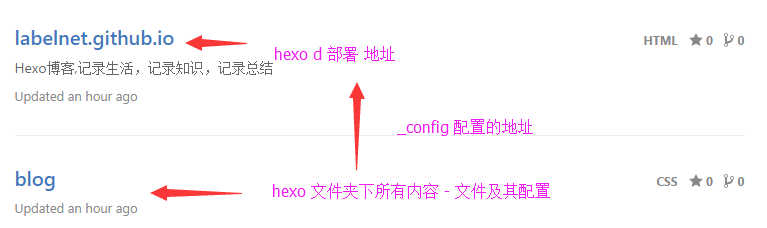
_config.yml 配置如下:
deploy:
  type: git
  repo: git@github.com:LABELNET/labelnet.github.io.git
  branch: master
最后
(1)待解决问题
实力坑 - Hexo - Next 主题本地不报错,TravisCI 无内容生成!!!


 1063
1063


 被折叠的 条评论
为什么被折叠?
被折叠的 条评论
为什么被折叠?
 到【灌水乐园】发言


