


Let’s Write Pong
You got the concept all figured out and have all the files you need to get started. It’s time to do some actual coding. First take a look at the SpriteBatch class and see how you can easily manage all the sprites. The SpriteBatch class is not only useful to render sprites in the same format as the graphics were saved, but it is possible to scale them up or down, recolor them, and even rotate them around.
现在你已经了解了这个游戏的概念,并且有了需要的文件,那么现在可以开始实际的编码了。首先来看看SpriteBatch类,它可以非常方便的来管理精灵。SpriteBatch类不仅用于渲染精灵,还可以缩放、重新上色甚至旋转这些精灵。
After putting the menu together you will add the paddles and move them with help of the input capabilities you already saw in Chapter 1. The ball itself moves with help of some simple variables, and every time you hit one of the paddles you bounce the ball back and play the PongBallHit.wav sound. If the ball goes out of the screen on the left or right side, the PongBallLost.wav sound is played and the player loses one life.
加入菜单之后,你还要加入挡板并利用你在第一章学到的来操作它们动起来。球依靠一些简单的变量来移动,每当球碰到挡板就要反弹回去并播放PongBallHit.wav里的声音。如果球飞出了屏幕,就播放PongBallLost.wav文件并且玩家失去一条命。
A few unit tests will be used to make sure that the menu and the basic game work. Then you will add additional unit tests to handle the complicated parts like hitting the ball from the sides of the paddle and fine-tuning the game play. For multiplayer support you will have a unit test to test out the controls, which are then wired up to the main menu option to support the multiplayer mode.
将会用到一些单元测试来保证菜单和游戏的正常运行。然后添加一些另外的单元测试来操作像挡板撞球和微调游戏之类的复杂部分。还要为单人模式添加一个用来检验控制操作单元测试,然后在菜单中添加支持双人模式的选项。
In the next part of this chapter you will then test the whole game on the Xbox 360 and think about more improvements you can make to the game.
在本章的下一个部分你将会在Xbox360上测试游戏,并考虑对游戏进行更多的改进。
As you saw in Chapter 1 the SpriteBatch class is used to render your textures directly on the screen. Because you don’t have any helper classes yet you will render everything the same way. For more information about helper classes to make your everyday game programming life easier, check out Chapter 3. For your Pong game you use two layers: the Space Background, which is loaded from the PongBackground.dds texture, and the menu and game textures showing the menu texts and the game components (paddles and ball).
就像你在第一章看到的那样,SpriteBatch类可以直接在屏幕上渲染文理。没有你还没有其它辅助类来完成同样的事。在第三章里,你会学到其它辅助类来让你的日常变成更容易。在Pong中你需要两层:第一,空间背景,这从PongBackground.dds文件中加载文理;第二,菜单和游戏纹理,用来显示菜单文字和游戏中的挡板和球。
To load all textures you use the following lines. First of all you have to define the textures you are using here:
使用下面的代码来加载文理。首先你要定义是要用的纹理:
Texture2D backgroundTexture, menuTexture, gameTexture;
Then load everything in the Initialize method:
然后在Initialize方法中加载:
 //
Load all our content
//
加载所有素材
backgroundTexture
=
content.Load
<
Texture2D
>
(
"
PongBackground
"
);menuTexture
=
content.Load
<
Texture2D
>
(
"
PongMenu
"
);gameTexture
=
content.Load
<
Texture2D
>
(
"
PongGame
"
);
//
Load all our content
//
加载所有素材
backgroundTexture
=
content.Load
<
Texture2D
>
(
"
PongBackground
"
);menuTexture
=
content.Load
<
Texture2D
>
(
"
PongMenu
"
);gameTexture
=
content.Load
<
Texture2D
>
(
"
PongGame
"
);
And finally you can render the background with the SpriteBatch methods you learned about in Chapter 1:
最后你可以用在第一章学到的SpriteBatch方法来渲染背景:
for the color means that you darken down the background a little bit for a better contrast to the foreground items (menu text and game elements). As you can see it is not just one line to render a sprite on the screen, and it will get a lot more complicated to render just parts of your sprite textures. Take a look at the rectangles you use for the game:
//
Draw background texture in a separate pass, else it gets messed up
//
with our other sprites, the ordering does not really work great.
//
用一个独立的过程绘制背景纹理,否则会和其它精灵搞混,渲染不能很好工作
spriteBatch.Begin();spriteBatch.Draw(backgroundTexture,
new
Rectangle(
0
,
0
, width, height), Color.LightGray);spriteBatch.End();
LightGray
LightGray亮灰色让背景稍稍变暗,以和前景选项(菜单文字和游戏元素)形成对比。如你所见,渲染一个精灵到屏幕上用不止一行,并且需要更复杂的渲染来正确处理精灵文理。看看游戏中所需要的矩形:
That is quite a lot of rectangles, but it is still simpler to just use these constant values than to import some xml data, for example. Static read-only is used instead of constants here because constants can’t be assigned to structs and static read-only behaves the same way as constants. You might ask how to get these values and how to make sure they are correct.
static
readonly
Rectangle XnaPongLogoRect
=
new
Rectangle(
0
,
0
,
512
,
110
), MenuSingleplayerRect
=
new
Rectangle(
0
,
110
,
512
,
38
), MenuMultiplayerRect
=
new
Rectangle(
0
,
148
,
512
,
38
), MenuExitRect
=
new
Rectangle(
0
,
185
,
512
,
38
), GameLifesRect
=
new
Rectangle(
0
,
222
,
100
,
34
), GameRedWonRect
=
new
Rectangle(
151
,
222
,
155
,
34
), GameBlueWonRect
=
new
Rectangle(
338
,
222
,
165
,
34
), GameRedPaddleRect
=
new
Rectangle(
23
,
0
,
22
,
92
), GameBluePaddleRect
=
new
Rectangle(
0
,
0
,
22
,
92
), GameBallRect
=
new
Rectangle(
1
,
94
,
33
,
33
), GameSmallBallRect
=
new
Rectangle(
37
,
108
,
19
,
19
);
这里有很多个矩形,但使用常量比从xml里导入数据等其他方法简单得多。这里使用静态只读来代替常量是因为常量不能分配成为结构类型,而静态只读的行为和常量一样。你可能要问怎样获取这些值并保证他们的正确。
Unit Testing in Games在游戏中使用单元测试
This is where unit testing comes into play. Unit testing for game programming basically means to split up your problems into small, easily manageable problems. Even for this very simple game it is still a good idea to write unit tests. Unit testing is perfect to align textures on the screen, test sound effects, and add collision testing. Originally I planned to write this chapter and the Pong game without using unit testing, but as soon as I programmed the game I couldn’t stop myself and before I knew it I had already written six unit tests, and I was convinced that this is the way to go and it would not make sense to delete the very useful tests.
接下来要开始进行单元测试的编写了。游戏的单元测试意味着将你的问题分割成、更易控制的小问题。即使对于像这样简单的游戏来说,这也不失为一个好的想法。单元测试用来校正显示在屏幕上的纹理、测试声音和添加碰撞检验。当初我没打算用单元测试来写本章和Pong游戏,但是当我开始编程之后,我不知不觉地就已经写了六个单元测试了,我确信这是应该做的,并且删除这些非常有用的测试是毫无意义的。
For example, to test out the menu graphics rectangles you use the following unit test:
例如,使用如下的单元测试来检查菜单图像的矩形:
Draw method.
public
static
void
TestMenuSprites()
 ...
{
...
{ StartTest( delegate
 ...{ testGame.RenderSprite(testGame.menuTexture, 512-XnaPongLogoRect.Width/2, 150, XnaPongLogoRect); testGame.RenderSprite(testGame.menuTexture, 512-MenuSingleplayerRect.Width/2, 300, MenuSingleplayerRect); testGame.RenderSprite(testGame.menuTexture, 512-MenuMultiplayerRect.Width/2, 350, MenuMultiplayerRect, Color.Orange); testGame.RenderSprite(testGame.menuTexture, 512-MenuExitRect.Width/2, 400, MenuExitRect);
 });
}); }
//
TestMenuSprites()
}
//
TestMenuSprites()
Please note: This is not the final way you will do unit testing in this book. You just use the very basic idea here to execute unit tests. The delegate holds the code you will execute each frame in the
注意:这不是唯一的单元测试的方法。你仅仅是使用非常简单的思想来执行测试。这个委托包含着Draw方法绘制每一帧时都要执行的代码。
You might ask yourself: What is StartTest? What about testGame or the RenderSprite method? Where do they come from? Well, this is one of the main differences between the old way of game programming and using an agile approach with unit testing. All these methods do not exist yet. Similar to how you planned your game, you also plan your unit tests by just writing down how you want to test something; in this case displaying the game logo and the three menu entries (Singleplayer, Multiplayer, and Exit).
你可能要问:StartTest是什么?testGame和RenderSprite方法又是什么?它们从哪来?好,这就是与传统编程方法主要的不同点之一,使用敏捷的方法来做单元测试。这些方法现在还不存在。就像你去规划你的游戏一样,你同样也需要规划你的测试,写下你想要做的测试;在本例中,要显示游戏logo和三个菜单入口(单人模式,双人模式和退出)。
After writing a unit test and all syntax errors are fixed you can immediately start testing by compiling your code - just press F5 and you will see a couple of errors. These errors have to be fixed step by step and then the unit test can be started. Static unit tests do not use Assert functions very often, but it is possible to add some code to throw exceptions if some values are not as expected. For your unit tests you will just test them by looking at the result on the screen and then modify the RenderSprite method until everything works the way you want.
在写单元测试并且所有的语法错误都被修正以后,你就可以马上开始编译代码来测试——按下F5,你会看到很多错误信息。这些错误被一个一个标记出来,单元测试就可以开始了。静态单元测试常常不用Assert功能,但是加入一些代码,当出现一些不希望得到的值时可以抛出异常。你的单元测试就是用来观察屏幕上的结果,然后修改RenderSprite方法直到所有的一切都是你想要的。
The next chapter talks in greater detail about unit testing. For the Pong game, you just derive from the PongGame class and add a simple delegate to render custom code in your unit tests:
下一章将更详细的讨论单元测试。对于Pong这个游戏,你只要得到PongGame类并在单元测试中添加一个简单的委托来渲染用户代码:
Now you can write the very simple StartTest method to create an instance of TestPongGame and then call Run to execute the Draw method with your custom testLoop code:
delegate
void
TestDelegate();
class
TestPongGame : PongGame
...
{ TestDelegate testLoop; public TestPongGame(TestDelegate setTestLoop) ...{ testLoop = setTestLoop;} // TestPongGame(setTestLoop) protected override void Draw(GameTime gameTime) ...{ base.Draw(gameTime); testLoop(); } // Draw(gameTime)}
//
class TestPongGame
现在你可以自己编写一个很简单的StartTest方法来创建一个TestPongGame的实例,然后用你的testLoop代码来调用Run执行Draw方法:
The static instance testGame is used to make writing the unit tests easier, but it can be confusing if you use it somewhere else because it will only be valid after StartTest is called. In the next chapters you will see a better way to do all this.
static
TestPongGame testGame;
static
void
StartTest(TestDelegate testLoop)
...
{ using (testGame = new TestPongGame(testLoop)) ...{ testGame.Run(); } // using}
//
StartTest(testLoop)
静态实例testGame使编写单元测试更容易,但是如果你把它写在别的什么地方它就会变得混乱,因为它要在StartTest被调用之后才是可正确使用的。下一章里你会看到做到这些的更好方法。
Now two of the errors from the first version of the unit test are fixed; only the RenderSprite method is missing now. It is ok to add an empty method just to make the unit test work:
现在在第一版本的单元测试中有两个错误被修正;现在只有RenderSprite方法还是未知的。添加一个空方法就好了,让单元测试工作起来:
After adding these two methods you can now execute the TestMenuSprites method. How to do that? With TestDriven.NET you can just right-click and select “Start Test,” but XNA Game Studio Express does not support plugins and you have to write your own way of unit testing by changing the Main method in the Program.cs file:
public
void
RenderSprite(Texture2D texture,
int
x,
int
y, Rectangle sourceRect, Color color)
...
{ //TODO}
//
RenderSprite(texture, rect, sourceRect)
public
void
RenderSprite(Texture2D texture,
int
x,
int
y, Rectangle sourceRect)
...
{ //TODO}
//
RenderSprite(texture, rect, sourceRect)
添加这两个方法之后你现在可以执行TestMenuSprites了。怎么做呢?你可以鼠标右击来调出TestDriven.NET,并选择“Start Test(开始测试)”,但是XNA GSE不支持插件,你就必须改写Program.cs文件中的Main方法来进行测试:
As you can see I have also extracted the StartGame method to make the Main method easier to read and to make it easy to change unit tests. StartGame uses just the standard code:
static
void
Main(
string
[] args)
...
{ //PongGame.StartGame(); PongGame.TestMenuSprites();}
//
Main(args)
想你看到的那样,我已经分离出了StartGame方法来让Main方法易于阅读且易于改变单元测试。StartGame使用标准代码:
If you press F5 now the unit test is executed instead of the normal game code. Because RenderSprite does not contain any code yet you will just see the space background that is drawn in the Draw method of PongGame. Now you add the code to make the menu work. You already know how to render sprites, but it is highly ineffective to start and end a SpriteBatch for every single RenderSprite call. Create a simple list of sprites you want to render each frame and add a new entry every time you call RenderSprite. Then at the end of the frame you will just draw all sprites:
public
static
void
StartGame()
...
{ using (PongGame game = new PongGame()) ...{ game.Run(); } // using}
//
StartGame()
如果你这时按下F5单元测试就会替代正常代码被执行。因为RenderSprite还没有包含任何代码,你只能看到空间背景被PongGame的Draw方法绘制。现在来添加代码来让菜单工作。你已经知道怎样渲染精灵,但是为每一个单独的RenderSprite开始和结束一个SpriteBatch是效率极低的。创建一个简单的list表储存每一帧你想渲染的精灵,每一次的RenderSprite调用添加一个新的入口。然后在每一帧的最后绘制出所有精灵:
By the way: You added all this code, including the unit tests, to your PongGame class. Usually you would want to reuse code and extend games later and it is better to split everything up in multiple classes. To keep things simple and because you won’t use much of this code later, everything is just written down in the fastest way possible. Though this is clearly not the cleanest and most elegant way to code, it is usually the fastest and most efficient way to make your unit tests run. At a later point you can refactor your code to make it more elegant and reusable. Thanks to unit testing you always have a strong tool to make sure everything is still functioning after changing the layout of the code several times.
class
SpriteToRender
...
{ public Texture2D texture; public Rectangle rect; public Rectangle? sourceRect; public Color color; public SpriteToRender(Texture2D setTexture, Rectangle setRect, Rectangle? setSourceRect, Color setColor) ...{ texture = setTexture; rect = setRect; sourceRect = setSourceRect; color = setColor; } // SpriteToRender(setTexture, setRect, setColor)}
//
SpriteToRender
List
<
SpriteToRender
>
sprites
=
new
List
<
SpriteToRender
>
();
顺便说一下:添加所有的代码到你的PongGame类里面,包括单元测试。通常你想要重用代码并接着扩展游戏,把每一件事分在多了类中是好方法。保持事情的简单,并且由于之后你也不会用到很多这些代码,每件事尽可能用最快的方法来写。尽管这是明智的但不是最整洁和优雅的代码编写方法,但这通常是最快速有效的让测试得以运行的方法。在后一点,你可以重构你的代码让它更加优雅和可重复使用。多亏有了单元测试你有了一个强大的工具来保证每一个功能的正确,即便是多次改变了代码的布局。
You might have seen that “Rectangle?” is used instead of just “Rectangle” for the sourceRect in the preceding code. “Rectangle?” means that this type is null-able and you can just pass in null for this argument, which makes it possible to create overloads of RenderSprite that don’t use sourceRect to just render the full texture:
你在前面的代码里可能已经看见了使用的是“Rectangle?”而不是“Rectangle”。“Rectangle?”是一个可空类型,这个参数可变为空,这可为RenderSprite创建不用sourceRect来渲染整个文理的重载:
That’s pretty straightforward. The DrawSprites method, which is called at the end of the Draw method, is also not very complicated:
public
void
RenderSprite(Texture2D texture, Rectangle rect, Rectangle
?
sourceRect, Color color)
...
{ sprites.Add(new SpriteToRender(texture, rect, sourceRect, color));}
//
RenderSprite(texture, rect, sourceRect, color)
继续前行。在Draw方法的最后调用DrawSprites方法,这不是非常复杂的事:
Though it is not very important for this game, at least on the Windows platform where you use 1024×768 as the default resolution anyway, you will rescale all sprites from 1024×768 to the current resolution. Please note that all textures for this game and all upcoming games in this book are usually stored in the 1024×768 resolution. The code in DrawSprites makes sure that all sprites are scaled correctly to the currently used resolutions. For example, on the Xbox 360 several resolutions are possible and will force the game to run in these resolutions, which you can’t know beforehand. For this reason Xbox 360 games should be resolution independent and allow HDTV-like 1080p (1920×1080) formats if possible.
public
void
DrawSprites()
...
{// No need to render if we got no sprites this frame//如果此帧没有精灵则不需要渲染 if (sprites.Count == 0) return;// Start rendering sprites//开始渲染精灵 spriteBatch.Begin(SpriteBlendMode.AlphaBlend, SpriteSortMode.BackToFront, SaveStateMode.None);// Render all sprites//渲染所有精灵 foreach (SpriteToRender sprite in sprites) spriteBatch.Draw(sprite.texture, // Rescale to fit resolution //重新调整以适合分辨率 new Rectangle( sprite.rect.X * width / 1024, sprite.rect.Y * height / 768, sprite.rect.Width * width / 1024, sprite.rect.Height * height / 768), sprite.sourceRect, sprite.color);// We are done, draw everything on screen with help of the end method.//使用end方法来在屏幕上绘制所有图像 spriteBatch.End(); // Kill list of remembered sprites//清空精灵列表 sprites.Clear();}
//
DrawSprites()
尽管这对这个游戏来说不是很重要,至少我们在Windows平台上使用1024×768作为默认分辨率,你要调整所有精灵由1024×768成为当前分辨率。请记住游戏中的所有纹理和本书中接下来的游戏都是使用1024×768的分辨率。DrawSprites中的代码保证所有精灵正确缩放到当前使用的分辨率。例如,在Xbox360有几种可能的分辨率,并强制游戏在此分辨率下运行,而你却不能事先知道这个分辨率是多少。因为这个原因,Xbox360的游戏应当能够分辨,如果可能还应该允许像1080p这样的高清电视格式。
Basically, DrawSprites checks if there are any sprites to render, else just exit the function. Then render all sprites with the default alpha blend mode and sorted from back to front without saving the states, which means that if you change any render state of XNA it will not be restored when End is called. Usually you will always want to use SaveStateMode.None because it is the fastest, and through your unit tests you make sure everything works out and is not changed in a way that messes up your rendering done after this method.
DrawSprites检查如果有精灵就渲染,否在就退出。使用默认的alpha混合模式渲染精灵,按从后往前的顺序,且不保存绘制状态,这也就是说如果你改变了XNA的渲染状态,当End方法被调用它将不会重新排序。你经常会想用SaveStateMode.None模式,因为它最快,通过你的单元测试来确保每一个功能的正确运行,并且【is not changed in a way that messes up your rendering done after this method】。
You might think “All that just to render the main menu graphics?” but if you press F5 now you can see the screen shown in Figure 2-5. Because you have implemented the basic code for your game, all the sprite rendering code, and everything you need for your unit tests, you have almost completed 50% of the work already. You now just need to add the game graphics, the controls, and some simple ball collision code and you are done.
你可能会想“这些就能正确渲染主菜单的图像了吗?但是如果你现在按下F5”你就可以看到如图2-5的画面了。因为你已经执行了游戏的基本代码——所有的精灵渲染代码,还有你需要的单元测试,你已经完成了50%的工作了。你现在只需要添加游戏图像、操作控制还有一些简单的球碰撞检验代码。

Adding the Ball and Paddles添加球和挡板
To add the ball, paddles, and all other game components you need you use another unit test called TestGameSprites:
你需要另一个单元测试TestGameSprites来添加球、挡板和游戏的其它部分:
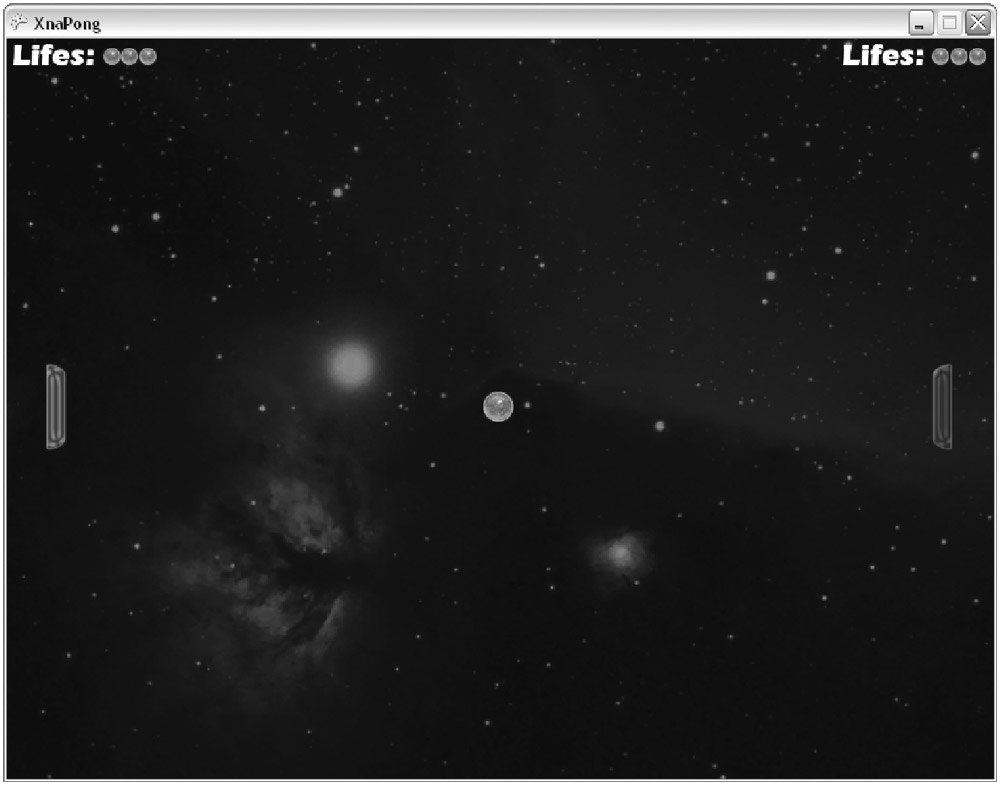
This unit test represents the methodology of the agile development process even better than the last unit test. As you can see you just took a look at the design concept and implemented everything at a very high level. At the top you see the number of lives each player has. Then there is the ball in the middle and each player has his paddle. The screen border does not use any special graphics and you already have the background.
public
static
void
TestGameSprites()
...
{ StartTest( delegate ...{ // Show lives testGame.ShowLives(); // Ball in center testGame.RenderBall(); // Render both paddles testGame.RenderPaddles(); });}
//
TestGameSprites()
这一个单元测试比前一个单元测试更能代表敏捷开发方法。你可以看到设计概念和从一个很高的层次来执行所有的东西。在画面顶部你可以看到每位玩家有多少条命。在屏幕中央有一个球,每一位玩家有一个挡板。屏幕的边界不需要其他特别的图像,你已经有了背景。
Just to make sure you understand the way these unit tests are done, add them and press F5 after adding this to the Main method and commenting out the old unit test:
确定你了解这些单元测试的用途,将他们添加到Main中,并注释掉之前的单元测试,然后按下F5:
//PongGame.StartGame();
//PongGame.TestMenuSprites();
PongGame.TestGameSprites();
You will get three error messages because none of the three new methods of TestGameSprites is implemented yet. Now after you see these errors you know exactly that these are your next three steps, and if all of them are implemented and tested, this test is complete and you continue with the next part of your game. I cannot mention this often enough: This really makes the overall process much more straightforward and it seems like you planned everything from start to finish, but as you saw earlier you just wrote down one simple page of your game idea. Everything else was just designed and created as you go from the top-level design down to the implementation at the lowest level. Take a look at the three new methods:
由于还没有编写TestGameSprites中的三个新方法,所以你将会得到三个错误信息。现在当你看到这些错误后,你应该很清楚地知道下一步应该做什么,如果编写好并测试这三个方法,这一个测试将完成,你可以继续进入到游戏开发的下一步。我已经多次提到:这使整个过程更加明确,而且看起来就像你从开始到结束规划好了所有东西,但是你只在一页纸上写了游戏的构思,看起来非常简单。所有其他事就是设计和创建,以一个自顶向下逐步求精的过程。现在来看看这三个新方法:
ShowLives just shows the “Lives:” text for both players and adds the number of lives as small balls from the game texture. RenderBall is even simpler:
public
void
ShowLives()
...
{ // Left players lives RenderSprite(menuTexture, 2, 2, GameLivesRect); for (int num = 0; num < leftPlayerLives; num++) RenderSprite(gameTexture, 2+GameLivesRect.Width+ GameSmallBallRect.Width*num-2, 9, GameSmallBallRect); // Right players lives int rightX = 1024-GameLivesRect.Width-GameSmallBallRect.Width*3-4; RenderSprite(menuTexture, rightX, 2, GameLivesRect); for (int num = 0; num < rightPlayerLives; num++) RenderSprite(gameTexture, rightX+GameLivesRect.Width+ GameSmallBallRect.Width*num-2, 9, GameSmallBallRect);}
//
ShowLives()
ShowLives在屏幕上显示“Lives:”,表示两个玩家的命数,用游戏纹理文件中的小球来表示。RenderBall更简单:
And finally you have RenderPaddles to show the left and right paddles at the current position:
public
void
RenderBall()
...
{ RenderSprite(gameTexture, (int)((0.05f+0.9f*ballPosition.X)*1024) GameBallRect.Width/2, (int)((0.02f+0.96f*ballPosition.Y)*768) GameBallRect.Height/2, GameBallRect);}
//
RenderBall()
最后还有一个RenderPaddles方法用来显示当前位置左边和右边的挡板:
Before you even wonder about the all the floating-point numbers in RenderBall and RenderPaddles, these are the new variables you need for your game to keep track of the current ball and paddles positions:
public
void
RenderPaddles()
...
{ RenderSprite(gameTexture, (int)(0.05f*1024)-GameRedPaddleRect.Width/2, (int)((0.06f+0.88f*leftPaddlePosition)*768) GameRedPaddleRect.Height/2, GameRedPaddleRect); RenderSprite(gameTexture, (int)(0.95f*1024)-GameBluePaddleRect.Width/2, (int)((0.06f+0.88f*rightPaddlePosition)*768) GameBluePaddleRect.Height/2, GameBluePaddleRect);}
//
RenderPaddle(leftPaddle)
在RenderBall和RenderPaddles里有一些浮点数可能会让你感到不解,这些是你游戏需要的几个新变量,用来表示球和挡板的位置:
Now it might be a little bit clearer why you work with floating-point numbers in the render methods. This way you don’t have to deal with screen coordinates, multiple resolutions, and checking screen borders. Both the ball and the paddles just stay between 0 and 1. For the x coordinate 0 means you are at the left border, and 1 means you are at the right border of the screen. Same thing for the y coordinate and the paddles; 0 is the topmost position and 1 is the bottom of the screen. You also use a speed vector to update the ball position each frame, which is discussed in a minute.
/**/
/// <summary>/// Current paddle positions, 0 means top, 1 means bottom./// 挡板当前的位置,0表示在顶部,1表示在底部/// </summary>
float
leftPaddlePosition
=
0.5f
, rightPaddlePosition
=
0.5f
;
/**/
/// <summary>/// Current ball position, again from 0 to 1, 0 is left and top,/// 1 is bottom and right./// 球当前的位置,0表示左边和顶部,1表示右边和底部/// </summary>
Vector2 ballPosition
=
new
Vector2(
0.5f
,
0.5f
);
/**/
/// <summary>/// Ball speed vector, randomized for every new ball./// Will be set to Zero if we are in menu or game is over./// 球的速度向量,为每一个新球赋一个随机的值/// </summary>
Vector2 ballSpeedVector
=
new
Vector2(
0
,
0
);
现在你可能更加明白了为什么在渲染方法中使用浮点数了。这样你不用处理屏幕坐标、多种分辨率还有屏幕边界的检查。球和挡板只在0和1之间。对于x轴,0代表你在屏幕的左边界,1代表你在右边界。对于y轴和挡板也是同样道理,0代表在屏幕最上面,1代表在最下面。你还需要一个表示速度的向量来在每一帧更新球的位置,这在稍后讨论。
The paddles are just rendered on the screen; you put the left paddle (red) to the left side and add 5% to make it more visible and add a little area behind it where the ball can move to lose a life for this player. The same thing happens for the right paddle (blue) at the right side at 95% (which is 0.95f) of the screen width. Take a look at the output you see after pressing F5 now (see Figure 2-6).
挡板只是渲染在了屏幕上,让左挡板(红色)离开左边界5%,让它的移动看起来更明显,在它后面留一些空间让球可以移动使这个玩家丢掉一条命。对右边的挡板(蓝色)也是同样情况,在屏幕宽度95%的地方(使用0.95f表示)。现在按下F5就会看到如下的输出结果。
That does look like the game is almost done right now. Although unit testing is great and gives you great results in a quick manner, it does not mean you are done yet. The input and the collision testing still have to be done.
看起来游戏马上就要完成了。尽管单元测试非常好,使用快速的方法得到了很好的结果,这并不意味着这已经完成。接下来还要做的是输入处理和碰撞检测。


 5819
5819


 被折叠的 条评论
为什么被折叠?
被折叠的 条评论
为什么被折叠?
 到【灌水乐园】发言


