


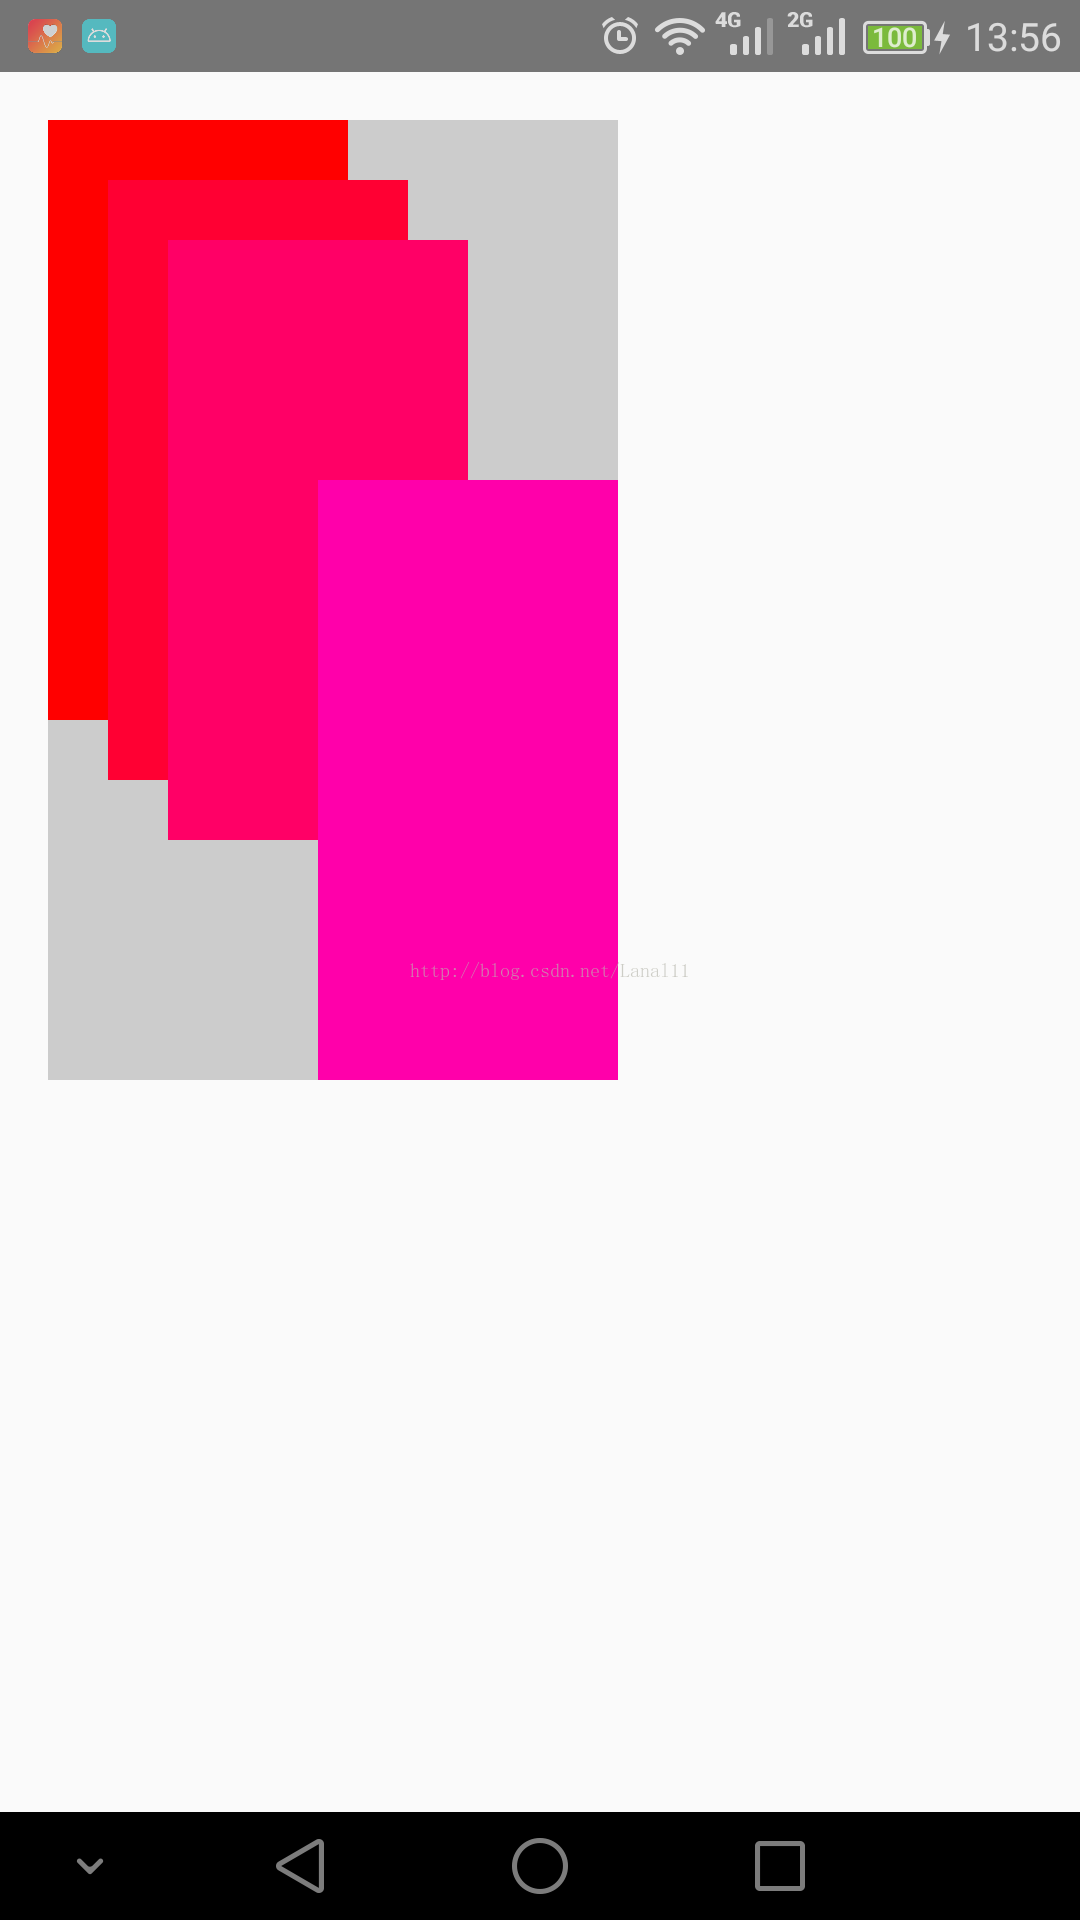
需要自定义一个组件CascadeLayout,让子view可以像拿扑克牌那样的层叠起来,主要实现效果:
为了设置子view之前的偏移距离,这里需要定义子view相对于上一张卡片的的左边距,上边距。然后每张卡片也可以单独的设置自己需要的边距。这个边距和不是指的内边距(padding)和外边距(margin),而是两张卡片之间的偏移距离。
在attrs中定义属性:
<?xml version="1.0" encoding="utf-8"?>
<resources>
    <declare-styleable name="Cascade_LayoutParams">
        <attr name="layout_leftCardPadding" format="dimension" />
        <attr name="layout_topCardPadding" format="dimension" />
    </declare-styleable>
    <declare-styleable name="Cascade">
        <attr name="leftCardPadding" format="dimension" />
        <attr name="topCardPadding" format="dimension" />
    </declare-styleable>
</resources>
其中,Cascade属性集为组件对子view设置的统一属性,每个view默认使用两个属性定义的相对于上一张卡片的左边距和上边距;Cascade_LayoutParams属性集为子view单独为自己设置的对于上一张卡片的左边距和上边距,如果子view定义了这两个属性,则会覆盖掉CascadeLayout 定义的边距;
构造方法中读取这两个属性:
    public CascadeLayout(Context context, AttributeSet attrs) {
        super(context, attrs);
        TypedArray ta = context.obtainStyledAttributes(attrs, R.styleable.Cascade_LayoutParams);
        try {
            leftCardPadding = ta.getDimensionPixelSize(R.styleable.Cascade_leftCardPadding, context.getResources().getDimensionPixelSize(R.dimen.default_leftCardPadding));
            topCardPadding = ta.getDimensionPixelSize(R.styleable.Cascade_topCardPadding, context.getResources().getDimensionPixelSize(R.dimen.default_leftCardPadding));
            Log.e("TAG", "leftCardPadding:" + leftCardPadding);
            Log.e("TAG", "topCardPadding:" + topCardPadding);
        } finally {
            if (ta != null) ta.recycle();
        }
    }
同样的,构造CascadeLayout.LayoutParams 来读取子view单独设置的属性:layoutLeftCardPadding,layoutTopCardPadding:
    public static class LayoutParams extends ViewGroup.LayoutParams {
        int x, y;//相对于father的位置
        int layoutLeftCardPadding;//自己需要显示的左边的尺寸
        int layoutTopCardPadding;//自己需要显示的上边的尺寸

        public LayoutParams(Context c, AttributeSet attrs) {
            super(c, attrs);
            TypedArray ta = c.obtainStyledAttributes(attrs, R.styleable.Cascade_LayoutParams);
            try {
                layoutLeftCardPadding = ta.getDimensionPixelSize(R.styleable.Cascade_LayoutParams_layout_leftCardPadding, -1);
                layoutTopCardPadding = ta.getDimensionPixelSize(R.styleable.Cascade_LayoutParams_layout_topCardPadding, -1);
                Log.e("TAG", "leftCardPadding:" + layoutLeftCardPadding);
                Log.e("TAG", "topCardPadding:" + layoutTopCardPadding);
            } finally {
                if (ta != null) ta.recycle();
            }
        }

        public LayoutParams(int width, int height) {
            super(width, height);
        }

        public LayoutParams(ViewGroup.LayoutParams source) {
            super(source);
        }
}LayoutParams的x,y用于保存自己在CascadeLayout中的位置。
属性设定好之后,就可以通过onMeasure方法和onLayout方法来计算尺寸和布局。
onMeasure方法除了需要计算自己的尺寸之外,还需要需要计算每一个子view的尺寸和位置。计算的时候,如果不是最后一张card,则总宽度累加一个偏移距离,最后一张不累加。然后如果有子view单独为自己设置了距离上一张卡片的边距,则覆盖CascadeLayout设置的值。
    @Override
    protected void onMeasure(int widthMeasureSpec, int heightMeasureSpec) {
        int width = getPaddingLeft(), height = getPaddingTop();
        int count = getChildCount();
        for (int i = 0; i < count; i++) {
            View child = getChildAt(i);
            measureChild(child, widthMeasureSpec, heightMeasureSpec);
            LayoutParams params = (LayoutParams) child.getLayoutParams();

            //计算下一张card的左边距和上边距
            int cardPaddingLeft = params.layoutLeftCardPadding > 0 ? params.layoutLeftCardPadding : leftCardPadding;
            int cardPaddingTop = params.layoutTopCardPadding > 0 ? params.layoutTopCardPadding : topCardPadding;

            //保存子view的位置
            params.x = width;
            params.y = height;

            //累加的width和height
            if (i != count - 1) {
                width += cardPaddingLeft;
                height += cardPaddingTop;
            } else {//最后一张
                width += getPaddingRight() + child.getMeasuredWidth();
                height += getPaddingBottom() + child.getMeasuredHeight();
            }
        }
        /**
         * resolveSize 和getDefaultSize有什么区别?
         *
         * getDefaultSize(size,measureSpec)优先使用measureSpec定义的大小;
         * resolveSize(size,measureSpec),如果measureSpec未定义,则使用提供的大小(size),
         * 否则,如果measureSpec的模式是(EXACTLY),则使用measureSpec定义的大小,
         * 如果measureSpec定义的是AT_MOST,则使用两者中较小的那个
         *
         * 区别是当measureSpec定义的是AT_MOST(布局中为WRAP_CONTENT)的时候,getDefaultSize使用的是measureSpec定义的大小,
         *  resolveSize使用的是两者中较小的那个
         */
        /**
         * 那么这里的话,如果是WRAP_CONTENT的话,则应该使用较小的那个,使用resolveSize更为妥当
         */
        setMeasuredDimension(resolveSize(width, widthMeasureSpec), resolveSize(height, heightMeasureSpec));
//        setMeasuredDimension(getDefaultSize(width, widthMeasureSpec), getDefaultSize(height, heightMeasureSpec));
    }
测量完之后,可以编写onLayout()了:
    @Override
    protected void onLayout(boolean changed, int l, int t, int r, int b) {
        int count = getChildCount();
        for (int i = 0; i < count; i++) {
            View child = getChildAt(i);
            LayoutParams params = (LayoutParams) child.getLayoutParams();
            child.layout(params.x, params.y, params.x + child.getMeasuredWidth(), params.y + child.getMeasuredHeight());
        }
    }
最后,自定义LayoutParams需要重写以下方法,可直接从android源码中复制过来。
    /**
     * 自定义LayoutParams 需要重写以下方法
     */
    @Override
    protected boolean checkLayoutParams(ViewGroup.LayoutParams p) {
        return p instanceof CascadeLayout.LayoutParams;
    }

    @Override
    protected ViewGroup.LayoutParams generateDefaultLayoutParams() {
        return new LayoutParams(LayoutParams.WRAP_CONTENT, LayoutParams.WRAP_CONTENT);
    }

    @Override
    public ViewGroup.LayoutParams generateLayoutParams(AttributeSet attrs) {
        return new LayoutParams(getContext(), attrs);
    }

    @Override
    protected ViewGroup.LayoutParams generateLayoutParams(ViewGroup.LayoutParams p) {
        return new LayoutParams(p);
    }
以上内容已完整记录自定义CascadeLayout的处理过程。为了美观,这里在使用的时候给子view添加了一个动画效果,其中应用到了LayoutAnimationController类,用于为子视图添加动画效果,让卡片一张接一张的显示出来。
MainActivtiy:
    void testLayoutAnimation() {
        cascadeLayout = (CascadeLayout) findViewById(R.id.cl1);
        AnimationSet set = new AnimationSet(true);
        Animation alphaAnimation = new AlphaAnimation(0f, 1f);
        alphaAnimation.setDuration(300);
        set.addAnimation(alphaAnimation);

        Animation scaleAnimation = new ScaleAnimation(0f, 1f, 0f, 1f, 0.5f, 0.5f);
        scaleAnimation.setDuration(300);
        set.addAnimation(scaleAnimation);
        LayoutAnimationController controller = new LayoutAnimationController(set, 0.2f);
        cascadeLayout.setLayoutAnimation(controller);
    }
测试使用的布局文件:
<?xml version="1.0" encoding="utf-8"?>
<LinearLayout xmlns:android="http://schemas.android.com/apk/res/android"
    xmlns:phy="http://schemas.android.com/apk/res-auto"
    android:layout_width="match_parent"
    android:layout_height="match_parent"
    android:orientation="vertical">

    <phy.cascade.CascadeLayout
        android:id="@+id/cl1"
        android:layout_width="wrap_content"
        android:layout_height="wrap_content"
        android:background="#cccccc"
        phy:leftCardPadding="20dp"
        phy:topCardPadding="30dp">

        <View
            android:layout_width="100dp"
            android:layout_height="200dp"
            android:background="#ff0000" />

        <View
            android:layout_width="100dp"
            android:layout_height="200dp"
            android:background="#ff0033" />

        <View
            android:layout_width="100dp"
            android:layout_height="200dp"
            android:background="#ff0066"
            phy:layout_leftCardPadding="50dp"
            phy:layout_topCardPadding="80dp" />

        <View
            android:layout_width="100dp"
            android:layout_height="200dp"
            android:background="#ff00aa" />
    </phy.cascade.CascadeLayout>
</LinearLayout>


 4347
4347


 被折叠的 条评论
为什么被折叠?
被折叠的 条评论
为什么被折叠?
 到【灌水乐园】发言


