


失败7次后成功。
1、必须CENTOS7,主要是python要2.7,yum要能用
2、关闭NetworkManager
3、多次安装,千万别修改IP,否则,必然失败
4、安装过程中,失败多次,处理各不同:【不知道是否与我的网络情况有关,导致失败多次】
使用配置参考:
https://www.linuxtechi.com/launch-instance-from-openstack-dashboard/
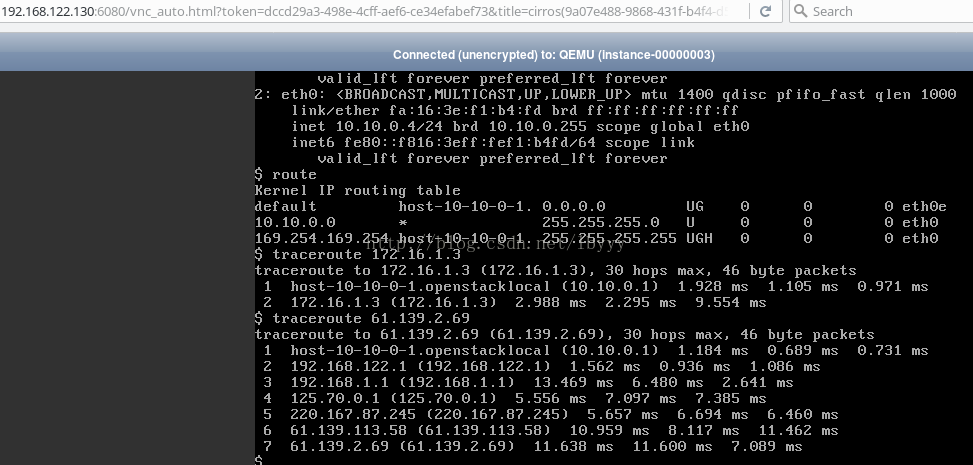
安装成功后的部分截图:
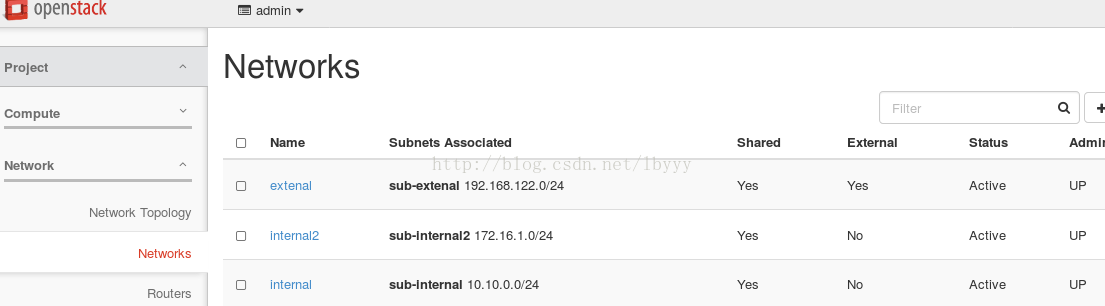
网络:
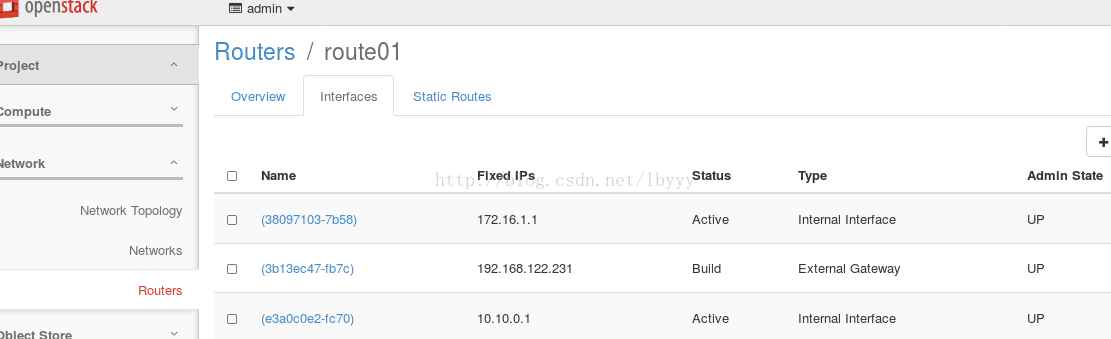
路由接口:
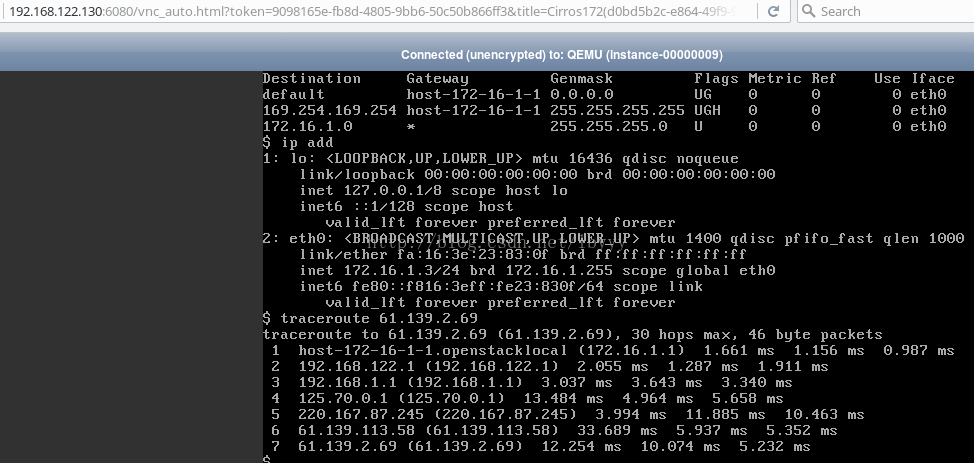
虚拟机网络测试:
开始安装:
KVM:
test@test-Vostro-2421:~$ qemu-img create -f qcow2 -o size=60G,preallocation=metadata /media/test/Seagate\ Expansion\ Drive/bak/kvm/Cos7Openstack.img
Formatting '/media/test/Seagate Expansion Drive/bak/kvm/Cos7Openstack.img', fmt=qcow2 size=64424509440 encryption=off cluster_size=65536 preallocation='metadata' lazy_refcounts=off
test@test-Vostro-2421:~$ virt-manager
挂载IMG到GUI【virt-manager】
修改VirtIO Disk1的Storage format 为qcow2;
添加centos7.iso光盘,挂载ISO为CDROM
设置Boot Option 为 cd-rom在第1引导
启动虚拟机
虚拟机上,安装centos7,选择的base web server +Large System Performance +Laod Balancer +MariaDB Database Client +Python+Compatibility Libraries+Development Tools 【583】,空间/boot +/swap +/ =120G,单网卡,【最好配2网卡,NAT方式,模拟RTL8139】,4G内存,1CPU【物理机i5+8G】,测试样例最好分5G内存,2CPU【物理机i5+8G】
ROOT PASSWORD ->123456->Done -> USER CREATION -> Full name:test ->Password:123456 ->Done
test
#:
root->chmod u+w sudoers-> vi /etc/sudoers -> 添加 test ALL......->chmod u-w sudoers
vi ifcfg-eth0-> boot on -> ifup eth0 -> ip addr ->ping baidu ok
vim /etc/yum.conf
[main]
cachedir=/var/cache/yum
keepcache=1
vi /etc/hostname 修改为
openstack01
vi /etc/hosts 添加
192.168.122.130 openstack01
systemctl stop NetworkManager
systemctl disable NetworkManager.service
chkconfig NetworkManager off
ERR1:
ERROR : Failed to run remote script, stdout: Loaded plugins: fastestmirror, langpacks
stderr: Warning: Permanently added '192.168.122.130' (ECDSA) to the list of known hosts.
vi /etc/hostname 修改为
openstack01
vi /etc/hosts 添加
192.168.122.130 openstack01
[test@192 ~]$ packstack --allinone|tee pactstack2.log
ERR2:
ERROR : Error appeared during Puppet run: 192.168.122.130_prescript.pp
Error: Execution of '/usr/bin/yum -d 0 -e 0 -y install iptables-services' returned 1: Error downloading packages
yum install iptables-services
[test@192 ~]$ packstack --allinone|tee pactstack3.log
ERR3:
192.168.122.130_api_nova.pp: [ ERROR ]
Applying Puppet manifests [ ERROR ]
* Warning: NetworkManager is active on 192.168.122.130. OpenStack networking currently does not work on systems that have the Network Manager service enabled.
sudo systemctl stop NetworkManager
sudo systemctl disable NetworkManager.service
sudo chkconfig NetworkManager off
[test@192 ~]$ packstack --allinone|tee pactstack4.log
ERR4:
192.168.122.130_neutron.pp: [ ERROR ]
Applying Puppet manifests [ ERROR ]
ERROR : Error appeared during Puppet run:192.168.122.130_neutron.pp
Error: /Stage[main]/Neutron::Db::Sync/Exec[neutron-db-sync]: Failed to call refresh: Command exceeded timeout
[test@192 ~]$ packstack --allinone|tee pactstack5.log
ERR5:
192.168.122.130_osclient.pp: [ DONE ]
假死,发现IP掉了
ifup eth0
[test@192 ~]$ packstack --allinone|tee pactstack6.log
Welcome to the Packstack setup utility
The installation log file is available at: /var/tmp/packstack/20160609-232624-G8KIr7/openstack-setup.log
Installing:
Clean Up [ DONE ]
Discovering ip protocol version [ DONE ]
Setting up ssh keys [ DONE ]
Preparing servers [ DONE ]
Pre installing Puppet and discovering hosts' details [ DONE ]
Adding pre install manifest entries [ DONE ]
Setting up CACERT [ DONE ]
Adding AMQP manifest entries [ DONE ]
Adding MariaDB manifest entries [ DONE ]
Adding Apache manifest entries [ DONE ]
Fixing Keystone LDAP config parameters to be undef if empty[ DONE ]
Adding Keystone manifest entries [ DONE ]
Adding Glance Keystone manifest entries [ DONE ]
Adding Glance manifest entries [ DONE ]
Adding Cinder Keystone manifest entries [ DONE ]
Checking if the Cinder server has a cinder-volumes vg[ DONE ]
Adding Cinder manifest entries [ DONE ]
Adding Nova API manifest entries [ DONE ]
Adding Nova Keystone manifest entries [ DONE ]
Adding Nova Cert manifest entries [ DONE ]
Adding Nova Conductor manifest entries [ DONE ]
Creating ssh keys for Nova migration [ DONE ]
Gathering ssh host keys for Nova migration [ DONE ]
Adding Nova Compute manifest entries [ DONE ]
Adding Nova Scheduler manifest entries [ DONE ]
Adding Nova VNC Proxy manifest entries [ DONE ]
Adding OpenStack Network-related Nova manifest entries[ DONE ]
Adding Nova Common manifest entries [ DONE ]
Adding Neutron VPNaaS Agent manifest entries [ DONE ]
Adding Neutron FWaaS Agent manifest entries [ DONE ]
Adding Neutron LBaaS Agent manifest entries [ DONE ]
Adding Neutron API manifest entries [ DONE ]
Adding Neutron Keystone manifest entries [ DONE ]
Adding Neutron L3 manifest entries [ DONE ]
Adding Neutron L2 Agent manifest entries [ DONE ]
Adding Neutron DHCP Agent manifest entries [ DONE ]
Adding Neutron Metering Agent manifest entries [ DONE ]
Adding Neutron Metadata Agent manifest entries [ DONE ]
Adding Neutron SR-IOV Switch Agent manifest entries [ DONE ]
Checking if NetworkManager is enabled and running [ DONE ]
Adding OpenStack Client manifest entries [ DONE ]
Adding Horizon manifest entries [ DONE ]
Adding Swift Keystone manifest entries [ DONE ]
Adding Swift builder manifest entries [ DONE ]
Adding Swift proxy manifest entries [ DONE ]
Adding Swift storage manifest entries [ DONE ]
Adding Swift common manifest entries [ DONE ]
Adding Provisioning manifest entries [ DONE ]
Adding Provisioning Glance manifest entries [ DONE ]
Adding Provisioning Demo bridge manifest entries [ DONE ]
Adding Gnocchi manifest entries [ DONE ]
Adding Gnocchi Keystone manifest entries [ DONE ]
Adding MongoDB manifest entries [ DONE ]
Adding Redis manifest entries [ DONE ]
Adding Ceilometer manifest entries [ DONE ]
Adding Ceilometer Keystone manifest entries [ DONE ]
Adding Aodh manifest entries [ DONE ]
Adding Aodh Keystone manifest entries [ DONE ]
Adding Nagios server manifest entries [ DONE ]
Adding Nagios host manifest entries [ DONE ]
Copying Puppet modules and manifests [ DONE ]
Applying 192.168.122.130_prescript.pp
192.168.122.130_prescript.pp: [ DONE ]
Applying 192.168.122.130_amqp.pp
Applying 192.168.122.130_mariadb.pp
192.168.122.130_amqp.pp: [ DONE ]
192.168.122.130_mariadb.pp: [ DONE ]
Applying 192.168.122.130_apache.pp
192.168.122.130_apache.pp: [ DONE ]
Applying 192.168.122.130_keystone.pp
Applying 192.168.122.130_glance.pp
Applying 192.168.122.130_cinder.pp
192.168.122.130_keystone.pp: [ DONE ]
192.168.122.130_glance.pp: [ DONE ]
192.168.122.130_cinder.pp: [ DONE ]
Applying 192.168.122.130_api_nova.pp
192.168.122.130_api_nova.pp: [ DONE ]
Applying 192.168.122.130_nova.pp
192.168.122.130_nova.pp: [ DONE ]
Applying 192.168.122.130_neutron.pp
192.168.122.130_neutron.pp: [ DONE ]
Applying 192.168.122.130_osclient.pp
Applying 192.168.122.130_horizon.pp
192.168.122.130_osclient.pp: [ DONE ]
Write failed: Broken pipe
test@test-Vostro-2421:/media/test/Seagate Expansion Drive/bak/packstack$ ssh test@192.168.122.130
test@192.168.122.130's password:
Last login: Thu Jun 9 21:27:24 2016 from 192.168.122.1
[test@openstack01 ~]$ packstack --allinone|tee pactstack6.log
Welcome to the Packstack setup utility
The installation log file is available at: /var/tmp/packstack/20160610-004125-SVXaAh/openstack-setup.log
Installing:
Clean Up [ DONE ]
Discovering ip protocol version [ DONE ]
Setting up ssh keys [ DONE ]
Preparing servers [ DONE ]
Pre installing Puppet and discovering hosts' details [ DONE ]
Adding pre install manifest entries [ DONE ]
Setting up CACERT [ DONE ]
Adding AMQP manifest entries [ DONE ]
Adding MariaDB manifest entries [ DONE ]
Adding Apache manifest entries [ DONE ]
Fixing Keystone LDAP config parameters to be undef if empty[ DONE ]
Adding Keystone manifest entries [ DONE ]
Adding Glance Keystone manifest entries [ DONE ]
Adding Glance manifest entries [ DONE ]
Adding Cinder Keystone manifest entries [ DONE ]
Checking if the Cinder server has a cinder-volumes vg[ DONE ]
Adding Cinder manifest entries [ DONE ]
Adding Nova API manifest entries [ DONE ]
Adding Nova Keystone manifest entries [ DONE ]
Adding Nova Cert manifest entries [ DONE ]
Adding Nova Conductor manifest entries [ DONE ]
Creating ssh keys for Nova migration [ DONE ]
Gathering ssh host keys for Nova migration [ DONE ]
Adding Nova Compute manifest entries [ DONE ]
Adding Nova Scheduler manifest entries [ DONE ]
Adding Nova VNC Proxy manifest entries [ DONE ]
Adding OpenStack Network-related Nova manifest entries[ DONE ]
Adding Nova Common manifest entries [ DONE ]
Adding Neutron VPNaaS Agent manifest entries [ DONE ]
Adding Neutron FWaaS Agent manifest entries [ DONE ]
Adding Neutron LBaaS Agent manifest entries [ DONE ]
Adding Neutron API manifest entries [ DONE ]
Adding Neutron Keystone manifest entries [ DONE ]
Adding Neutron L3 manifest entries [ DONE ]
Adding Neutron L2 Agent manifest entries [ DONE ]
Adding Neutron DHCP Agent manifest entries [ DONE ]
Adding Neutron Metering Agent manifest entries [ DONE ]
Adding Neutron Metadata Agent manifest entries [ DONE ]
Adding Neutron SR-IOV Switch Agent manifest entries [ DONE ]
Checking if NetworkManager is enabled and running [ DONE ]
Adding OpenStack Client manifest entries [ DONE ]
Adding Horizon manifest entries [ DONE ]
Adding Swift Keystone manifest entries [ DONE ]
Adding Swift builder manifest entries [ DONE ]
Adding Swift proxy manifest entries [ DONE ]
Adding Swift storage manifest entries [ DONE ]
Adding Swift common manifest entries [ DONE ]
Adding Provisioning manifest entries [ DONE ]
Adding Provisioning Glance manifest entries [ DONE ]
Adding Provisioning Demo bridge manifest entries [ DONE ]
Adding Gnocchi manifest entries [ DONE ]
Adding Gnocchi Keystone manifest entries [ DONE ]
Adding MongoDB manifest entries [ DONE ]
Adding Redis manifest entries [ DONE ]
Adding Ceilometer manifest entries [ DONE ]
Adding Ceilometer Keystone manifest entries [ DONE ]
Adding Aodh manifest entries [ DONE ]
Adding Aodh Keystone manifest entries [ DONE ]
Adding Nagios server manifest entries [ DONE ]
Adding Nagios host manifest entries [ DONE ]
Copying Puppet modules and manifests [ DONE ]
Applying 192.168.122.130_prescript.pp
192.168.122.130_prescript.pp: [ DONE ]
Applying 192.168.122.130_amqp.pp
Applying 192.168.122.130_mariadb.pp
192.168.122.130_amqp.pp: [ DONE ]
192.168.122.130_mariadb.pp: [ DONE ]
Applying 192.168.122.130_apache.pp
192.168.122.130_apache.pp: [ DONE ]
Applying 192.168.122.130_keystone.pp
Applying 192.168.122.130_glance.pp
Applying 192.168.122.130_cinder.pp
192.168.122.130_keystone.pp: [ DONE ]
192.168.122.130_glance.pp: [ DONE ]
192.168.122.130_cinder.pp: [ DONE ]
Applying 192.168.122.130_api_nova.pp
192.168.122.130_api_nova.pp: [ DONE ]
Applying 192.168.122.130_nova.pp
192.168.122.130_nova.pp: [ DONE ]
Applying 192.168.122.130_neutron.pp
192.168.122.130_neutron.pp: [ DONE ]
Applying 192.168.122.130_osclient.pp
Applying 192.168.122.130_horizon.pp
192.168.122.130_osclient.pp: [ DONE ]
192.168.122.130_horizon.pp: [ DONE ]
Applying 192.168.122.130_ring_swift.pp
192.168.122.130_ring_swift.pp: [ DONE ]
Applying 192.168.122.130_swift.pp
192.168.122.130_swift.pp: [ DONE ]
Applying 192.168.122.130_provision.pp
Applying 192.168.122.130_provision_glance
192.168.122.130_provision.pp: [ DONE ]
192.168.122.130_provision_glance: [ DONE ]
Applying 192.168.122.130_provision_bridge.pp
192.168.122.130_provision_bridge.pp: [ DONE ]
Applying 192.168.122.130_gnocchi.pp
192.168.122.130_gnocchi.pp: [ DONE ]
Applying 192.168.122.130_mongodb.pp
Applying 192.168.122.130_redis.pp
192.168.122.130_mongodb.pp: [ DONE ]
192.168.122.130_redis.pp: [ DONE ]
Applying 192.168.122.130_ceilometer.pp
192.168.122.130_ceilometer.pp: [ DONE ]
Applying 192.168.122.130_aodh.pp
192.168.122.130_aodh.pp: [ DONE ]
Applying 192.168.122.130_nagios.pp
Applying 192.168.122.130_nagios_nrpe.pp
192.168.122.130_nagios.pp: [ DONE ]
192.168.122.130_nagios_nrpe.pp: [ DONE ]
Applying Puppet manifests [ DONE ]
Finalizing [ DONE ]
**** Installation completed successfully ******
Additional information:
* A new answerfile was created in: /home/test/packstack-answers-20160610-004126.txt
* Time synchronization installation was skipped. Please note that unsynchronized time on server instances might be problem for some OpenStack components.
* File /root/keystonerc_admin has been created on OpenStack client host 192.168.122.130. To use the command line tools you need to source the file.
* Copy of keystonerc_admin file has been created for non-root user in /home/test.
* To access the OpenStack Dashboard browse to http://192.168.122.130/dashboard .
Please, find your login credentials stored in the keystonerc_admin in your home directory.
* To use Nagios, browse to http://192.168.122.130/nagios username: nagiosadmin, password: 014485468608421d
* The installation log file is available at: /var/tmp/packstack/20160610-004125-SVXaAh/openstack-setup.log
* The generated manifests are available at: /var/tmp/packstack/20160610-004125-SVXaAh/manifests
VMWARE:
$ sudo yum install -y centos-release-openstack-mitaka
$ sudo yum install -y openstack-packstack
$ packstack --allinone感觉在第一次安装过程中,172.16.144.132_glance.pp [done] 后
IP会掉,但手动重启,导致一个172.16.144.132_cinder.pp失败,提示网卡重新启动了
重新packstack --allinone
第2次死于172.16.144.132_nova.pp,提示什么error download openstack-nova-console,其实可以下载yum install ...ok
重新packstack --allinone
第3次死于172.16.144.132_neutron.pp,提示什么error download openvswitch,
yum install openvswitch 提示openvswitch-2.4.0-1.el7.x86_64没有mirrors to try
https://cloudrouter.org/repo/centos/7/x86_64/下载“ openvswitch-2.4.0-1.el7.centos.x86_64.rpm”rpm -ivh 安装后
yum install openvswitch 提示 Nothing to do
重新packstack --allinone
第4次死于172.16.144.132_swift.pp,提示什么error download openstack-nova-console,其实可以 yum install openstack-swift-object ok
重新packstack --allinone
第5次死于172.16.144.132_provsion_glance,提示什么e/usr/bin/openstack image set cirros No image with a name or id of 'cirros' exists.
重新packstack --allinone
第6次死于172.16.144.132_redis.pp,提示什么error download packages, 可以 yum install redis ...ok
重新packstack --allinone
第7次死于172.16.144.132_ceilometer.pp,提示什么error download packages, 可以 yum install openstack-ceilometer-api ...ok
重新packstack --allinone
安装输出:
Welcome to the Packstack setup utility

The installation log file is available at: /var/tmp/packstack/20160607-053835-zTTINd/openstack-setup.log

Installing:
Clean Up                                             [ [32mDONE[0m ]
Discovering ip protocol version                      [ [32mDONE[0m ]
Setting up ssh keys                                  [ [32mDONE[0m ]
Preparing servers                                    [ [32mDONE[0m ]
Pre installing Puppet and discovering hosts' details [ [32mDONE[0m ]
Adding pre install manifest entries                  [ [32mDONE[0m ]
Setting up CACERT                                    [ [32mDONE[0m ]
Adding AMQP manifest entries                         [ [32mDONE[0m ]
Adding MariaDB manifest entries                      [ [32mDONE[0m ]
Adding Apache manifest entries                       [ [32mDONE[0m ]
Fixing Keystone LDAP config parameters to be undef if empty[ [32mDONE[0m ]
Adding Keystone manifest entries                     [ [32mDONE[0m ]
Adding Glance Keystone manifest entries              [ [32mDONE[0m ]
Adding Glance manifest entries                       [ [32mDONE[0m ]
Adding Cinder Keystone manifest entries              [ [32mDONE[0m ]
Checking if the Cinder server has a cinder-volumes vg[ [32mDONE[0m ]
Adding Cinder manifest entries                       [ [32mDONE[0m ]
Adding Nova API manifest entries                     [ [32mDONE[0m ]
Adding Nova Keystone manifest entries                [ [32mDONE[0m ]
Adding Nova Cert manifest entries                    [ [32mDONE[0m ]
Adding Nova Conductor manifest entries               [ [32mDONE[0m ]
Creating ssh keys for Nova migration                 [ [32mDONE[0m ]
Gathering ssh host keys for Nova migration           [ [32mDONE[0m ]
Adding Nova Compute manifest entries                 [ [32mDONE[0m ]
Adding Nova Scheduler manifest entries               [ [32mDONE[0m ]
Adding Nova VNC Proxy manifest entries               [ [32mDONE[0m ]
Adding OpenStack Network-related Nova manifest entries[ [32mDONE[0m ]
Adding Nova Common manifest entries                  [ [32mDONE[0m ]
Adding Neutron VPNaaS Agent manifest entries         [ [32mDONE[0m ]
Adding Neutron FWaaS Agent manifest entries          [ [32mDONE[0m ]
Adding Neutron LBaaS Agent manifest entries          [ [32mDONE[0m ]
Adding Neutron API manifest entries                  [ [32mDONE[0m ]
Adding Neutron Keystone manifest entries             [ [32mDONE[0m ]
Adding Neutron L3 manifest entries                   [ [32mDONE[0m ]
Adding Neutron L2 Agent manifest entries             [ [32mDONE[0m ]
Adding Neutron DHCP Agent manifest entries           [ [32mDONE[0m ]
Adding Neutron Metering Agent manifest entries       [ [32mDONE[0m ]
Adding Neutron Metadata Agent manifest entries       [ [32mDONE[0m ]
Adding Neutron SR-IOV Switch Agent manifest entries  [ [32mDONE[0m ]
Checking if NetworkManager is enabled and running    [ [32mDONE[0m ]
Adding OpenStack Client manifest entries             [ [32mDONE[0m ]
Adding Horizon manifest entries                      [ [32mDONE[0m ]
Adding Swift Keystone manifest entries               [ [32mDONE[0m ]
Adding Swift builder manifest entries                [ [32mDONE[0m ]
Adding Swift proxy manifest entries                  [ [32mDONE[0m ]
Adding Swift storage manifest entries                [ [32mDONE[0m ]
Adding Swift common manifest entries                 [ [32mDONE[0m ]
Adding Provisioning manifest entries                 [ [32mDONE[0m ]
Adding Provisioning Glance manifest entries          [ [32mDONE[0m ]
Adding Provisioning Demo bridge manifest entries     [ [32mDONE[0m ]
Adding Gnocchi manifest entries                      [ [32mDONE[0m ]
Adding Gnocchi Keystone manifest entries             [ [32mDONE[0m ]
Adding MongoDB manifest entries                      [ [32mDONE[0m ]
Adding Redis manifest entries                        [ [32mDONE[0m ]
Adding Ceilometer manifest entries                   [ [32mDONE[0m ]
Adding Ceilometer Keystone manifest entries          [ [32mDONE[0m ]
Adding Aodh manifest entries                         [ [32mDONE[0m ]
Adding Aodh Keystone manifest entries                [ [32mDONE[0m ]
Adding Nagios server manifest entries                [ [32mDONE[0m ]
Adding Nagios host manifest entries                  [ [32mDONE[0m ]
Copying Puppet modules and manifests                 [ [32mDONE[0m ]
Applying 172.16.144.132_prescript.pp

172.16.144.132_prescript.pp:                         [ [32mDONE[0m ]
Applying 172.16.144.132_amqp.pp
Applying 172.16.144.132_mariadb.pp

172.16.144.132_amqp.pp:                              [ [32mDONE[0m ]

172.16.144.132_mariadb.pp:                           [ [32mDONE[0m ]
Applying 172.16.144.132_apache.pp

172.16.144.132_apache.pp:                            [ [32mDONE[0m ]
Applying 172.16.144.132_keystone.pp
Applying 172.16.144.132_glance.pp
Applying 172.16.144.132_cinder.pp

172.16.144.132_keystone.pp:                          [ [32mDONE[0m ]

172.16.144.132_glance.pp:                            [ [32mDONE[0m ]

172.16.144.132_cinder.pp:                            [ [32mDONE[0m ]
Applying 172.16.144.132_api_nova.pp

172.16.144.132_api_nova.pp:                          [ [32mDONE[0m ]
Applying 172.16.144.132_nova.pp

172.16.144.132_nova.pp:                              [ [32mDONE[0m ]
Applying 172.16.144.132_neutron.pp

172.16.144.132_neutron.pp:                           [ [32mDONE[0m ]
Applying 172.16.144.132_osclient.pp
Applying 172.16.144.132_horizon.pp

172.16.144.132_osclient.pp:                          [ [32mDONE[0m ]

172.16.144.132_horizon.pp:                           [ [32mDONE[0m ]
Applying 172.16.144.132_ring_swift.pp

172.16.144.132_ring_swift.pp:                        [ [32mDONE[0m ]
Applying 172.16.144.132_swift.pp

172.16.144.132_swift.pp:                             [ [32mDONE[0m ]
Applying 172.16.144.132_provision.pp
Applying 172.16.144.132_provision_glance

172.16.144.132_provision.pp:                         [ [32mDONE[0m ]

172.16.144.132_provision_glance:                     [ [32mDONE[0m ]
Applying 172.16.144.132_provision_bridge.pp

172.16.144.132_provision_bridge.pp:                  [ [32mDONE[0m ]
Applying 172.16.144.132_gnocchi.pp

172.16.144.132_gnocchi.pp:                           [ [32mDONE[0m ]
Applying 172.16.144.132_mongodb.pp
Applying 172.16.144.132_redis.pp

172.16.144.132_mongodb.pp:                           [ [32mDONE[0m ]

172.16.144.132_redis.pp:                             [ [32mDONE[0m ]
Applying 172.16.144.132_ceilometer.pp

172.16.144.132_ceilometer.pp:                        [ [32mDONE[0m ]
Applying 172.16.144.132_aodh.pp

172.16.144.132_aodh.pp:                              [ [32mDONE[0m ]
Applying 172.16.144.132_nagios.pp
Applying 172.16.144.132_nagios_nrpe.pp

172.16.144.132_nagios.pp:                            [ [32mDONE[0m ]

172.16.144.132_nagios_nrpe.pp:                       [ [32mDONE[0m ]
Applying Puppet manifests                            [ [32mDONE[0m ]
Finalizing                                           [ [32mDONE[0m ]

 **** Installation completed successfully ******

Additional information:
 * A new answerfile was created in: /home/test/packstack-answers-20160607-053836.txt
 * Time synchronization installation was skipped. Please note that unsynchronized time on server instances might be problem for some OpenStack components.
 * File /root/keystonerc_admin has been created on OpenStack client host 172.16.144.132. To use the command line tools you need to source the file.
 * Copy of keystonerc_admin file has been created for non-root user in /home/test.
 * To access the OpenStack Dashboard browse to http://172.16.144.132/dashboard .
Please, find your login credentials stored in the keystonerc_admin in your home directory.
 * To use Nagios, browse to http://172.16.144.132/nagios username: nagiosadmin, password: 11cc5b0fc9d948ee
 * The installation log file is available at: /var/tmp/packstack/20160607-053835-zTTINd/openstack-setup.log
 * The generated manifests are available at: /var/tmp/packstack/20160607-053835-zTTINd/manifests
参考原文: http://www.linuxidc.com/Linux/2014-01/94926.htm
找到一个网站,国外的, http://openstack.RedHat.com/Main_Page,进入到quickstart页面中,简单翻译如下:
用到的工具是一个被成为RDO的东东, 能够在基于RHEL内核的linux系统,如RedHat,CentOS,Scientific Linux下,快速实现三步安装。
一:安装RDO软件
二:安装一个叫packstack的部署包
三:一键自动安装
$ sudo yum install -y centos-release-openstack-mitaka
$ sudo yum install -y openstack-packstack
$ packstack --allinone
安装完毕,可以通过OpenStack的网络管理接口Horizon进行访问,地址如:http://192.168.1.123/dashboard ,用户名为admin,密码可以在
/root/ 下的keystonerc_admin文件中找到到。
Packstack quickstart: Proof of concept for single node
Packstack is an installation utility that lets you spin up a proof of concept cloud on one node. You will be able toadd more nodes to your OpenStack cloud later, if you choose.
-
If you are looking for instructions on how to deploy a production-ready cloud, possibly with HA, see theTripleO quickstart.
-
If you just want to try out OpenStack without installing anything, check out TryStack.
This document describes installing the current Mitaka release.
Summary for the impatient
If you are using non-English locale make sure your /etc/environment is populated:
LANG=en_US.utf-8
LC_ALL=en_US.utf-8
If your system meets all the prerequisites mentioned below, proceed with running the following commands.
-
On RHEL:
$ sudo yum install -y https://www.rdoproject.org/repos/rdo-release.rpm $ sudo yum update -y $ sudo yum install -y openstack-packstack $ packstack --allinone -
On CentOS:
$ sudo yum install -y centos-release-openstack-mitaka
$ sudo yum update -y
$ sudo yum install -y openstack-packstack
$ packstack --allinone
Step 0: Prerequisites
Software
Red Hat Enterprise Linux (RHEL) 7 is the minimum recommended version, or the equivalent version of one of the RHEL-based Linux distributions such asCentOS,Scientific Linux, and so on.x86_64 is currently the only supported architecture.
- See RDO repositories for details on required repositories.
Name the host with a fully qualified domain name rather than a short-form name to avoid DNS issues with Packstack.
Hardware
Machine with at least 4GB RAM, preferably 6GB RAM, processors with hardware virtualization extensions, and at least one network adapter.
Network
If you plan on having external network access to the server and instances, this is a good moment to properly configure your network settings. A static IP address to your network card, and disabling NetworkManager are good ideas.
$ sudo systemctl disable NetworkManager $ sudo systemctl enable network $ sudo systemctl stop NetworkManager.service $ sudo systemctl start network.service
If you are planing on something fancier, read the document on advanced networking before proceeding.
Step 1: Software repositories
On RHEL, download and install the RDO repository RPM to set up the OpenStack repository:
$ sudo yum install -y https://rdoproject.org/repos/rdo-release.rpm
On CentOS, the Extras repository provides the RPM that enables the OpenStack repository.Extras is enabled by default on CentOS 7, so you can simply install the RPM to set up the OpenStack repository:
$ sudo yum install -y centos-release-openstack-mitaka
Update your current packages:
$ sudo yum update -y
Looking for an older version? See http://rdoproject.org/repos/ for the full listing.
Step 2: Install Packstack Installer
$ sudo yum install -y openstack-packstack
Step 3: Run Packstack to install OpenStack
Packstack takes the work out of manually setting up OpenStack. For a single node OpenStack deployment, run the following command:
$ packstack --allinone
If you encounter failures, see the Workarounds page for tips.
If you have run Packstack previously, there will be a file in your home directory named something likepackstack-answers-20130722-153728.txt You will probably want to use that file again, using the--answer-file option, so that any passwords you have already set (for example, mysql) will be reused.
The installer will ask you to enter the root password for each host node you are installing on the network, to enable remote configuration of the host so it can remotely configure each node using Puppet.
Once the process is complete, you can log in to the OpenStack web interface Horizon by going tohttp://$YOURIP/dashboard. The user name isadmin. The password can be found in the filekeystonerc_admin in the/root directory of the control node.
Next steps
Now that your single node OpenStack instance is up and running, you can read on aboutrunning an instance, configuring afloating IP range, configuring RDO to work with your existing network, or about expanding your installation by adding a compute node.
使用配置参考:
https://www.linuxtechi.com/launch-instance-from-openstack-dashboard/
Launch an Instance from OpenStack (Liberty) Dashboard
To Launch an instance from OpenStack dashboard, first we need to finish following steps :
- Create a Project and add a member to the Project.
- Create a Image and Flavor
- Create a Network and Router for a Project.
In my Case i will use Project Name as “Innovation” and linuxtechi as Project Member of Innovation.
- Internal Network = 10.10.10.0/24
- External Network or Floating IP Network = 192.168.1.0/24
- Gateway of External Network = 192.168.1.1
Create a Project and add a member to the Project.
Login to the dashboard using Admin credentials and Go to Identity Tab –> Projects and Click on Create Project.
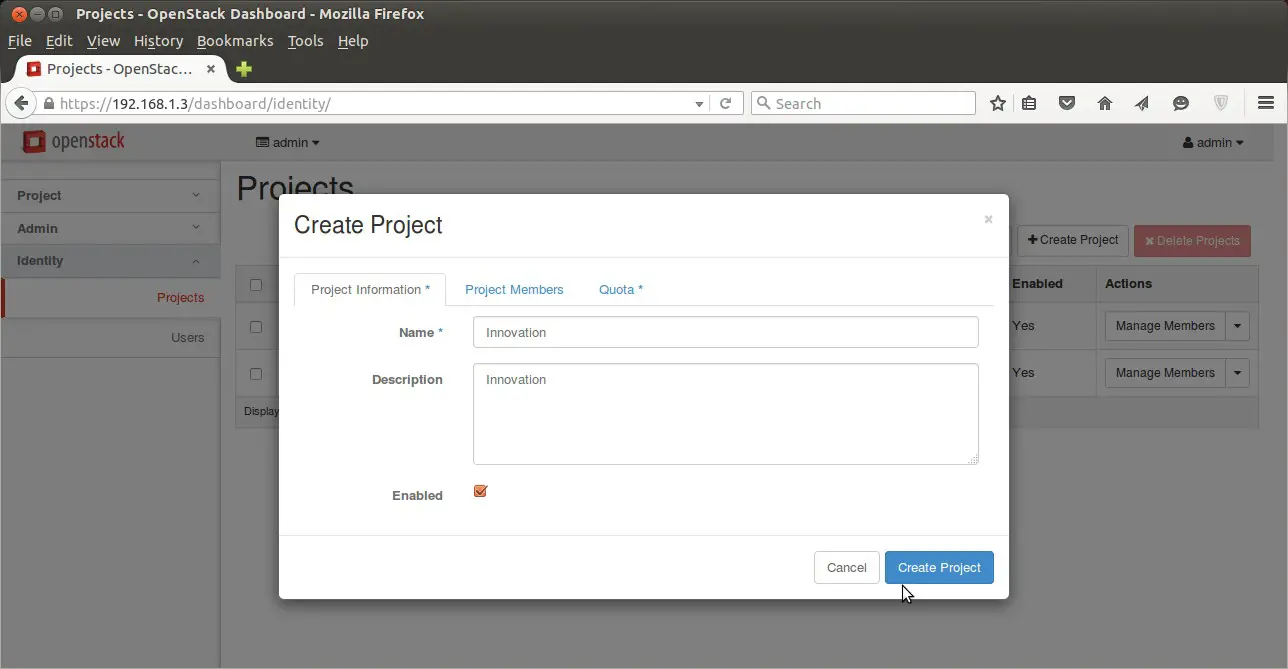
Click on “Create Project” , We can also set the Quota for the project from Quota Tab.
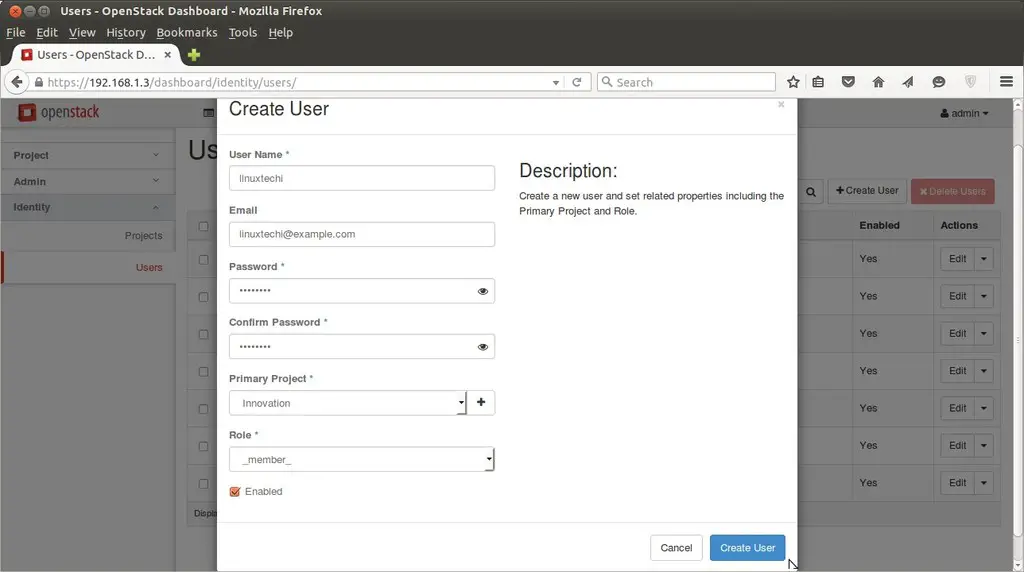
To create Users , Go to Identify Tab–> Users–> Click on ‘Create User’
In my case i have specify the followings :
- User Name = linuxtechi
- email = linuxtechi@example.com
- password = xxxxxx
- Primary Project = innovation
- Role = member
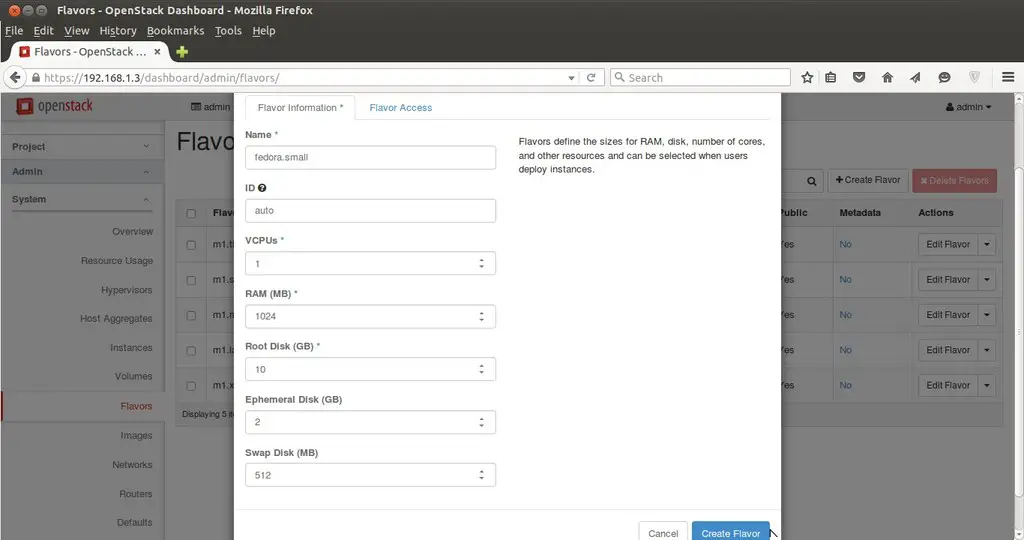
Create a flavor and image :
To create a flavor login in dashboard using admin credentials , Go to Admin Tab –> Flavors –> Click on create Flavor.
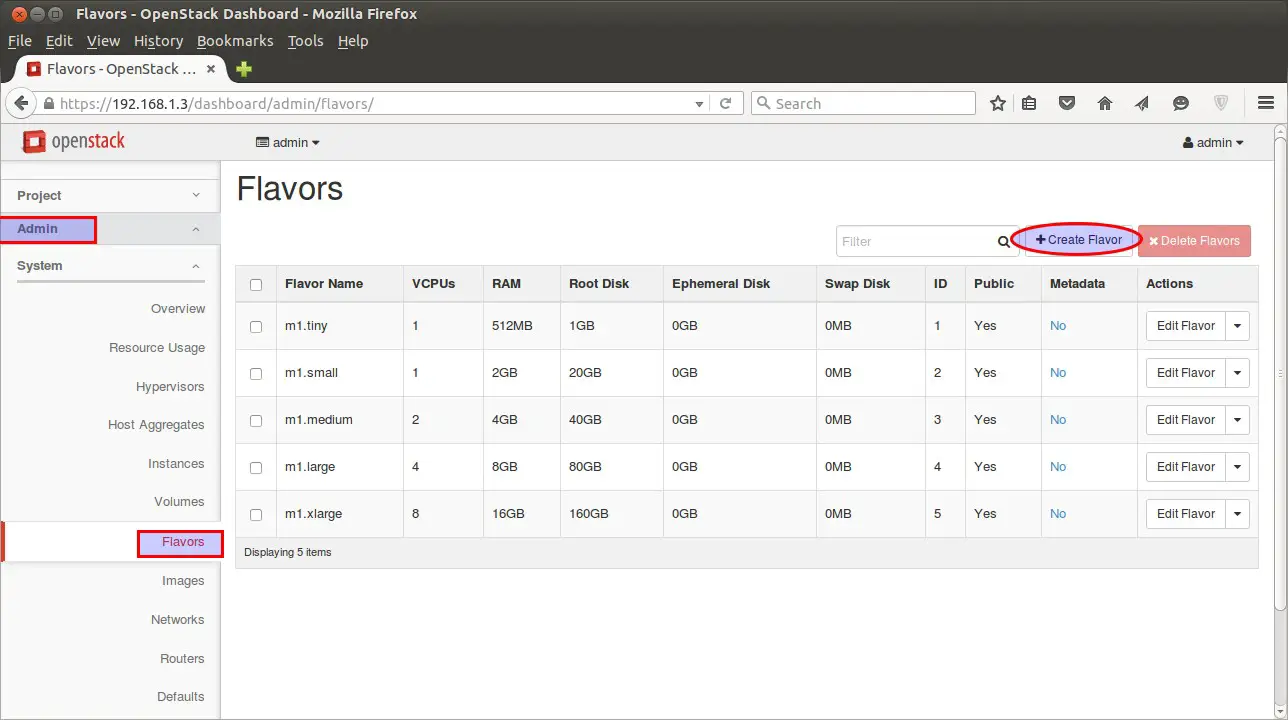
Specify the Flavor Name (fedora.small) , VCPU , Root Disk , Ephemeral Disk & Swap disk.
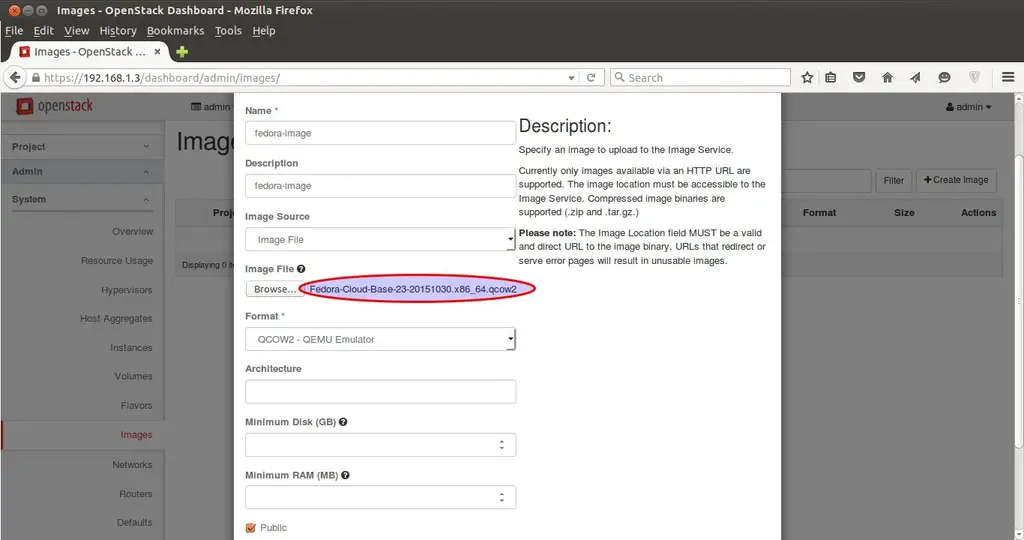
To Create Image , Go to Admin Tab –> Images—> Click on Create Image.
Specify the Image Name , Description, Image Soure ( in my case i am using Image File as i have already downloaded the Fedora 23 Cloud Image ) , Format QCOW2
Create Network and Router for Project Innovation.
To create Network and router for Innovation project sign out of admin user and login as “linuxtechi” user in dashboard.
Go to the Network Tab —> Click on Networks —> then Click on Create Network
Specify the Network Name as Internal
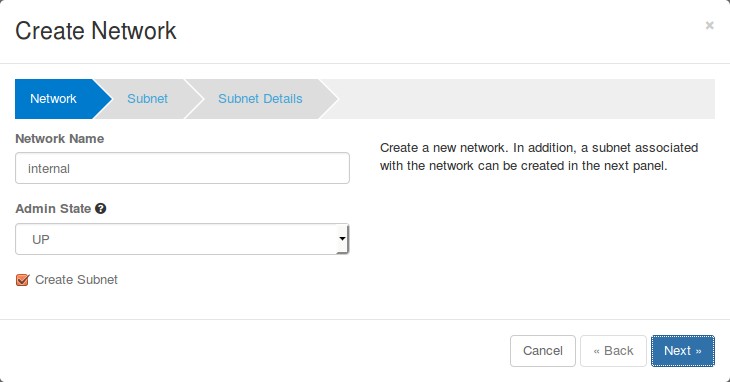
click on Next..
Specify the Subnet name (sub-internal) and Network Address (10.10.0.0/24)
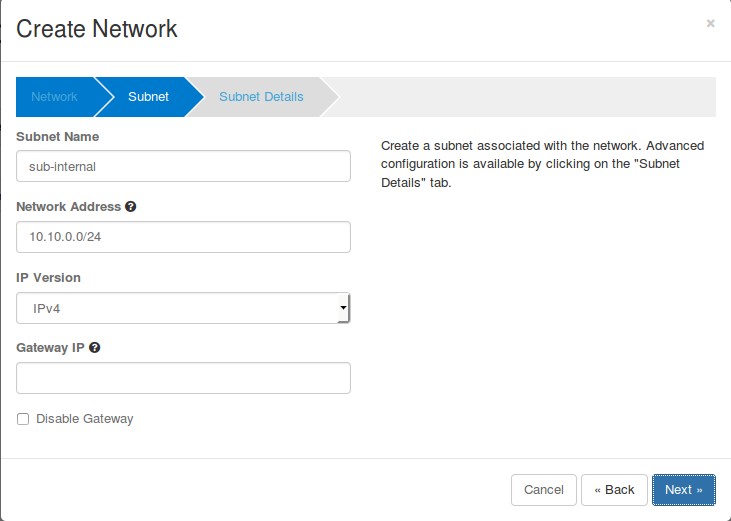
Click on Next..
VMs will be getting internal ip from DHCP Server because we enable DHCP option for internal network.
Now Create External Network . Click on “Create Network” again , Specify Network Name as “external”
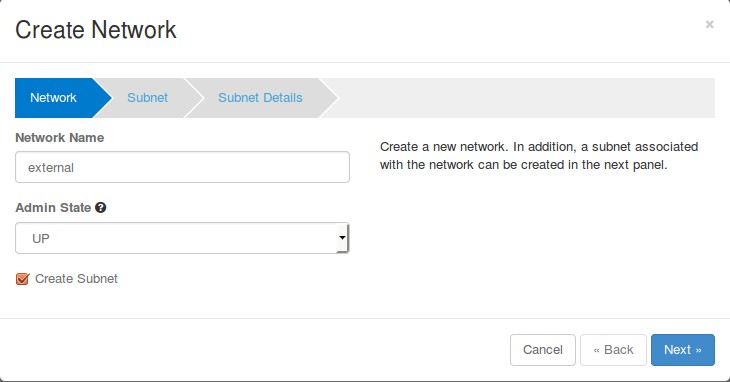
Click on Next…
Specify subnet Name as “sub-external” & Network Address as “192.168.1.0/24”
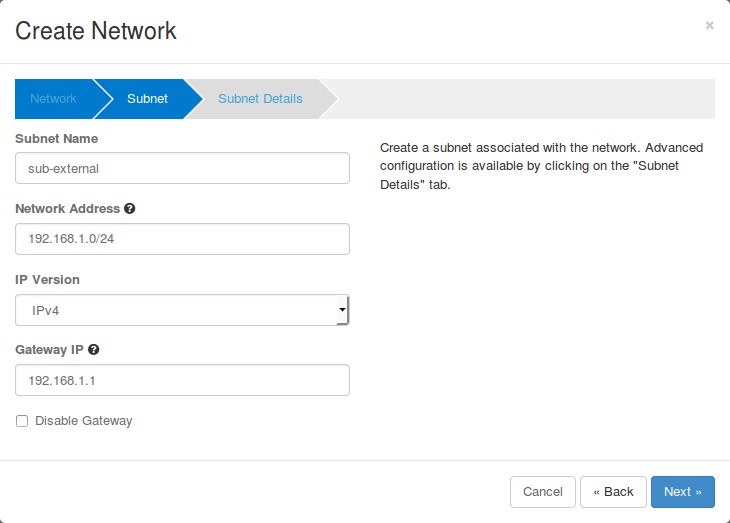
Click on Next
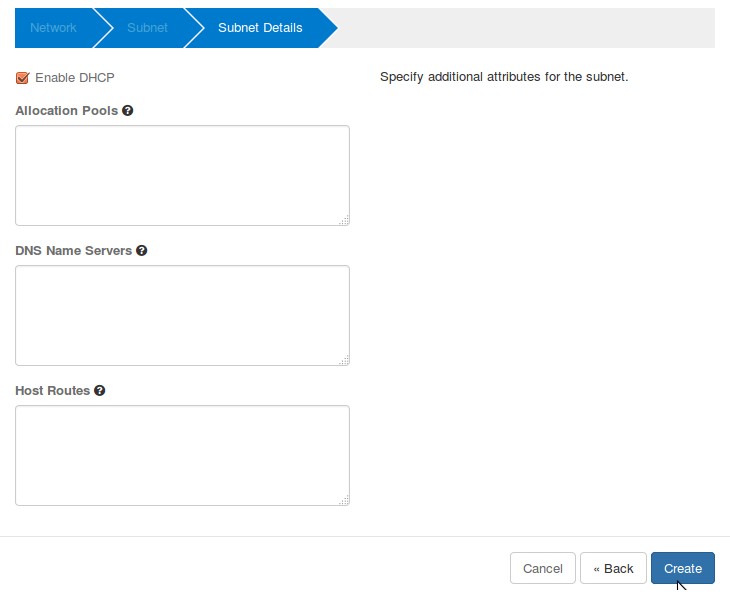
Untick “Enable DHCP” option and Specify the ip address pool for external network.
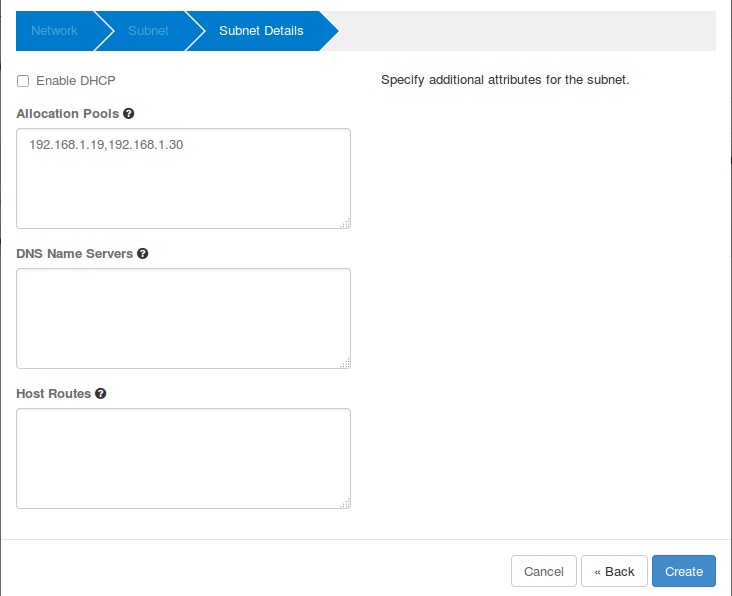
Click on Create.
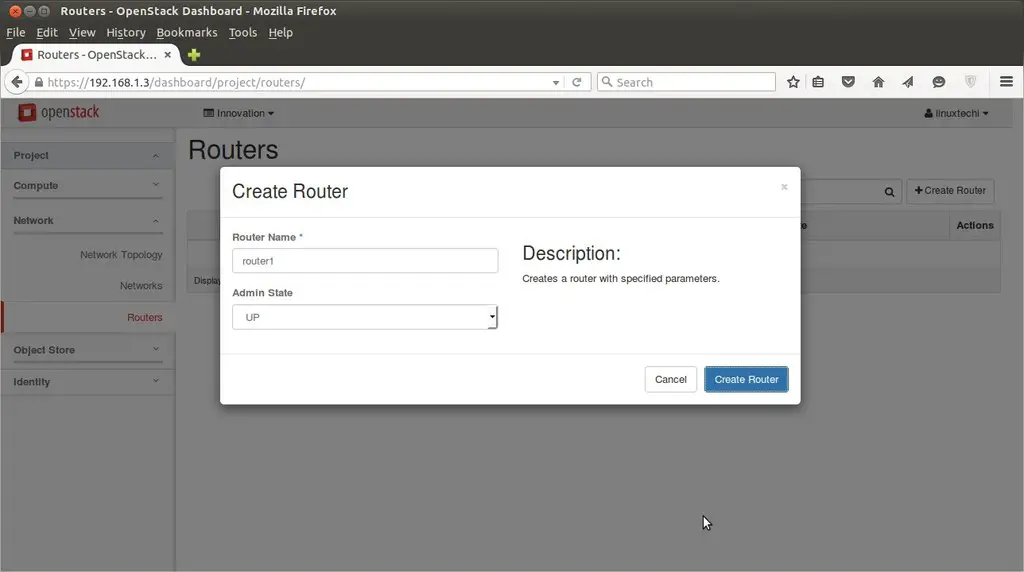
Now time to create a Router.
Go To Network Tab –> Routers –> Click on ‘+ Create Router’
Now Mark External network as “External” , this task can be completed only from admin user , so logout from linuxtechi user and login as admin.
Go to Admin Tab —> Networks–> Click on Edit Network for “External”
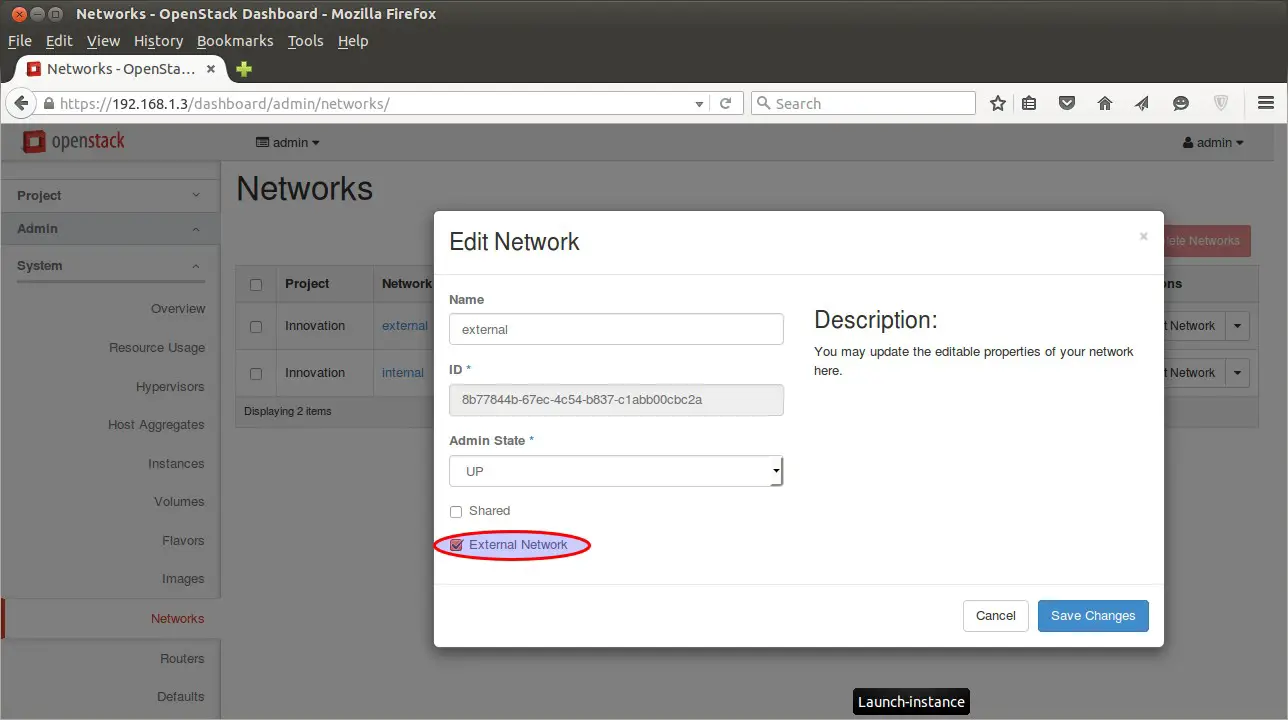
Click on Save Changes
Now Logout from admin user and login as linuxtechi user.
Go to Network Tab —> Routers –> for Router1 click on “Set Gateway”
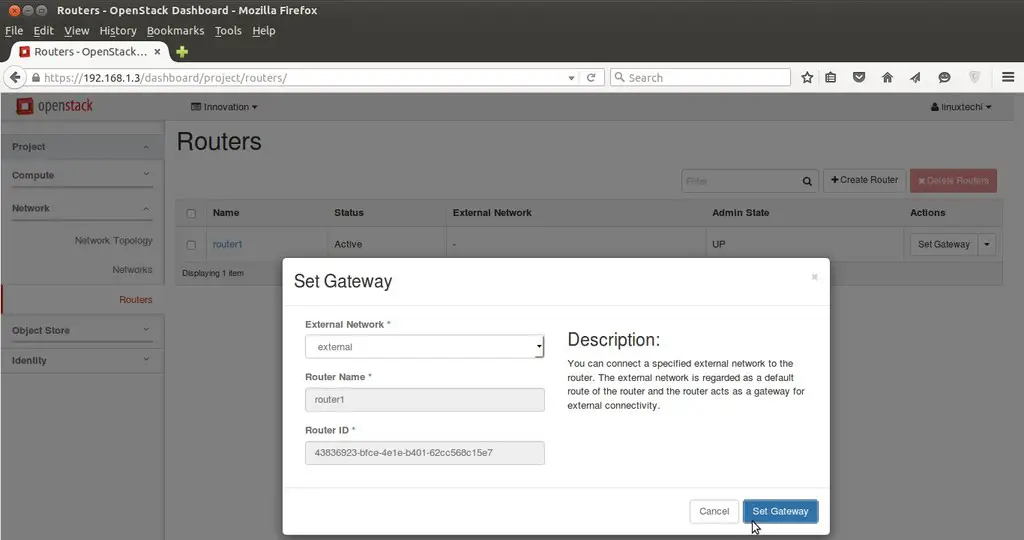
Click on “Set Gateway” , this will add a interface on router and will assign the first ip of external subnet (192.168.1.0/24).
Add internal interface to router as well , Click on the “router1″ and select on “interfaces” and then click on “Add interface”
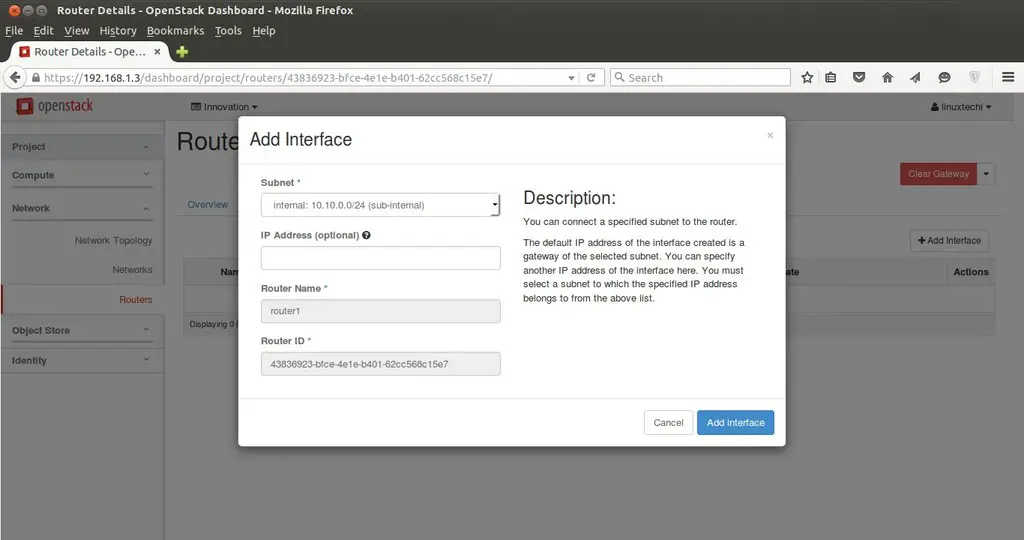
Click on Add interface.
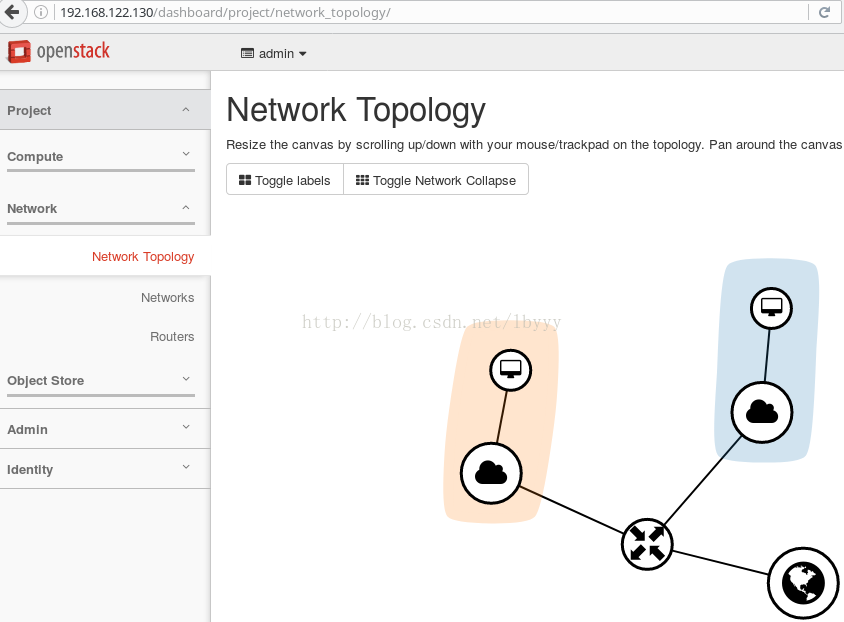
Network Part is completed Now & we can view Network Topology from “Network Topology” Tab
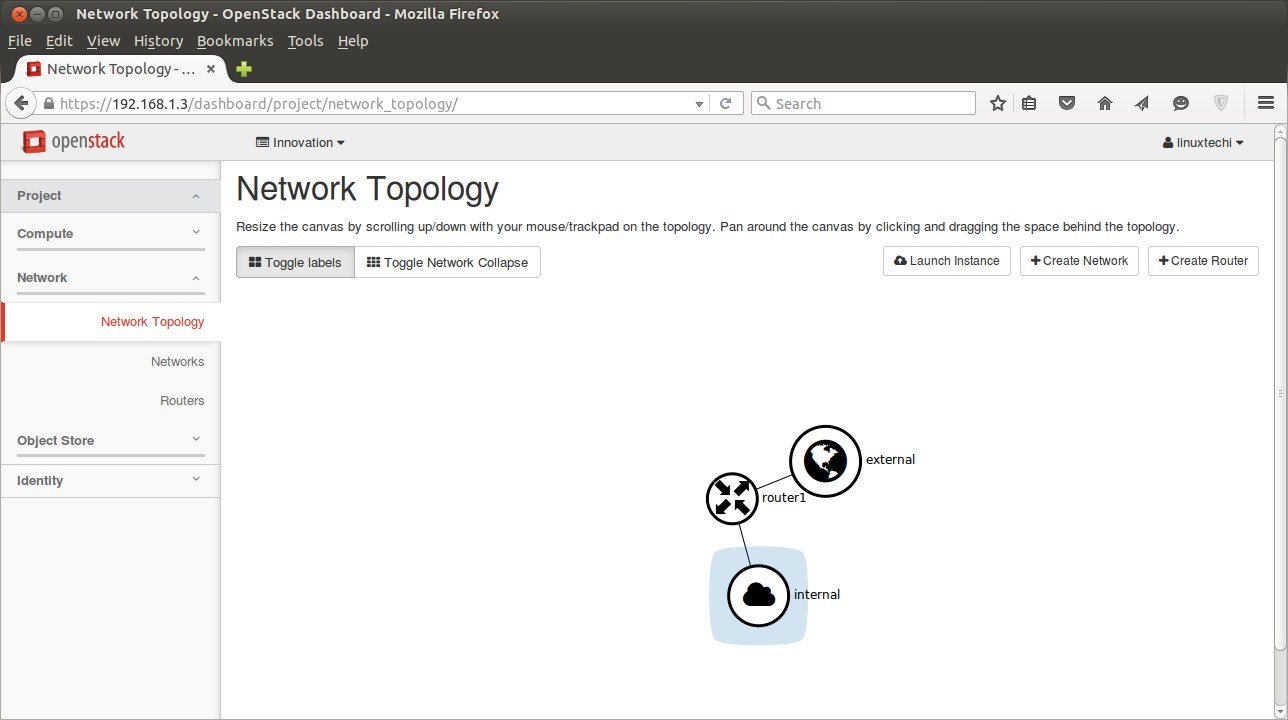
Now Create a key pair that will be used for accessing the VM and define the Security firewall rules.
For creating a key pair
Go to ‘Access & Security’ Tab —> Click on Key Pairs –> then click on ‘Create Key Pair‘
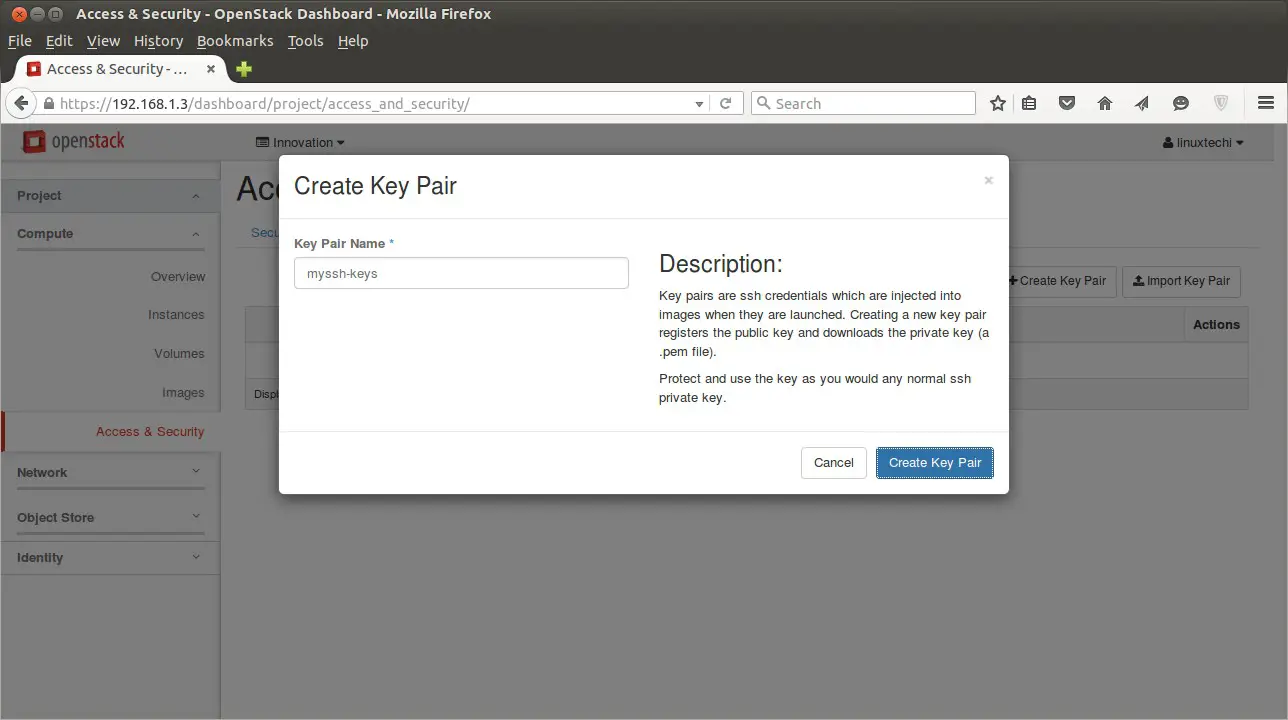
It will create a Key pair with name “myssh-keys.pem”
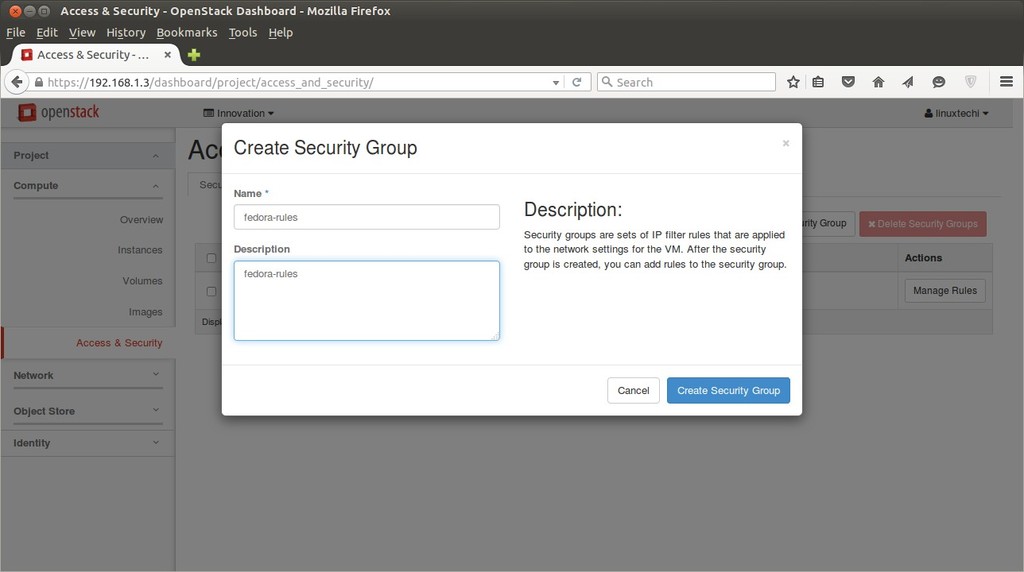
Add a new Security Group with name ‘fedora-rules’ from Access & Security Tab. Allow 22 and ICMP from Internet ( 0.0.0.0 ).
Once the Security Group ‘fedora-rules’ created , click on Manage Rules and allow 22 & ICMP ping.
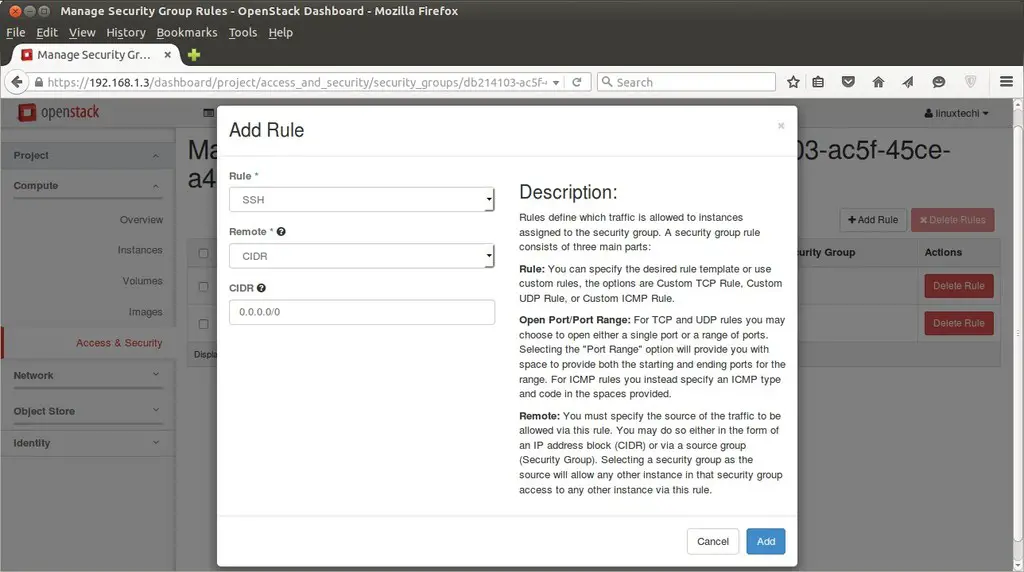
Click on Add , Similarly add a rule for ICMP.
Now Finally it’s time to Launch an instance.
Go to Compute Tab –> Click on Instances –> then click on ‘Launch Instance’
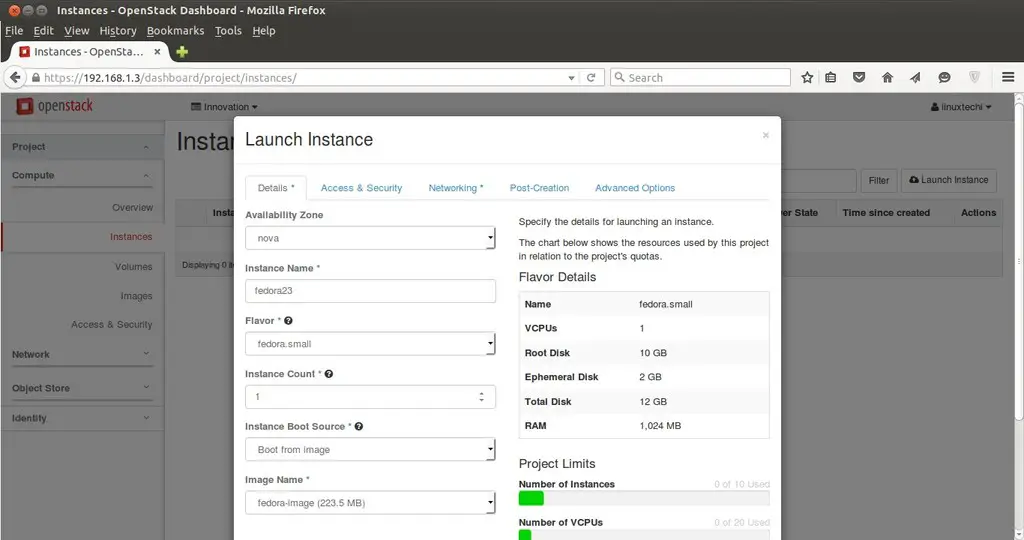
Specify the Instance Name , Flavor that we created in above steps and ‘Boot from image’ from Instance Boot Source option and Select Image Name ‘fedora-image’.
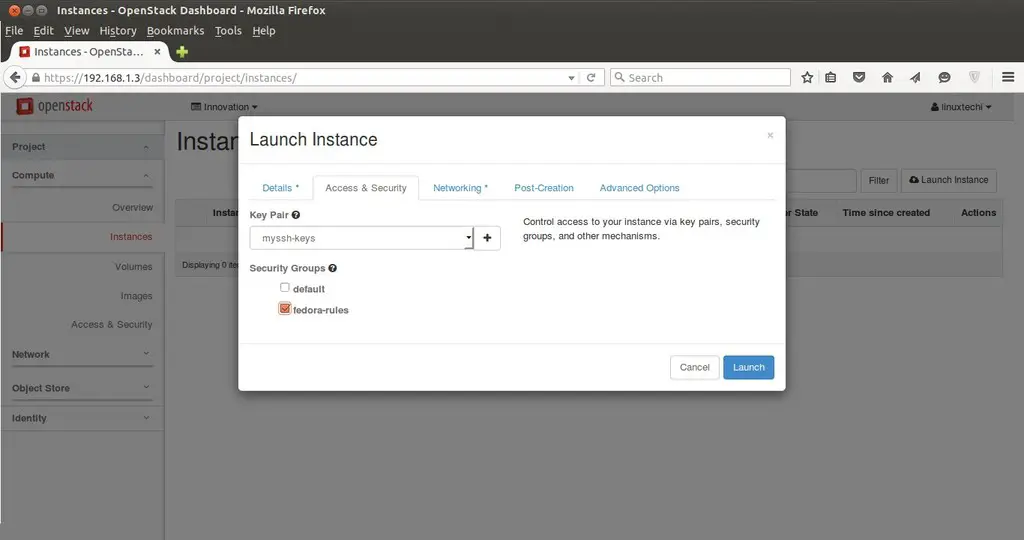
Click on ‘Access & Security’ and Select the Security Group ‘fedora-rules’ & Key Pair ”myssh-keys‘
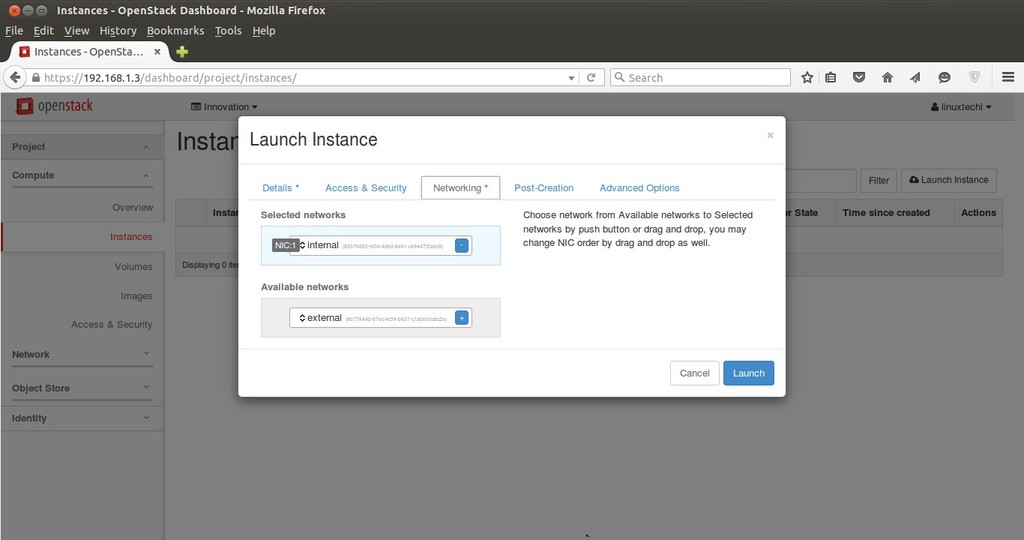
Now Select Networking and add ‘Internal’ Network and the Click on Launch ….
Once the VM is launched , Associate a floating ip so that we can access the VM.
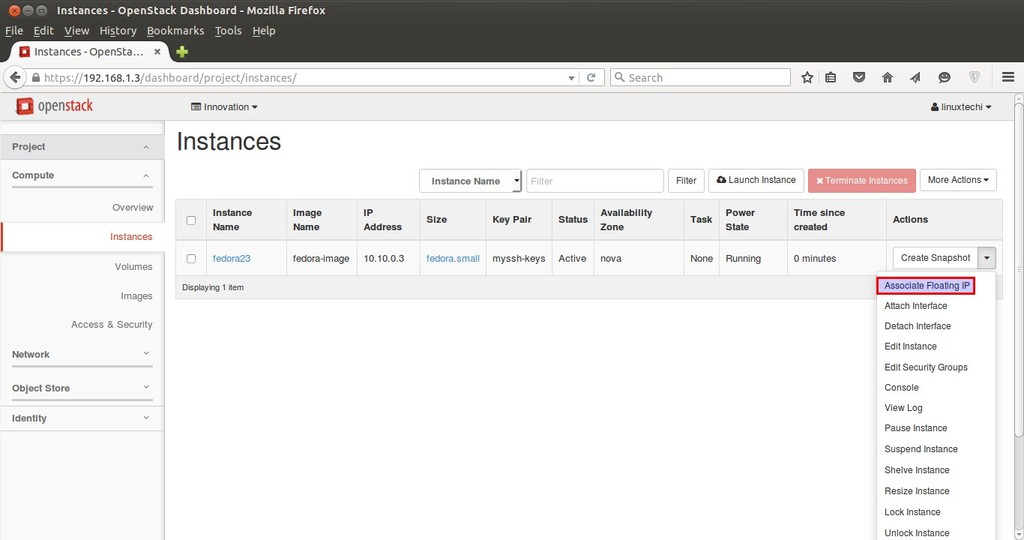
Click on ‘Associate Floating IP‘
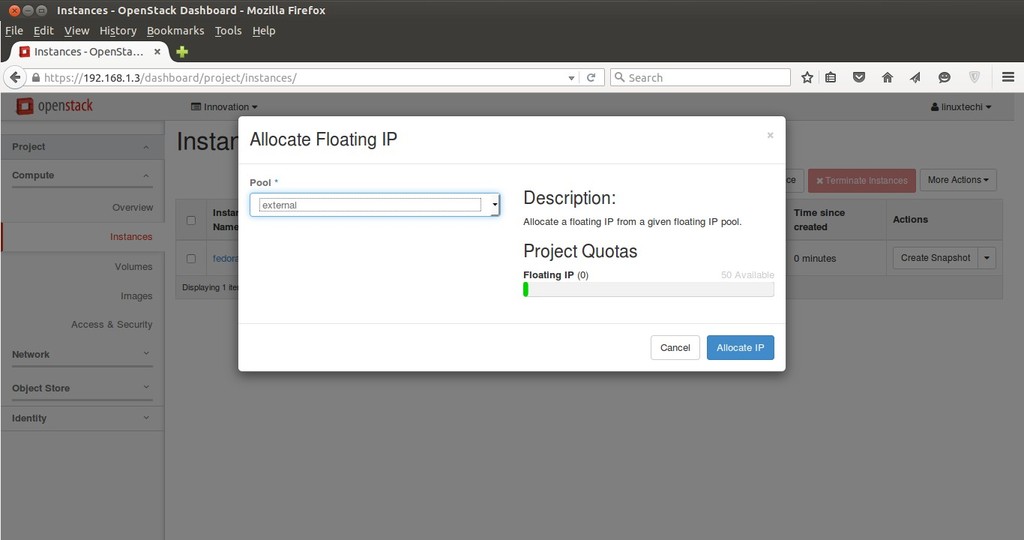
Click on Allocate IP.
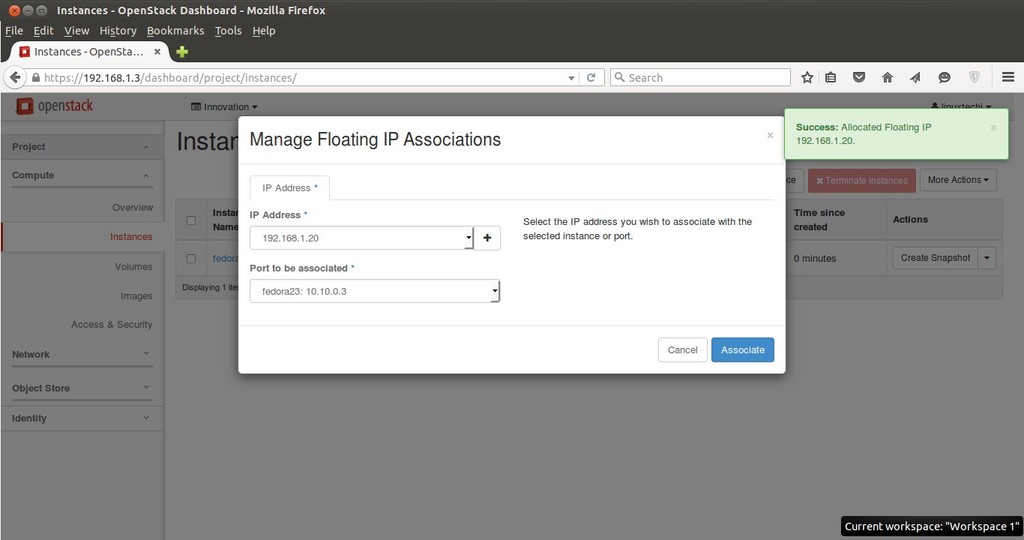
Click on Associate
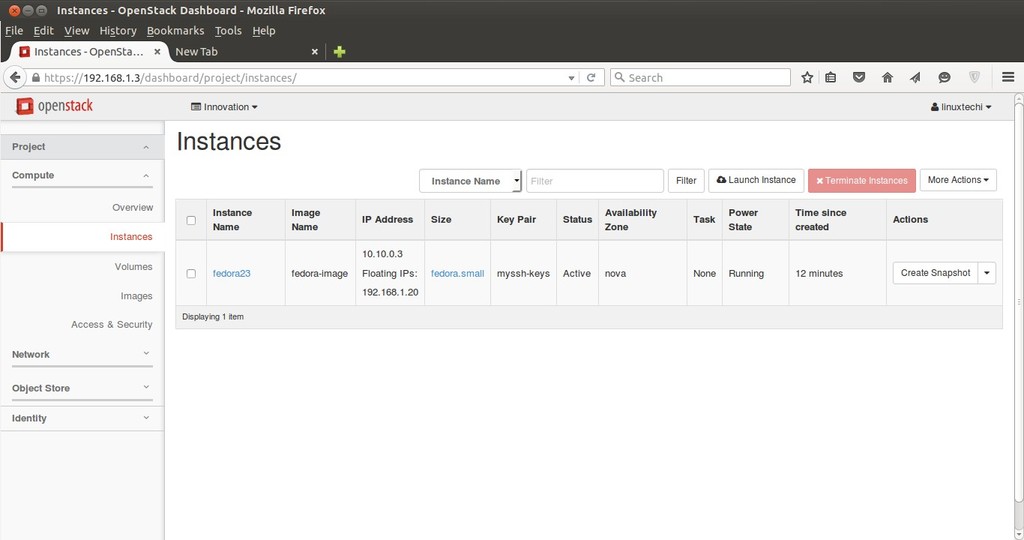
Now try to access the VM with floating IP ( 192.168.1.20) using keys.

As we can see above that we are able to access the VM using keys. Our task of launching a VM from Dashboard is Completed Now.
Hope you like steps and do not hesitate to share this article.


 616
616


 被折叠的 条评论
为什么被折叠?
被折叠的 条评论
为什么被折叠?
 到【灌水乐园】发言


