


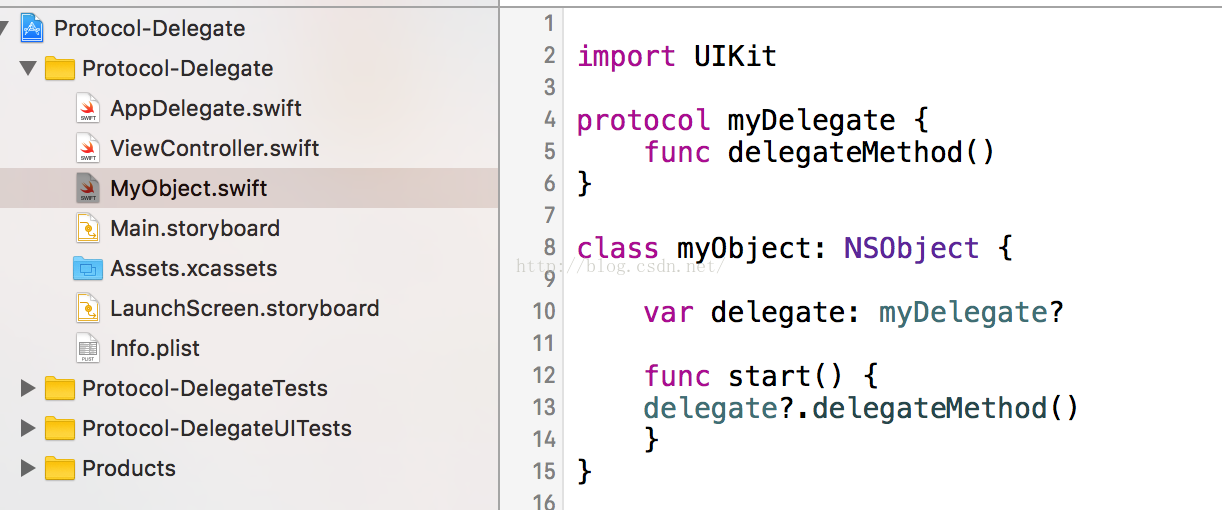
关于swift的协议
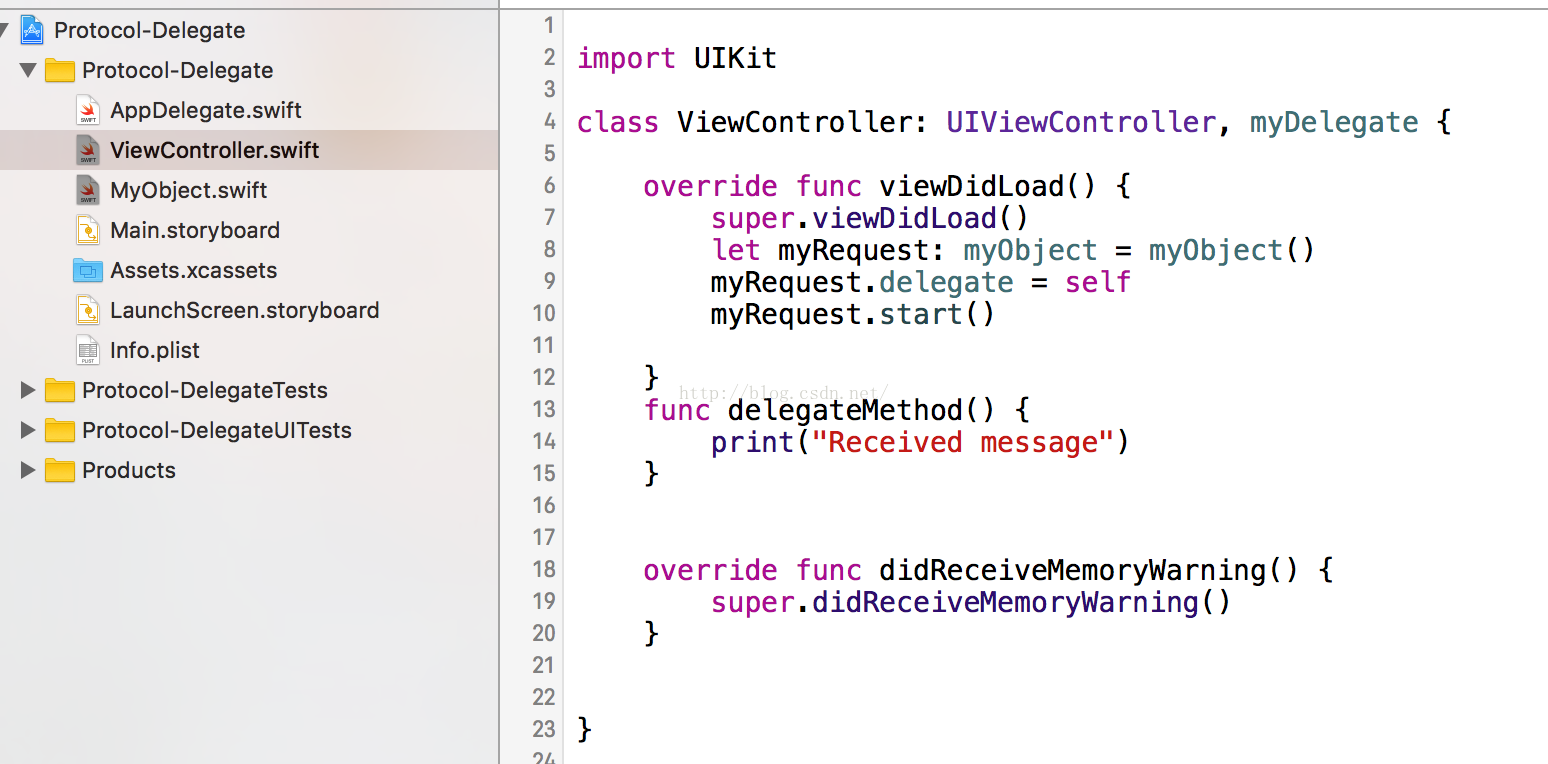
在viewController会显示 "Received message"
class ViewController:UIViewController ,UITableViewDelegate,UITableViewDataSource
{
var tableView :UITableView?
var items :NSMutableArray?
var leftBtn:UIButton?
overridefunc viewDidLoad() {
super.viewDidLoad()
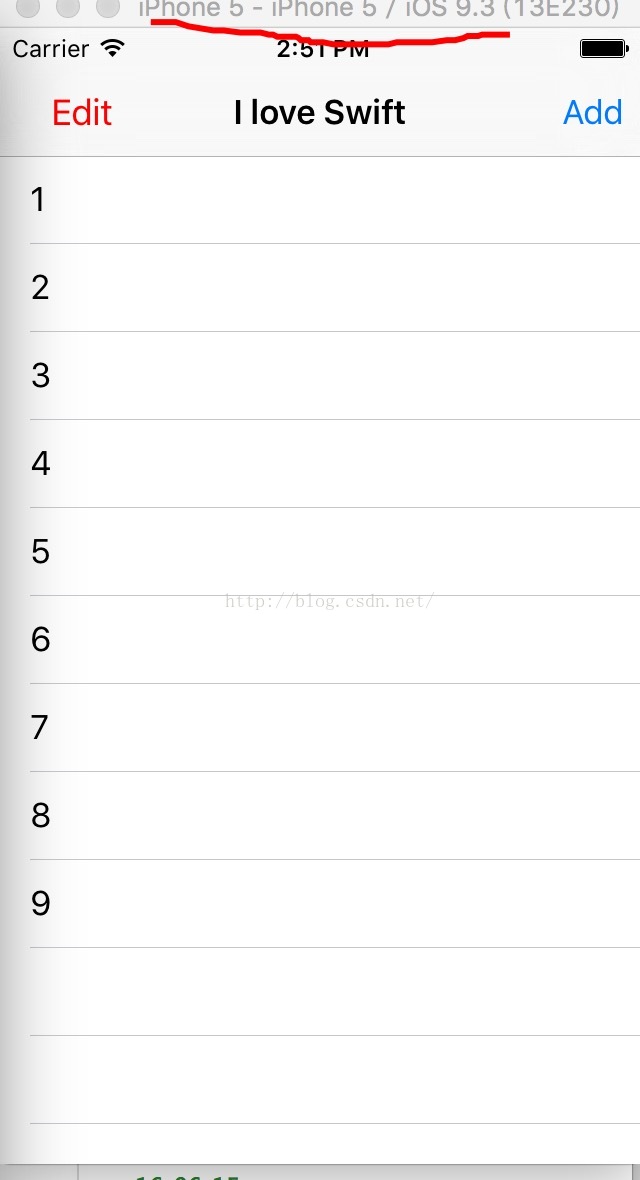
self.title ="I love Swift"
self.items =NSMutableArray()
self.items?.addObject("1")
self.items?.addObject("2")
self.items?.addObject("3")
self.items?.addObject("4")
self.items?.addObject("5")
// Do any additional setup after loading the view, typically from a nib.
setupViews()
setupRightBarButtonItem()
setupLeftBarButtonItem();
}
func setupViews()
{
self.tableView =UITableView(frame:self.view!.frame)
self.tableView!.delegate =self
self.tableView!.dataSource =self
self.tableView!.registerClass(UITableViewCell.self, forCellReuseIdentifier: "cell")
self.tableView?.separatorStyle=UITableViewCellSeparatorStyle.SingleLine;
self.view.addSubview(self.tableView!)
}
func setupLeftBarButtonItem()
{
self.leftBtn =UIButton.init(type:UIButtonType.Custom)
self.leftBtn!.frame =CGRectMake(0,0,50,40)
self.leftBtn?.setTitleColor(UIColor.redColor(), forState: UIControlState.Normal)
self.leftBtn?.setTitle("Edit", forState: UIControlState.Normal)
self.leftBtn!.tag =100
self.leftBtn!.userInteractionEnabled = false
self.leftBtn?.addTarget(self, action: #selector(ViewController.leftBarButtonItemClicked), forControlEvents:UIControlEvents.TouchUpInside)
let barButtonItem =UIBarButtonItem(customView:self.leftBtn!)
self.navigationItem.leftBarButtonItem = barButtonItem
}
func setupRightBarButtonItem()
{
let barButtonItem =UIBarButtonItem(title: "Add", style: UIBarButtonItemStyle.Plain, target:self, action: #selector(ViewController.rightBarButtonItemClicked))
self.navigationItem.rightBarButtonItem = barButtonItem
}
func rightBarButtonItemClicked()
{
let row =self.items!.count
let indexPath =NSIndexPath(forRow:row,inSection:0)
self.items?.addObject("1")
self.tableView?.insertRowsAtIndexPaths([indexPath], withRowAnimation:UITableViewRowAnimation.Left)
self.leftBtn!.userInteractionEnabled = true
}
func leftBarButtonItemClicked()
{
if (self.leftBtn!.tag == 100)
{
self.tableView?.setEditing(true, animated: true)
self.leftBtn!.tag =200
self.leftBtn?.setTitle("Done", forState: UIControlState.Normal)
}
else
{
self.tableView?.setEditing(false, animated: true)
self.leftBtn!.tag =100
self.leftBtn?.setTitle("Edit", forState: UIControlState.Normal)
}
}
overridefunc didReceiveMemoryWarning() {
super.didReceiveMemoryWarning()
// Dispose of any resources that can be recreated.
}
func tableView(tableView:UITableView, numberOfRowsInSection section:Int) -> Int
{
returnself.items!.count
}
func tableView(tableView:UITableView, cellForRowAtIndexPath indexPath:NSIndexPath) -> UITableViewCell
{
let cell = tableView .dequeueReusableCellWithIdentifier("cell", forIndexPath: indexPath) asUITableViewCell
cell.textLabel!.text =String(format: "%i", indexPath.row+1)
return cell
}
func tableView(tableView:UITableView, canEditRowAtIndexPath indexPath:NSIndexPath) -> Bool
{
returntrue
}
func tableView(tableView:UITableView, commitEditingStyle editingStyle:UITableViewCellEditingStyle, forRowAtIndexPath indexPath:NSIndexPath)
{
self.items?.removeObjectAtIndex(indexPath.row)
self.tableView?.deleteRowsAtIndexPaths([indexPath], withRowAnimation:UITableViewRowAnimation.Top)
if (self.items!.count == 0)
{
self.leftBtn!.userInteractionEnabled = false
}
}
func tableView(tableView:UITableView, editingStyleForRowAtIndexPath indexPath:NSIndexPath) -> UITableViewCellEditingStyle
{
return (UITableViewCellEditingStyle.Delete)
}
func tableView(tableView:UITableView, canMoveRowAtIndexPath indexPath:NSIndexPath) -> Bool
{
returntrue
}
func tableView(tableView:UITableView, moveRowAtIndexPath sourceIndexPath:NSIndexPath, toIndexPath destinationIndexPath:NSIndexPath)
{
self.tableView?.moveRowAtIndexPath(sourceIndexPath, toIndexPath: destinationIndexPath)
self.items?.exchangeObjectAtIndex(sourceIndexPath.row, withObjectAtIndex: destinationIndexPath.row)
}
func tableView(tableView:UITableView, didSelectRowAtIndexPath indexPath:NSIndexPath)
{
print("row = %d",indexPath.row)
}
}
运行结果


 3695
3695


 被折叠的 条评论
为什么被折叠?
被折叠的 条评论
为什么被折叠?
 到【灌水乐园】发言


