


1. 下载源码包 squid-3.4.13.tar.gz
root@master:/home/lihan/work/cluster# ls
nginx-1.8.0 nginx-1.8.0.tar.gz squid-3.4.13.tar.gz
2. 解压源码包
root@master:/home/lihan/work/cluster# tar zxvf squid-3.4.13.tar.gz
root@master:/home/lihan/work/cluster# ls
nginx-1.8.0 nginx-1.8.0.tar.gz squid-3.4.13 squid-3.4.13.tar.gz
3. 编译安装squid
root@master:/home/lihan/work/cluster# cd squid-3.4.13
root@master:/home/lihan/work/cluster/squid-3.4.13# ./configure
root@master:/home/lihan/work/cluster/squid-3.4.13# make
root@master:/home/lihan/work/cluster/squid-3.4.13# make install
4. 进去squid默认安装目录查看
root@master:/usr/local/squid# ls
bin etc libexec sbin share var
其中,squid可执行文件位于./sbin, 配置文件squid.conf位于./etc/
5. 修改三个文件夹的权限
# chmod 777 /usr/local/squid/var/logs/
# chmod 777 /usr/local/squid/var/cache/squid
# chmod 777 /var/log/squid
root@master:/usr/local/squid/sbin# ./squid -N -d1 #d1(1234的1非dl)
root@master:/home/lihan/work/cluster# ls
nginx-1.8.0 nginx-1.8.0.tar.gz squid-3.4.13.tar.gz
2. 解压源码包
root@master:/home/lihan/work/cluster# tar zxvf squid-3.4.13.tar.gz
root@master:/home/lihan/work/cluster# ls
nginx-1.8.0 nginx-1.8.0.tar.gz squid-3.4.13 squid-3.4.13.tar.gz
3. 编译安装squid
root@master:/home/lihan/work/cluster# cd squid-3.4.13
root@master:/home/lihan/work/cluster/squid-3.4.13# ./configure
root@master:/home/lihan/work/cluster/squid-3.4.13# make
root@master:/home/lihan/work/cluster/squid-3.4.13# make install
4. 进去squid默认安装目录查看
root@master:/usr/local/squid# ls
bin etc libexec sbin share var
其中,squid可执行文件位于./sbin, 配置文件squid.conf位于./etc/
5. 修改三个文件夹的权限
# chmod 777 /usr/local/squid/var/logs/
# chmod 777 /usr/local/squid/var/cache/squid
# chmod 777 /var/log/squid
6. 修改配置文件/usr/local/squid/etc/squid.conf
<span style="font-family:Microsoft YaHei;"><span style="font-family:Microsoft YaHei;">#
# Recommended minimum configuration:
#

# Example rule allowing access from your local networks.
# Adapt to list your (internal) IP networks from where browsing
# should be allowed
acl localnet src 10.0.0.0/8	# RFC1918 possible internal network
acl localnet src 172.16.0.0/12	# RFC1918 possible internal network
acl localnet src 192.168.0.0/16	# RFC1918 possible internal network
acl localnet src fc00::/7       # RFC 4193 local private network range
acl localnet src fe80::/10      # RFC 4291 link-local (directly plugged) machines

acl SSL_ports port 443
acl Safe_ports port 80		# http
acl Safe_ports port 21		# ftp
acl Safe_ports port 443		# https
acl Safe_ports port 70		# gopher
acl Safe_ports port 210		# wais
acl Safe_ports port 1025-65535	# unregistered ports
acl Safe_ports port 280		# http-mgmt
acl Safe_ports port 488		# gss-http
acl Safe_ports port 591		# filemaker
acl Safe_ports port 777		# multiling http
acl CONNECT method CONNECT

#
# Recommended minimum Access Permission configuration:
#
# Deny requests to certain unsafe ports
http_access deny !Safe_ports

# Deny CONNECT to other than secure SSL ports
http_access deny CONNECT !SSL_ports

# Only allow cachemgr access from localhost
http_access allow localhost manager
http_access deny manager

# We strongly recommend the following be uncommented to protect innocent
# web applications running on the proxy server who think the only
# one who can access services on "localhost" is a local user
#http_access deny to_localhost

#
# INSERT YOUR OWN RULE(S) HERE TO ALLOW ACCESS FROM YOUR CLIENTS
#

# Example rule allowing access from your local networks.
# Adapt localnet in the ACL section to list your (internal) IP networks
# from where browsing should be allowed
http_access allow localnet
http_access allow localhost

# And finally deny all other access to this proxy
http_access deny all

# Squid normally listens to port 3128
#http_port 3128
#http_port 192.168.100.30:80 vhost
http_port 80 vhost

cache_peer 192.168.100.31 parent 80 0 originserver weight=5 max-conn=30
cache_peer 192.168.100.210 parent 80 0 originserver weight=5 max-conn=30

cache_mem 64 MB
maximum_object_size 4096 KB

access_log /var/log/squid/access.log

# Uncomment and adjust the following to add a disk cache directory.
cache_dir ufs /usr/local/squid/var/cache/squid 100 16 256

# Leave coredumps in the first cache dir
coredump_dir /usr/local/squid/var/cache/squid

#
# Add any of your own refresh_pattern entries above these.
#
refresh_pattern ^ftp:		1440	20%	10080
refresh_pattern ^gopher:	1440	0%	1440
refresh_pattern -i (/cgi-bin/|\?) 0	0%	0
refresh_pattern .		0	20%	4320</span></span>
root@master:/usr/local/squid/sbin# ./squid -N -d1 #d1(1234的1非dl)
8. 测试
8.1 拓扑
如下图所示,squid运行于s0服务器上面,其ip地址为192.168.100.30 ,http端口号为80. 其配置与/usr/local/squid/etc/squid.conf保持一致. squid对s1, s2进行代理:
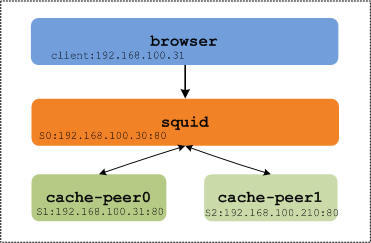
图1 拓扑
8.2 抓包
启动服务器s0上的wireshark抓;启动浏览器,浏览器所在的客户端ip地址为192.168.100.31,在浏览器地址栏中输入http://192.168.100.30,不断的刷新浏览器,报文如下:
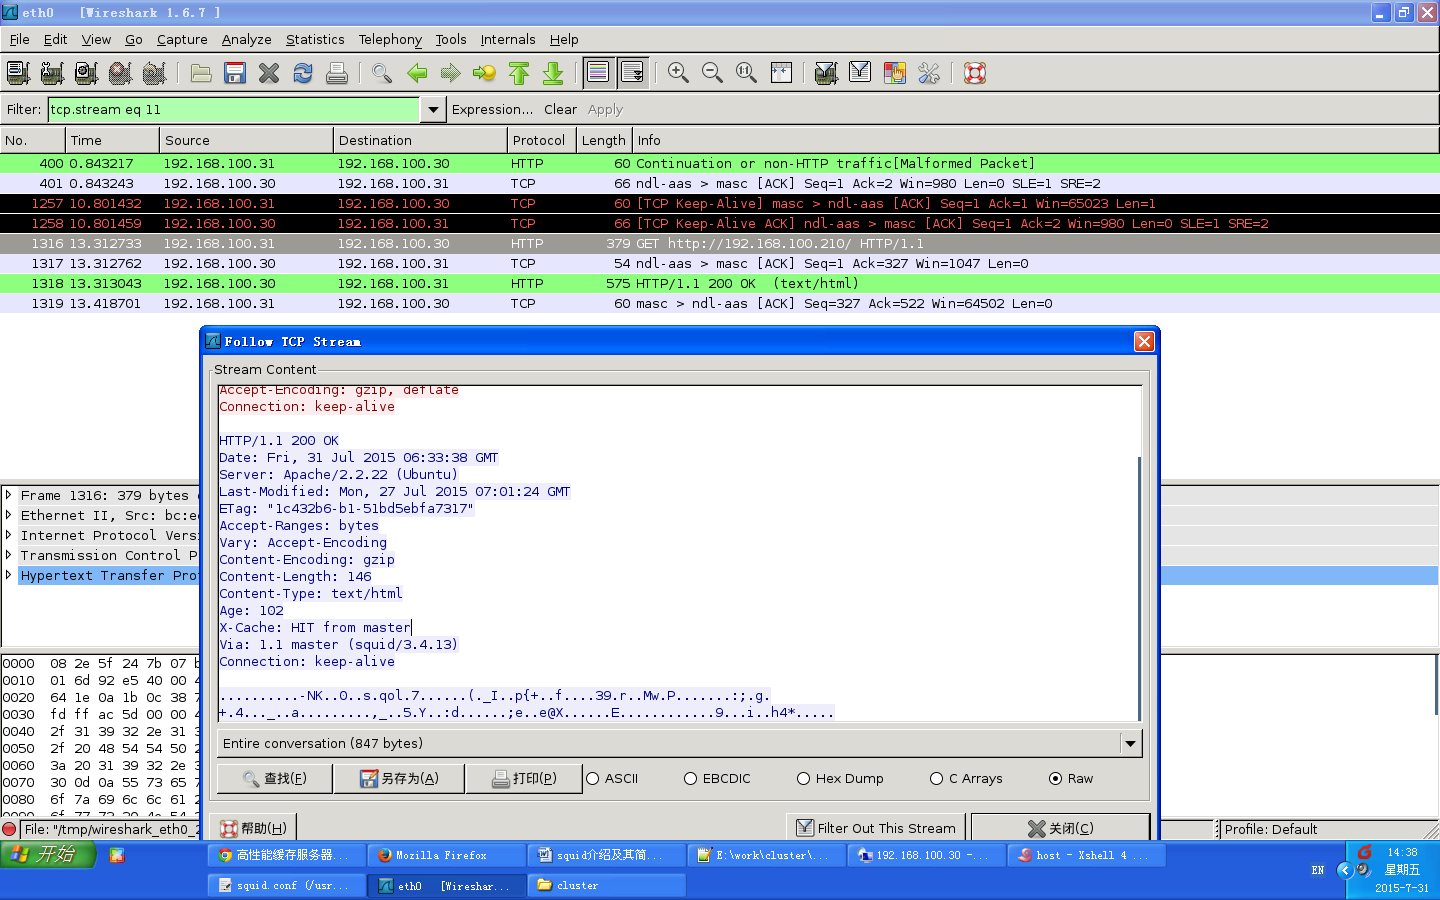
图2 抓包
可见,s0所在squid对192.168.100.31/210的服务器的静态页面进行了cache. (192.168.100.31对192.168.100.30进行了http请求,而192.168.100.30并未请求192.168.100.31/210, 而是直接回应了http响应).


 3248
3248

 被折叠的 条评论
为什么被折叠?
被折叠的 条评论
为什么被折叠?
 到【灌水乐园】发言


