


在介绍View绘制之前先来介绍一下LayoutInflater,而介绍LayoutInflater之前,先介绍一种单例实现模式:使用容器实现单例模式
public class SingletonManager {
  private static Map<String, Object> objMap = new HashMap<String,Object>();
  private Singleton() {
  }
  public static void registerService(String key, Objectinstance) {
    if (!objMap.containsKey(key) ) {
      objMap.put(key, instance) ;
    }
  }
  public static ObjectgetService(String key) {
    return objMap.get(key) ;
  }
}
在程序的初始,将多种单例模式类型注入到一个统一管理类中,在使用的时候根据对应的key获取对应类型的对象。这种方式使得我们可以管理多种类型的单例,并且在使用的时候通过统一的接口进行获取操作,降低了用户的使用成本,也对用户隐藏了具体的实现,降低了耦合度。
在Android系统中,我们经常会通过context获取系统级别的服务,如WindowsManagerService,ActivityManagerService。更常用的是LayoutInflater这个类,这些服务会在合适的时候以单例的形式注册在系统中,在我们需要的时候通过Context的getSystemService(String name)获取。我们经常在ListView中使用自定义Adapter的时候,复写getView方法的时候,都会使用到
if(convertView == null){
	convertView = LayoutInflater.from(mContext).inflate(R.layout.unanswered_listview_item, null);
}
这样的代码,我们通常用LayoutInflater.from(context)来获取LayoutInflater服务,
 /**
     * Obtains the LayoutInflater from the given context.
     */
    public static LayoutInflater from(Context context) {
        LayoutInflater LayoutInflater =
                (LayoutInflater) context.getSystemService(Context.LAYOUT_INFLATER_SERVICE);
        if (LayoutInflater == null) {
            throw new AssertionError("LayoutInflater not found.");
        }
        return LayoutInflater;
    }
看到这里,我们可以看到最终其实是调用了Context的getSystemService(name)方法来获取服务的,但是跟踪至Context发现其是个抽象类(abstract),那么我们应该去找其实现子类。其实在Application,Service,Activity中都会存在一个Context对象。我们这里以Activity为例。那我们的Activity中的Context是在什么时候实例化的呢。其实在我们Activity中最终使用的是Context的实现类ContextImpl。在ContextImpl中有一个 ServiceFetcher实体类,存放着activity所需要的系统服务。
/*package*/ static class ServiceFetcher {
        int mContextCacheIndex = -1;

        /**
         * Main entrypoint; only override if you don't need caching.
         */
        public Object getService(ContextImpl ctx) {
            ArrayList<Object> cache = ctx.mServiceCache;
            Object service;
            synchronized (cache) {
                if (cache.size() == 0) {
                    // Initialize the cache vector on first access.
                    // At this point sNextPerContextServiceCacheIndex
                    // is the number of potential services that are
                    // cached per-Context.
                    for (int i = 0; i < sNextPerContextServiceCacheIndex; i++) {
                        cache.add(null);
                    }
                } else {
                    service = cache.get(mContextCacheIndex);
                    if (service != null) {
                        return service;
                    }
                }
                service = createService(ctx);
                cache.set(mContextCacheIndex, service);
                return service;
            }
        }

        /**
         * Override this to create a new per-Context instance of the
         * service.  getService() will handle locking and caching.
         */
        public Object createService(ContextImpl ctx) {
            throw new RuntimeException("Not implemented");
        }
    }

    /**
     * Override this class for services to be cached process-wide.
     */
    abstract static class StaticServiceFetcher extends ServiceFetcher {
        private Object mCachedInstance;

        @Override
        public final Object getService(ContextImpl unused) {
            synchronized (StaticServiceFetcher.this) {
                Object service = mCachedInstance;
                if (service != null) {
                    return service;
                }
                return mCachedInstance = createStaticService();
            }
        }

        public abstract Object createStaticService();
    }

    private static final HashMap<String, ServiceFetcher> SYSTEM_SERVICE_MAP =
            new HashMap<String, ServiceFetcher>();

    private static int sNextPerContextServiceCacheIndex = 0;
    private static void registerService(String serviceName, ServiceFetcher fetcher) {
        if (!(fetcher instanceof StaticServiceFetcher)) {
            fetcher.mContextCacheIndex = sNextPerContextServiceCacheIndex++;
        }
        SYSTEM_SERVICE_MAP.put(serviceName, fetcher);
    }
这里其实使用了单例模式(容器实现单例),创建了一个名位SYSTEM_SERVICE_MAP的map集合类,里面存放我们所需要的服务类型,key为服务的名称,value就是一个ServiceFetcher类型的实例
registerService(LAYOUT_INFLATER_SERVICE, new ServiceFetcher() {
                public Object createService(ContextImpl ctx) {
                    return PolicyManager.makeNewLayoutInflater(ctx.getOuterContext());
                }});
在ContextImpl中有很长一段的静态代码块(这里只标注了LAYOUT_INFLATER_SERVICE),当我们实例化ContextImpl的时候会执行这些静态代码块,将我们Activity所需要的系统服务注册进来,等到需要使用的时候直接就可以使用了
  @Override
    public Object getSystemService(String name) {  //获取系统服务
        ServiceFetcher fetcher = SYSTEM_SERVICE_MAP.get(name);
        return fetcher == null ? null : fetcher.getService(this);
    }
我们在上面看到了其实是调用PolicyManager的makeNewLayoutInflater函数来实现的,我们继续深入进PolicyManager中去。
  public static LayoutInflater makeNewLayoutInflater(Context context) {
        return sPolicy.makeNewLayoutInflater(context);
    }
最后调用sPolicy的makeNewLayoutInflater方法,查看得到private static final IPolicy sPolicy;是个接口类型 ,我们肯定得找他的实现类并且还存在这样一段代码
  private static final String POLICY_IMPL_CLASS_NAME =
        "com.android.internal.policy.impl.Policy";

    private static final IPolicy sPolicy;

    static {
        // Pull in the actual implementation of the policy at run-time
        try {
            Class policyClass = Class.forName(POLICY_IMPL_CLASS_NAME);
            sPolicy = (IPolicy)policyClass.newInstance();
        } catch (ClassNotFoundException ex) {
            throw new RuntimeException(
                    POLICY_IMPL_CLASS_NAME + " could not be loaded", ex);
        } catch (InstantiationException ex) {
            throw new RuntimeException(
                    POLICY_IMPL_CLASS_NAME + " could not be instantiated", ex);
        } catch (IllegalAccessException ex) {
            throw new RuntimeException(
                    POLICY_IMPL_CLASS_NAME + " could not be instantiated", ex);
        }
    }
我们进入Policy类里面继续查看,终于找到最终实现了,其实LayoutInflater最终实现就是PhoneLayoutInflater。
 public LayoutInflater makeNewLayoutInflater(Context context) {
        return new PhoneLayoutInflater(context);
    }
再来看看PhoneLayoutInflater里面有一些什么
public class PhoneLayoutInflater extends LayoutInflater {
    private static final String[] sClassPrefixList = {
        "android.widget.",
        "android.webkit.",
        "android.app."
    };

    /**
     * Instead of instantiating directly, you should retrieve an instance
     * through {@link Context#getSystemService}
     *
     * @param context The Context in which in which to find resources and other
     *                application-specific things.
     *
     * @see Context#getSystemService
     */
    public PhoneLayoutInflater(Context context) {
        super(context);
    }

    protected PhoneLayoutInflater(LayoutInflater original, Context newContext) {
        super(original, newContext);
    }

    /** Override onCreateView to instantiate names that correspond to the
        widgets known to the Widget factory. If we don't find a match,
        call through to our super class.
    */
    @Override protected View onCreateView(String name, AttributeSet attrs) throws ClassNotFoundException {
        for (String prefix : sClassPrefixList) {
            try {
                View view = createView(name, prefix, attrs);
                if (view != null) {
                    return view;
                }
            } catch (ClassNotFoundException e) {
                // In this case we want to let the base class take a crack
                // at it.
            }
        }


        return super.onCreateView(name, attrs);
    }

    public LayoutInflater cloneInContext(Context newContext) {
        return new PhoneLayoutInflater(this, newContext);
    }
}
首先定义了一个数组里面有3个String类型的“android.widget” 和"android.webkit","android.app",还复写了onCreateView,里面其实就是创建view了,这里说明了为什么我们系统内置控件,例如TextView,Button不需要写完整的类名"android.widget.TextView",系统就能直接认识他们,而我们自定义的控件需要写完整的类名,才能创建控件并显示出来的原因。
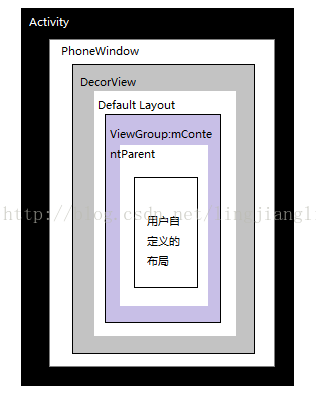
window的View层级图
现在以Activity的setContentView为例,看看View到底是怎么构造出来的。
  public void setContentView(View view) {
        getWindow().setContentView(view);
        initActionBar();
    }
其实我们跟踪代码,最后发现这个window对象是PhoneWindow对象,看看PhoneWindow里面对应的方法。。
  @Override
    public void setContentView(int layoutResID) {
        if (mContentParent == null) {
            installDecor();
        } else {
            mContentParent.removeAllViews();
        }
        mLayoutInflater.inflate(layoutResID, mContentParent);
        final Callback cb = getCallback();
        if (cb != null && !isDestroyed()) {
            cb.onContentChanged();
        }
    }
只里面installDecor()方法有一些复杂,这里不细说,只是简单的介绍里面做了一些什么事情。
- 根据getWindowStyle()返回的数组来设定一些窗口属性值feature,如是否全屏,是否带标题栏。
- 根据上面设定的features值,决定加载何种窗口布局文件。
- 把特定的view添加到decorView里。
- contentParent由findViewById返回,实际上就是mDecorView一部分
来看这句代码mLayoutInflater.inflate(layoutResID, mContentParent);的具体操作。
  public View inflate(int resource, ViewGroup root) {
        return inflate(resource, root, root != null);
    }
继续跟踪进入inflate方法,最终实现方法继续看下面
    public View inflate(XmlPullParser parser, ViewGroup root, boolean attachToRoot) {
        synchronized (mConstructorArgs) {
            final AttributeSet attrs = Xml.asAttributeSet(parser);
            Context lastContext = (Context)mConstructorArgs[0];
            mConstructorArgs[0] = mContext;
            View result = root;

            try {
                // Look for the root node.
                int type;
                while ((type = parser.next()) != XmlPullParser.START_TAG &&
                        type != XmlPullParser.END_DOCUMENT) {
                    // Empty
                }

                if (type != XmlPullParser.START_TAG) {
                    throw new InflateException(parser.getPositionDescription()
                            + ": No start tag found!");
                }

                final String name = parser.getName();

                if (DEBUG) {
                    System.out.println("**************************");
                    System.out.println("Creating root view: "
                            + name);
                    System.out.println("**************************");
                }

                if (TAG_MERGE.equals(name)) {   //代码1  解析merge标签
                    if (root == null || !attachToRoot) {
                        throw new InflateException("<merge /> can be used only with a valid "
                                + "ViewGroup root and attachToRoot=true");
                    }

                    rInflate(parser, root, attrs, false);
                } else {  //代码2  不是merge标签那么直接解析布局中的视图
                    // Temp is the root view that was found in the xml
                    View temp;
                    if (TAG_1995.equals(name)) {
                        temp = new BlinkLayout(mContext, attrs);
                    } else {   //代码3  根据xml中的tag来解析layout根视图
                        temp = createViewFromTag(root, name, attrs);
                    }

                    ViewGroup.LayoutParams params = null;

                    if (root != null) {
                        if (DEBUG) {
                            System.out.println("Creating params from root: " +
                                    root);
                        }
                        // Create layout params that match root, if supplied
                        params = root.generateLayoutParams(attrs);
                        if (!attachToRoot) {
                            // Set the layout params for temp if we are not
                            // attaching. (If we are, we use addView, below)
                            temp.setLayoutParams(params);
                        }
                    }

                    if (DEBUG) {
                        System.out.println("-----> start inflating children");
                    }
                    // Inflate all children under temp
                    rInflate(parser, temp, attrs, true);
                    if (DEBUG) {
                        System.out.println("-----> done inflating children");
                    }

                    // We are supposed to attach all the views we found (int temp)
                    // to root. Do that now.
                    if (root != null && attachToRoot) {
                        root.addView(temp, params);
                    }

                    // Decide whether to return the root that was passed in or the
                    // top view found in xml.
                    if (root == null || !attachToRoot) {
                        result = temp;
                    }
                }

            } catch (XmlPullParserException e) {
                InflateException ex = new InflateException(e.getMessage());
                ex.initCause(e);
                throw ex;
            } catch (IOException e) {
                InflateException ex = new InflateException(
                        parser.getPositionDescription()
                        + ": " + e.getMessage());
                ex.initCause(e);
                throw ex;
            } finally {
                // Don't retain static reference on context.
                mConstructorArgs[0] = lastContext;
                mConstructorArgs[1] = null;
            }

            return result;
        }
    }
上面的inflate方法中,主要有以下几步:
(1)解析xml中的根标签(第一个元素,pull解析)
(2)如果根标签是merge,那么调用rInflate进行解析,rInflate会将merge标签下的所有子View直接添加到根标签中。
(3)如果根标签是普通的元素,那就运行代码3,调用createViewFromTag对该元素进行解析。
(4)调用rInflate解析temp根元素下的所有子View,并且将这些子View都添加到temp下
(5)返回解析到的根视图
我们先来看看createViewFromTag这个函数
    View createViewFromTag(View parent, String name, AttributeSet attrs, boolean inheritContext) {
        if (name.equals("view")) {
            name = attrs.getAttributeValue(null, "class");
        }

        Context viewContext;
        if (parent != null && inheritContext) {
            viewContext = parent.getContext();
        } else {
            viewContext = mContext;
        }

        // Apply a theme wrapper, if requested.
        final TypedArray ta = viewContext.obtainStyledAttributes(attrs, ATTRS_THEME);
        final int themeResId = ta.getResourceId(0, 0);
        if (themeResId != 0) {
            viewContext = new ContextThemeWrapper(viewContext, themeResId);
        }
        ta.recycle();

        if (name.equals(TAG_1995)) {
            // Let's party like it's 1995!
            return new BlinkLayout(viewContext, attrs);
        }

        if (DEBUG) System.out.println("******** Creating view: " + name);

        try {
            View view;
			//1.用户可以通过设置LayoutInflater的factory来自行解析view,默认的factor都为空
            if (mFactory2 != null) {
                view = mFactory2.onCreateView(parent, name, viewContext, attrs);
            } else if (mFactory != null) {
                view = mFactory.onCreateView(name, viewContext, attrs);
            } else {
                view = null;
            }

            if (view == null && mPrivateFactory != null) {
                view = mPrivateFactory.onCreateView(parent, name, viewContext, attrs);
            }
			//2.没有factory的时候通过调用onCreateView或者createView来创建view
            if (view == null) {
                final Object lastContext = mConstructorArgs[0];
                mConstructorArgs[0] = viewContext;
                try {
                    if (-1 == name.indexOf('.')) {  //3.内置View的解析
                        view = onCreateView(parent, name, attrs);
                    } else {  //4.自定义View的解析
                        view = createView(name, null, attrs);
                    }
                } finally {
                    mConstructorArgs[0] = lastContext;
                }
            }

            if (DEBUG) System.out.println("Created view is: " + view);
            return view;

        } catch (InflateException e) {
            throw e;

        } catch (ClassNotFoundException e) {
            InflateException ie = new InflateException(attrs.getPositionDescription()
                    + ": Error inflating class " + name);
            ie.initCause(e);
            throw ie;

        } catch (Exception e) {
            InflateException ie = new InflateException(attrs.getPositionDescription()
                    + ": Error inflating class " + name);
            ie.initCause(e);
            throw ie;
        }
    }
本方法的重点代码在代码2 3 4,我们通过判断tag的名字中是否包含“.”来判断一个view的系统原生态的view还是我们自定义view,因为系统的view当我们在xml文件中直接布局的时候,直接写名称,例如TextView,我们在布局中这样写
<TextView
        android:layout_width="wrap_content"
        android:layout_height="wrap_content"
        android:text="@string/hello_world" />
而自定义view我们要写类的全称,例如
<com.example.androidtest.MyButton
            android:id="@+id/btn"
            android:layout_width="match_parent"
            android:layout_height="wrap_content"
            android:text="事件传递测试"
那么系统为什么要这样做呢?
上文我们知道,我们的LayoutInflter其实是个抽象类,真正实现是PhoneLayoutInflater,在PhoneLayoutInflater中复写了onCreateView方法,我再将代码贴出来
 @Override protected View onCreateView(String name, AttributeSet attrs) throws ClassNotFoundException {
        for (String prefix : sClassPrefixList) {
            try {
                View view = createView(name, prefix, attrs);
                if (view != null) {
                    return view;
                }
            } catch (ClassNotFoundException e) {
                // In this case we want to let the base class take a crack
                // at it.
            }
        }

        return super.onCreateView(name, attrs);
    }
这里的sClassPrefixList就是包含3哥string的“android.widget” 和"android.webkit","android.app"数组,我们这里可以看出其实无论是系统内置的控件还是我们自定义的控件最后都是调用createView方法。在LayoutInflater解析的时候如果遇到只写类名的View,那么认为是内置的View控件,在onCreateView方法中会将sClassPrefixList中的前缀传递给createView方法,组成全类名,来解析View,如果是自定义View就必须写完整的路径,此时调用createView且前缀为null来进行解析。
看看createView方法是怎么做的
 /**
     * Low-level function for instantiating a view by name. This attempts to
     * instantiate a view class of the given <var>name</var> found in this
     * LayoutInflater's ClassLoader.
     *
     * <p>
     * There are two things that can happen in an error case: either the
     * exception describing the error will be thrown, or a null will be
     * returned. You must deal with both possibilities -- the former will happen
     * the first time createView() is called for a class of a particular name,
     * the latter every time there-after for that class name.
     *
     * @param name The full name of the class to be instantiated.
     * @param attrs The XML attributes supplied for this instance.
     *
     * @return View The newly instantiated view, or null.
     */

	//根据完整的类名 通过反射机制来构造View对象
    public final View createView(String name, String prefix, AttributeSet attrs)
            throws ClassNotFoundException, InflateException {
		//1.从缓存中获取构造函数
        Constructor<? extends View> constructor = sConstructorMap.get(name);
        Class<? extends View> clazz = null;

        try {
            Trace.traceBegin(Trace.TRACE_TAG_VIEW, name);
		//2.没有缓存构造函数
            if (constructor == null) {
                // Class not found in the cache, see if it's real, and try to add it
				//如果prefix不为空,那么构造完整的view路径,并且加载该类
                clazz = mContext.getClassLoader().loadClass(
                        prefix != null ? (prefix + name) : name).asSubclass(View.class);

                if (mFilter != null && clazz != null) {
                    boolean allowed = mFilter.onLoadClass(clazz);
                    if (!allowed) {
                        failNotAllowed(name, prefix, attrs);
                    }
                }
				//3.从clazz对象中获取构造函数
                constructor = clazz.getConstructor(mConstructorSignature);
				//4.将构造函数放入缓存
                sConstructorMap.put(name, constructor);
            } else {
                // If we have a filter, apply it to cached constructor
                if (mFilter != null) {
                    // Have we seen this name before?
                    Boolean allowedState = mFilterMap.get(name);
                    if (allowedState == null) {
                        // New class -- remember whether it is allowed
                        clazz = mContext.getClassLoader().loadClass(
                                prefix != null ? (prefix + name) : name).asSubclass(View.class);

                        boolean allowed = clazz != null && mFilter.onLoadClass(clazz);
                        mFilterMap.put(name, allowed);
                        if (!allowed) {
                            failNotAllowed(name, prefix, attrs);
                        }
                    } else if (allowedState.equals(Boolean.FALSE)) {
                        failNotAllowed(name, prefix, attrs);
                    }
                }
            }

            Object[] args = mConstructorArgs;
            args[1] = attrs;

            constructor.setAccessible(true);
			//5.通过反射来构造对象
            final View view = constructor.newInstance(args);
            if (view instanceof ViewStub) {
                // Use the same context when inflating ViewStub later.
                final ViewStub viewStub = (ViewStub) view;
                viewStub.setLayoutInflater(cloneInContext((Context) args[0]));
				}
            return view;

        } catch (NoSuchMethodException e) {
            InflateException ie = new InflateException(attrs.getPositionDescription()
                    + ": Error inflating class "
                    + (prefix != null ? (prefix + name) : name));
            ie.initCause(e);
            throw ie;

        } catch (ClassCastException e) {
            // If loaded class is not a View subclass
            InflateException ie = new InflateException(attrs.getPositionDescription()
                    + ": Class is not a View "
                    + (prefix != null ? (prefix + name) : name));
            ie.initCause(e);
            throw ie;
        } catch (ClassNotFoundException e) {
            // If loadClass fails, we should propagate the exception.
            throw e;
        } catch (Exception e) {
            InflateException ie = new InflateException(attrs.getPositionDescription()
                    + ": Error inflating class "
                    + (clazz == null ? "<unknown>" : clazz.getName()));
            ie.initCause(e);
            throw ie;
        } finally {
            Trace.traceEnd(Trace.TRACE_TAG_VIEW);
        }
    }
createView相对较简单,如果有前缀,那么构造View的完整路径,并且将该类加载到虚拟机中,然后将构造函数缓存起来,再通过构造函数来构建对象,最后将构建的View对象返回。
这里只是说了这些,还得回到我们最终的inflate方法中,无论这个方法中是否根元素是merger最后都会调用一个rInflate的方法,来看看这个方法
    /**
     * Recursive method used to descend down the xml hierarchy and instantiate
     * views, instantiate their children, and then call onFinishInflate().
     *
     * @param inheritContext Whether the root view should be inflated in its
     *            parent's context. This should be true when called inflating
     *            child views recursively, or false otherwise.
     */
    void rInflate(XmlPullParser parser, View parent, final AttributeSet attrs,
            boolean finishInflate, boolean inheritContext) throws XmlPullParserException,
            IOException {
		//1.获取树的深度,深度优先遍历
        final int depth = parser.getDepth();
        int type;
		//2 .挨个元素解析(用pull解析,类似dom树)
        while (((type = parser.next()) != XmlPullParser.END_TAG ||
                parser.getDepth() > depth) && type != XmlPullParser.END_DOCUMENT) {

            if (type != XmlPullParser.START_TAG) {
                continue;
            }

            final String name = parser.getName();

            if (TAG_REQUEST_FOCUS.equals(name)) {
                parseRequestFocus(parser, parent);
            } else if (TAG_TAG.equals(name)) {
                parseViewTag(parser, parent, attrs);
            } else if (TAG_INCLUDE.equals(name)) {
                if (parser.getDepth() == 0) {
                    throw new InflateException("<include /> cannot be the root element");
                }
                parseInclude(parser, parent, attrs, inheritContext);
            } else if (TAG_MERGE.equals(name)) {
                throw new InflateException("<merge /> must be the root element");
            } else {
			//3.根据元素名称解析 又回到createViewFromTag方法中
                final View view = createViewFromTag(parent, name, attrs, inheritContext);
                final ViewGroup viewGroup = (ViewGroup) parent;
                final ViewGroup.LayoutParams params = viewGroup.generateLayoutParams(attrs);
				//递归调用进行解析
                rInflate(parser, view, attrs, true, true);
				//将解析到的view添加到viewGroup中,也就是parent中
                viewGroup.addView(view, params);
            }
        }

        if (finishInflate) parent.onFinishInflate();
    }
rInflate方法通过深度优先遍历来构造视图树,每解析到一个view就进行递归调用,知道路径的最后一个元素,然后回朔将每个view添加到parent中。当Activity调用onResume方法之后,我们通过setContentView就会出现在我们的视野中。
根据我的博客关于activity的分析中,Activity最终显示在屏幕上会调用ActivityThread的handleResumeActivity方法,我们看看
  final void handleResumeActivity(IBinder token,
            boolean clearHide, boolean isForward, boolean reallyResume) {
        // If we are getting ready to gc after going to the background, well
        // we are back active so skip it.
        unscheduleGcIdler();
        mSomeActivitiesChanged = true;

        // TODO Push resumeArgs into the activity for consideration
        ActivityClientRecord r = performResumeActivity(token, clearHide);

        if (r != null) {
            final Activity a = r.activity;

            if (localLOGV) Slog.v(
                TAG, "Resume " + r + " started activity: " +
                a.mStartedActivity + ", hideForNow: " + r.hideForNow
                + ", finished: " + a.mFinished);

            final int forwardBit = isForward ?
                    WindowManager.LayoutParams.SOFT_INPUT_IS_FORWARD_NAVIGATION : 0;

            // If the window hasn't yet been added to the window manager,
            // and this guy didn't finish itself or start another activity,
            // then go ahead and add the window.
            boolean willBeVisible = !a.mStartedActivity;
            if (!willBeVisible) {
                try {
                    willBeVisible = ActivityManagerNative.getDefault().willActivityBeVisible(
                            a.getActivityToken());
                } catch (RemoteException e) {
                }
            }
            if (r.window == null && !a.mFinished && willBeVisible) {
                r.window = r.activity.getWindow();
                View decor = r.window.getDecorView();
                decor.setVisibility(View.INVISIBLE);
                WindowManager wm = a.getWindowManager();
                WindowManager.LayoutParams l = r.window.getAttributes();
                a.mDecor = decor;
                l.type = WindowManager.LayoutParams.TYPE_BASE_APPLICATION;
                l.softInputMode |= forwardBit;
                if (a.mVisibleFromClient) {
                    a.mWindowAdded = true;
                    wm.addView(decor, l);
                }

            // If the window has already been added, but during resume
            // we started another activity, then don't yet make the
            // window visible.
            } else if (!willBeVisible) {
                if (localLOGV) Slog.v(
                    TAG, "Launch " + r + " mStartedActivity set");
                r.hideForNow = true;
            }

            // Get rid of anything left hanging around.
            cleanUpPendingRemoveWindows(r);

            // The window is now visible if it has been added, we are not
            // simply finishing, and we are not starting another activity.
            if (!r.activity.mFinished && willBeVisible
                    && r.activity.mDecor != null && !r.hideForNow) {
                if (r.newConfig != null) {
                    if (DEBUG_CONFIGURATION) Slog.v(TAG, "Resuming activity "
                            + r.activityInfo.name + " with newConfig " + r.newConfig);
                    performConfigurationChanged(r.activity, r.newConfig);
                    freeTextLayoutCachesIfNeeded(r.activity.mCurrentConfig.diff(r.newConfig));
                    r.newConfig = null;
                }
                if (localLOGV) Slog.v(TAG, "Resuming " + r + " with isForward="
                        + isForward);
                WindowManager.LayoutParams l = r.window.getAttributes();
                if ((l.softInputMode
                        & WindowManager.LayoutParams.SOFT_INPUT_IS_FORWARD_NAVIGATION)
                        != forwardBit) {
                    l.softInputMode = (l.softInputMode
                            & (~WindowManager.LayoutParams.SOFT_INPUT_IS_FORWARD_NAVIGATION))
                            | forwardBit;
                    if (r.activity.mVisibleFromClient) {
                        ViewManager wm = a.getWindowManager();
                        View decor = r.window.getDecorView();
                        wm.updateViewLayout(decor, l);
                    }
                }
                r.activity.mVisibleFromServer = true;
                mNumVisibleActivities++;
                if (r.activity.mVisibleFromClient) {
                    r.activity.makeVisible();
                }
            }

            if (!r.onlyLocalRequest) {
                r.nextIdle = mNewActivities;
                mNewActivities = r;
                if (localLOGV) Slog.v(
                    TAG, "Scheduling idle handler for " + r);
                Looper.myQueue().addIdleHandler(new Idler());
            }
            r.onlyLocalRequest = false;

            // Tell the activity manager we have resumed.
            if (reallyResume) {
                try {
                    ActivityManagerNative.getDefault().activityResumed(token);
                } catch (RemoteException ex) {
                }
            }

        } else {
            // If an exception was thrown when trying to resume, then
            // just end this activity.
            try {
                ActivityManagerNative.getDefault()
                    .finishActivity(token, Activity.RESULT_CANCELED, null, false);
            } catch (RemoteException ex) {
            }
        }
    }
最终调用的是WindowManager的addView方法将我们的根视图DecView添加到window中的,而WindowManager是个抽象类,我们看他的具体实现类WindowManagerImpl
public final class WindowManagerImpl implements WindowManager {
    private final WindowManagerGlobal mGlobal = WindowManagerGlobal.getInstance();
    private final Display mDisplay;
    private final Window mParentWindow;

    public WindowManagerImpl(Display display) {
        this(display, null);
    }

    private WindowManagerImpl(Display display, Window parentWindow) {
        mDisplay = display;
        mParentWindow = parentWindow;
    }

    public WindowManagerImpl createLocalWindowManager(Window parentWindow) {
        return new WindowManagerImpl(mDisplay, parentWindow);
    }

    public WindowManagerImpl createPresentationWindowManager(Display display) {
        return new WindowManagerImpl(display, mParentWindow);
    }

    @Override
    public void addView(View view, ViewGroup.LayoutParams params) {
        mGlobal.addView(view, params, mDisplay, mParentWindow);
    }

    @Override
    public void updateViewLayout(View view, ViewGroup.LayoutParams params) {
        mGlobal.updateViewLayout(view, params);
    }

    @Override
    public void removeView(View view) {
        mGlobal.removeView(view, false);
    }

    @Override
    public void removeViewImmediate(View view) {
        mGlobal.removeView(view, true);
    }

    @Override
    public Display getDefaultDisplay() {
        return mDisplay;
    }
}
最后其实调用的是mGloble的addView方法,看看mGloble的类WindowManagerGloble中的addView方法
    public void addView(View view, ViewGroup.LayoutParams params,
            Display display, Window parentWindow) {
        if (view == null) {
            throw new IllegalArgumentException("view must not be null");
        }
        if (display == null) {
            throw new IllegalArgumentException("display must not be null");
        }
        if (!(params instanceof WindowManager.LayoutParams)) {
            throw new IllegalArgumentException("Params must be WindowManager.LayoutParams");
        }

        final WindowManager.LayoutParams wparams = (WindowManager.LayoutParams)params;
        if (parentWindow != null) {
            parentWindow.adjustLayoutParamsForSubWindow(wparams);
        } else {
            // If there's no parent and we're running on L or above (or in the
            // system context), assume we want hardware acceleration.
            final Context context = view.getContext();
            if (context != null
                    && context.getApplicationInfo().targetSdkVersion >= Build.VERSION_CODES.LOLLIPOP) {
                wparams.flags |= WindowManager.LayoutParams.FLAG_HARDWARE_ACCELERATED;
            }
        }

        ViewRootImpl root;
        View panelParentView = null;

        synchronized (mLock) {
            // Start watching for system property changes.
            if (mSystemPropertyUpdater == null) {
                mSystemPropertyUpdater = new Runnable() {
                    @Override public void run() {
                        synchronized (mLock) {
                            for (int i = mRoots.size() - 1; i >= 0; --i) {
                                mRoots.get(i).loadSystemProperties();
                            }
                        }
                    }
                };
                SystemProperties.addChangeCallback(mSystemPropertyUpdater);
            }

            int index = findViewLocked(view, false);
            if (index >= 0) {
                if (mDyingViews.contains(view)) {
                    // Don't wait for MSG_DIE to make it's way through root's queue.
                    mRoots.get(index).doDie();
                } else {
                    throw new IllegalStateException("View " + view
                            + " has already been added to the window manager.");
                }
                // The previous removeView() had not completed executing. Now it has.
            }

            // If this is a panel window, then find the window it is being
            // attached to for future reference.
            if (wparams.type >= WindowManager.LayoutParams.FIRST_SUB_WINDOW &&
                    wparams.type <= WindowManager.LayoutParams.LAST_SUB_WINDOW) {
                final int count = mViews.size();
                for (int i = 0; i < count; i++) {
                    if (mRoots.get(i).mWindow.asBinder() == wparams.token) {
                        panelParentView = mViews.get(i);
                    }
                }
            }
			//在这里初始化了ViewRootImpl
            root = new ViewRootImpl(view.getContext(), display);
			//设置布局参数
            view.setLayoutParams(wparams);

            mViews.add(view);
            mRoots.add(root);
            mParams.add(wparams);
        }

        // do this last because it fires off messages to start doing things
        try {
		//将我们view设置到我们的视图中
            root.setView(view, wparams, panelParentView);
        } catch (RuntimeException e) {
            // BadTokenException or InvalidDisplayException, clean up.
            synchronized (mLock) {
                final int index = findViewLocked(view, false);
                if (index >= 0) {
                    removeViewLocked(index, true);
                }
            }
            throw e;
        }
    }
继续跟进root.setView(view, wparams, panelParentView);其实他是ViewRootImpl的一个实现方法
**
 * We have one child
 */
public void setView(View view, WindowManager.LayoutParams attrs, View panelParentView) {
    synchronized (this) {
        if (mView == null) {
            mView = view;
            ...
            mAdded = true;
            int res; /* = WindowManagerImpl.ADD_OKAY; */
            // Schedule the first layout -before- adding to the window
            // manager, to make sure we do the relayout before receiving
            // any other events from the system.
            requestLayout();
            ...
            if ((mWindowAttributes.inputFeatures
                        & WindowManager.LayoutParams.INPUT_FEATURE_NO_INPUT_CHANNEL) == 0) {
                    mInputChannel = new InputChannel();
                }
                try {
                    mOrigWindowType = mWindowAttributes.type;
                    mAttachInfo.mRecomputeGlobalAttributes = true;
                    collectViewAttributes();
                    res = mWindowSession.addToDisplay(mWindow, mSeq, mWindowAttributes,
                            getHostVisibility(), mDisplay.getDisplayId(),
                            mAttachInfo.mContentInsets, mInputChannel);
                } catch (RemoteException e) {
                    mAdded = false;
                    mView = null;
                    mAttachInfo.mRootView = null;
                    mInputChannel = null;
                    mFallbackEventHandler.setView(null);
                    unscheduleTraversals();
                    setAccessibilityFocus(null, null);
                    throw new RuntimeException("Adding window failed", e);
                } finally {
                    if (restore) {
                        attrs.restore();
                }
            }
        }
    }
}
上述操作执行完成之后,ViewRoot类的成员函数setView就可以将成员变量mAdded的值设置为true了,表示当前正在处理的一个ViewRoot对象已经关联好一个View对象了。接下来,ViewRoot类的成员函数setView还需要执行两个操作:
- 调用
ViewRootImpl类的另外一个成员函数requestLayout来请求对应用程序窗口视图的UI作第一次布局。 - 调用
ViewRootImpl类的静态成员变量sWindowSession所描述的一个类型为Session的Binder代理对象的成员函数add来请求WindowManagerService增加一个WindowState对象,以便可以用来描述当前正在处理的一个ViewRoot所关联的一个应用程序窗口。
我们继续追踪 ViewRootImpl 类的 requestLayout 成员方法
  @Override
    public void requestLayout() {
        if (!mHandlingLayoutInLayoutRequest) {
            checkThread();  //检查是否是主线程
            mLayoutRequested = true;
            scheduleTraversals();
        }
    }
   void scheduleTraversals() {
        if (!mTraversalScheduled) {
            mTraversalScheduled = true;
            mTraversalBarrier = mHandler.getLooper().postSyncBarrier();
            mChoreographer.postCallback(
                    Choreographer.CALLBACK_TRAVERSAL, mTraversalRunnable, null);
            if (!mUnbufferedInputDispatch) {
                scheduleConsumeBatchedInput();
            }
            notifyRendererOfFramePending();
        }
    }
我们继续跟进mChoreographer中进去看看postCallback的具体实现
   public void postCallback(int callbackType, Runnable action, Object token) {
        postCallbackDelayed(callbackType, action, token, 0);
    }
    /**
     * Posts a callback to run on the next frame after the specified delay.
     * <p>
     * The callback runs once then is automatically removed.
     * </p>
     *
     * @param callbackType The callback type.
     * @param action The callback action to run during the next frame after the specified delay.
     * @param token The callback token, or null if none.
     * @param delayMillis The delay time in milliseconds.
     *
     * @see #removeCallback
     * @hide
     */
    public void postCallbackDelayed(int callbackType,
            Runnable action, Object token, long delayMillis) {
        if (action == null) {
            throw new IllegalArgumentException("action must not be null");
        }
        if (callbackType < 0 || callbackType > CALLBACK_LAST) {
            throw new IllegalArgumentException("callbackType is invalid");
        }

        postCallbackDelayedInternal(callbackType, action, token, delayMillis);
    }

    private void postCallbackDelayedInternal(int callbackType,
            Object action, Object token, long delayMillis) {
        if (DEBUG) {
            Log.d(TAG, "PostCallback: type=" + callbackType
                    + ", action=" + action + ", token=" + token
                    + ", delayMillis=" + delayMillis);
        }

        synchronized (mLock) {
            final long now = SystemClock.uptimeMillis();
            final long dueTime = now + delayMillis;
            mCallbackQueues[callbackType].addCallbackLocked(dueTime, action, token);

            if (dueTime <= now) {
                scheduleFrameLocked(now);
            } else {
                Message msg = mHandler.obtainMessage(MSG_DO_SCHEDULE_CALLBACK, action);
                msg.arg1 = callbackType;
                msg.setAsynchronous(true);
                mHandler.sendMessageAtTime(msg, dueTime);
            }
        }
    }
其实就是调用了handler发送了一个runnable对象,那我们回到那个runnable对象中去看看究竟做了些什么
 final class TraversalRunnable implements Runnable {
        @Override
        public void run() {
            doTraversal();
        }
    }
他是ViewRootImpl的一个内部类,run方法就做了一件事,执行doTraversal方法
void doTraversal() {
if (mTraversalScheduled) {
mTraversalScheduled = false;
mHandler.getLooper().removeSyncBarrier(mTraversalBarrier);
if (mProfile) {
Debug.startMethodTracing("ViewAncestor");
}
Trace.traceBegin(Trace.TRACE_TAG_VIEW, "performTraversals");
try {
performTraversals();
} finally {
Trace.traceEnd(Trace.TRACE_TAG_VIEW);
}
if (mProfile) {
Debug.stopMethodTracing();
mProfile = false;
}
}
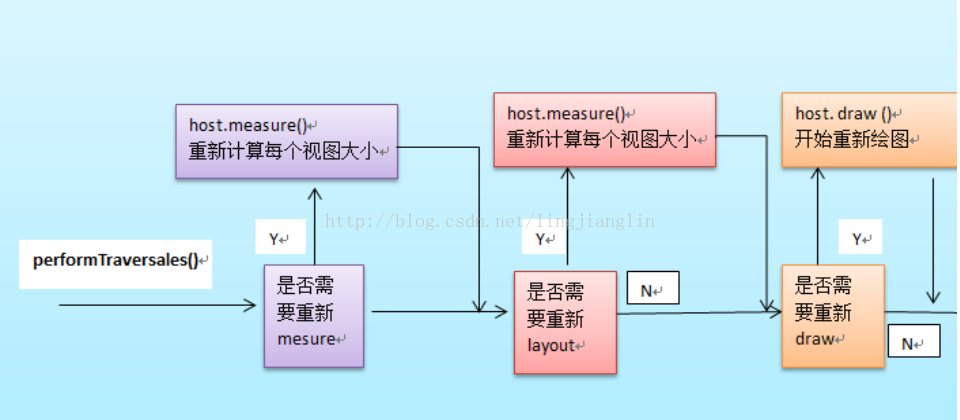
}哎呦,追踪了这么久,终于看到了我们常说的视图绘制首先执行的方法performTraversals方法了,里面做了View 测量,定位,绘制,其中主要的方法是performMeasure()(测量),performLayout(),(布局),performDraw()(绘制)
这个performTraversals主要就是做了我们常用的自定义控件的三部曲onMeasue,onLayout,onDraw,方法太长就不解析了,只要知道这个方法具体干什么就ok了。


 315
315


 被折叠的 条评论
为什么被折叠?
被折叠的 条评论
为什么被折叠?
 到【灌水乐园】发言


