


android studio升级到stable 2.2之后,发现还有了个ConstraintLayout。看名字就是约束布局,用各种约束来确定widget的展示。该ConstraintLayout最低支持API 9。
看preview,也是各种线条,感觉很高端的样子。。。
下面看下怎么用:
dependencies {
    compile 'com.android.support.constraint:constraint-layout:1.0.0-alpha9'
}
写个简单的布局:
<?xml version="1.0" encoding="utf-8"?>
<android.support.constraint.ConstraintLayout
    xmlns:android="http://schemas.android.com/apk/res/android"
    xmlns:app="http://schemas.android.com/apk/res-auto"
    xmlns:tools="http://schemas.android.com/tools"
    android:id="@+id/lay_root"
    android:layout_width="match_parent"
    android:layout_height="match_parent">

    <Button
        android:id="@+id/btn1"
        android:layout_width="wrap_content"
        android:layout_height="wrap_content"
        android:text="btn1"
        app:layout_constraintLeft_toLeftOf="parent"
        app:layout_constraintRight_toRightOf="parent"/>
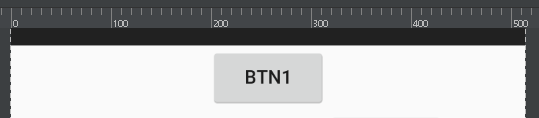
</android.support.constraint.ConstraintLayout>上面这段布局代码的效果就是button水平居中在整个屏幕(垂直不居中)。这里看到有两个属性app:layout_constraintLeft_toLeftOf和app:layout_constraintRight_toRightOf,稍后会解释。
首先来看下一些主要的属性:
相对位置属性
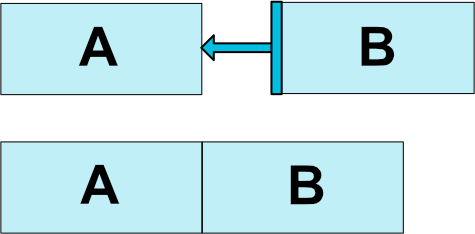
如果要将button b放在button a的右边,并且相邻,布局可以这样写:
<Button android:id="@+id/buttonA" ... />

<Button android:id="@+id/buttonB" ...
        app:layout_constraintLeft_toRightOf="@+id/buttonA" />
layout_constraintLeft_toRightOf这个属性的意思是,buttonB的左边缘,贴着buttonA的右边缘。注意这个toRightOf这个和以往的不一样哦!!!
还记得在relativeLayout中子控件有个属性叫android:layout_toRightOf,这两个其实是不一样的意思。虽然这两个效果都是一样,都是将button b放在button a的右边,但是意义不一样。除了layout_constraintLeft_toRightOf以外,还有其他类似属性:
layout_constraintLeft_toLeftOf
layout_constraintLeft_toRightOf
layout_constraintRight_toLeftOf
layout_constraintRight_toRightOf
layout_constraintTop_toTopOf
layout_constraintTop_toBottomOf
layout_constraintBottom_toTopOf
layout_constraintBottom_toBottomOf
layout_constraintBaseline_toBaselineOf
layout_constraintStart_toEndOf
layout_constraintStart_toStartOf
layout_constraintEnd_toStartOf
layout_constraintEnd_toEndOf
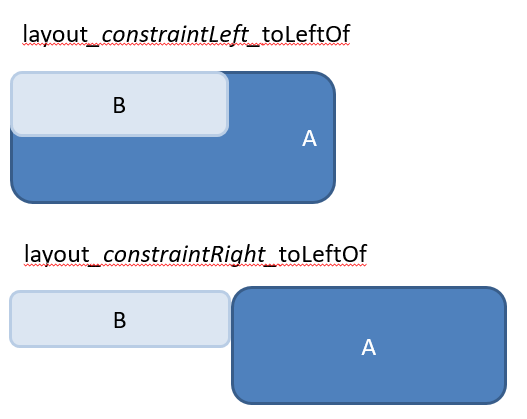
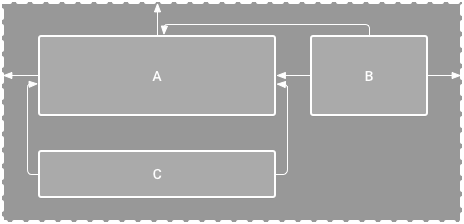
可以看到layout_constraintLeft_toLeftOf和layout_constraintRight_toLeftOf其实很类似,只是在toLeftOf之前的不一样。如果按照以往relativeLayout理解的话,只是把控件放在左边而已。但其实这两种是不一样,看下效果:
其实这些个属性可以这么拆分:
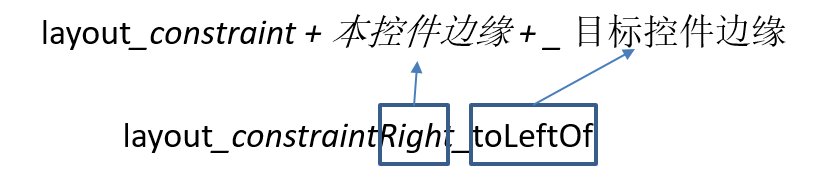
所以刚刚说了RelativeLayout的toRightOf和ConstraintLayout的Left_toRightOf是不一样的。RelativeLayout中是将控件作为一个整体,而ConstraintLayout是对齐控件四周的边缘。
理解了上面的问题后再来看一种“不可能的情况”。上代码:
<Button
        android:id="@+id/btn1"
        android:layout_width="wrap_content"
        android:layout_height="wrap_content"
        app:layout_constraintLeft_toLeftOf="parent"
        app:layout_constraintRight_toRightOf="parent"
        android:text="btn1"/>
parent代表的是父控件,也就是ConstraintLayout。看上面的代码的意思是,这个按钮的左边距要贴着父控件的左边距,按钮的右边距贴着父控件的右边距。但是现在父控件是占满整个屏幕的,而button的大小又是wrap_content,也不可能将button拉大,那这怎么办呢?
其实这种情况就会让该按钮在父控件中水平居中(垂直不居中)。
看完上述的应该对这些个属性比较理解了。
Margins when connected to a GONE widget
原来接触过android:layout_marginLeft等属性,是用来控制该控件与周围控件的间隔大小。而在ConstraintLayout中多了一些属性,看标题就知道当你周围对齐的目标控件为gone的时候,所设置的margin。例如:
<Button
android:id="@+id/btn1"
android:layout_width="wrap_content"
android:layout_height="wrap_content"
android:visibility="visible"
android:text="btn1"/>
<Button
android:id="@+id/btn2"
android:layout_width="wrap_content"
android:layout_height="wrap_content"
android:text="btn2"
app:layout_constraintLeft_toRightOf="@+id/btn1"
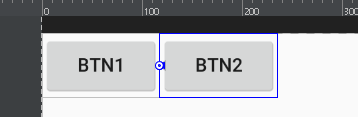
app:layout_goneMarginLeft="40dp"/>当btn1可见时,效果如下:
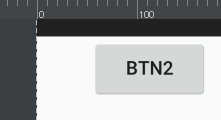
当btn1设为gone时,效果如下:
边距比例
刚刚说到一种情况就是当控件水平居中的时候,那么如何控制该控件在父控件居中的比例呢?
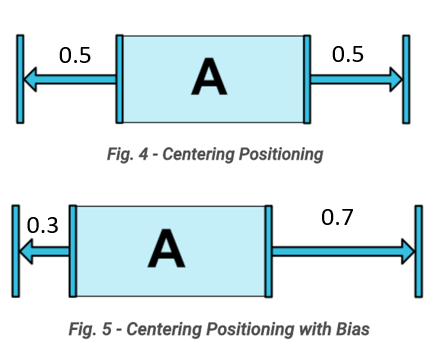
像上图的情况可以通过控制layout_constraintHorizontal_bias该属性:
<android.support.constraint.ConstraintLayout ...>
             <Button android:id="@+id/button" ...
                 app:layout_constraintHorizontal_bias="0.3"
                 app:layout_constraintLeft_toLeftOf="parent"
                 app:layout_constraintRight_toRightOf="parent/>
         </>
长宽比例
如果你想控制控件的长宽比例的话,可以通过设置app:layout_constraintDimensionRatio该属性。
以往设置控件大小的话都是通过设置layout_width和layout_height。如果给这两个属性设置0dp的话,和match_parent是一样的效果。
如果你想设置控件的长宽比例的话,需要设置比例,通过app:layout_constraintDimensionRatio = “1:1”,比例的格式是“width:height”。当然这只是设置了比例,你还需要指定长(或宽)有固定大小,例如:
<Button android:layout_width="wrap_content"
                   android:layout_height="0dp"
                   app:layout_constraintDimensionRatio="1:1" />
这种情况的话,button的宽度根据button的内容而定,而高度的话,会设置成与宽度一样大小。而不固定的一方一定要设置成0dp,这里height根据width而改变,则需要设置成0dp。
在google官网中还可以给该属性设置app:layout_constraintDimensionRatio=”H,16:9”,但是我还是没搞懂。。。。如果读者明白的话,欢迎留言。
https://developer.android.com/reference/android/support/constraint/ConstraintLayout.html#DimensionConstraints
其他:
需要注意的是,任何在ConstraintLayout中的子控件,都要给控件加上constraint,如果不加,则默认绘制在constraintLayout坐标(0,0)的地方。
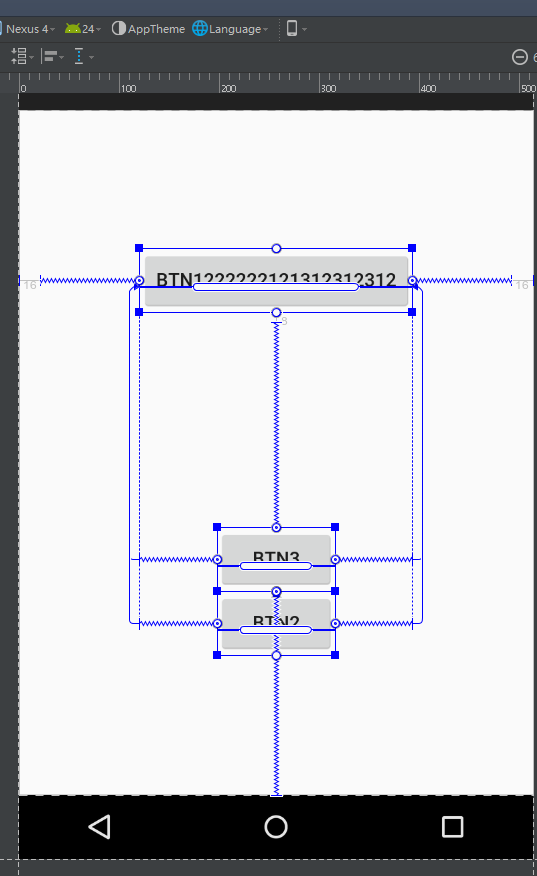
目前AndroidStudio的布局编辑器已经和好的支持ConstraintLayout了,可以轻松的在控件的某个边缘点击拖动鼠标,关联到另一个控件的某个边缘。十分方便,不需要依赖xml布局的编写。需要注意的是,当你用鼠标随意拖动控件的时候,控件会停留在鼠标离开的位置,即使这个控件没有任何的约束。所以该控件可能停留在布局的任何一个地方,但是刚刚说过了,一个控件在布局上无任何的约束,会画在ConstraintLayout坐标(0,0)的位置,所以preview中展示的样子,不一定是真实运行起来的样子!!!!!
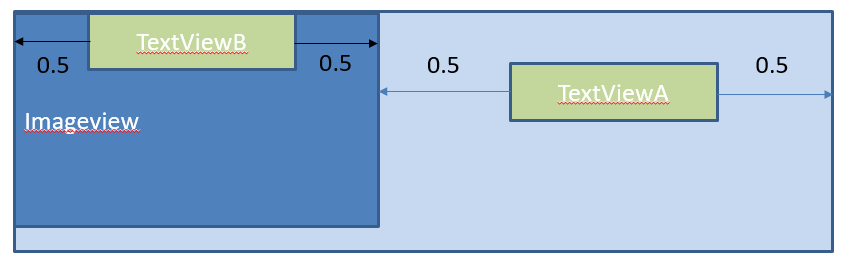
例如这个例子:
该图中imageView左边关联着parent的左边缘,上边缘关联着parent的上边缘,textViewA的左边缘贴着imageview的右边缘,上边缘则和ImageView的上边缘水平,右边缘则关联parent的右边缘。textViewB的话左边缘关联着imageview的左边缘,右边缘则关联imageview的右边缘。
那么实际上运行起来的样子也是长这个样子么?当然不是。
textViewB其实是显示在Imageview上面,并且水平居中在ImageView上,因为只给TextViewB指定了水平的位置,但是却没有指定垂直的坐标,结果是长这个样子:
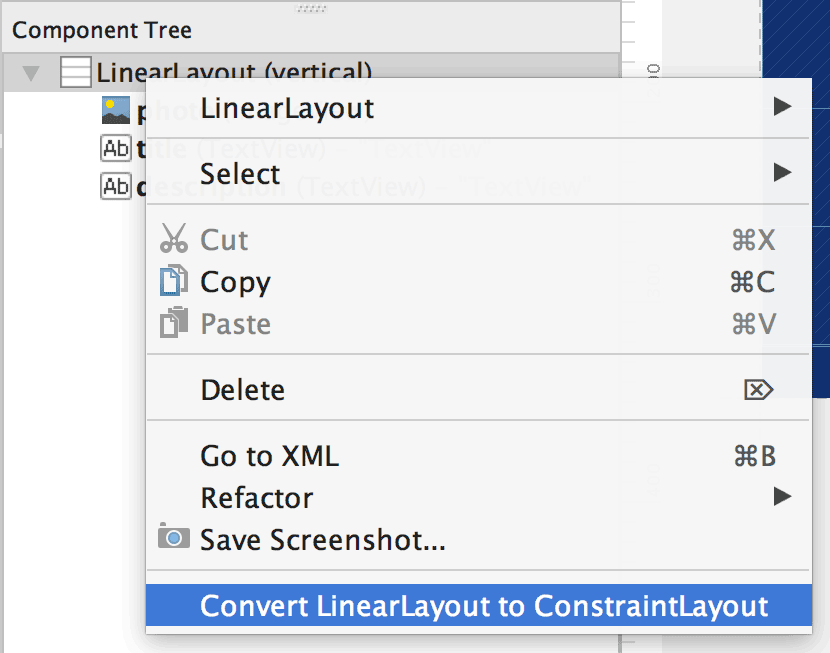
如何将原来的RelativeLayout或者LinearLayout转换成ConstraintLayout


 1128
1128


 被折叠的 条评论
为什么被折叠?
被折叠的 条评论
为什么被折叠?
 到【灌水乐园】发言


