


消息中间件之间可以细度: http://www.cnblogs.com/charlesblc/p/6058799.html
消息队列-推/拉模式学习 & ActiveMQ及JMS学习:https://www.cnblogs.com/charlesblc/p/6045238.html
消息队列之观察者模式可参考:https://www.cnblogs.com/taotingkai/p/6645436.html
消息队列使用的四大场景
http://blog.csdn.net/cws1214/article/details/52922267
如果是使用的linux下单间连接activeMq的时候记得关闭防火墙测试
原因:防火墙未关闭,必须关闭防火墙,设置端口都不好使,必须关闭。
解决办法:关闭防火墙,一切ok!
下面说一下我们为什么要使用消息中间件有哪些优点和好处:
1. 解耦
在项目启动之初来预测将来项目会碰到什么需求,是极其困难的。消息队列在处理过程中间插入了一个隐含的、基于数据的接口层,两边的处理过程都要实现这一接口。这允许你独立的扩展或修改两边的处理过程,只要确保它们遵守同样的接口约束。
2. 冗余
有时在处理数据的时候处理过程会失败。除非数据被持久化,否则将永远丢失。消息队列把数据进行持久化直到它们已经被完全处理,通过这一方式规避了数据丢失风险。在被许多消息队列所采用的"插入-获取-删除"范式中,在把一个消息从队列中删除之前,需要你的处理过程明确的指出该消息已经被处理完毕,确保你的数据被安全的保存直到你使用完毕。
3. 扩展性
因为消息队列解耦了你的处理过程,所以增大消息入队和处理的频率是很容易的;只要另外增加处理过程即可。不需要改变代码、不需要调节参数。扩展就像调大电力按钮一样简单。
4. 灵活性 & 峰值处理能力
当你的应用上了Hacker News的首页,你将发现访问流量攀升到一个不同寻常的水平。在访问量剧增的情况下,你的应用仍然需要继续发挥作用,但是这样的突发流量并不常见;如果为 以能处理这类峰值访问为标准来投入资源随时待命无疑是巨大的浪费。使用消息队列能够使关键组件顶住增长的访问压力,而不是因为超出负荷的请求而完全崩溃。 请查看我们关于峰值处理能力的博客文章了解更多此方面的信息。
5. 可恢复性
当体系的一部分组件失效,不会影响到整个系统。消息队列降低了进程间的耦合度,所以即使一个处理消息的进程挂掉,加入队列中的消息仍然可以在系统恢复后被处理。而这种允许重试或者延后处理请求的能力通常是造就一个略感不便的用户和一个沮丧透顶的用户之间的区别。
6. 送达保证
消息队列提供的冗余机制保证了消息能被实际的处理,只要一个进程读取了该队列即可。在此基础上,IronMQ提供了一个"只送达一次"保证。无论有多少进 程在从队列中领取数据,每一个消息只能被处理一次。这之所以成为可能,是因为获取一个消息只是"预定"了这个消息,暂时把它移出了队列。除非客户端明确的 表示已经处理完了这个消息,否则这个消息会被放回队列中去,在一段可配置的时间之后可再次被处理。
7.排序保证
在许多情况下,数据处理的顺序都很重要。消息队列本来就是排序的,并且能保证数据会按照特定的顺序来处理。IronMO保证消息浆糊通过FIFO(先进先出)的顺序来处理,因此消息在队列中的位置就是从队列中检索他们的位置。
8.缓冲
在任何重要的系统中,都会有需要不同的处理时间的元素。例如,加载一张图片比应用过滤器花费更少的时间。消息队列通过一个缓冲层来帮助任务最高效率的执行--写入队列的处理会尽可能的快速,而不受从队列读的预备处理的约束。该缓冲有助于控制和优化数据流经过系统的速度。
9. 理解数据流
在一个分布式系统里,要得到一个关于用户操作会用多长时间及其原因的总体印象,是个巨大的挑战。消息系列通过消息被处理的频率,来方便的辅助确定那些表现不佳的处理过程或领域,这些地方的数据流都不够优化。
10. 异步通信
很多时候,你不想也不需要立即处理消息。消息队列提供了异步处理机制,允许你把一个消息放入队列,但并不立即处理它。你想向队列中放入多少消息就放多少,然后在你乐意的时候再去处理它们。
ActiveMQ官网下载地址:http://activemq.apache.org/download.html
ActiveMQ 提供了Windows 和Linux、Unix 等几个版本,楼主这里选择了Linux 版本下进行开发。
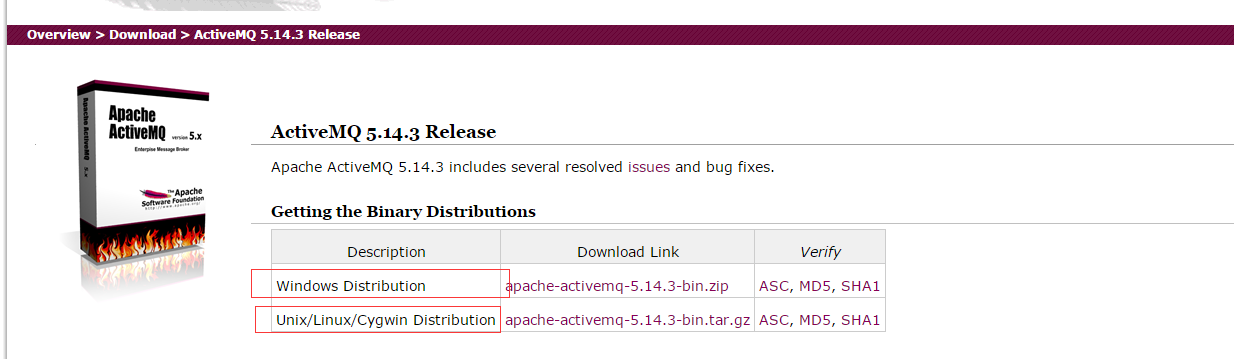
下载完安装包,解压之后的目录:

从它的目录来说,还是很简单的:
- bin存放的是脚本文件
- conf存放的是基本配置文件
- data存放的是日志文件
- docs存放的是说明文档
- examples存放的是简单的实例
- lib存放的是activemq所需jar包
- webapps用于存放项目的目录
2、启动ActiveMQ
进入到ActiveMQ 安装目录的Bin 目录,linux 下输入 ./activemq start 启动activeMQ 服务。
输入命令之后,会提示我们创建了一个进程IP 号,这时候说明服务已经成功启动了。

ActiveMQ默认启动时,启动了内置的jetty服务器,提供一个用于监控ActiveMQ的admin应用。
admin:http://127.0.0.1:8161/admin/
我们在浏览器打开链接之后输入账号密码(这里和tomcat 服务器类似)
默认账号:admin
密码:admin
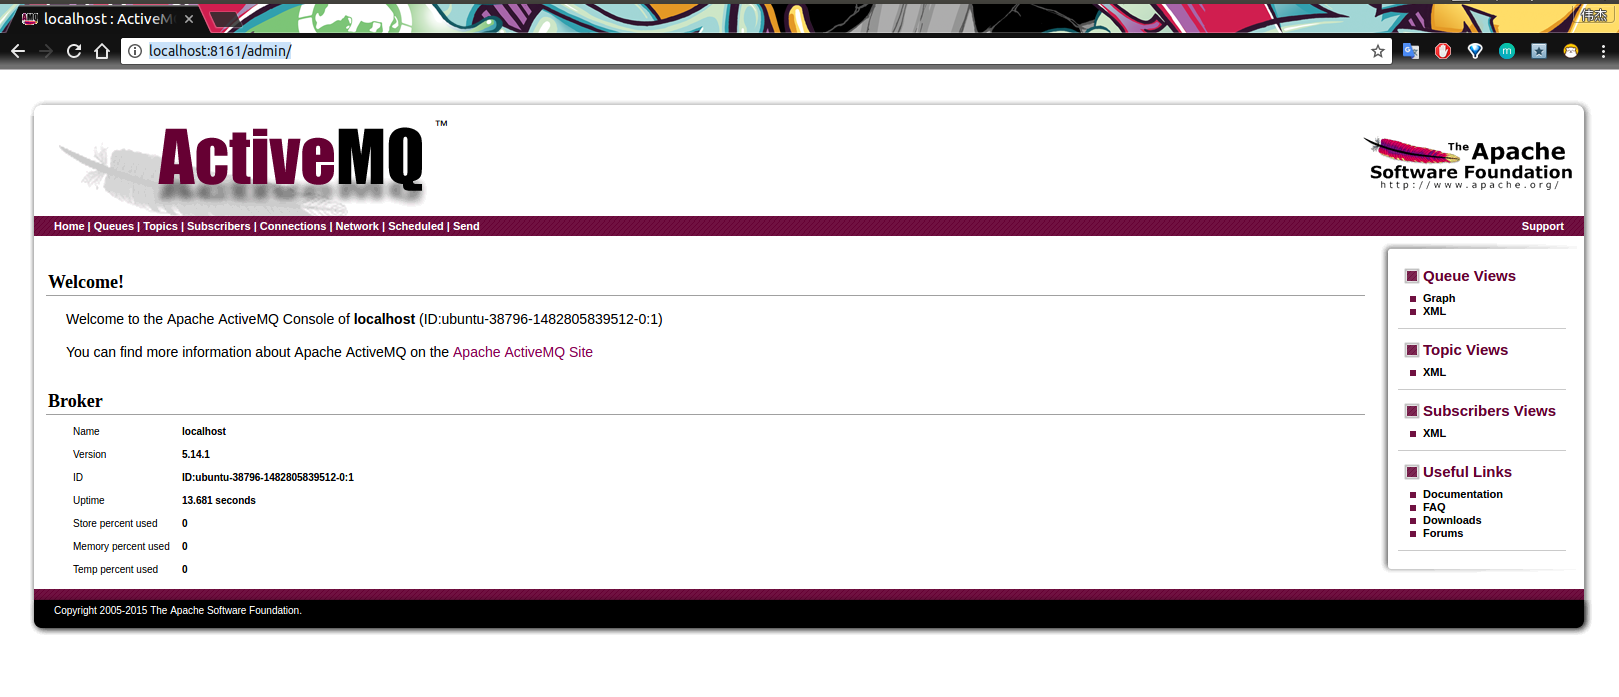
到这里为止,ActiveMQ 服务端就启动完毕了。
ActiveMQ 在linux 下的终止命令是 ./activemq stop
3、创建一个ActiveMQ工程
项目目录结构:
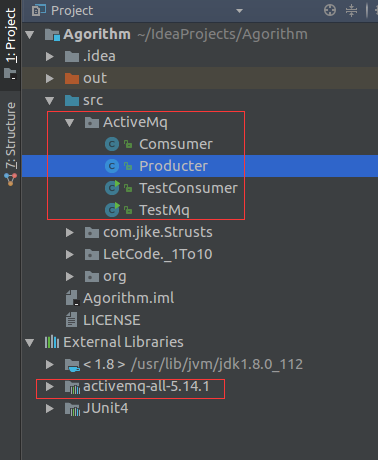
上述在官网下载ActiveMq 的时候,我们可以在目录下看到一个jar包:

这个jar 包就是我们需要在项目中进行开发中使用到的相关依赖。
3.1 创建生产者

public class Producter {

    //ActiveMq 的默认用户名
    private static final String USERNAME = ActiveMQConnection.DEFAULT_USER;
    //ActiveMq 的默认登录密码
    private static final String PASSWORD = ActiveMQConnection.DEFAULT_PASSWORD;
    //ActiveMQ 的链接地址
    private static final String BROKEN_URL = ActiveMQConnection.DEFAULT_BROKER_URL;

    AtomicInteger count = new AtomicInteger(0);
    //链接工厂
    ConnectionFactory connectionFactory;
    //链接对象
    Connection connection;
    //事务管理
    Session session;
    ThreadLocal<MessageProducer> threadLocal = new ThreadLocal<>();

    public void init(){
        try {
            //创建一个链接工厂
            connectionFactory = new ActiveMQConnectionFactory(USERNAME,PASSWORD,BROKEN_URL);
            //从工厂中创建一个链接
            connection  = connectionFactory.createConnection();
            //开启链接
            connection.start();
            //创建一个事务(这里通过参数可以设置事务的级别)
            session = connection.createSession(true,Session.SESSION_TRANSACTED);
        } catch (JMSException e) {
            e.printStackTrace();
        }
    }

    public void sendMessage(String disname){
        try {
            //创建一个消息队列
            Queue queue = session.createQueue(disname);
            //消息生产者
            MessageProducer messageProducer = null;
            if(threadLocal.get()!=null){
                messageProducer = threadLocal.get();
            }else{
                messageProducer = session.createProducer(queue);
                threadLocal.set(messageProducer);
            }
           while(true){
                Thread.sleep(1000);
                int num = count.getAndIncrement();
                //创建一条消息
                TextMessage msg = session.createTextMessage(Thread.currentThread().getName()+
                        "productor:我是大帅哥,我现在正在生产东西!,count:"+num);
                System.out.println(Thread.currentThread().getName()+
                        "productor:我是大帅哥,我现在正在生产东西!,count:"+num);
                //发送消息
                messageProducer.send(msg);
                //提交事务
                session.commit();
            }
        } catch (JMSException e) {
            e.printStackTrace();
        } catch (InterruptedException e) {
            e.printStackTrace();
        }
    }
}
3.2 创建消费者
public class Comsumer {

    private static final String USERNAME = ActiveMQConnection.DEFAULT_USER;

    private static final String PASSWORD = ActiveMQConnection.DEFAULT_PASSWORD;

    private static final String BROKEN_URL = ActiveMQConnection.DEFAULT_BROKER_URL;

    ConnectionFactory connectionFactory;

    Connection connection;

    Session session;

    ThreadLocal<MessageConsumer> threadLocal = new ThreadLocal<>();
    AtomicInteger count = new AtomicInteger();

    public void init(){
        try {
            connectionFactory = new ActiveMQConnectionFactory(USERNAME,PASSWORD,BROKEN_URL);
            connection  = connectionFactory.createConnection();
            connection.start();
            session = connection.createSession(false,Session.AUTO_ACKNOWLEDGE);
        } catch (JMSException e) {
            e.printStackTrace();
        }
    }


    public void getMessage(String disname){
        try {
            Queue queue = session.createQueue(disname);
            MessageConsumer consumer = null;

            if(threadLocal.get()!=null){
                consumer = threadLocal.get();
            }else{
                consumer = session.createConsumer(queue);
                threadLocal.set(consumer);
            }
            while(true){
                Thread.sleep(1000);
                TextMessage msg = (TextMessage) consumer.receive();
                if(msg!=null) {
                    msg.acknowledge();
                    System.out.println(Thread.currentThread().getName()+": Consumer:我是消费者,我正在消费Msg"+msg.getText()+"--->"+count.getAndIncrement());
                }else {
                    break;
                }
            }
        } catch (JMSException e) {
            e.printStackTrace();
        } catch (InterruptedException e) {
            e.printStackTrace();
        }
    }
}
4、运行ActiveMQ项目
4.1 生产者开始生产消息
public class TestMq {
    public static void main(String[] args){
        Producter producter = new Producter();
        producter.init();
        TestMq testMq = new TestMq();
        try {
            Thread.sleep(1000);
        } catch (InterruptedException e) {
            e.printStackTrace();
        }
        //Thread 1
        new Thread(testMq.new ProductorMq(producter)).start();
        //Thread 2
        new Thread(testMq.new ProductorMq(producter)).start();
        //Thread 3
        new Thread(testMq.new ProductorMq(producter)).start();
        //Thread 4
        new Thread(testMq.new ProductorMq(producter)).start();
        //Thread 5
        new Thread(testMq.new ProductorMq(producter)).start();
    }

    private class ProductorMq implements Runnable{
        Producter producter;
        public ProductorMq(Producter producter){
            this.producter = producter;
        }

        @Override
        public void run() {
            while(true){
                try {
                    producter.sendMessage("Jaycekon-MQ");
                    Thread.sleep(10000);
                } catch (InterruptedException e) {
                    e.printStackTrace();
                }
            }
        }
    }
}
运行结果:
 INFO | Successfully connected to tcp://localhost:61616
Thread-6productor:我是大帅哥,我现在正在生产东西!,count:0
Thread-4productor:我是大帅哥,我现在正在生产东西!,count:1
Thread-2productor:我是大帅哥,我现在正在生产东西!,count:3
Thread-5productor:我是大帅哥,我现在正在生产东西!,count:2
Thread-3productor:我是大帅哥,我现在正在生产东西!,count:4
Thread-6productor:我是大帅哥,我现在正在生产东西!,count:5
Thread-3productor:我是大帅哥,我现在正在生产东西!,count:6
Thread-5productor:我是大帅哥,我现在正在生产东西!,count:7
Thread-2productor:我是大帅哥,我现在正在生产东西!,count:8
Thread-4productor:我是大帅哥,我现在正在生产东西!,count:9
Thread-6productor:我是大帅哥,我现在正在生产东西!,count:10
Thread-3productor:我是大帅哥,我现在正在生产东西!,count:11
Thread-5productor:我是大帅哥,我现在正在生产东西!,count:12
Thread-2productor:我是大帅哥,我现在正在生产东西!,count:13
Thread-4productor:我是大帅哥,我现在正在生产东西!,count:14
Thread-6productor:我是大帅哥,我现在正在生产东西!,count:15
Thread-3productor:我是大帅哥,我现在正在生产东西!,count:16
Thread-5productor:我是大帅哥,我现在正在生产东西!,count:17
Thread-2productor:我是大帅哥,我现在正在生产东西!,count:18
Thread-4productor:我是大帅哥,我现在正在生产东西!,count:19

4.2 消费者开始消费消息
public class TestConsumer {
    public static void main(String[] args){
        Comsumer comsumer = new Comsumer();
        comsumer.init();
        TestConsumer testConsumer = new TestConsumer();
        new Thread(testConsumer.new ConsumerMq(comsumer)).start();
        new Thread(testConsumer.new ConsumerMq(comsumer)).start();
        new Thread(testConsumer.new ConsumerMq(comsumer)).start();
        new Thread(testConsumer.new ConsumerMq(comsumer)).start();
    }

    private class ConsumerMq implements Runnable{
        Comsumer comsumer;
        public ConsumerMq(Comsumer comsumer){
            this.comsumer = comsumer;
        }

        @Override
        public void run() {
            while(true){
                try {
                    comsumer.getMessage("Jaycekon-MQ");
                    Thread.sleep(10000);
                } catch (InterruptedException e) {
                    e.printStackTrace();
                }
            }
        }
    }
}
运行结果:
|
1
2
3
4
5
6
7
8
9
10
11
12
13
14
15
16
17
18
19
20
21
22
|
INFO | Successfully connected to tcp:
//localhost:61616
Thread-2: Consumer:我是消费者,我正在消费MsgThread-5productor:我是大帅哥,我现在正在生产东西!,count:4--->0
Thread-3: Consumer:我是消费者,我正在消费MsgThread-4productor:我是大帅哥,我现在正在生产东西!,count:36--->1
Thread-4: Consumer:我是消费者,我正在消费MsgThread-3productor:我是大帅哥,我现在正在生产东西!,count:38--->2
Thread-5: Consumer:我是消费者,我正在消费MsgThread-6productor:我是大帅哥,我现在正在生产东西!,count:37--->3
Thread-2: Consumer:我是消费者,我正在消费MsgThread-6productor:我是大帅哥,我现在正在生产东西!,count:2--->4
Thread-3: Consumer:我是消费者,我正在消费MsgThread-5productor:我是大帅哥,我现在正在生产东西!,count:40--->5
Thread-4: Consumer:我是消费者,我正在消费MsgThread-6productor:我是大帅哥,我现在正在生产东西!,count:42--->6
Thread-5: Consumer:我是消费者,我正在消费MsgThread-4productor:我是大帅哥,我现在正在生产东西!,count:41--->7
Thread-2: Consumer:我是消费者,我正在消费MsgThread-3productor:我是大帅哥,我现在正在生产东西!,count:1--->8
Thread-3: Consumer:我是消费者,我正在消费MsgThread-2productor:我是大帅哥,我现在正在生产东西!,count:44--->9
Thread-4: Consumer:我是消费者,我正在消费MsgThread-4productor:我是大帅哥,我现在正在生产东西!,count:46--->10
Thread-5: Consumer:我是消费者,我正在消费MsgThread-5productor:我是大帅哥,我现在正在生产东西!,count:45--->11
Thread-2: Consumer:我是消费者,我正在消费MsgThread-2productor:我是大帅哥,我现在正在生产东西!,count:3--->12
Thread-3: Consumer:我是消费者,我正在消费MsgThread-3productor:我是大帅哥,我现在正在生产东西!,count:48--->13
Thread-4: Consumer:我是消费者,我正在消费MsgThread-5productor:我是大帅哥,我现在正在生产东西!,count:50--->14
Thread-5: Consumer:我是消费者,我正在消费MsgThread-2productor:我是大帅哥,我现在正在生产东西!,count:49--->15
Thread-4: Consumer:我是消费者,我正在消费MsgThread-2productor:我是大帅哥,我现在正在生产东西!,count:54--->16
Thread-2: Consumer:我是消费者,我正在消费MsgThread-5productor:我是大帅哥,我现在正在生产东西!,count:6--->17
Thread-3: Consumer:我是消费者,我正在消费MsgThread-6productor:我是大帅哥,我现在正在生产东西!,count:52--->18
Thread-5: Consumer:我是消费者,我正在消费MsgThread-3productor:我是大帅哥,我现在正在生产东西!,count:53--->19
Thread-4: Consumer:我是消费者,我正在消费MsgThread-3productor:我是大帅哥,我现在正在生产东西!,count:58--->20
|
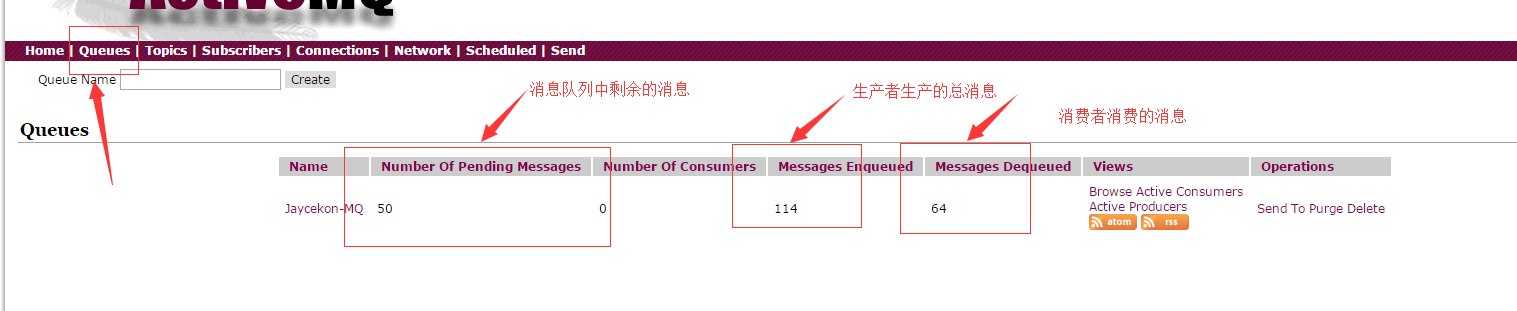
查看运行结果,我们可以做ActiveMQ 服务端:http://127.0.0.1:8161/admin/ 里面的Queues 中查看我们生产的消息。
5、ActiveMQ的特性
5.1 ActiveMq 的特性
- 多种语言和协议编写客户端。语言: Java, C, C++, C#, Ruby, Perl, Python, PHP。应用协议: OpenWire,Stomp REST,WS Notification,XMPP,AMQP
- 完全支持JMS1.1和J2EE 1.4规范 (持久化,XA消息,事务)
- 对Spring的支持,ActiveMQ可以很容易内嵌到使用Spring的系统里面去,而且也支持Spring2.0的特性
- 通过了常见J2EE服务器(如 Geronimo,JBoss 4, GlassFish,WebLogic)的测试,其中通过JCA 1.5 resource adaptors的配置,可以让ActiveMQ可以自动的部署到任何兼容J2EE 1.4 商业服务器上
- 支持多种传送协议:in-VM,TCP,SSL,NIO,UDP,JGroups,JXTA
- 支持通过JDBC和journal提供高速的消息持久化
- 从设计上保证了高性能的集群,客户端-服务器,点对点
- 支持Ajax
- 支持与Axis的整合
- 可以很容易得调用内嵌JMS provider,进行测试
5.2 什么情况下使用ActiveMQ?
- 多个项目之间集成
(1) 跨平台
(2) 多语言
(3) 多项目 - 降低系统间模块的耦合度,解耦
(1) 软件扩展性 - 系统前后端隔离
(1) 前后端隔离,屏蔽高安全区
ActiveMQ官网下载地址:http://activemq.apache.org/download.html
ActiveMQ 提供了Windows 和Linux、Unix 等几个版本,楼主这里选择了Linux 版本下进行开发。
下载完安装包,解压之后的目录:
从它的目录来说,还是很简单的:
- bin存放的是脚本文件
- conf存放的是基本配置文件
- data存放的是日志文件
- docs存放的是说明文档
- examples存放的是简单的实例
- lib存放的是activemq所需jar包
- webapps用于存放项目的目录
2、启动ActiveMQ
进入到ActiveMQ 安装目录的Bin 目录,linux 下输入 ./activemq start 启动activeMQ 服务。
输入命令之后,会提示我们创建了一个进程IP 号,这时候说明服务已经成功启动了。
ActiveMQ默认启动时,启动了内置的jetty服务器,提供一个用于监控ActiveMQ的admin应用。
admin:http://127.0.0.1:8161/admin/
我们在浏览器打开链接之后输入账号密码(这里和tomcat 服务器类似)
默认账号:admin
密码:admin
到这里为止,ActiveMQ 服务端就启动完毕了。
ActiveMQ 在linux 下的终止命令是 ./activemq stop
3、创建一个ActiveMQ工程
项目目录结构:
上述在官网下载ActiveMq 的时候,我们可以在目录下看到一个jar包:
这个jar 包就是我们需要在项目中进行开发中使用到的相关依赖。
3.1 创建生产者
public class Producter {

    //ActiveMq 的默认用户名
    private static final String USERNAME = ActiveMQConnection.DEFAULT_USER;
    //ActiveMq 的默认登录密码
    private static final String PASSWORD = ActiveMQConnection.DEFAULT_PASSWORD;
    //ActiveMQ 的链接地址
    private static final String BROKEN_URL = ActiveMQConnection.DEFAULT_BROKER_URL;

    AtomicInteger count = new AtomicInteger(0);
    //链接工厂
    ConnectionFactory connectionFactory;
    //链接对象
    Connection connection;
    //事务管理
    Session session;
    ThreadLocal<MessageProducer> threadLocal = new ThreadLocal<>();

    public void init(){
        try {
            //创建一个链接工厂
            connectionFactory = new ActiveMQConnectionFactory(USERNAME,PASSWORD,BROKEN_URL);
            //从工厂中创建一个链接
            connection  = connectionFactory.createConnection();
            //开启链接
            connection.start();
            //创建一个事务(这里通过参数可以设置事务的级别)
            session = connection.createSession(true,Session.SESSION_TRANSACTED);
        } catch (JMSException e) {
            e.printStackTrace();
        }
    }

    public void sendMessage(String disname){
        try {
            //创建一个消息队列
            Queue queue = session.createQueue(disname);
            //消息生产者
            MessageProducer messageProducer = null;
            if(threadLocal.get()!=null){
                messageProducer = threadLocal.get();
            }else{
                messageProducer = session.createProducer(queue);
                threadLocal.set(messageProducer);
            }
           while(true){
                Thread.sleep(1000);
                int num = count.getAndIncrement();
                //创建一条消息
                TextMessage msg = session.createTextMessage(Thread.currentThread().getName()+
                        "productor:我是大帅哥,我现在正在生产东西!,count:"+num);
                System.out.println(Thread.currentThread().getName()+
                        "productor:我是大帅哥,我现在正在生产东西!,count:"+num);
                //发送消息
                messageProducer.send(msg);
                //提交事务
                session.commit();
            }
        } catch (JMSException e) {
            e.printStackTrace();
        } catch (InterruptedException e) {
            e.printStackTrace();
        }
    }
}
3.2 创建消费者
public class Comsumer {

    private static final String USERNAME = ActiveMQConnection.DEFAULT_USER;

    private static final String PASSWORD = ActiveMQConnection.DEFAULT_PASSWORD;

    private static final String BROKEN_URL = ActiveMQConnection.DEFAULT_BROKER_URL;

    ConnectionFactory connectionFactory;

    Connection connection;

    Session session;

    ThreadLocal<MessageConsumer> threadLocal = new ThreadLocal<>();
    AtomicInteger count = new AtomicInteger();

    public void init(){
        try {
            connectionFactory = new ActiveMQConnectionFactory(USERNAME,PASSWORD,BROKEN_URL);
            connection  = connectionFactory.createConnection();
            connection.start();
            session = connection.createSession(false,Session.AUTO_ACKNOWLEDGE);
        } catch (JMSException e) {
            e.printStackTrace();
        }
    }


    public void getMessage(String disname){
        try {
            Queue queue = session.createQueue(disname);
            MessageConsumer consumer = null;

            if(threadLocal.get()!=null){
                consumer = threadLocal.get();
            }else{
                consumer = session.createConsumer(queue);
                threadLocal.set(consumer);
            }
            while(true){
                Thread.sleep(1000);
                TextMessage msg = (TextMessage) consumer.receive();
                if(msg!=null) {
                    msg.acknowledge();
                    System.out.println(Thread.currentThread().getName()+": Consumer:我是消费者,我正在消费Msg"+msg.getText()+"--->"+count.getAndIncrement());
                }else {
                    break;
                }
            }
        } catch (JMSException e) {
            e.printStackTrace();
        } catch (InterruptedException e) {
            e.printStackTrace();
        }
    }
}
4、运行ActiveMQ项目
4.1 生产者开始生产消息
public class TestMq {
    public static void main(String[] args){
        Producter producter = new Producter();
        producter.init();
        TestMq testMq = new TestMq();
        try {
            Thread.sleep(1000);
        } catch (InterruptedException e) {
            e.printStackTrace();
        }
        //Thread 1
        new Thread(testMq.new ProductorMq(producter)).start();
        //Thread 2
        new Thread(testMq.new ProductorMq(producter)).start();
        //Thread 3
        new Thread(testMq.new ProductorMq(producter)).start();
        //Thread 4
        new Thread(testMq.new ProductorMq(producter)).start();
        //Thread 5
        new Thread(testMq.new ProductorMq(producter)).start();
    }

    private class ProductorMq implements Runnable{
        Producter producter;
        public ProductorMq(Producter producter){
            this.producter = producter;
        }

        @Override
        public void run() {
            while(true){
                try {
                    producter.sendMessage("Jaycekon-MQ");
                    Thread.sleep(10000);
                } catch (InterruptedException e) {
                    e.printStackTrace();
                }
            }
        }
    }
}
运行结果:
 INFO | Successfully connected to tcp://localhost:61616
Thread-6productor:我是大帅哥,我现在正在生产东西!,count:0
Thread-4productor:我是大帅哥,我现在正在生产东西!,count:1
Thread-2productor:我是大帅哥,我现在正在生产东西!,count:3
Thread-5productor:我是大帅哥,我现在正在生产东西!,count:2
Thread-3productor:我是大帅哥,我现在正在生产东西!,count:4
Thread-6productor:我是大帅哥,我现在正在生产东西!,count:5
Thread-3productor:我是大帅哥,我现在正在生产东西!,count:6
Thread-5productor:我是大帅哥,我现在正在生产东西!,count:7
Thread-2productor:我是大帅哥,我现在正在生产东西!,count:8
Thread-4productor:我是大帅哥,我现在正在生产东西!,count:9
Thread-6productor:我是大帅哥,我现在正在生产东西!,count:10
Thread-3productor:我是大帅哥,我现在正在生产东西!,count:11
Thread-5productor:我是大帅哥,我现在正在生产东西!,count:12
Thread-2productor:我是大帅哥,我现在正在生产东西!,count:13
Thread-4productor:我是大帅哥,我现在正在生产东西!,count:14
Thread-6productor:我是大帅哥,我现在正在生产东西!,count:15
Thread-3productor:我是大帅哥,我现在正在生产东西!,count:16
Thread-5productor:我是大帅哥,我现在正在生产东西!,count:17
Thread-2productor:我是大帅哥,我现在正在生产东西!,count:18
Thread-4productor:我是大帅哥,我现在正在生产东西!,count:19
4.2 消费者开始消费消息
public class TestConsumer {
    public static void main(String[] args){
        Comsumer comsumer = new Comsumer();
        comsumer.init();
        TestConsumer testConsumer = new TestConsumer();
        new Thread(testConsumer.new ConsumerMq(comsumer)).start();
        new Thread(testConsumer.new ConsumerMq(comsumer)).start();
        new Thread(testConsumer.new ConsumerMq(comsumer)).start();
        new Thread(testConsumer.new ConsumerMq(comsumer)).start();
    }

    private class ConsumerMq implements Runnable{
        Comsumer comsumer;
        public ConsumerMq(Comsumer comsumer){
            this.comsumer = comsumer;
        }

        @Override
        public void run() {
            while(true){
                try {
                    comsumer.getMessage("Jaycekon-MQ");
                    Thread.sleep(10000);
                } catch (InterruptedException e) {
                    e.printStackTrace();
                }
            }
        }
    }
}
运行结果:
|
1
2
3
4
5
6
7
8
9
10
11
12
13
14
15
16
17
18
19
20
21
22
|
INFO | Successfully connected to tcp:
//localhost:61616
Thread-2: Consumer:我是消费者,我正在消费MsgThread-5productor:我是大帅哥,我现在正在生产东西!,count:4--->0
Thread-3: Consumer:我是消费者,我正在消费MsgThread-4productor:我是大帅哥,我现在正在生产东西!,count:36--->1
Thread-4: Consumer:我是消费者,我正在消费MsgThread-3productor:我是大帅哥,我现在正在生产东西!,count:38--->2
Thread-5: Consumer:我是消费者,我正在消费MsgThread-6productor:我是大帅哥,我现在正在生产东西!,count:37--->3
Thread-2: Consumer:我是消费者,我正在消费MsgThread-6productor:我是大帅哥,我现在正在生产东西!,count:2--->4
Thread-3: Consumer:我是消费者,我正在消费MsgThread-5productor:我是大帅哥,我现在正在生产东西!,count:40--->5
Thread-4: Consumer:我是消费者,我正在消费MsgThread-6productor:我是大帅哥,我现在正在生产东西!,count:42--->6
Thread-5: Consumer:我是消费者,我正在消费MsgThread-4productor:我是大帅哥,我现在正在生产东西!,count:41--->7
Thread-2: Consumer:我是消费者,我正在消费MsgThread-3productor:我是大帅哥,我现在正在生产东西!,count:1--->8
Thread-3: Consumer:我是消费者,我正在消费MsgThread-2productor:我是大帅哥,我现在正在生产东西!,count:44--->9
Thread-4: Consumer:我是消费者,我正在消费MsgThread-4productor:我是大帅哥,我现在正在生产东西!,count:46--->10
Thread-5: Consumer:我是消费者,我正在消费MsgThread-5productor:我是大帅哥,我现在正在生产东西!,count:45--->11
Thread-2: Consumer:我是消费者,我正在消费MsgThread-2productor:我是大帅哥,我现在正在生产东西!,count:3--->12
Thread-3: Consumer:我是消费者,我正在消费MsgThread-3productor:我是大帅哥,我现在正在生产东西!,count:48--->13
Thread-4: Consumer:我是消费者,我正在消费MsgThread-5productor:我是大帅哥,我现在正在生产东西!,count:50--->14
Thread-5: Consumer:我是消费者,我正在消费MsgThread-2productor:我是大帅哥,我现在正在生产东西!,count:49--->15
Thread-4: Consumer:我是消费者,我正在消费MsgThread-2productor:我是大帅哥,我现在正在生产东西!,count:54--->16
Thread-2: Consumer:我是消费者,我正在消费MsgThread-5productor:我是大帅哥,我现在正在生产东西!,count:6--->17
Thread-3: Consumer:我是消费者,我正在消费MsgThread-6productor:我是大帅哥,我现在正在生产东西!,count:52--->18
Thread-5: Consumer:我是消费者,我正在消费MsgThread-3productor:我是大帅哥,我现在正在生产东西!,count:53--->19
Thread-4: Consumer:我是消费者,我正在消费MsgThread-3productor:我是大帅哥,我现在正在生产东西!,count:58--->20
|
查看运行结果,我们可以做ActiveMQ 服务端:http://127.0.0.1:8161/admin/ 里面的Queues 中查看我们生产的消息。
5、ActiveMQ的特性
5.1 ActiveMq 的特性
- 多种语言和协议编写客户端。语言: Java, C, C++, C#, Ruby, Perl, Python, PHP。应用协议: OpenWire,Stomp REST,WS Notification,XMPP,AMQP
- 完全支持JMS1.1和J2EE 1.4规范 (持久化,XA消息,事务)
- 对Spring的支持,ActiveMQ可以很容易内嵌到使用Spring的系统里面去,而且也支持Spring2.0的特性
- 通过了常见J2EE服务器(如 Geronimo,JBoss 4, GlassFish,WebLogic)的测试,其中通过JCA 1.5 resource adaptors的配置,可以让ActiveMQ可以自动的部署到任何兼容J2EE 1.4 商业服务器上
- 支持多种传送协议:in-VM,TCP,SSL,NIO,UDP,JGroups,JXTA
- 支持通过JDBC和journal提供高速的消息持久化
- 从设计上保证了高性能的集群,客户端-服务器,点对点
- 支持Ajax
- 支持与Axis的整合
- 可以很容易得调用内嵌JMS provider,进行测试
5.2 什么情况下使用ActiveMQ?
- 多个项目之间集成
(1) 跨平台
(2) 多语言
(3) 多项目 - 降低系统间模块的耦合度,解耦
(1) 软件扩展性 - 系统前后端隔离
(1) 前后端隔离,屏蔽高安全区


 2655
2655


 被折叠的 条评论
为什么被折叠?
被折叠的 条评论
为什么被折叠?
 到【灌水乐园】发言


