


英文参考地址
https://docs.jboss.org/author/display/AS71/Remote+EJB+invocations+via+JNDI+-+EJB+client+API+or+remote-naming+project
要解决的问题
公司的底层架构中的Ejb的远程调用通过Controller调用的Bean,所有现在存在的问题就是业务逻辑都写到了Controller,有一些业务得不到复用,方法得不到复用、分布式事务无法控制等等,所以咱们急需把业务写到Bean的实现里面,因为咱们是Bean调用Bean,Bean是在Jboss的容器内部,所以咱们是可以理解为服务器调用服务器的Bean,以前是客户端调用服务器的远程调用方式。
此方案解决的问题
1:原先远程调用的写到代码中写死的代码和端口,用户名等信息,不利于系统变动
2:分布式事务的解决
3:所有系统的统一管理(stonlone.xml的内容)
需要改的的地方不是很多,为了统一咱们这种服务器调用服务器(Bean调Bean方式)
Jboss服务器需要的修改
找到自己的Jboss的D:\jboss\jboss-eap-6.2\standalone\configuration中的standalone.xml
1:<security-realms>节点下添加如下代码
<span style="font-size:18px;"><management>
        <security-realms>
            ...
            <security-realm name="ejb-security-realm">
                <server-identities>
                  <secret value="IWFkbWluMTIz"/>
                </server-identities>
            </security-realm>
        </security-realms>
...

</span>
为了统一管理和配置(以下value的值密码为(!admin123)是根据Base64编码加密之后得到,大家现在可以先不用管)
添加完后本借点的全视图
<span style="font-size:18px;"><security-realms>
            <security-realm name="ManagementRealm">
                <authentication>
                    <local default-user="$local"/>
                    <properties path="mgmt-users.properties" relative-to="jboss.server.config.dir"/>
                </authentication>
                <authorization map-groups-to-roles="false">
                    <properties path="mgmt-groups.properties" relative-to="jboss.server.config.dir"/>
                </authorization>
            </security-realm>
            <security-realm name="ApplicationRealm">
                <authentication>
                    <local default-user="$local" allowed-users="*"/>
                    <properties path="application-users.properties" relative-to="jboss.server.config.dir"/>
                </authentication>
                <authorization>
                    <properties path="application-roles.properties" relative-to="jboss.server.config.dir"/>
                </authorization>
            </security-realm>
			<span style="color:#FF6666;"><security-realm name="ejb-security-realm">
                <server-identities>
                    <secret value="IWFkbWluMTIz"/>
                </server-identities>
            </security-realm></span>
        </security-realms>
</span>
2:在<socket-binding-group>节点下添加如下代码意思为所要调用的jboss服务器的ip和远程端口号(如果你需要调用多个)
<span style="font-size:18px;"><outbound-socket-binding name="remote-ejb">
            <remote-destination host="192.168.*.*" port="4444"/>
        </outbound-socket-binding>
</span>
添加完后的这个节点下的代码
<span style="font-size:18px;"><socket-binding-group name="standard-sockets" default-interface="any" port-offset="${jboss.socket.binding.port-offset:0}">
        <socket-binding name="management-native" interface="management" port="${jboss.management.native.port:9999}"/>
        <socket-binding name="management-http" interface="management" port="${jboss.management.http.port:9991}"/>
        <socket-binding name="management-https" interface="management" port="${jboss.management.https.port:9443}"/>
        <socket-binding name="ajp" port="8009"/>
        <socket-binding name="http" port="8080"/>
        <socket-binding name="https" port="8443"/>
        <socket-binding name="remoting" port="4447"/>
        <socket-binding name="txn-recovery-environment" port="4712"/>
        <socket-binding name="txn-status-manager" port="4713"/>
        <outbound-socket-binding name="mail-smtp">
            <remote-destination host="localhost" port="25"/>
        </outbound-socket-binding>
		<outbound-socket-binding name="remote-ejb">
            <remote-destination host="192.168.*.*" port="4444"/>
        </outbound-socket-binding>
		<outbound-socket-binding name="remote-ejb2">
            <remote-destination host="192.168.*.*" port="4447"/>
        </outbound-socket-binding>
    </socket-binding-group>
</span>
如果是需要远程调用多个系统的Jboss服务器,配置
3:在<subsystem xmlns="urn:jboss:domain:remoting:1.1">
节点下添加如下代码(注意红色的ejb-security-realm和第一步的名称相对应的),username为提供服务的Jboss服务器添加的把b类型用户的名称,密码默认为(!admin123),这个节点配置的是SSL的一种安全协议机制,咱们现在把它改成false,即不采取这种安全策略
<span style="font-size:18px;"> <outbound-connections>
                <remote-outbound-connection name="remote-ejb-connection" outbound-socket-binding-ref="remote-ejb" security-realm="ejb-security-realm" username="adminjc">
                    <properties>
                        <property name="SASL_POLICY_NOANONYMOUS" value="false"/>
                        <property name="SSL_ENABLED" value="false"/>
                    </properties>
                </remote-outbound-connection>
            </outbound-connections>

</span>
基础:adminjc 权限adminqx 考试:adminks 评教:adminpj 新生:adminxs
密码通知都为(!admin123)
代码中需要修改的地方
1:大家只需要在自己的ear如下图所示添加一个jboss-ejb-client.xml,把下面的附件拷过去即可,不用做任何修改
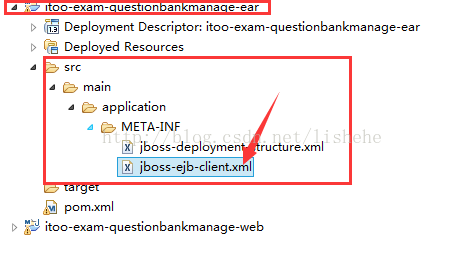
jboss-ejb-client.xml中的内容
<span style="font-size:18px;"><?xml version="1.0" encoding="UTF-8"?>
<jboss-ejb-client xmlns="urn:jboss:ejb-client:1.0">
<client-context>
<ejb-receivers>
<remoting-ejb-receiver outbound-connection-ref="remote-ejb-connection"/>
</ejb-receivers>
</client-context>
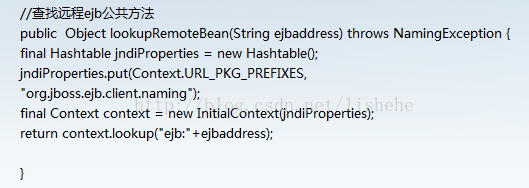
</jboss-ejb-client></span>2:咱们底层修封装了关于远程调用的方法(Bean调用Bean),架构底层中封装了lookup查找相应远程bean的接口的方法
在自己一条线的Bean的实现方法里面需要调用其他系统或者其他模块的Bean在自己的方法如下写即可
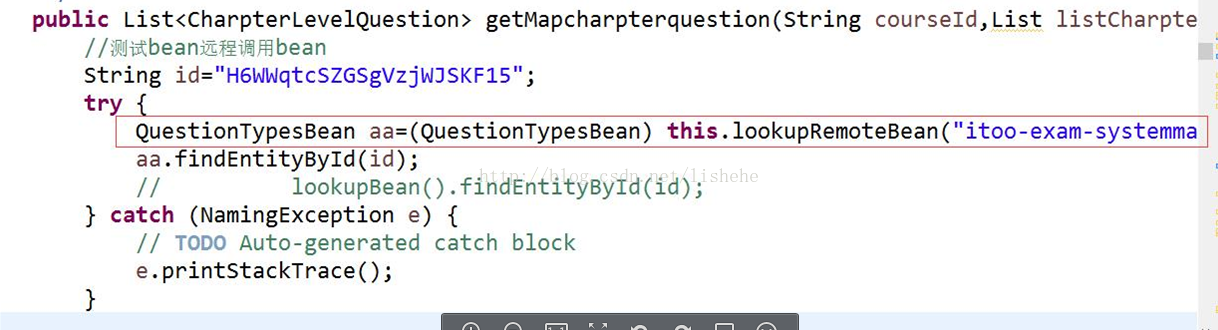
QuestionTypesBeanaa= (QuestionTypesBean)this.lookupRemoteBean("itoo-exam-systemmanage-questiontypes-ear/itoo-exam-systemmanage-questiontypes-core-0.0.1-SNAPSHOT/questionTypesBeanImpl!com.tgb.itoo.exam.service.QuestionTypesBean");今后新线的开发和现有系统的注意事项
1:现有已经开发好的线,如果是增删改是调用其他系统的,而现在是在Controller调用的,是不受EJB分布式事务(JTA)控制的,会出现数据的不准确性,所以为了提高数据的正确性,大家需要把此种方法的调用在自己的Bean的实现里面调用
2:系统内部有把其他Core打包到自己的ear里面,不利于后期的维护
3:远程调用的用户名和密码以前咱们都是在xml里面,等项目开发部署后如果改变服务器不利于项目的迁移
4:分布式事务的解决


 1761
1761


 被折叠的 条评论
为什么被折叠?
被折叠的 条评论
为什么被折叠?
 到【灌水乐园】发言


