


序言
前一段有一些需求,就是企业级的通讯录,需要从服务器端下载,但是由于企业级通讯录会比较大,消耗用户流量(比如,我只想找一下张三,但是我第一次打开通讯录就会把整个公司的通讯录都请求下来,而且企业级的通讯录很大,加载时间也会比较长,流量消耗也会比较多,所以这给用户的体验是十分不友好的),因此,我们把企业级的通讯录做成多级树结构,用户打开通讯录模块,只会把一级目录结构请求下来,当用户需要查找人时,点击对应的部门item,就会请求对应部门下的列表,这样在极大程度上减少了用户的流量消耗和等待时间。因此,就有了下面的文章。
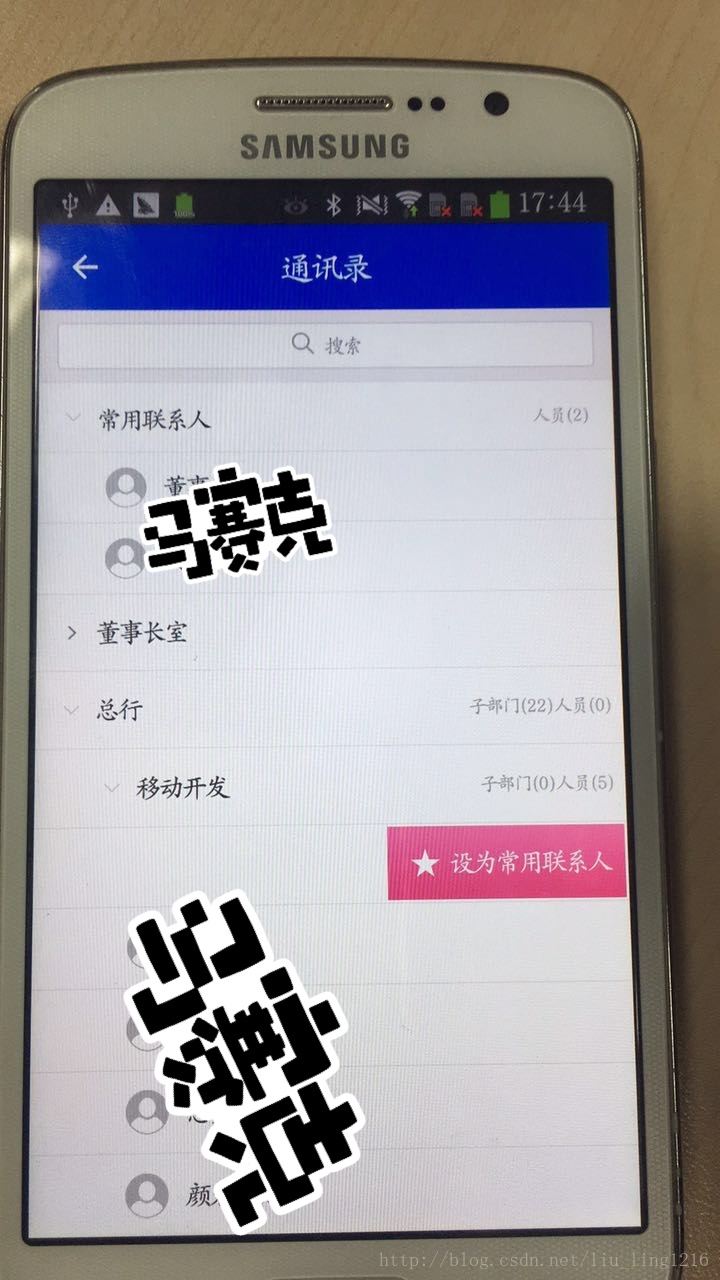
效果图和思路
该需求的难点:
1.多级树的缩进展示(数据结构的设计)
2.多种情况的展示(正常、单选、多选等)
3.控制条目侧滑
一、多级树的实现
当时拿到需求,考虑到使用expandlistview,但是由于需求不是太一致,所以放弃了使用。然后查阅了相关的资料,决定使用listview,缩进每个item来达到多级树的目录结构。
<?xml version="1.0" encoding="utf-8"?>
<LinearLayout xmlns:android="http://schemas.android.com/apk/res/android"
    android:id="@+id/main"
    android:layout_width="match_parent"
    android:layout_height="match_parent"
    android:background="@color/white"
    android:orientation="vertical">

    <ListView
        android:id="@+id/listview"
        android:layout_width="match_parent"
        android:layout_height="wrap_content"
        android:background="@color/white"
        android:divider="@color/transparent"
        android:dividerHeight="0dp"></ListView>

    <View
        android:layout_width="match_parent"
        android:layout_height="1dp"
        android:background="@color/line"
        />

</LinearLayout>
二、单选多选等情况的实现
根据需求,会有不同Activity跳转到通讯录选人,所以会有多选和单选,本文主要实现了单选和多选的样式和相关逻辑,如有需要,只需要修改,然后写回调就可以拿到选中数据。
三、条目侧滑的实现
关于侧滑,listview并没有提供类似recycleview那样的api,而网上很多侧滑,都是自定义listview,这样侵入性太强,结合起来会比较麻烦,而且有的还存在bug。在次,我使用的注释张的SwipeMenuLayout,只需要在item布局上做文章就可以,简单方便,而且强大。http://blog.csdn.net/zxt0601/article/details/52303781
代码的实现
1.请求服务器端,拿到数据,按照本地的bean格式修改数据源
    /**
     * 第一次的数据源
     *
     * @param res
     * @return
     */
    public List<Node> initNodeRoot(List<ContactTreeListOut> res) {  //核心代码
        ArrayList<Node> roots = new ArrayList<Node>();  //根节点列表
        for (ContactTreeListOut ct : res) {
            Node node = new Node(ct.getName(), "0".equals(ct.getIsNone()) ? "dept" : "people", "", ct.getId(), -1, ct.getIsNone());
            roots.add(node);
        }
        return roots;
    }
2.本地Node相关代码,由于比较多,只贴一下构造方法
    /**
     * 设置节点值
     *
     * @param parentkey 父节点id
     * @param item_id   自己id
     * @param isNone    是否是部门,1是/0否
     */
    public Node(String simlpleName, String value, String parentkey, String item_id, int iconId, String isNone) {
        this.simpleName = simlpleName;
        this.value = value;
        this.parentkey = parentkey;
        this.icon = iconId;
        this.item_id = item_id;
        this.isNone = isNone;
    }
3.Adapter的初始化
    /**
     * @param context     响应监听的上下文
     * @param root        已经挂好树的根节点(此时列表结构还不是树形结构,但关系是树形结构)
     * @param tree_ex_id  展开图标的iconid:值为-1是使用默认的(箭头),可传自定的iconid
     * @param tree_ec_id  收缩图标的iconid:值为-1是使用默认的(箭头),可传自定的iconid
     * @param expandLevel 初始展开等级,例:0表示只展示到根节点,1表示展示到子节点,2表示展示到孙节点,依此类推...
     */
    public void initNode(Context context, List<Node> root, boolean hasCheckBox, int tree_ex_id, final int tree_ec_id, int expandLevel) {
        if (selecttype == 0 || selecttype == 1) {   //单选
            treeAdapter = new ContactsTreeAdapter(context, root, selecttype);
        } else {            //多选
            treeAdapter = new ContactsTreeAdapter(context, root);
        }
        // 设置整个树是否显示复选框
        treeAdapter.setCheckBox(hasCheckBox);
        // 设置展开和折叠时图标(-1是用默认的箭头)
        int tree_ex_id_ = (tree_ex_id == -1) ? R.mipmap.down : tree_ex_id;
        int tree_ec_id_ = (tree_ec_id == -1) ? R.mipmap.right : tree_ec_id;
        treeAdapter.setCollapseAndExpandIcon(tree_ex_id_, tree_ec_id_);
        // 设置默认展开级别
        treeAdapter.setExpandLevel(expandLevel);
        //为列表配置adapter
        listview.setAdapter(treeAdapter);
    }
/**
* 构造方法
*
* @param rootNodes 是关系上的树形,列表本身并不是树形
*/
public ContactsTreeAdapter(Context _context, List<Node> rootNodes) {
this.context = _context;
layoutInflater = (LayoutInflater) context
.getSystemService(Context.LAYOUT_INFLATER_SERVICE);
for (int i = 0; i < rootNodes.size(); i++) {
addNode(rootNodes.get(i));
}
}public void addNode(Node node) {
all.add(node);
cache.add(node);
if (node.isLeaf()) { // 若叶子是人,则人++
if (node.getValue().equals("people")) {
node.setIcon(1);
}
return;
}
for (int i = 0; i < node.getChildrens().size(); i++) {
addNode(node.getChildrens().get(i));
node.setPersonNums(node.getPersonNums() + node.getChildrens().get(i).getPersonNums());
}
}4.点击某item后,树形结构的展示
    /**
     * 控制展开缩放某节点
     *
     * @param location
     */
    public void ExpandOrCollapse(final int location) {
        final Node n = all.get(location);// 获得当前视图需要处理的节点
        if (n != null)// 排除传入参数错误异常
        {
            if (n.isGetChild()) {// 已经通过网络请求获取到孩子结点 只需要做展开操作
                n.setExplaned(!n.isExplaned());// 由于该方法是用来控制展开和收缩的,所以取反即可
                filterNode(n);//**************遍历一下,将所有上级节点展开的节点重新挂上去
                notifyDataSetChanged();// 刷新视图
            } else if (!n.isLeaf() || n.getValue().equals("dept")) {
                if (n.isExplaned()) {
                    n.setExplaned(!n.isExplaned());// 由于该方法是用来控制展开和收缩的,所以取反即可
                    filterNode(n);//**************遍历一下,将所有上级节点展开的节点重新挂上去
                    notifyDataSetChanged();// 刷新视图
                    return;
                }

                List<ContactTreeListOut> list = new ArrayList<ContactTreeListOut>();

                for (int i = 0; i < 10; i++) {
                    ContactTreeListOut contactTreeListOut = new ContactTreeListOut("" + i, "李四" + i, "1");
                    list.add(i, contactTreeListOut);
                }

                totalNum = list.size();
                totalMap.put(n.getitem_id(), totalNum + "");
                ArrayList<Node> roots = new ArrayList<Node>();  //根节点列表

                for (ContactTreeListOut ct : list) {
                    Node node = new Node(ct.getName(), "0".equals(ct.getIsNone()) ? "dept" : "people", n.getitem_id(), ct.getId(), -1, ct.getIsNone());
                    n.addNode(node);
                    node.setParent(n);
                    roots.add(node);
                }
                int l = all.indexOf(n);
                int c = cache.indexOf(n);
                for (int i = 0; i < roots.size(); i++) {
                    l++;
                    c++;
                    addNode(l, c, roots.get(i));
                }
                n.setExplaned(!n.isExplaned());// 由于该方法是用来控制展开和收缩的,所以取反即可
                filterNode(n);//**************遍历一下,将所有上级节点展开的节点重新挂上去
                notifyDataSetChanged();// 刷新视图
                n.setGetChild(true);// 设置此结点获取网络请求成功 下次无需获取
            }
            // ************ 如果是叶子节点(人员),则跳转详情
            else {
                Toast.makeText(context,"此节点是人员",Toast.LENGTH_SHORT);
            }
        }

    }
// 显示文本
viewItem.tv.setText(node2.getDeptkey());
if (node2.getValue().equals("people")) {
// 控制缩进
_view.setPadding(50 + 20 * node2.getLevel(), 3, 3, 3);
} else {
// 控制缩进
_view.setPadding(20 * node2.getLevel(), 3, 3, 3);
}5.单选多选的实现
// 设置是否显示复选框
if (selecttype == 0 || selecttype == 1) {             //单选情况下,如果是叶子节点,则显示checkbox;不是叶子节点,不显示checkbox
    if (node2.getValue().equals("people")) {         //单选下,可以点击人,不能点击部门
        viewItem.cb.setVisibility(View.VISIBLE);
        viewItem.cb.setClickable(true);
     } else if (node2.getValue().equals("dept")) {
        viewItem.cb.setVisibility(View.GONE);
        viewItem.cb.setClickable(false);
     } else {
        viewItem.cb.setVisibility(View.GONE);
        viewItem.cb.setClickable(false);
     }
 } else {
    if (hasCheckBox) {
        viewItem.cb.setVisibility(View.VISIBLE);
    } else {
        viewItem.cb.setVisibility(View.GONE);
    }
}viewItem.cb.setOnClickListener(new OnClickListener() {
@Override
public void onClick(View v) {
if (selecttype == 0) { //单选
if (!((CheckBox) v).isChecked()) { //取消选中
Node node1 = (Node) v.getTag();
checkNode(node1, ((CheckBox) v).isChecked());
} else { //选中
if (oldNode != null) {
checkNode(oldNode, false); //一次性对某节点的所有节点进行选中or取消操作
}
Node node1 = (Node) v.getTag();
oldNode = node1;
checkNode(node1, ((CheckBox) v).isChecked());
}
} else { //多选
Node node1 = (Node) v.getTag();
checkNode(node1, ((CheckBox) v).isChecked());
tree.notifyDataSetChanged();
}
tree.notifyDataSetChanged();
}
});6.侧滑的实现
<?xml version="1.0" encoding="utf-8"?>
<com.mcxtzhang.swipemenulib.SwipeMenuLayout                     xmlns:android="http://schemas.android.com/apk/res/android"
    android:layout_width="match_parent"
    android:layout_height="wrap_content"
    android:gravity="center_vertical"
    android:orientation="horizontal">

    <RelativeLayout
        android:layout_width="match_parent"
        android:layout_height="44dp">

        <ImageView
            android:id="@+id/ivec"
            android:layout_width="9dp"
            android:layout_height="16dp"
            android:layout_centerVertical="true"
            android:layout_marginLeft="17dp"
            android:src="@mipmap/right" />

        <RelativeLayout
            android:layout_width="fill_parent"
            android:layout_height="wrap_content"
            android:layout_centerVertical="true"
            android:layout_marginLeft="6dp"
            android:layout_toRightOf="@id/ivec"
            >

            <ImageView
                android:id="@+id/ivicon"
                android:layout_width="26dp"
                android:layout_height="26dp"
                android:minHeight="40dp"
                android:layout_centerVertical="true"
                android:src="@mipmap/ic_mine_person" />

            <RelativeLayout
                android:id="@+id/item_click"
                android:layout_width="fill_parent"
                android:layout_height="wrap_content"
                android:layout_centerVertical="true"
                android:layout_marginLeft="5dp"
                android:layout_toRightOf="@+id/ivicon">

                <RelativeLayout
                    android:id="@+id/list_item_rl"
                    android:layout_width="fill_parent"
                    android:layout_height="wrap_content">

                    <TextView
                        android:id="@+id/itemvalue"
                        android:layout_width="wrap_content"
                        android:layout_height="wrap_content"
                        android:layout_centerVertical="true"
                        android:layout_marginLeft="5dp"
                        android:gravity="center_vertical"
                        android:minHeight="30dp"
                        android:text="--"
                        android:textColor="#404040"
                        android:textSize="15sp" />

                    <CheckBox
                        android:id="@+id/cb"
                        android:layout_width="25dp"
                        android:layout_height="25dp"
                        android:layout_alignParentRight="true"
                        android:layout_centerVertical="true"
                        android:layout_marginRight="5dp"
                        android:background="@drawable/checkboxstyle"
                        android:button="@null"
                        android:clickable="true"
                        android:focusable="false"
                        android:focusableInTouchMode="false"
                        android:paddingBottom="10dp"
                        android:paddingLeft="13dp"
                        android:paddingTop="10dp" />

                    <TextView
                        android:id="@+id/list_item_personnum_tv"
                        android:layout_width="wrap_content"
                        android:layout_height="wrap_content"
                        android:layout_alignParentRight="true"
                        android:layout_centerVertical="true"
                        android:layout_marginRight="5dp"
                        android:text="--"
                        android:textColor="#aeaeae"
                        android:textSize="11sp" />

                    <TextView
                        android:id="@+id/list_item_deptnum_tv"
                        android:layout_width="wrap_content"
                        android:layout_height="wrap_content"
                        android:layout_centerVertical="true"
                        android:layout_toLeftOf="@id/list_item_personnum_tv"
                        android:text="--"
                        android:textColor="#aeaeae"
                        android:textSize="11sp" />

                </RelativeLayout>

            </RelativeLayout>

            <View
                android:id="@+id/line"
                android:layout_width="match_parent"
                android:layout_height="1dp"
                android:background="@color/line"
                android:layout_alignParentBottom="true"
                />
        </RelativeLayout>
    </RelativeLayout>

    <TextView
        android:id="@+id/tv_add_contact"
        android:layout_width="wrap_content"
        android:layout_height="44dp"
        android:layout_centerInParent="true"
        android:background="@mipmap/contacts_background"
        android:drawableLeft="@mipmap/xing"
        android:drawablePadding="6dp"
        android:gravity="center"
        android:paddingLeft="14dp"
        android:paddingRight="9dp"
        android:text="设为常用联系人"
        android:textColor="@android:color/white"
        android:textSize="15sp" />
</com.mcxtzhang.swipemenulib.SwipeMenuLayout>
以上是核心的一些代码,本文主要的核心是,根据不同的层级,设置padding来实现层级结构。侧滑这块,上面有作者的连接,如果有感兴趣的同学,可以点进去深入去学习一下。侧滑这块网上一种是设置负的padding值来实现,有的需要在listview或者adapter上做手角,个人比较喜欢SwipeMenuLayout,因为使用方便(主要我懒)。
总结
多级树结构这块,主要还是在于父id和子id,实体bean的设计,这里可以参考弘洋大神的,然后根据自己的实际需求修改。只要有了思路,实际上实现起来还是很简单的。这个是我在实际开发中遇到的东西,个人觉得可以分享一下。因为没有时间整理,所以这个demo代码可能写的比较乱,不过跟一下思路就清晰了。哈哈,好了,大家继续gaygayup吧。


 1720
1720


 被折叠的 条评论
为什么被折叠?
被折叠的 条评论
为什么被折叠?
 到【灌水乐园】发言


