


前段时间在公司做了一个项目,项目用了spring框架实现,WEB容器是Tomct 5,虽然说把项目做完了,但是一直对spring的IoC容器在web容器如何启动和起作用的并不清楚。所以就抽时间看一下spring的源代码,借此了解它的原理。
我们知道,对于使用Spring的web应用,无须手动创建Spring容器,而是通过配置文件,声明式的创建Spring容器。因此在Web应用中创建Spring容器有如下两种方式:
1. 直接在web.xml文件中配置创建Spring容器。
2. 利用第三方MVC框架的扩展点,创建Spring容器。
其实第一种方式是更加常见。为了让Spring容器随Web应用的启动而启动,有如下两种方式:
1. 利用ServletContextListener实现。
2. 利用load-on-startup Servlet实现。
Spring提供ServletContextListener的一个实现类ContextLoaderListener,该类可以作为Listener 使用,它会在创建时自动查找WEB-INF下的applicationContext.xml文件,因此,如果只有一个配置文件,并且文件名为applicationContext.xml,则只需在web.xml文件中增加以下配置片段就可以了
<listener>
      <listener-class>
        org.springframework.web.context.ContextLoaderListener
      </listener-class>
</listener> 带多个配置文件的web.xml文件如下:
    <context-param>
         <param-name>contextLoaderListener</param-name>
         <param-value>
                WEB-INF/*.xml, classpath:spring/*.xml
         </param-value>
    </context-param>

    <listener>
          <listener-class>
            org.springframework.web.context.ContextLoaderListener
          </listener-class>
    </listener>
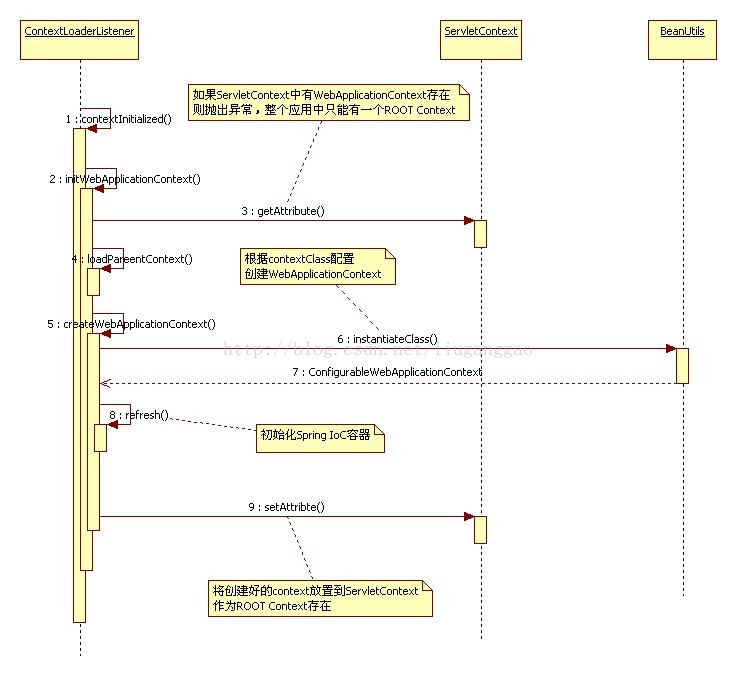
下面我们来看它的具体实现过程是怎样的,首先我们从ContextLoaderListener入手,它的代码如下:
    public class ContextLoaderListener implements ServletContextListener
    {

        private ContextLoader contextLoader;


        /**
         * 这个方法就是用来初始化web application context的
         */
        public void contextInitialized(ServletContextEvent event)
                    {
            this.contextLoader = createContextLoader();
            this.contextLoader.initWebApplicationContext(event.getServletContext());
        }

        /**
         * 创建一个contextLoader.
         * @return the new ContextLoader
         */
        protected ContextLoader createContextLoader()
                    {
            return new ContextLoader();
        }
         ................

    }
new ContextLoader()具体做了什么事呢?ContextLoader的代码片段:
    static {
        try {
            // 这里创建一个ClassPathResource对象,载入ContextLoader.properties,用于创建对应的ApplicationContext容器
            // 这个文件跟ContextLoader类在同一个目录下,文件内容如:
            // org.springframework.web.context.WebApplicationContext=org.springframework.web.context.support.XmlWebApplicationContext
            // 如此说来,spring默认初始化的是XmlWebApplicationContext
            ClassPathResource resource = new ClassPathResource(<span style="color:#3366FF;">DEFAULT_STRATEGIES_PATH</span>, ContextLoader.class);
            // 得到一个Properties对象,后面根据类名来创建ApplicationContext容器
            defaultStrategies = PropertiesLoaderUtils.loadProperties(resource);
           }catch (IOException ex) {
             throw new IllegalStateException("Could not load 'ContextLoader.properties': " + ex.getMessage());
           }
    }
再下来我们再看一下initWebApplicationContext方法的实现过程:
    public WebApplicationContext initWebApplicationContext(ServletContext servletContext)
                throws IllegalStateException, BeansException {

            // 从servletContext中获取ApplicationContext容器;如果已经存在,则提示初始化容器失败,检查web.xml文件中是否定义有多个容器加载器
            // ServletContext接口的简述:public interface ServletContext
            // 定义了一系列方法用于与相应的servlet容器通信,比如:获得文件的MIME类型,分派请求,或者是向日志文件写日志等。
            // 每一个web-app只能有一个ServletContext,web-app可以是一个放置有web application 文件的文件夹,也可以是一个.war的文件。
            // ServletContext对象包含在ServletConfig对象之中,ServletConfig对象在servlet初始化时提供servlet对象。

            if (servletContext.getAttribute(WebApplicationContext.ROOT_WEB_APPLICATION_CONTEXT_ATTRIBUTE) != null) {
                throw new IllegalStateException(
                        "Cannot initialize context because there is already a root application context present - " +
                        "check whether you have multiple ContextLoader* definitions in your web.xml!");
            }

            servletContext.log("Initializing Spring root WebApplicationContext");
            if (logger.isInfoEnabled()) {
                logger.info("Root WebApplicationContext: initialization started");
            }
            long startTime = System.currentTimeMillis();

            try {
                // Determine parent for root web application context, if any.
                // 获取父容器
                ApplicationContext parent = loadParentContext(servletContext);

                // Store context in local instance variable, to guarantee that
                // it is available on ServletContext shutdown.
                // 创建ApplicationContext容器
                this.context = createWebApplicationContext(servletContext, parent);
                // 把容器放入到servletContext中
                servletContext.setAttribute(WebApplicationContext.ROOT_WEB_APPLICATION_CONTEXT_ATTRIBUTE, this.context);

                if (logger.isDebugEnabled()) {
                    logger.debug("Published root WebApplicationContext as ServletContext attribute with name [" +
                            WebApplicationContext.ROOT_WEB_APPLICATION_CONTEXT_ATTRIBUTE + "]");
                }
                if (logger.isInfoEnabled()) {
                    long elapsedTime = System.currentTimeMillis() - startTime;
                    logger.info("Root WebApplicationContext: initialization completed in " + elapsedTime + " ms");
                }

                return this.context;
            }
            catch (RuntimeException ex) {
                logger.error("Context initialization failed", ex);
                servletContext.setAttribute(WebApplicationContext.ROOT_WEB_APPLICATION_CONTEXT_ATTRIBUTE, ex);
                throw ex;
            }
            catch (Error err) {
                logger.error("Context initialization failed", err);
                servletContext.setAttribute(WebApplicationContext.ROOT_WEB_APPLICATION_CONTEXT_ATTRIBUTE, err);
                throw err;
            }
        }


    从上面的代码可以看出,我们创建好的applicationContext容器会放在servletContext中。servletContext是什么  呢?

    在web容器中,通过ServletContext为Spring的IOC容器提供宿主环境,对应的建立起一个IOC容器的体系。其中,首先需要建立的是根上下文,这个上下文持有的对象可以有业务对象,数据存取对象,资源,事物管理器等各种中间层对象。在这个上下文的基础上,和web MVC相关还会有一个上下文来保存控制器之类的MVC对象,这样就构成了一个层次化的上下文结构。

    从initWebApplicationContext中可以看到真正创建applicationContext容器是由createWebApplicationContext方法来实现的,它的代码如下:


    protected WebApplicationContext createWebApplicationContext(
                ServletContext servletContext, ApplicationContext parent) throws BeansException
        {
            // 首先决定要创建的applicationContext容器的类
            Class contextClass = determineContextClass(servletContext);
            // 如果获取到的类不是ConfigurableWebApplicationContext类型的,则创建容器失败,所以这里创建的容器必须是ConfigurableWebApplicationContext类型的
            if (!ConfigurableWebApplicationContext.class.isAssignableFrom(contextClass))
            {
                throw new ApplicationContextException("Custom context class [" + contextClass.getName() +
                        "] is not of type [" + ConfigurableWebApplicationContext.class.getName() + "]");
            }

            // 实例化spring容器
            ConfigurableWebApplicationContext wac =
                    (ConfigurableWebApplicationContext) BeanUtils.instantiateClass(contextClass);
            wac.setParent(parent);
            wac.setServletContext(servletContext);
            // 获取contextConfigLocation初始化参数,该参数记录的是需要载入的多个配置文件(即定义bean的配置文件)
            String configLocation = servletContext.getInitParameter(CONFIG_LOCATION_PARAM);
            if (configLocation != null)
            {
                wac.setConfigLocations(StringUtils.tokenizeToStringArray(configLocation,
                        ConfigurableWebApplicationContext.CONFIG_LOCATION_DELIMITERS));
            }

            wac.refresh();
            return wac;
        }
createWebApplicationContext方法实现步骤为:
1. 首先决定要创建的applicationContext容器的类
2. 实例化applicationContext容器
但它是如何决定要创建的容器类呢?我们看一下determineContextClass方法:
    protected Class determineContextClass(ServletContext servletContext) throws ApplicationContextException
        {
            // 从web.xml中获取需要初始化的容器的类名
            String contextClassName = servletContext.getInitParameter(CONTEXT_CLASS_PARAM);
            // 如果获取到的类名不为空,则创建该容器的Class对象
            if (contextClassName != null)
            {
                try {
                    return ClassUtils.forName(contextClassName);
                }
                catch (ClassNotFoundException ex) {
                    throw new ApplicationContextException(
                            "Failed to load custom context class [" + contextClassName + "]", ex);
                }
            }
            // 否则创建默认的容器的Class对象,即:org.springframework.web.context.support.XmlWebApplicationContext
            // 在创建ContextLoader时,defaultStrategies = PropertiesLoaderUtils.loadProperties(resource);这句代码已经准备好默认的容器类
            else
            {
                contextClassName = defaultStrategies.getProperty(WebApplicationContext.class.getName());
                try
                {
                    return ClassUtils.forName(contextClassName);
                }
                catch (ClassNotFoundException ex)
                {
                    throw new ApplicationContextException(
                            "Failed to load default context class [" + contextClassName + "]", ex);
                }
            }
        }
该方法首先判断从web.xml文件的初始化参数CONTEXT_CLASS_PARAM(的定义为public static final String CONTEXT_CLASS_PARAM = "contextClass";)获取的的类名是否存在,如果存在,则容器的Class;否则返回默认的Class。如何获取默认的容器Class,注意看创建contextLoader时的代码注释就知道了。
由此看来,spring不仅有默认的applicationContext的容器类,还允许我们自定义applicationContext容器类,不过Spring不建义我们自定义applicationContext容器类。
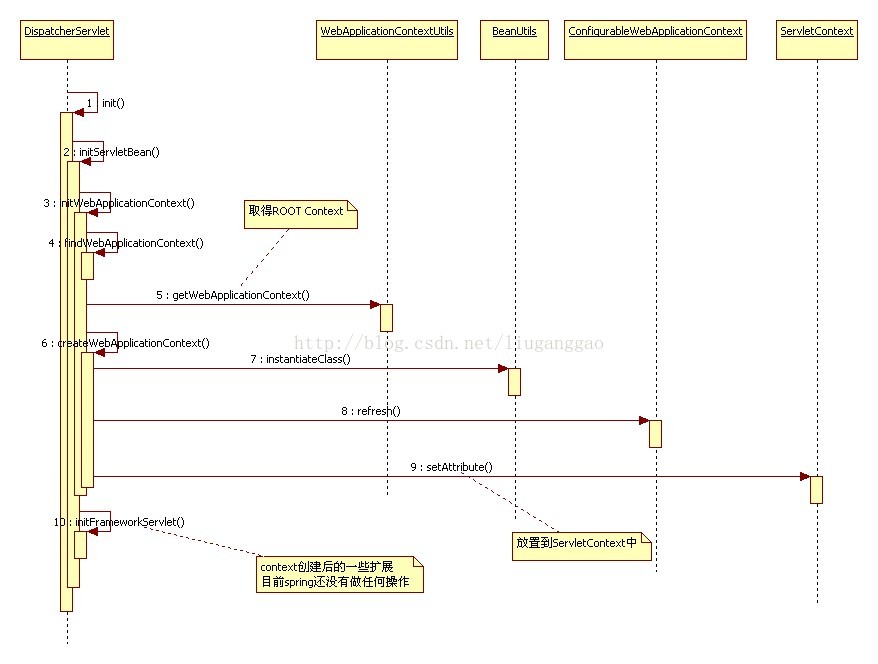
2、利用load-on-startup Servlet实现。
    <servlet>
        <servlet-name>springServlet</servlet-name>
        <servlet-class>org.springframework.web.servlet.DispatcherServlet</servlet-class>
        <init-param>
            <param-name>contextConfigLocation</param-name>
            <param-value>/WEB-INF/spring-mvc.xml</param-value>
        </init-param>
        <load-on-startup>1</load-on-startup>
    </servlet>
    <servlet-mapping>
        <servlet-name>springServlet</servlet-name>
        <url-pattern>/</url-pattern>
    </servlet-mapping>
好了,这就是spring的IoC容器在web容器如何启动和起作用的全部过程。细心的朋友可以看出创建applicationContext容器的同时会初始化配置文件中定义的bean类,createWebApplicationContext方法中的wac.refresh();这段代码就是用来初始化配置文件中定义的bean类的。它具体的实现过程现在还没完全搞清楚,等搞清楚了再跟大家分享!


 被折叠的 条评论
为什么被折叠?
被折叠的 条评论
为什么被折叠?
 到【灌水乐园】发言


