


开放封闭原则(OCP,Open Closed Principle)是所有面向对象原则的核心。软件设计本身所追求的目标就是封装变化、降低耦合,而开放封闭原则正是对这一目标的最直接体现。
在软件架构中,模块化编程思想将系统分成很多的模块,模块内部关注自身需要实现的核心业务。模块间的低耦合,而模块内的高聚合。
在Windows、linux及unix等操作系统中,我们常常看见动态链接库(.dll/.so),静态库(.lib/.a)身影。动态链接库和静态库也就是我们所说的模块化设计思想。
共享库的主要特征是实现资源共享,信息封装隐蔽,这样会带来这样的优势:
1) 当开发商业化软件时,保护了自己的知识产权;
2) 软件架构清晰,减少软件测试的难度;
3) 模块化软件升级便捷。
在VxWorks6.X之后,Workbench3.0工程中有了Shared library project功能。互联网上这方面内容不知道为何那么少?这一点我感觉比较迷惑?
本文从Windows环境下开发常用的动态链接库和静态库两点出发,解决我们初学者首次在开发过程中可能出现各种的问题(如有)。考虑到我们在动态编译过程中,使用苍白的文本可能并不能完全清晰地说明问题。因此,本文使用了大量的截图,描述编译中需要的配置。
尽管本文使用C++编写的测试范例很简单,但对于入门VxWorks共享库编程还是有所帮助的,希望此文能对你将来开发复杂的系统提供微薄之力。
下面的内容可能显得比较简单,而有些编译过程中碰到的问题,网络上也需求不到答案,也许你也曾经困惑过。
一、目录组织
WorkSapce:“D:\casco800A\fep\code\test_sys”
文件组织:--d:/casco800A
---------------------/fep
---------------------------/bin
---------------------------/lib
---------------------------/code
----------------------------------/test_sys
二、设置环境变量FEPROOT
注意:在文件路径书写上,除了Windows相关的操作系统,其他操作系统中,我建议你统一使用反斜杠,否则在后面使用该环境变量时出现不能识别的问题。
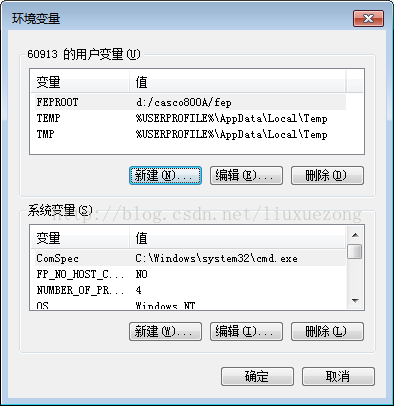
图2.1 环境变量设置
三、创建动态链接库(.so)
我们首先建立一个名称为“libdemo”动态链接库。根据向导按照如下步骤执行即可,其余选项都按系统默认。

图3.1 新建so动态链接库
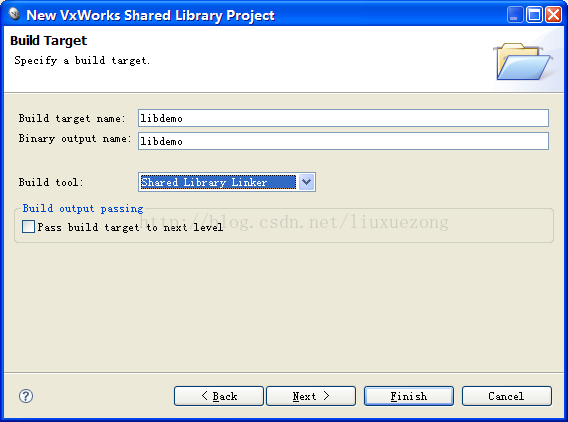
图3.2 选择动态链接库
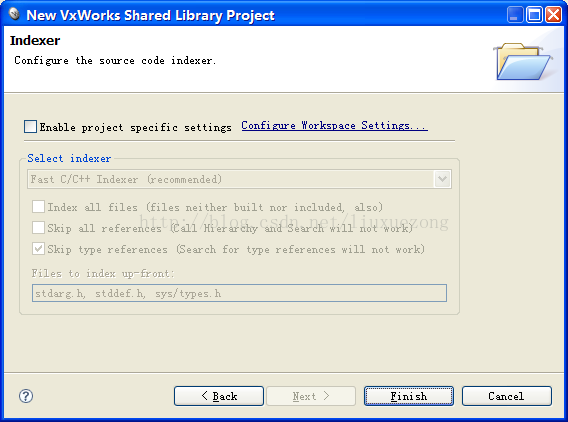
图3.3 完成向导
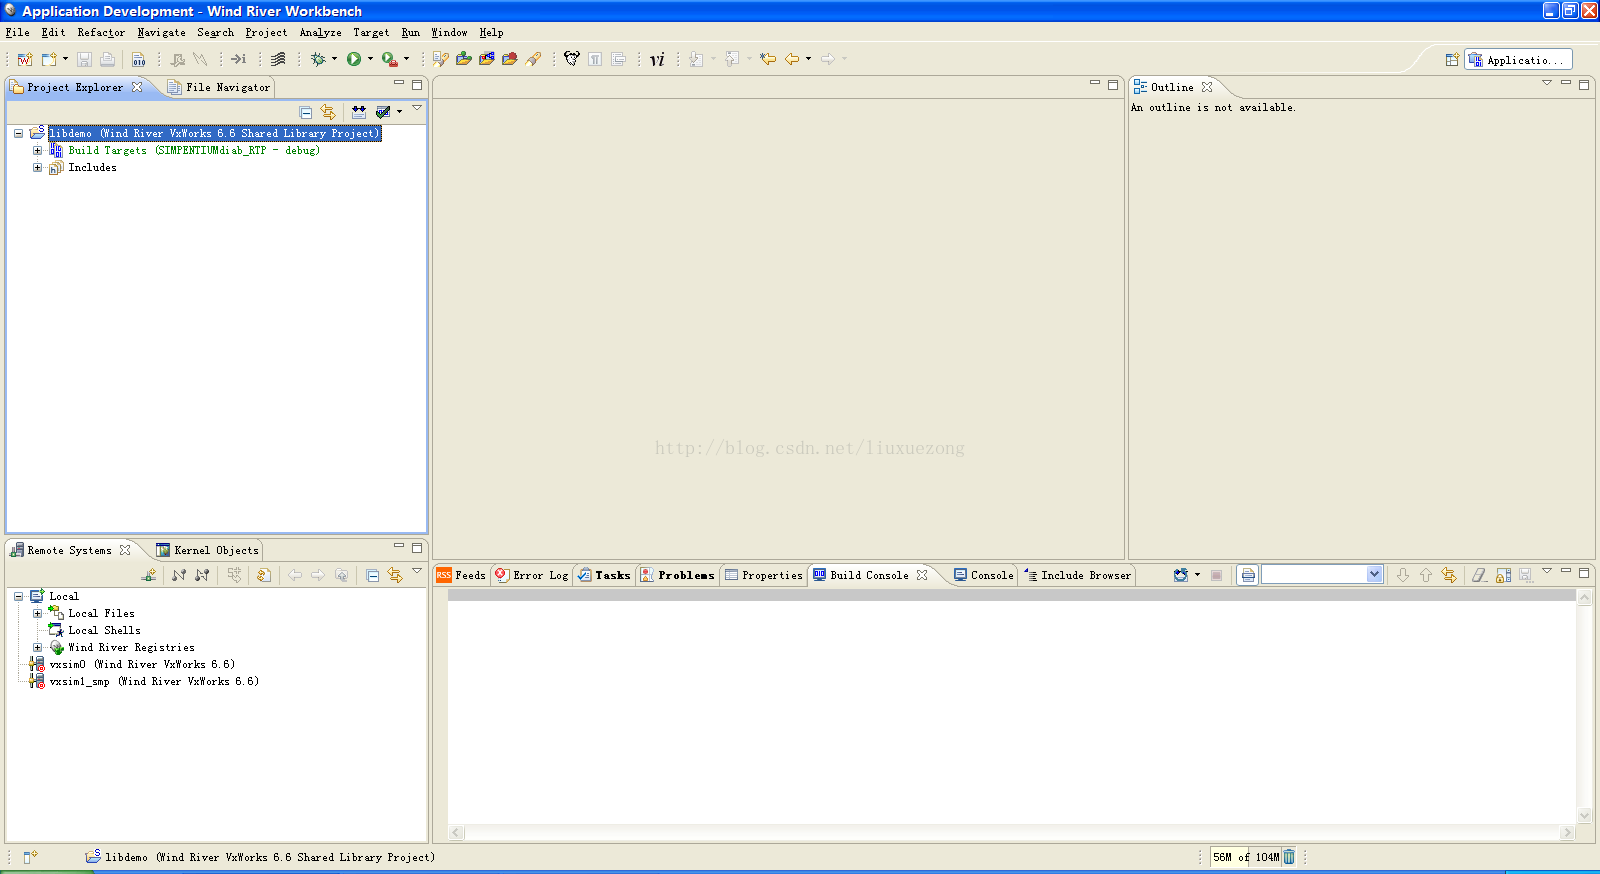
图3.4 生成后的框架
图2.4生成的框架,在没有编译之前只有两个目录,此时我们不要急着编译,否则你可能出现没法编译生成期望的libdemo.so文件。
关于为何加入的新文件,workbench不能生成*.so,这一点我在网络上查找了很多文档都没提示说明,也许WorkBench就是这么设计的。
其实具体的原因很简单,该开发环境选择的工程一旦编译,自动生成MakeFile就不因为新加的文件而自动修改。当前我们要添加相应的资源文件*.cpp和*.h文件,具体内容在后面会讲到。
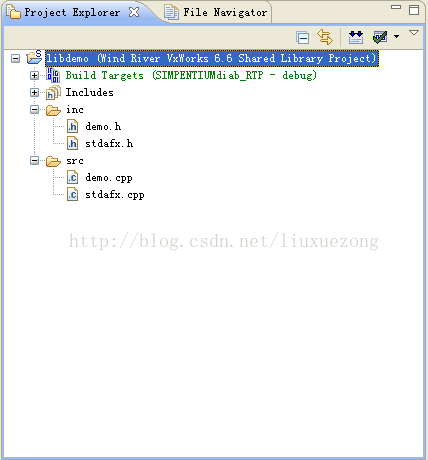
图3.5 添加两个文件夹inc和src,并建立相应的文件
1)stdafx.h实现代码:
// stdafx.h : include file for standard system include files,
// or project specific include files that are used frequently, but
// are changed infrequently
//
#if !defined(AFX_STDAFX_H__E5CE9468_AAF9_46A6_979B_9C125F6E9D00__INCLUDED_)
#define AFX_STDAFX_H__E5CE9468_AAF9_46A6_979B_9C125F6E9D00__INCLUDED_
#if _MSC_VER > 1000
#pragma once
#endif // _MSC_VER > 1000
#define WIN32_LEAN_AND_MEAN // Exclude rarely-used stuff from Windows headers
#include <stdio.h>
// TODO: reference additional headers your program requires here
//{{AFX_INSERT_LOCATION}}
// Microsoft Visual C++ will insert additional declarations immediately before the previous line.
#endif // !defined(AFX_STDAFX_H__E5CE9468_AAF9_46A6_979B_9C125F6E9D00__INCLUDED_)
2)stdafx.cpp实现代码:
// stdafx.cpp : source file that includes just the standard includes
// libdemo.pch will be the pre-compiled header
// stdafx.obj will contain the pre-compiled type information
#include "stdafx.h"
// TODO: reference any additional headers you need in STDAFX.H
// and not in this file
3)demo.h实现代码:
#ifndef _DEMO_H_
#define _DEMO_H_
// The following ifdef block is the standard way of creating macros which make exporting
// from a DLL simpler. All files within this DLL are compiled with the AE_DEMO_EXPORTS
// symbol defined on the command line. this symbol should not be defined on any project
// that uses this DLL. This way any other project whose source files include this file see
// AE_DEMO_ENTRY functions as being imported from a DLL, wheras this DLL sees symbols
// defined with this macro as being exported.
#ifdef WIN32
#ifdef AE_DEMO_EXPORTS
#define AE_DEMO_ENTRY__declspec(dllexport)
#else
#define AE_DEMO_ENTRY__declspec(dllimport)
#endif
#else
#define AE_DEMO_ENTRY
#endif
// This class is exported from the libdemo.dll
class AE_DEMO_ENTRY CTest
{
public:
CTest();
virtual ~CTest();
public:
int Add(int a,int b);
protected:
int m_nCount;
};
extern AE_DEMO_ENTRY int nTest;
AE_DEMO_ENTRY int fnTest();
#endif // _DEMO_H_
4)demo.cpp实现代码:
#include "stdafx.h"
#include "demo.h"
// This is an example of an exported variable
AE_DEMO_ENTRY int nTest = 0x64;
// This is an example of an exported function.
AE_DEMO_ENTRY int fnTest()
{
return 64;
}
// This is the constructor of a class that has been exported.
// see demo.h for the class definition
CTest::CTest()
{
}
CTest::~CTest()
{
}
int CTest::Add(int a,int b)
{
return (a + b);
}
当然我们实现的代码资源已经存在,我们可以直接导入关联的文件即可:
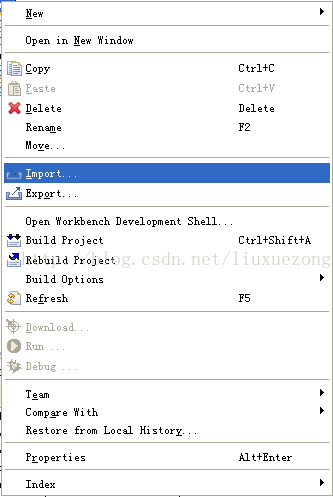
图3.6 直接导入资源文件
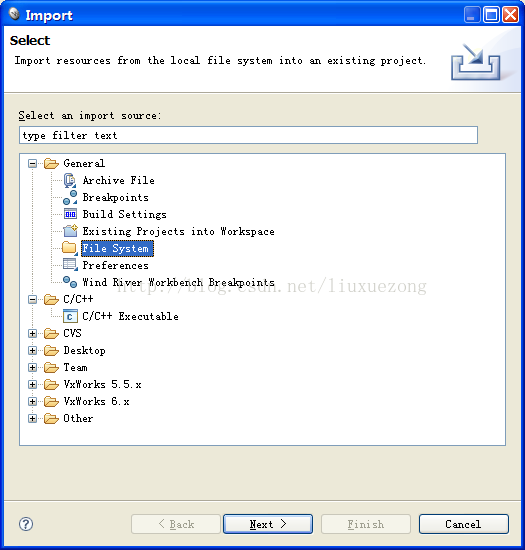
图3.7 选择“File System”
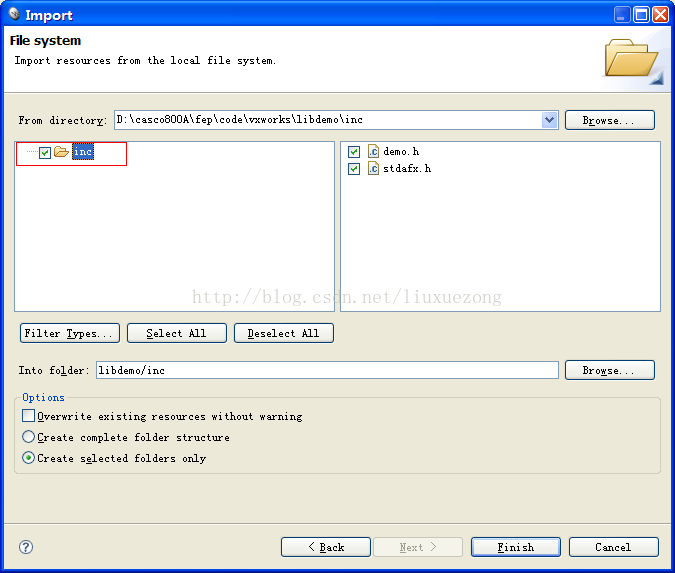
图3.8 导入相应的资源
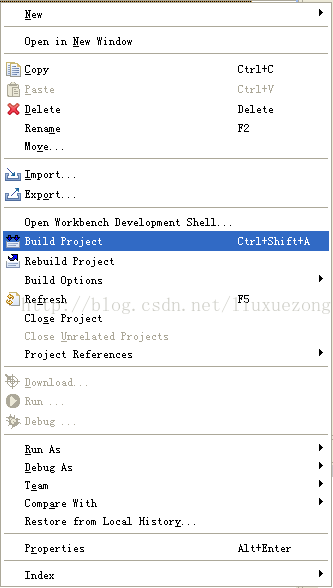
图3.9 编译工程
我们发现“build console”出现如下错误,主要原因是包含路径问题:
Build Started in Project 'libdemo': 2015-02-07 21:35:56
Generation of makefiles started.
Generation of makefiles finished (Elapsed Time: 00:00).
Platform: Wind River VxWorks 6.6
Command: make --no-print-directory BUILD_SPEC=SIMPENTIUMdiab_RTP DEBUG_MODE=1 TRACE=1
Working Directory: D:/casco800A/fep/code/test_sys/libdemo/SIMPENTIUMdiab_RTP
if [ ! -d "`dirname "libdemo/Debug/Objects/libdemo/src/demo.sho"`" ]; then mkdir -p "`dirname "libdemo/Debug/Objects/libdemo/src/demo.sho"`"; fi;echo "building libdemo/Debug/Objects/libdemo/src/demo.sho"; dplus -g -tX86LH:rtpsim -Xansi -Xforce-declarations -Xmake-dependency=0xd -Xpic -IC:/WindRiver-GPPVE-3.6-PPC-Eval/vxworks-6.6/target/usr/h -IC:/WindRiver-GPPVE-3.6-PPC-Eval/vxworks-6.6/target/usr/h/wrn/coreip -D_VX_CPU=_VX_SIMPENTIUM -D_VX_TOOL_FAMILY=diab -D_VX_TOOL=diab -o "libdemo/Debug/Objects/libdemo/src/demo.sho" -c "D:/casco800A/fep/code/test_sys/libdemo/src/demo.cpp"
building libdemo/Debug/Objects/libdemo/src/demo.sho
"D:/casco800A/fep/code/test_sys/libdemo/src/demo.cpp", line 1: catastrophic error (etoa:4005):
could not open source file "stdafx.h"
#include "stdafx.h"
^
1 catastrophic error detected in the compilation of "D:/casco800A/fep/code/test_sys/libdemo/src/demo.cpp".
Compilation terminated.
C:\WindRiver-GPPVE-3.6-PPC-Eval\workbench-3.0\x86-win32\bin\make.exe: *** [libdemo/Debug/Objects/libdemo/src/demo.sho] Error 1
Build Failed in Project 'libdemo' (Process Exit Value was 2): 2015-02-07 21:35:57 (Elapsed Time: 00:01)
解决方法:
熟悉微软VS开发环境的人基本都很清楚,怎么让自己生成的目标文件和对象拷贝到何方,包括引用的动态库和引用目录,这一切都是从project->setting内设置。
1)增加copy功能,我们通常把动态库与运行程序放在bin目录下。
echo "copy $@ to $(FEPROOT)/bin"; cp -f "$@" $(FEPROOT)/bin/libdemo.so
也可以这样写,让系统生成默认的文件,其中$@可以不加“”:
echo "copy $@ to $(FEPROOT)/bin"; cp -f $@ $(FEPROOT)/bin
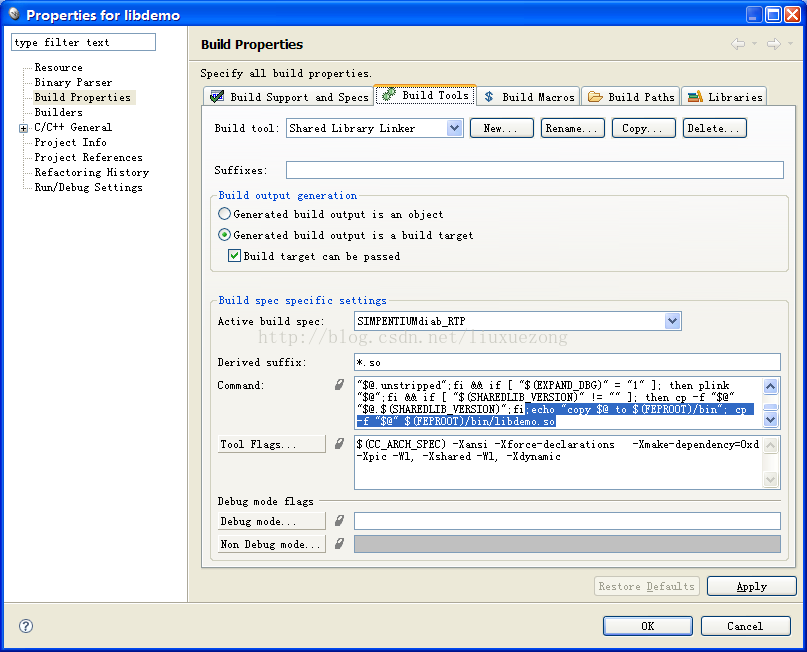
图3.10 增加copy功能命令
2)增加路径包含功能,注意相对目录层次。
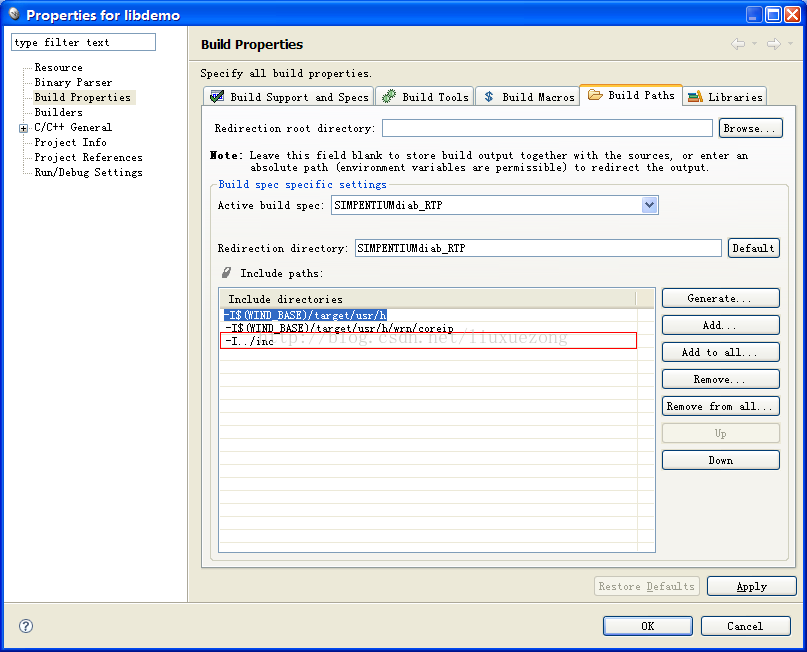
图3.11 增加“inc”目录,可以写成“-I$(PRJ_ROOT_DIR/inc”
3)再次编译即可通过
Build Started in Project 'libdemo': 2015-02-07 21:41:55
Generation of makefiles started.
Generation of makefiles finished (Elapsed Time: 00:00).
Platform: Wind River VxWorks 6.6
Command: make --no-print-directory BUILD_SPEC=SIMPENTIUMdiab_RTP DEBUG_MODE=1 TRACE=1
Working Directory: D:/casco800A/fep/code/test_sys/libdemo/SIMPENTIUMdiab_RTP
if [ ! -d "`dirname "libdemo/Debug/Objects/libdemo/src/demo.sho"`" ]; then mkdir -p "`dirname "libdemo/Debug/Objects/libdemo/src/demo.sho"`"; fi;echo "building libdemo/Debug/Objects/libdemo/src/demo.sho"; dplus -g -tX86LH:rtpsim -Xansi -Xforce-declarations -Xmake-dependency=0xd -Xpic -IC:/WindRiver-GPPVE-3.6-PPC-Eval/vxworks-6.6/target/usr/h -IC:/WindRiver-GPPVE-3.6-PPC-Eval/vxworks-6.6/target/usr/h/wrn/coreip -I../inc -D_VX_CPU=_VX_SIMPENTIUM -D_VX_TOOL_FAMILY=diab -D_VX_TOOL=diab -o "libdemo/Debug/Objects/libdemo/src/demo.sho" -c "D:/casco800A/fep/code/test_sys/libdemo/src/demo.cpp"
building libdemo/Debug/Objects/libdemo/src/demo.sho
if [ ! -d "`dirname "libdemo/Debug/Objects/libdemo/src/stdafx.sho"`" ]; then mkdir -p "`dirname "libdemo/Debug/Objects/libdemo/src/stdafx.sho"`"; fi;echo "building libdemo/Debug/Objects/libdemo/src/stdafx.sho"; dplus -g -tX86LH:rtpsim -Xansi -Xforce-declarations -Xmake-dependency=0xd -Xpic -IC:/WindRiver-GPPVE-3.6-PPC-Eval/vxworks-6.6/target/usr/h -IC:/WindRiver-GPPVE-3.6-PPC-Eval/vxworks-6.6/target/usr/h/wrn/coreip -I../inc -D_VX_CPU=_VX_SIMPENTIUM -D_VX_TOOL_FAMILY=diab -D_VX_TOOL=diab -o "libdemo/Debug/Objects/libdemo/src/stdafx.sho" -c "D:/casco800A/fep/code/test_sys/libdemo/src/stdafx.cpp"
building libdemo/Debug/Objects/libdemo/src/stdafx.sho
if [ ! -d "`dirname "libdemo/Debug/libdemo.so"`" ]; then mkdir -p "`dirname "libdemo/Debug/libdemo.so"`"; fi;echo "building libdemo/Debug/libdemo.so";SONAME=`basename ""libdemo/Debug/libdemo.so""`;if [ "" != "" ]; then SONAME=$SONAME.;fi; dplus -tX86LH:rtpsim -Xansi -Xforce-declarations -Xmake-dependency=0xd -Xpic -Wl, -Xshared -Wl, -Xdynamic -soname="$SONAME" -o "libdemo/Debug/libdemo.so" libdemo/Debug/Objects/libdemo/src/demo.sho libdemo/Debug/Objects/libdemo/src/stdafx.sho -lstlstd -LC:/WindRiver-GPPVE-3.6-PPC-Eval/vxworks-6.6/target/usr/lib/simpentium/SIMPENTIUM/common/PIC && if [ "0" = "1" ]; then mv -f "libdemo/Debug/libdemo.so" "libdemo/Debug/libdemo.so.unstripped" && strippentium -g -o "libdemo/Debug/libdemo.so" "libdemo/Debug/libdemo.so.unstripped";fi && if [ "0" = "1" ]; then plink "libdemo/Debug/libdemo.so";fi && if [ "" != "" ]; then cp -f "libdemo/Debug/libdemo.so" "libdemo/Debug/libdemo.so.";fi;echo "copy libdemo/Debug/libdemo.so to d:/casco800A/fep/bin"; cp -f "libdemo/Debug/libdemo.so" d:/casco800A/fep/bin/libdemo.so
building libdemo/Debug/libdemo.so
copy libdemo/Debug/libdemo.so to d:/casco800A/fep/bin
make: built targets of D:/casco800A/fep/code/test_sys/libdemo/SIMPENTIUMdiab_RTP
Build Finished in Project 'libdemo': 2015-02-07 21:41:56 (Elapsed Time: 00:01)
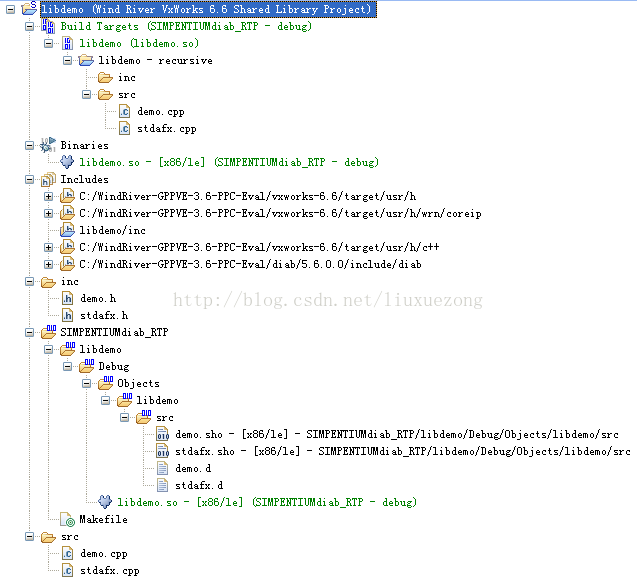
图3.12 工程生成之后的目录状况
4)当然您还可以通过shell直接编译
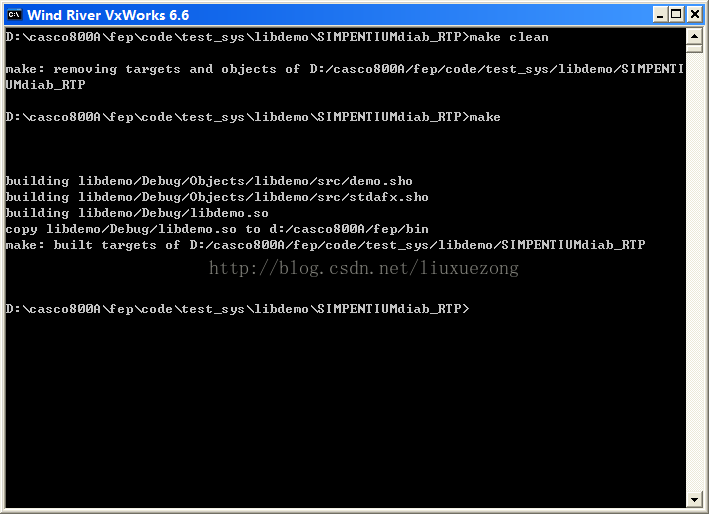
图3.13 shell编译工程
当然如果你直接修改MakeFile也是可以的,但是我建议你不要这么费工夫,让系统按照它自己的规则定义是最好的(我是这么看的)。因此,只要执行下面的操作,然后再次编译工程即可。

图3.14 删除选择的文件夹,让系统重新生成MakeFile
使用图3.14这种方式,对于刚新建而加入的文件(*.cpp)特别适合。
四、创建RTP测试程序(testdemo)

图4.1 创建testdemo工程(RTP)
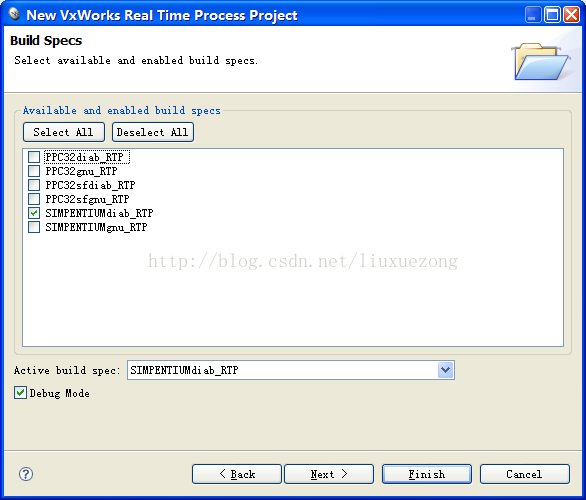
图4.2 选择SIMPENTIUMdiab_RTP
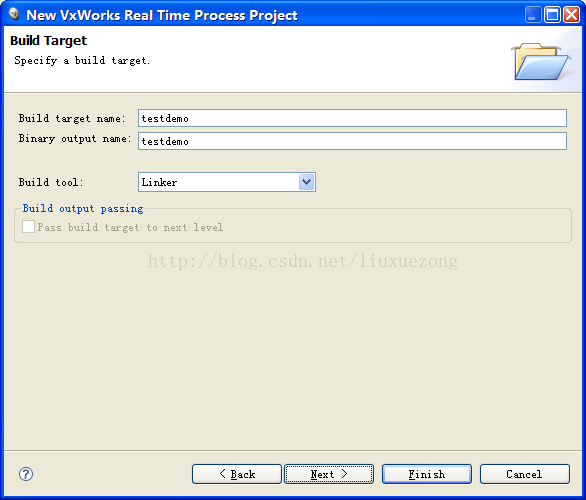
图4.3 选择Linker编译工具
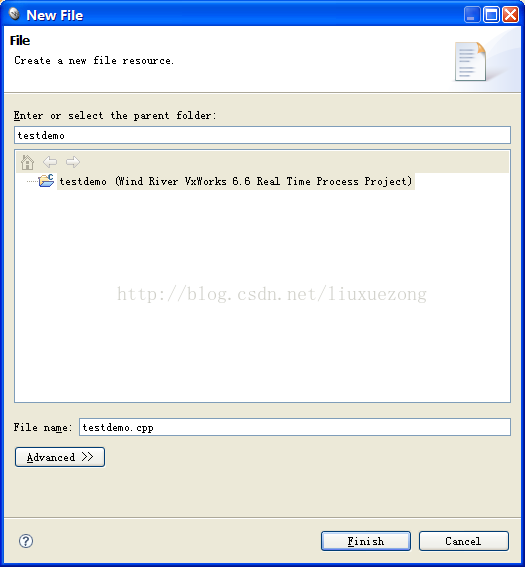
图4.4 新建文件testdemo.cpp
(stdafx.cpp和stdafx.h与上面类似)
// testdemo.cpp : Defines the entry point for the console application.
//
#include "stdafx.h"
#include "demo.h"
int main(int argc,char* argv[])
{
CTest test;
int nSum = test.Add(1, 2);
printf("a=1,b=2,sum=%d\n", nSum);
printf("nTest=%d\n", nTest);
printf("int fnTest() return %d\n", fnTest());
return 0;
}
项目属性设置:
1)增加copy功能,我们通常把动态库与运行程序放在bin目录下。
echo "copy $@ to $(FEPROOT)/bin"; cp -f "$@" $(FEPROOT)/bin/testdemo.so
也可以写成这样:
echo "copy $@ to $(FEPROOT)/bin"; cp -f $@ $(FEPROOT)/bin
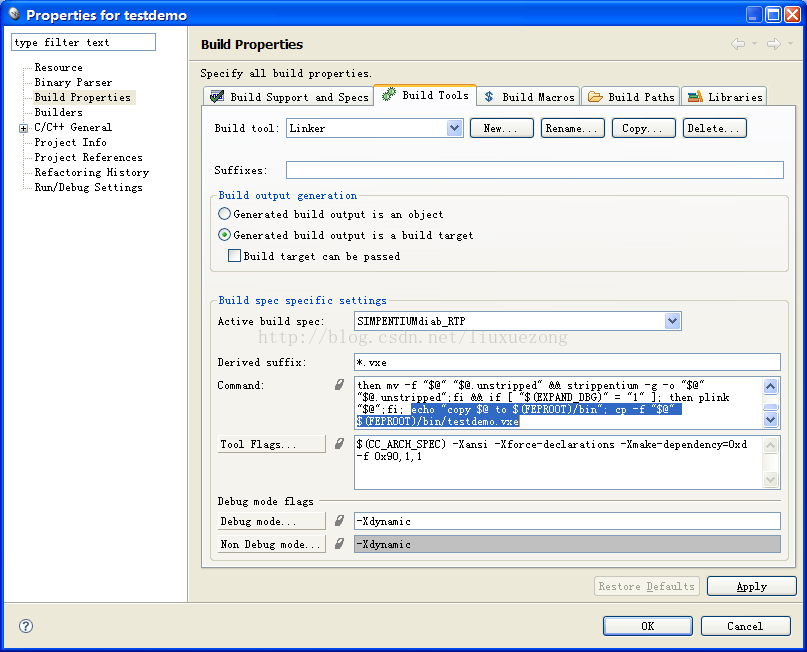
图4.5增加“copy”功能
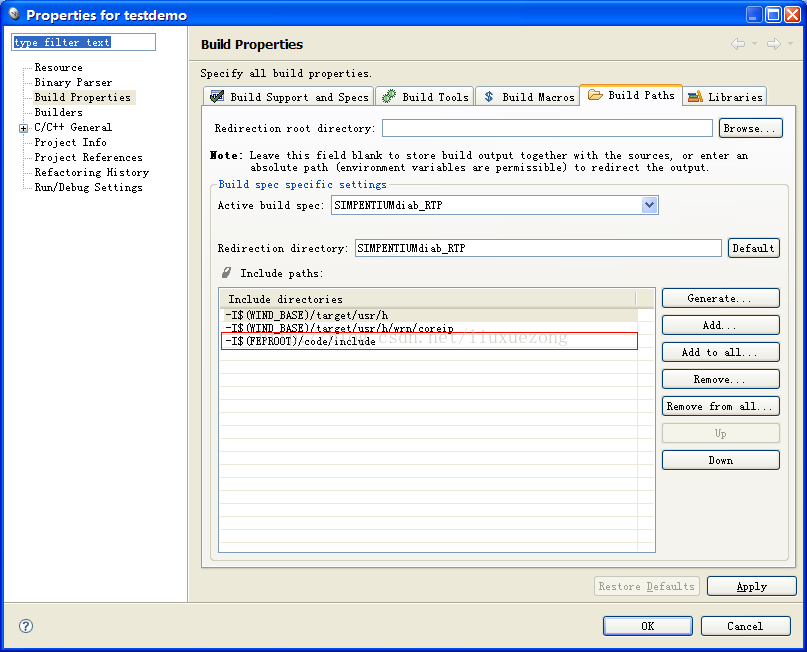
图4.6增加“copy”功能
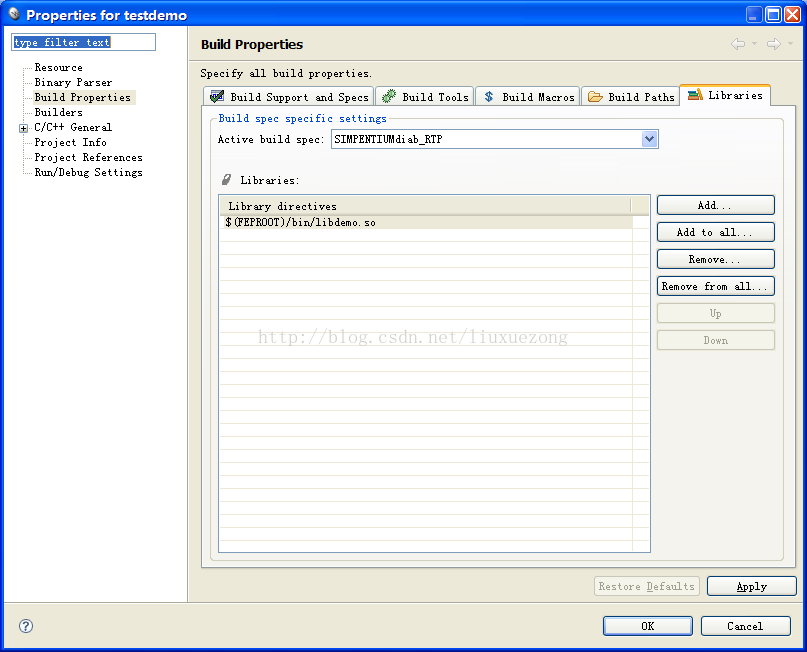
图4.7 增加libdemo.so动态链接库引用
如果我们不按照图4.7指定方法添加,那么你还可以按照下列(图4.8—图4.10)设置完成,这样我们可以把动态链接库和静态库统一使用这样配置:
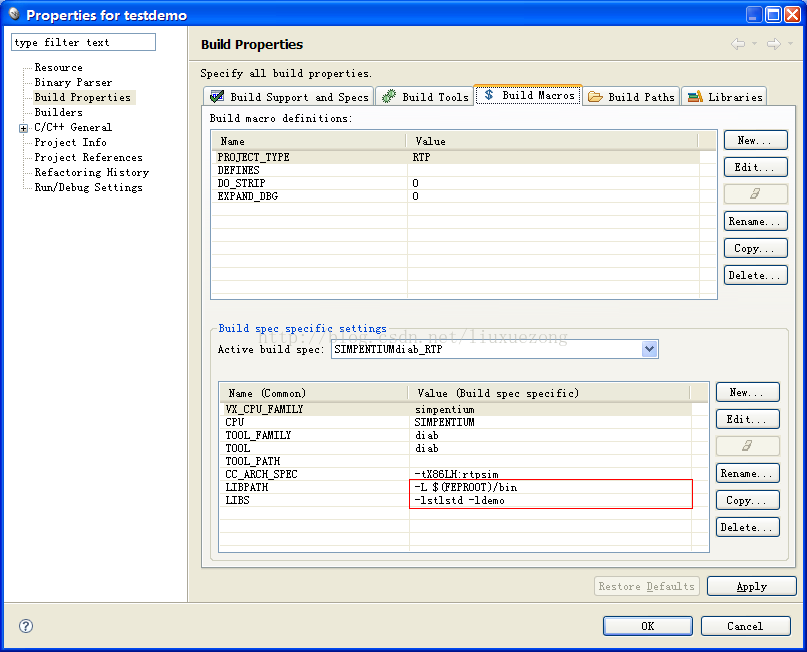
图4.8 常规增加libdemo.so动态链接库引用
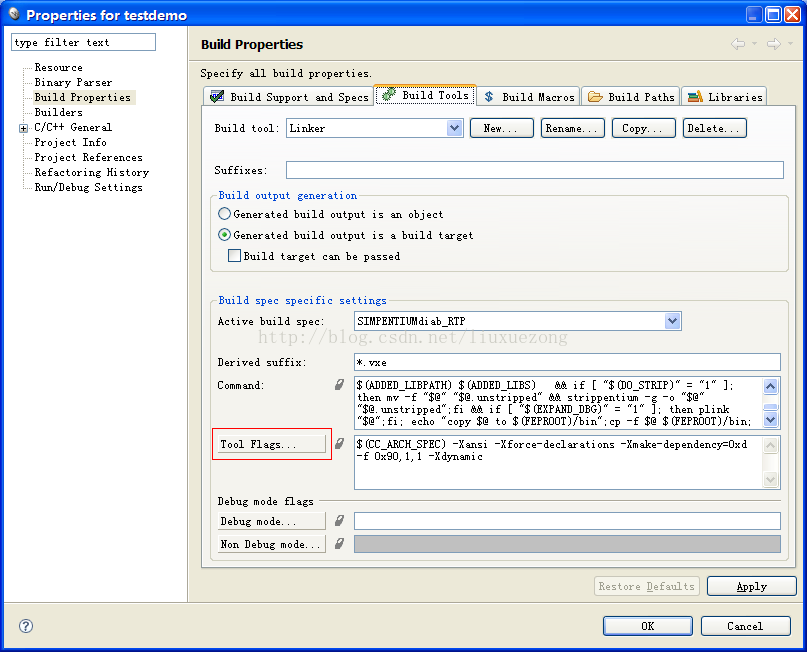
图4.9 设置编译选项:-Xdynmaic
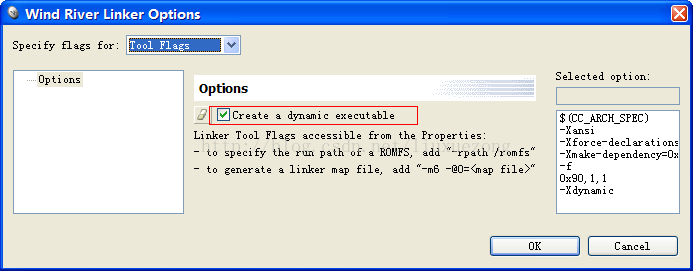
图4.10选中:Create a dynamic executable
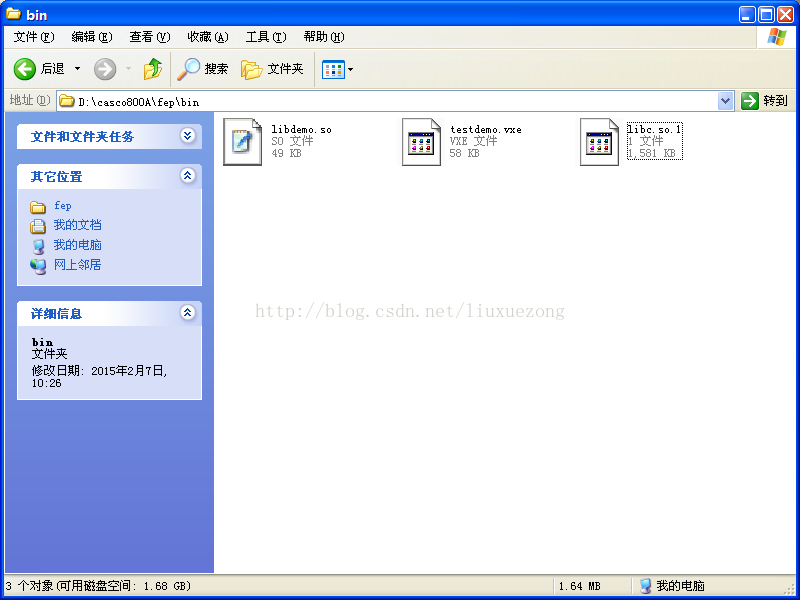
图4.11 bin目录下的动态库与运行程序
五、DEBUG程序
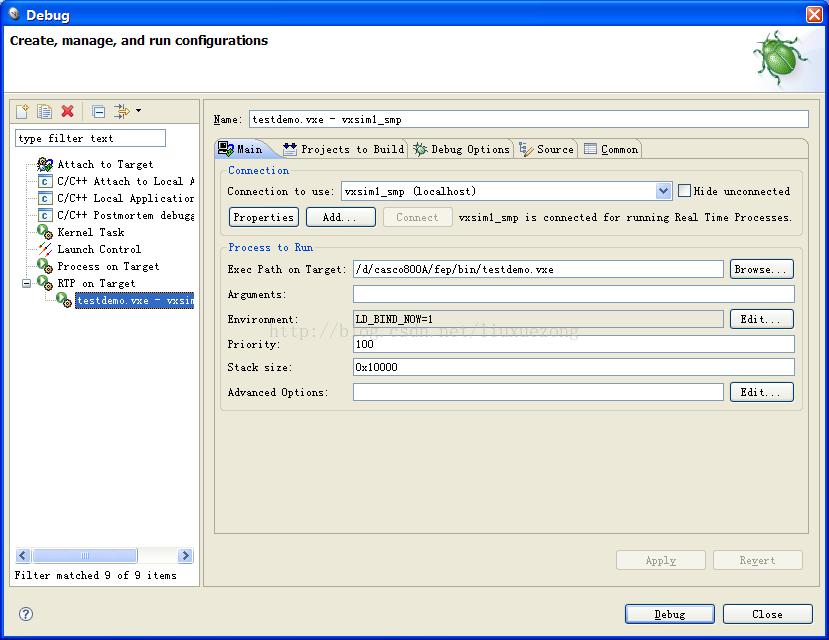
图5.1 Debug调试环境设置
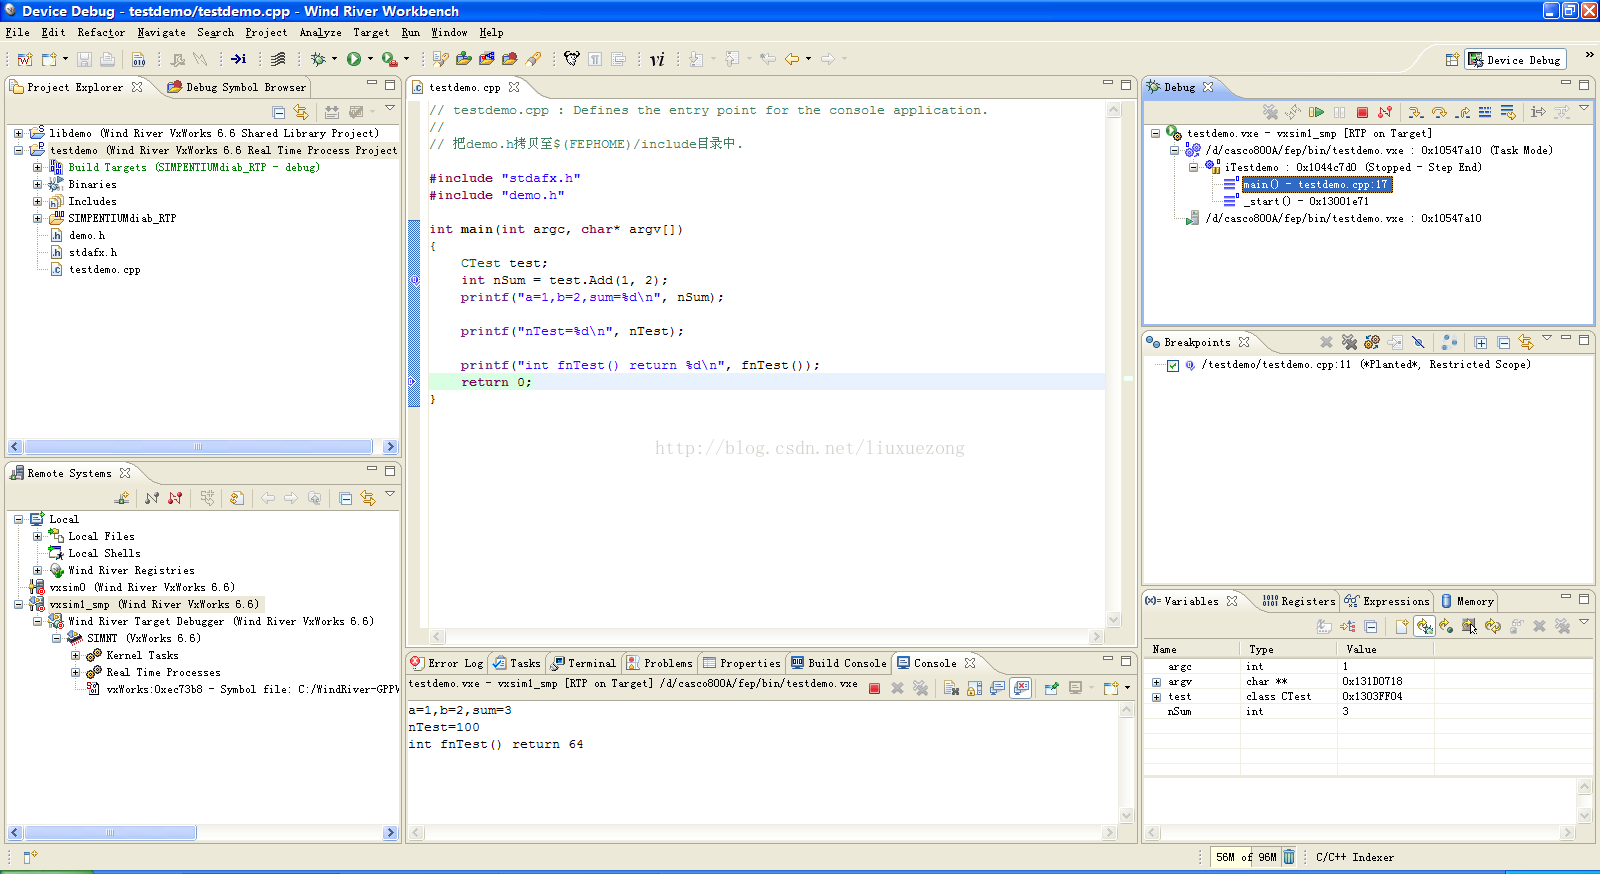
图5.2 Debug控制台输出内容
输出的结果:
a=1,b=2,sum=3
nTest=100
int fnTest() return 64
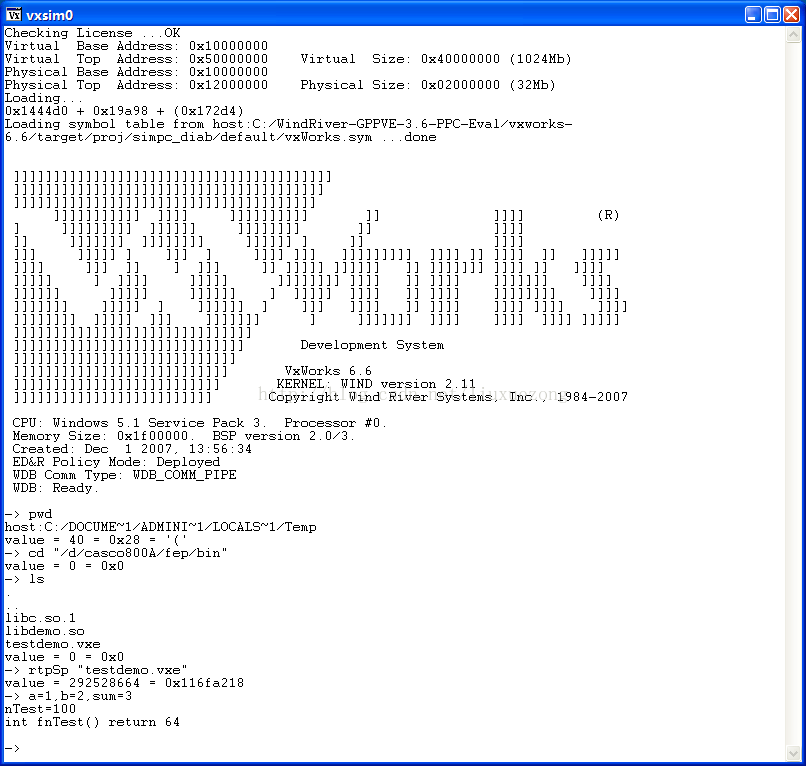
图5.3 vxsim0控制台输出内容
六、创建静态库(.a)
上面我们已经实现了动态链接库,并通过测试相应的范例程序。下面准备用两种方法生成静态库:
第1种常见方法:
依据工程向导,我们按照前面动态链接库的步骤即可,只要注意下面的设置选项:
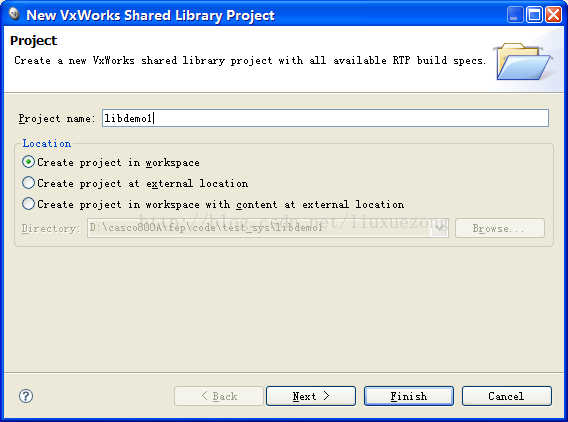
图6.1 创建libdemo1静态库(.a)
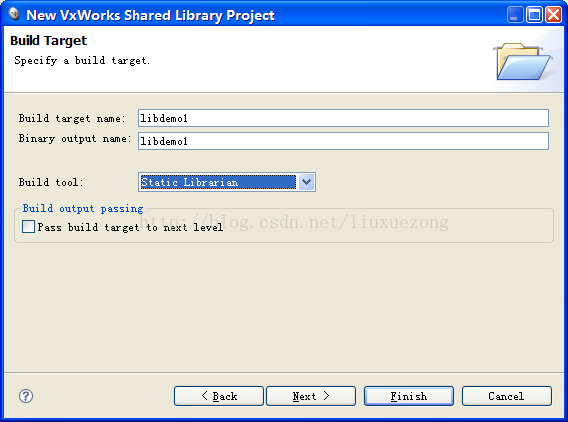
图6.2 选择静态库编译工具
添加上述静态库的文件,并编译工程libdemo1:
Build Started in Project 'libdemo1': 2015-02-10 10:11:42
Generation of makefiles started.
Generation of makefiles finished (Elapsed Time: 00:00).
Platform: Wind River VxWorks 6.6
Command: make --no-print-directory BUILD_SPEC=SIMPENTIUMdiab_RTP DEBUG_MODE=1 TRACE=1 clean all
Working Directory: D:/casco800A/fep/code/test_sys/libdemo1/SIMPENTIUMdiab_RTP
make: removing targets and objects of D:/casco800A/fep/code/test_sys/libdemo1/SIMPENTIUMdiab_RTP
if [ -d "libdemo1" ]; then cd "libdemo1"; rm -rf Debug; fi
if [ ! -d "`dirname "libdemo1/Debug/Objects/libdemo1/src/demo.sho"`" ]; then mkdir -p "`dirname "libdemo1/Debug/Objects/libdemo1/src/demo.sho"`"; fi;echo "building libdemo1/Debug/Objects/libdemo1/src/demo.sho"; dplus -g -tX86LH:rtpsim -Xansi -Xforce-declarations -Xmake-dependency=0xd -Xpic -IC:/WindRiver-GPPVE-3.6-PPC-Eval/vxworks-6.6/target/usr/h -IC:/WindRiver-GPPVE-3.6-PPC-Eval/vxworks-6.6/target/usr/h/wrn/coreip -I../inc -D_VX_CPU=_VX_SIMPENTIUM -D_VX_TOOL_FAMILY=diab -D_VX_TOOL=diab -o "libdemo1/Debug/Objects/libdemo1/src/demo.sho" -c "D:/casco800A/fep/code/test_sys/libdemo1/src/demo.cpp"
building libdemo1/Debug/Objects/libdemo1/src/demo.sho
if [ ! -d "`dirname "libdemo1/Debug/Objects/libdemo1/src/stdafx.sho"`" ]; then mkdir -p "`dirname "libdemo1/Debug/Objects/libdemo1/src/stdafx.sho"`"; fi;echo "building libdemo1/Debug/Objects/libdemo1/src/stdafx.sho"; dplus -g -tX86LH:rtpsim -Xansi -Xforce-declarations -Xmake-dependency=0xd -Xpic -IC:/WindRiver-GPPVE-3.6-PPC-Eval/vxworks-6.6/target/usr/h -IC:/WindRiver-GPPVE-3.6-PPC-Eval/vxworks-6.6/target/usr/h/wrn/coreip -I../inc -D_VX_CPU=_VX_SIMPENTIUM -D_VX_TOOL_FAMILY=diab -D_VX_TOOL=diab -o "libdemo1/Debug/Objects/libdemo1/src/stdafx.sho" -c "D:/casco800A/fep/code/test_sys/libdemo1/src/stdafx.cpp"
building libdemo1/Debug/Objects/libdemo1/src/stdafx.sho
if [ ! -d "`dirname "libdemo1/Debug/libdemo1.a"`" ]; then mkdir -p "`dirname "libdemo1/Debug/libdemo1.a"`"; fi;echo "building libdemo1/Debug/libdemo1.a"; dar crus "libdemo1/Debug/libdemo1.a" libdemo1/Debug/Objects/libdemo1/src/demo.sho libdemo1/Debug/Objects/libdemo1/src/stdafx.sho ; echo "copy libdemo1/Debug/libdemo1.a to d:/casco800A/fep/lib";cp -f libdemo1/Debug/libdemo1.a d:/casco800A/fep/lib;
building libdemo1/Debug/libdemo1.a
copy libdemo1/Debug/libdemo1.a to d:/casco800A/fep/lib
make: built targets of D:/casco800A/fep/code/test_sys/libdemo1/SIMPENTIUMdiab_RTP
Build Finished in Project 'libdemo1': 2015-02-10 10:11:42 (Elapsed Time: 00:01)
设置testdemo工程配置项:
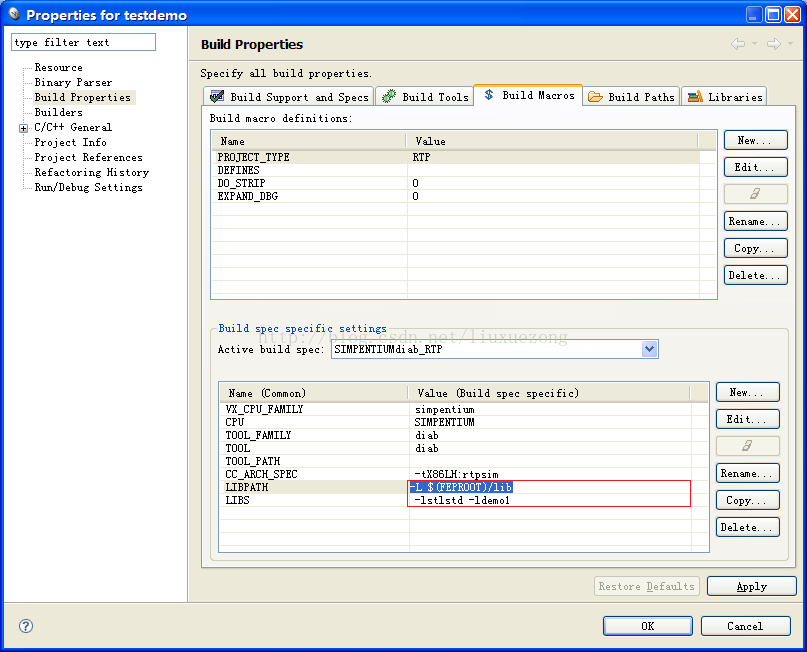
图6.3 配置引用的路径和静态库文件
重新编译testDemo工程:
Build Started in Project 'testdemo': 2015-02-10 10:14:02
Generation of makefiles started.
Generation of makefiles finished (Elapsed Time: 00:00).
Platform: Wind River VxWorks 6.6
Command: make --no-print-directory BUILD_SPEC=SIMPENTIUMdiab_RTP DEBUG_MODE=1 TRACE=1 clean all
Working Directory: D:/casco800A/fep/code/test_sys/testdemo/SIMPENTIUMdiab_RTP
make: removing targets and objects of D:/casco800A/fep/code/test_sys/testdemo/SIMPENTIUMdiab_RTP
if [ -d "testdemo" ]; then cd "testdemo"; rm -rf Debug; fi
if [ ! -d "`dirname "testdemo/Debug/Objects/testdemo/testdemo.o"`" ]; then mkdir -p "`dirname "testdemo/Debug/Objects/testdemo/testdemo.o"`"; fi;echo "building testdemo/Debug/Objects/testdemo/testdemo.o"; dplus -g -tX86LH:rtpsim -Xansi -Xforce-declarations -Xmake-dependency=0xd -IC:/WindRiver-GPPVE-3.6-PPC-Eval/vxworks-6.6/target/usr/h -IC:/WindRiver-GPPVE-3.6-PPC-Eval/vxworks-6.6/target/usr/h/wrn/coreip -Id:/casco800A/fep/code/include -D_VX_CPU=_VX_SIMPENTIUM -D_VX_TOOL_FAMILY=diab -D_VX_TOOL=diab -o "testdemo/Debug/Objects/testdemo/testdemo.o" -c "D:/casco800A/fep/code/test_sys/testdemo/testdemo.cpp"
building testdemo/Debug/Objects/testdemo/testdemo.o
if [ ! -d "`dirname "testdemo/Debug/testdemo.vxe"`" ]; then mkdir -p "`dirname "testdemo/Debug/testdemo.vxe"`"; fi;echo "building testdemo/Debug/testdemo.vxe"; dplus -tX86LH:rtpsim -Xansi -Xforce-declarations -Xmake-dependency=0xd -f 0x90,1,1 -o "testdemo/Debug/testdemo.vxe" testdemo/Debug/Objects/testdemo/testdemo.o -L d:/casco800A/fep/lib -lstlstd -ldemo1 -LC:/WindRiver-GPPVE-3.6-PPC-Eval/vxworks-6.6/target/usr/lib/simpentium/SIMPENTIUM/common && if [ "0" = "1" ]; then mv -f "testdemo/Debug/testdemo.vxe" "testdemo/Debug/testdemo.vxe.unstripped" && strippentium -g -o "testdemo/Debug/testdemo.vxe" "testdemo/Debug/testdemo.vxe.unstripped";fi && if [ "0" = "1" ]; then plink "testdemo/Debug/testdemo.vxe";fi; echo "copy testdemo/Debug/testdemo.vxe to d:/casco800A/fep/bin";cp -f testdemo/Debug/testdemo.vxe d:/casco800A/fep/bin;
building testdemo/Debug/testdemo.vxe
dld: warning: Undefined symbol '__GOTT_BASE__' in file 'demo.sho(d:/casco800A/fep/lib\libdemo1.a)'
dld: warning: Undefined symbol '__GOTT_INDEX__' in file 'demo.sho(d:/casco800A/fep/lib\libdemo1.a)'
dld: error: Undefined symbols found - no output written
copy testdemo/Debug/testdemo.vxe to d:/casco800A/fep/bin
cp: cannot stat `testdemo\\Debug\\testdemo.vxe': No such file or directory
C:\WindRiver-GPPVE-3.6-PPC-Eval\workbench-3.0\x86-win32\bin\make.exe: *** [testdemo/Debug/testdemo.vxe] Error 1
Build Failed in Project 'testdemo' (Process Exit Value was 2): 2015-02-10 10:14:03 (Elapsed Time: 00:01)
为什么这样,网络上也无语?
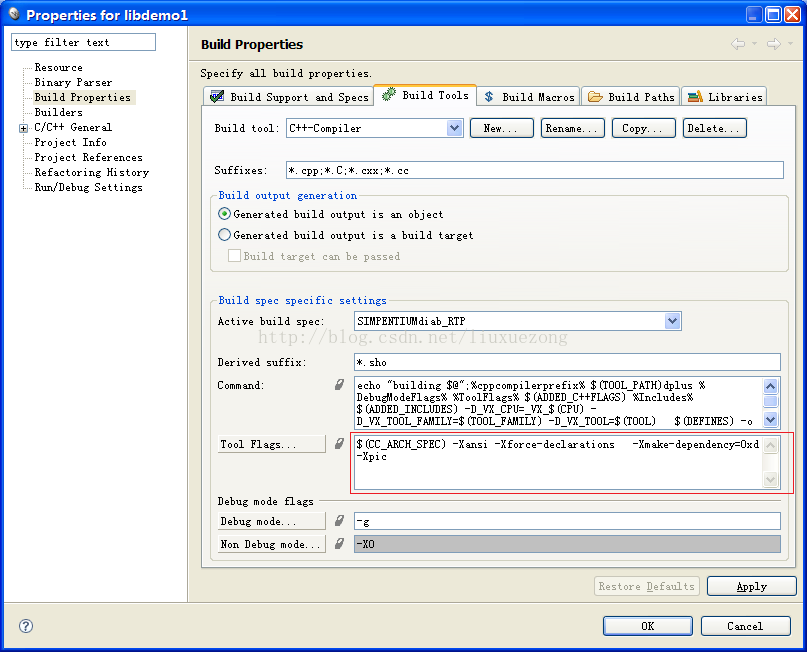
图6.4 C++编译器中有编译选项-Xpic
解决方法:
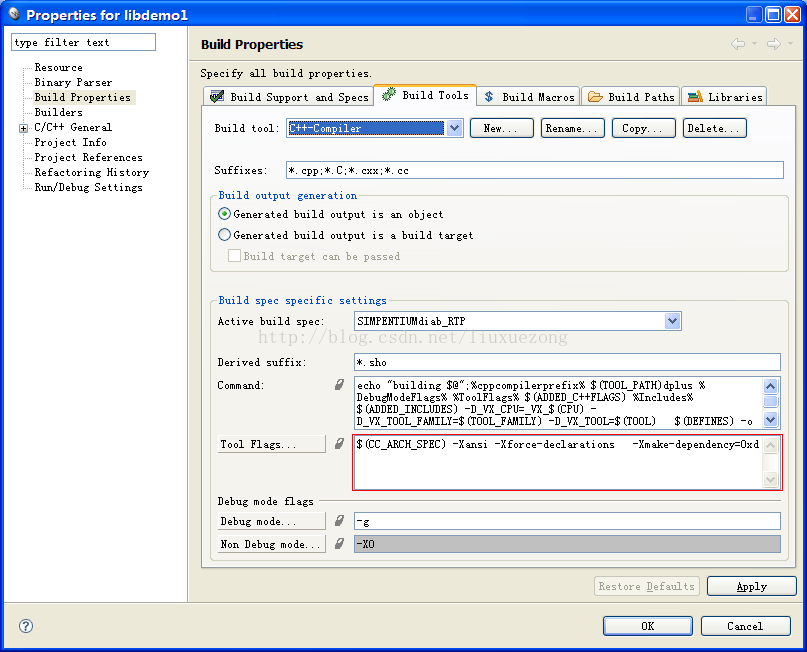
图6.5 去除C++编译选项-Xpic
重新编译libDemo1工程,重新编译testDemo工程:
Build Started in Project 'testdemo': 2015-02-10 10:27:25
Generation of makefiles started.
Generation of makefiles finished (Elapsed Time: 00:00).
Platform: Wind River VxWorks 6.6
Command: make --no-print-directory BUILD_SPEC=SIMPENTIUMdiab_RTP DEBUG_MODE=1 TRACE=1 clean all
Working Directory: D:/casco800A/fep/code/test_sys/testdemo/SIMPENTIUMdiab_RTP
make: removing targets and objects of D:/casco800A/fep/code/test_sys/testdemo/SIMPENTIUMdiab_RTP
if [ -d "testdemo" ]; then cd "testdemo"; rm -rf Debug; fi
if [ ! -d "`dirname "testdemo/Debug/Objects/testdemo/testdemo.o"`" ]; then mkdir -p "`dirname "testdemo/Debug/Objects/testdemo/testdemo.o"`"; fi;echo "building testdemo/Debug/Objects/testdemo/testdemo.o"; dplus -g -tX86LH:rtpsim -Xansi -Xforce-declarations -Xmake-dependency=0xd -IC:/WindRiver-GPPVE-3.6-PPC-Eval/vxworks-6.6/target/usr/h -IC:/WindRiver-GPPVE-3.6-PPC-Eval/vxworks-6.6/target/usr/h/wrn/coreip -Id:/casco800A/fep/code/include -D_VX_CPU=_VX_SIMPENTIUM -D_VX_TOOL_FAMILY=diab -D_VX_TOOL=diab -o "testdemo/Debug/Objects/testdemo/testdemo.o" -c "D:/casco800A/fep/code/test_sys/testdemo/testdemo.cpp"
building testdemo/Debug/Objects/testdemo/testdemo.o
if [ ! -d "`dirname "testdemo/Debug/testdemo.vxe"`" ]; then mkdir -p "`dirname "testdemo/Debug/testdemo.vxe"`"; fi;echo "building testdemo/Debug/testdemo.vxe"; dplus -tX86LH:rtpsim -Xansi -Xforce-declarations -Xmake-dependency=0xd -f 0x90,1,1 -o "testdemo/Debug/testdemo.vxe" testdemo/Debug/Objects/testdemo/testdemo.o -L d:/casco800A/fep/lib -lstlstd -ldemo1 -LC:/WindRiver-GPPVE-3.6-PPC-Eval/vxworks-6.6/target/usr/lib/simpentium/SIMPENTIUM/common && if [ "0" = "1" ]; then mv -f "testdemo/Debug/testdemo.vxe" "testdemo/Debug/testdemo.vxe.unstripped" && strippentium -g -o "testdemo/Debug/testdemo.vxe" "testdemo/Debug/testdemo.vxe.unstripped";fi && if [ "0" = "1" ]; then plink "testdemo/Debug/testdemo.vxe";fi; echo "copy testdemo/Debug/testdemo.vxe to d:/casco800A/fep/bin";cp -f testdemo/Debug/testdemo.vxe d:/casco800A/fep/bin;
building testdemo/Debug/testdemo.vxe
copy testdemo/Debug/testdemo.vxe to d:/casco800A/fep/bin
make: built targets of D:/casco800A/fep/code/test_sys/testdemo/SIMPENTIUMdiab_RTP
Build Finished in Project 'testdemo': 2015-02-10 10:27:25 (Elapsed Time: 00:01)
编译通过,调试testDemo:
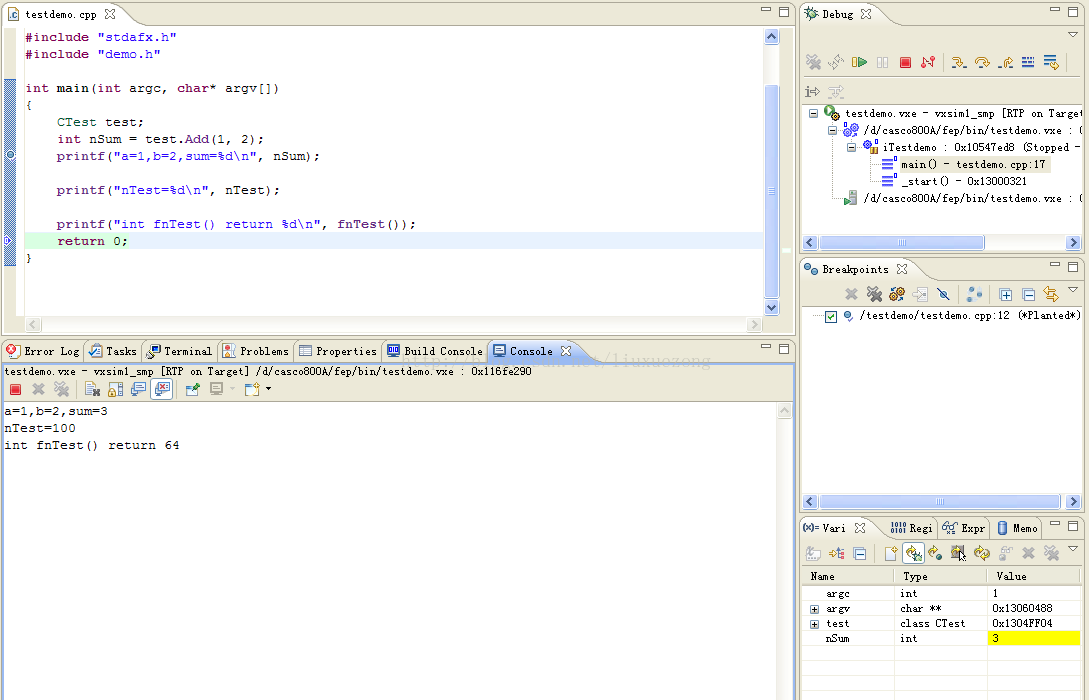
图6.6 测试结果
关于PIC补充一点说明:
缩写pic代表位置独立代码(position independent code)。
-Xpic:表示编译为位置独立的代码,不用此选项的话编译后的代码,是位置相关的。所以动态载入时是通过代码拷贝的方式来满足不同进程的需要,而不能达到真正代码段共享的目的。–shared:指明编译成动态库。
选项-Xpic表示输出的对象模块式按照可重定位地址(relocatable addressing)方式生成的。
第2种特殊方法:
这一种方法主要使用Real Time Process工程创建静态库,请注意下面的选项。

图6.7 创建libdemo2静态库
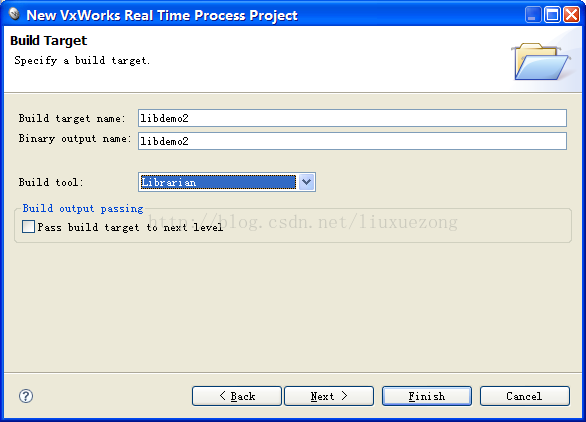
图6.8 选择静态库项
包含路径与libdemo一样即可,导入inc和src相关文件,再次编译libedem2:
Build Started in Project 'libdemo2': 2015-02-10 11:08:58
Generation of makefiles started.
Generation of makefiles finished (Elapsed Time: 00:00).
Platform: Wind River VxWorks 6.6
Command: make --no-print-directory BUILD_SPEC=SIMPENTIUMdiab_RTP DEBUG_MODE=1 TRACE=1 clean all
Working Directory: D:/casco800A/fep/code/test_sys/libdemo2/SIMPENTIUMdiab_RTP
make: removing targets and objects of D:/casco800A/fep/code/test_sys/libdemo2/SIMPENTIUMdiab_RTP
if [ -d "libdemo2" ]; then cd "libdemo2"; rm -rf Debug; fi
if [ ! -d "`dirname "libdemo2/Debug/Objects/libdemo2/src/demo.o"`" ]; then mkdir -p "`dirname "libdemo2/Debug/Objects/libdemo2/src/demo.o"`"; fi;echo "building libdemo2/Debug/Objects/libdemo2/src/demo.o"; dplus -g -tX86LH:rtpsim -Xansi -Xforce-declarations -Xmake-dependency=0xd -IC:/WindRiver-GPPVE-3.6-PPC-Eval/vxworks-6.6/target/usr/h -IC:/WindRiver-GPPVE-3.6-PPC-Eval/vxworks-6.6/target/usr/h/wrn/coreip -I../inc -D_VX_CPU=_VX_SIMPENTIUM -D_VX_TOOL_FAMILY=diab -D_VX_TOOL=diab -o "libdemo2/Debug/Objects/libdemo2/src/demo.o" -c "D:/casco800A/fep/code/test_sys/libdemo2/src/demo.cpp"
building libdemo2/Debug/Objects/libdemo2/src/demo.o
if [ ! -d "`dirname "libdemo2/Debug/Objects/libdemo2/src/stdafx.o"`" ]; then mkdir -p "`dirname "libdemo2/Debug/Objects/libdemo2/src/stdafx.o"`"; fi;echo "building libdemo2/Debug/Objects/libdemo2/src/stdafx.o"; dplus -g -tX86LH:rtpsim -Xansi -Xforce-declarations -Xmake-dependency=0xd -IC:/WindRiver-GPPVE-3.6-PPC-Eval/vxworks-6.6/target/usr/h -IC:/WindRiver-GPPVE-3.6-PPC-Eval/vxworks-6.6/target/usr/h/wrn/coreip -I../inc -D_VX_CPU=_VX_SIMPENTIUM -D_VX_TOOL_FAMILY=diab -D_VX_TOOL=diab -o "libdemo2/Debug/Objects/libdemo2/src/stdafx.o" -c "D:/casco800A/fep/code/test_sys/libdemo2/src/stdafx.cpp"
building libdemo2/Debug/Objects/libdemo2/src/stdafx.o
if [ ! -d "`dirname "libdemo2/Debug/libdemo2.a"`" ]; then mkdir -p "`dirname "libdemo2/Debug/libdemo2.a"`"; fi;echo "building libdemo2/Debug/libdemo2.a"; dar crus "libdemo2/Debug/libdemo2.a" libdemo2/Debug/Objects/libdemo2/src/demo.o libdemo2/Debug/Objects/libdemo2/src/stdafx.o ; echo "copy libdemo2/Debug/libdemo2.a to d:/casco800A/fep/lib";cp -f libdemo2/Debug/libdemo2.a d:/casco800A/fep/lib;
building libdemo2/Debug/libdemo2.a
copy libdemo2/Debug/libdemo2.a to d:/casco800A/fep/lib
make: built targets of D:/casco800A/fep/code/test_sys/libdemo2/SIMPENTIUMdiab_RTP
Build Finished in Project 'libdemo2': 2015-02-10 11:08:58 (Elapsed Time: 00:01)
再次设置testDemo工程:
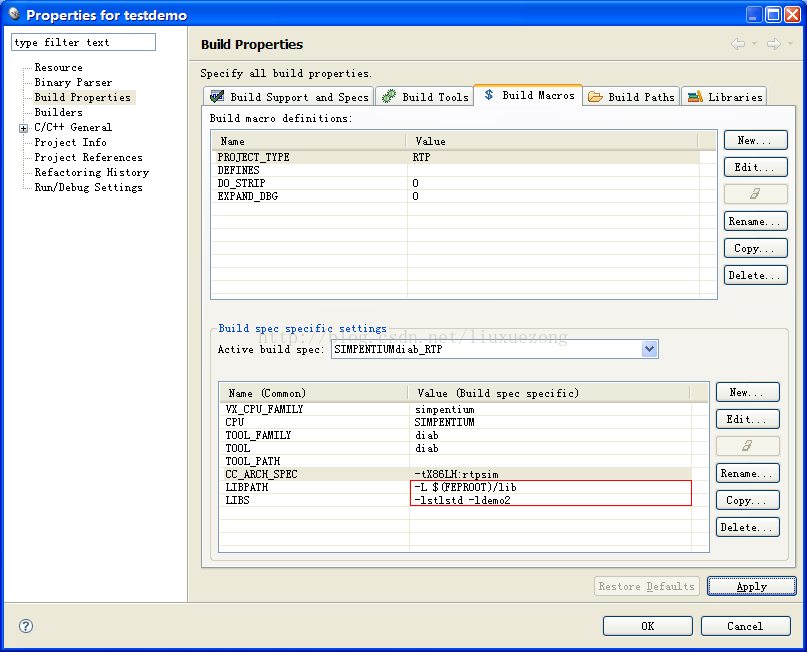
图6.9 静态库路径引用项和libdemo2文件
再次编译testDemo工程:
Build Started in Project 'testdemo': 2015-02-10 11:13:16
Generation of makefiles started.
Generation of makefiles finished (Elapsed Time: 00:00).
Platform: Wind River VxWorks 6.6
Command: make --no-print-directory BUILD_SPEC=SIMPENTIUMdiab_RTP DEBUG_MODE=1 TRACE=1 clean all
Working Directory: D:/casco800A/fep/code/test_sys/testdemo/SIMPENTIUMdiab_RTP
make: removing targets and objects of D:/casco800A/fep/code/test_sys/testdemo/SIMPENTIUMdiab_RTP
if [ -d "testdemo" ]; then cd "testdemo"; rm -rf Debug; fi
if [ ! -d "`dirname "testdemo/Debug/Objects/testdemo/testdemo.o"`" ]; then mkdir -p "`dirname "testdemo/Debug/Objects/testdemo/testdemo.o"`"; fi;echo "building testdemo/Debug/Objects/testdemo/testdemo.o"; dplus -g -tX86LH:rtpsim -Xansi -Xforce-declarations -Xmake-dependency=0xd -IC:/WindRiver-GPPVE-3.6-PPC-Eval/vxworks-6.6/target/usr/h -IC:/WindRiver-GPPVE-3.6-PPC-Eval/vxworks-6.6/target/usr/h/wrn/coreip -Id:/casco800A/fep/code/include -D_VX_CPU=_VX_SIMPENTIUM -D_VX_TOOL_FAMILY=diab -D_VX_TOOL=diab -o "testdemo/Debug/Objects/testdemo/testdemo.o" -c "D:/casco800A/fep/code/test_sys/testdemo/testdemo.cpp"
building testdemo/Debug/Objects/testdemo/testdemo.o
if [ ! -d "`dirname "testdemo/Debug/testdemo.vxe"`" ]; then mkdir -p "`dirname "testdemo/Debug/testdemo.vxe"`"; fi;echo "building testdemo/Debug/testdemo.vxe"; dplus -tX86LH:rtpsim -Xansi -Xforce-declarations -Xmake-dependency=0xd -f 0x90,1,1 -o "testdemo/Debug/testdemo.vxe" testdemo/Debug/Objects/testdemo/testdemo.o -L d:/casco800A/fep/lib -lstlstd -ldemo2 -LC:/WindRiver-GPPVE-3.6-PPC-Eval/vxworks-6.6/target/usr/lib/simpentium/SIMPENTIUM/common && if [ "0" = "1" ]; then mv -f "testdemo/Debug/testdemo.vxe" "testdemo/Debug/testdemo.vxe.unstripped" && strippentium -g -o "testdemo/Debug/testdemo.vxe" "testdemo/Debug/testdemo.vxe.unstripped";fi && if [ "0" = "1" ]; then plink "testdemo/Debug/testdemo.vxe";fi; echo "copy testdemo/Debug/testdemo.vxe to d:/casco800A/fep/bin";cp -f testdemo/Debug/testdemo.vxe d:/casco800A/fep/bin;
building testdemo/Debug/testdemo.vxe
copy testdemo/Debug/testdemo.vxe to d:/casco800A/fep/bin
make: built targets of D:/casco800A/fep/code/test_sys/testdemo/SIMPENTIUMdiab_RTP
Build Finished in Project 'testdemo': 2015-02-10 11:13:17 (Elapsed Time: 00:01)
测试结果:
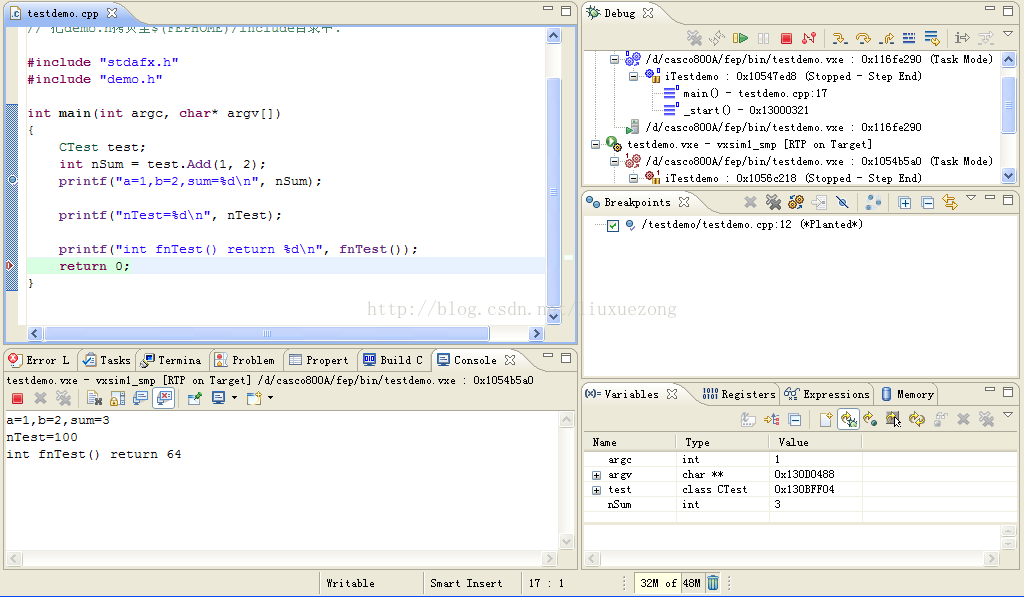
图6.10 单步调试结果
七、总结
我们用大量的截图说明创建了动态链接库和静态库,其中动态链接库看起来比较简单。静态库创建有两种方法,第一种是我们传统创建方法,但需要注意编译器的配置项。第二种是使用RTP创建,基本没有太多配置。无论是第一种还是第二种方法,其实我们可以发现编译开发PIC是关键。
用大量截图说明创建共享库的过程,这是一种直接而显而易见的方法,我相信参考上述这些过程,你碰到的问题基本能得以解决。


 2398
2398


 被折叠的 条评论
为什么被折叠?
被折叠的 条评论
为什么被折叠?
 到【灌水乐园】发言


