


1、jdk1.6 Java6
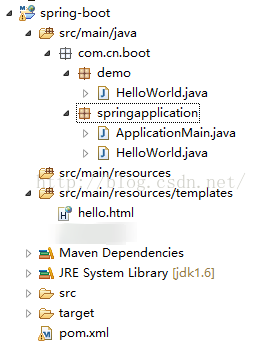
2、创建maven web项目,项目结构图:
3、pom.xml
<project xmlns="http://maven.apache.org/POM/4.0.0" xmlns:xsi="http://www.w3.org/2001/XMLSchema-instance" xsi:schemaLocation="http://maven.apache.org/POM/4.0.0 http://maven.apache.org/xsd/maven-4.0.0.xsd">
<modelVersion>4.0.0</modelVersion>
<groupId>spring-boot</groupId>
<artifactId>spring-boot</artifactId>
<version>0.0.1-SNAPSHOT</version>
<packaging>jar</packaging>
<name>spring-boot</name>
<url>http://maven.apache.org</url>
<!-- spring-boot-starter-parent是个特殊的starter,它提供了有用的maven默认设置 -->
<parent>
<groupId>org.springframework.boot</groupId>
<artifactId>spring-boot-starter-parent</artifactId>
<version>1.2.5.RELEASE</version>
</parent>
<properties>
<project.build.sourceEncoding>UTF-8</project.build.sourceEncoding>
<java.version>1.6</java.version>
<tomcat.version>7.0.59</tomcat.version>
</properties>
<dependencies>
<!-- 指定为Web应用,并启动一个内嵌的Servlet容器(默认是Tomcat)用于处理HTTP请求 -->
<dependency>
<groupId>org.springframework.boot</groupId>
<artifactId>spring-boot-starter-web</artifactId>
<version>1.2.5.RELEASE</version>
</dependency>
<!--用thymeleaf模板渲染 -->
<dependency>
<groupId>org.springframework.boot</groupId>
<artifactId>spring-boot-starter-thymeleaf</artifactId>
<version>1.2.5.RELEASE</version>
</dependency>
<dependency>
<groupId>junit</groupId>
<artifactId>junit</artifactId>
<scope>test</scope>
</dependency>
<dependency>
<groupId>javax.servlet</groupId>
<artifactId>jstl</artifactId>
<version>1.2</version>
</dependency>
</dependencies>
<build>
<plugins>
<plugin>
<groupId>org.springframework.boot</groupId>
<artifactId>spring-boot-maven-plugin</artifactId>
<version>1.2.5.RELEASE</version>
</plugin>
</plugins>
</build>
</project>
4、
ApplicationMain
.java
import org.springframework.boot.SpringApplication;
import org.springframework.boot.autoconfigure.EnableAutoConfiguration;
import org.springframework.boot.autoconfigure.SpringBootApplication;
import org.springframework.web.bind.annotation.RequestMapping;
import org.springframework.web.bind.annotation.RestController;
@EnableAutoConfiguration
@SpringBootApplication
@RestController
public class ApplicationMain {
@RequestMapping("/hello1")
public String demo() {
return "Hello World!";
}
public static void main(String[] args){
//SpringApplication.run(
ApplicationMain
.class,
args
);
SpringApplication.run(new Object[]{(Object)HelloWorld.class,(Object)ApplicationMain.class}, args);
}
}
5、
HelloWorld.java
import org.springframework.boot.autoconfigure.EnableAutoConfiguration;
import org.springframework.boot.autoconfigure.SpringBootApplication;
import org.springframework.stereotype.Controller;
import org.springframework.ui.Model;
import org.springframework.web.bind.annotation.PathVariable;
import org.springframework.web.bind.annotation.RequestMapping;
@Controller
@EnableAutoConfiguration
@SpringBootApplication
public class HelloWorld{
@RequestMapping("/login")
public String test(String name,Model model) {
model.addAttribute("name",name);
return "hello";
}
@RequestMapping("/test/{name}")
public String test2(@PathVariable String name,String modelstr,Model model) {
System.out.println(name);
model.addAttribute("name",name);
model.addAttribute("model",modelstr);
return "test";
}
}
6、hello.html
<!DOCTYPE html>
<html xmlns:th="http://www.thymeleaf.org">
<head>
<meta http-equiv="Content-Type" content="text/html; charset=UTF-8" />
<title>Insert title here</title>
</head>
<body>
<h3>我是页面渲染的结果:</h3>
<hr/>
<p th:text="'Hello, ' + ${name} + '!'" />
</body>
</
html
>
优化:
由于原有的第四步骤,main里面需要些所有要执行的类,
SpringApplication.
run
(
new
Object[]{(Object)HelloWorld.
class
,(Object)ApplicationMain.
class
}, args);因此,我就想怎么才可以写一个main以后,再也不在考虑main的问题了,后来费劲心思终于找到,很简单只要写main方法的类继承
extends
SpringBootServletInitializer 然后main方法写
SpringApplication.run(
ApplicationMain
.class,
args
);以后不管写多少执行类都不在去考虑main里面还没有配置的问题了
</project>
2、遇到问题
①The type java.lang.reflect.AnnotatedElement cannot be resolved. It is indirectly referenced from required .class files
该问题是有这一行
SpringApplication.
run
(
new
Object[]{
HelloWorld
.
class
,ApplicationMain.
class
}, args)引起,是由于
HelloWorld
.
class并不是一个Object对象,需要强转
SpringApplication.
run
(
new
Object[]{(Object)HelloWorld.
class
,(
Object
)ApplicationMain.
class
}, args);如果类型没问题还报以上错误,就只能看看jdk版本问题了
②
java.lang.UnsupportedClassVersionError: javax/annotation/ManagedBean : Unsupported major.minor version 51.0
这是由于jdk版本引起的问题,我用的1.6,所以运行spring-boot的main方法就报错,解决办法,spring-boot最好用1.8版本的jdk,这样的话就没有问题;当然有些公司直接要求只能应用jdk1.6版本,那我们就应该知道,是什么引起的,这样我们才好解决哦,我的是由于spring-boot默认内嵌的tomcat是8.*的版本,jdk1.6不支持,所以我们可以pom文件设定tomcat的版本
<
properties
>
<
tomcat.version
>
7.0.59
</
tomcat.version
>
</
properties
>,完美解决!


 3392
3392


 被折叠的 条评论
为什么被折叠?
被折叠的 条评论
为什么被折叠?
 到【灌水乐园】发言


