


Mcollecitve+activemq安装配置比较繁琐,本来想在window上安装好的,但是puppetlabs官方没有提供安装指令,网上教程也比较少,捣鼓几天也没出来,只是在centos环境中安装配置成功。
activemq是消息中间间,我试了,可以单独安装在一台服务器上,也可以安装在装有puppet master的服务器上。
现以两台机器进行说明:
[PS:两台机器都已分别装好puppet master, puppet client]
A服务器:puppet master + mcollective-client + activemq
B服务器:puppet client + mcollective-*
1.在A中安装ActiveMQ
yum install -y activemqA的主机域名为mas2.domain.com,而且mas2.domain.com证书已认证安装,所以可以直接进入下面的配置ActiveMQ,要是将ActiveMQ单独安装一台新的服务器C上,还有在C上安装puppet client,以便认证。参考刘宇的《puppet实战》
2.配置ActiveMQ
(1)配置用户
增加Mcollective用户,推荐用mcollective,
<simpleAuthenticationPlugin>
  <users>
    <!--authenticationUser username="${activemq.username}" password="${activemq.password}" groups="admins,everyone"/ -->
    <authenticationUser username="mcollective" password="secret" groups="mcollective,admins,everyone"/>
    <authenticationUser username="admin" password="secret" groups="mcollective,admins,everyone"/>
  </users>
</simpleAuthenticationPlugin>
(2)配置TLS
PS:所有的密码均是secret
1)创建Truststore
keytool -import -alias "activemq" -file /var/lib/puppet/ssl/certs/ca.pem -keystore truststore.jks
密码:secret

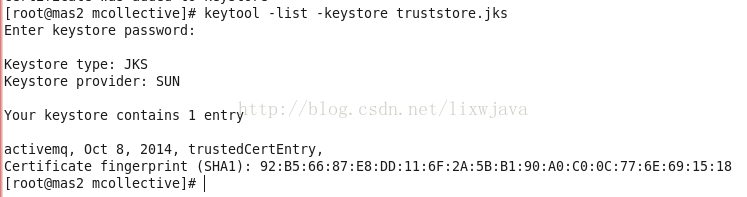
2)验证上面是否创建成功:
keytool -list -keystore truststore.jks输入密码可以查看:
openssl x509 -in /var/lib/puppet/ssl/certs/ca.pem -fingerprint -md5
3)创建KeyStore,和1)的操作类似
PS:密码均是secret
cat /var/lib/puppet/ssl/private_keys/mas2.domain.com.pem var/lib/puppet/ssl/certs/mas2.domain.com.pem > temp.pem
openssl pkcs12 -export -in temp.pem -out activemq.p12 -name mas2.domain.comkeytool -importkeystore -destkeystore keystore.jks -srckeystore activemq.p12 -srcstoretype PKCS12 -alias mas2.domain.com4)验证3)
keytool -list -keystore keystore.jks
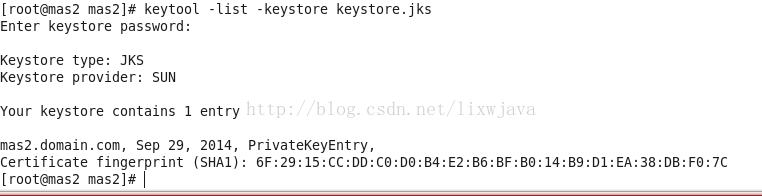
openssl x509 -in /var/lib/puppet/ssl/certs/mas2.domain.com.pem -fingerprint -md55)将文件复制到/etc/acitvemq下:
cp keystore.jks truststore.jks /etc/activemq/查看/etc/activemq

(3)配置sslContext
sslContext要放在Plugins和SystemUsage中间:
在/etc/activemq/activemq.xml添加:
<sslContext>
 <sslContext
   keyStore ="keystore.jks" keyStorePassword="secret"
   trustStore="truststore.jks" trustStorePassword="secret"
 />
</sslContext>vim /etc/activemq/activemq.xml
<transportConnectors>
  <transportConnector name="openwire" uri="tcp://0.0.0.0:61616"/>
  <transportConnector name="stompssl" uri="stomp+ssl://0.0.0.0:61614?needClientAuth=true"/>
</transportConnectors>
(5)启动ActiveMQ和验证Stomp监听TCP端口
service activemq start
netstat -an|grep 61614
PS:不是ActiveMQ开启之后马上就可以监听,可能需要等一两分钟。
这样中间件ActiveMQ安装配置就OK了。
3.Mcollective 安装
Mcollective Client安装在puppet master上
yum install -y mcollective-*Mcollective Server 安装在puppet client上
yum install -y mcollective-*4.MCollective控制端配(Mcollective client端)置
Mcollective client端就是Puppet Master端
1)生产Mcollective 应用层共享证书
sudo ppuppet cert generate mcollective-servers2)配置/etc/mcollective/client.cfg
参考:https://docs.puppetlabs.com/mcollective/configure/client.html
# Connector settings (required):
# -----------------------------

connector = activemq
direct_addressing = 1

# ActiveMQ connector settings:
plugin.activemq.pool.size = 1
plugin.activemq.pool.1.host = mas2.domain.com
plugin.activemq.pool.1.port = 61614
plugin.activemq.pool.1.user = mcollective
plugin.activemq.pool.1.password = secret
plugin.activemq.pool.1.ssl = 1
plugin.activemq.pool.1.ssl.ca = /var/lib/puppet/ssl/certs/ca.pem
plugin.activemq.pool.1.ssl.cert = /var/lib/puppet/ssl/certs/mas2.domain.com.pem
plugin.activemq.pool.1.ssl.key = /var/lib/puppet/ssl/private_keys/mas2.domain.com.pem
plugin.activemq.pool.1.ssl.fallback = 0


# Security plugin settings (required):
# -----------------------------------

securityprovider = ssl

# SSL plugin settings:
plugin.ssl_server_public = /var/lib/puppet/ssl/certs/mcollective-servers.pem
plugin.ssl_client_private = /var/lib/puppet/ssl/private_keys/mas2.domain.com.pem
plugin.ssl_client_public = /var/lib/puppet/ssl/certs/mas2.domain.com.pem

# PSK plugin settings:
plugin.psk = j9q8kx7fnuied9e

# Interface settings (optional):
# ------------------------------

# Discovery settings:

default_discovery_method = mc
# default_discovery_options = /etc/mcollective/nodes.txt

# Performance settings:

direct_addressing_threshold = 10
ttl = 60
discovery_timeout = 2
publish_timeout = 2
threaded = false

# Miscellaneous settings:

color = 1
rpclimitmethod = first

# Subcollectives (optional):
# -----------------------------------

collectives = mcollective,uk_collective
main_collective = mcollective

# Advanced settings and platform defaults:
# -----------------------------------

logger_type = console
loglevel = warn
logfile = /var/log/mcollective.log
keeplogs = 5
max_log_size = 2097152
logfacility = user
libdir = /usr/libexec/mcollective
#rpchelptemplate = /etc/mcollective/rpc-help.erb
#helptemplatedir = /etc/mcollective
ssl_cipher = aes-256-cbc

#Facts
#---------------------------------------

factsource = yaml
plugin.yaml = /etc/mcollective/facts.yaml
4.Mcollective 节点(Mcollective Server)配置
1)创建MCollective模板
mkdir /etc/puppet/modules/mcollective/{manifests,files,templates} -p
sudo mkdir -p /etc/puppet/modules/mcollective/files/pem/clients
vim /etc/puppet/modules/mcollective/manifests/init.pp
class mcollective(
  $activemq_server,
  $mcollective_password){
  package {
    ['mcollective','mcollective-puppet-agent','mcollective-service-agent']:
    ensure => installed,
  }

  service {
    "mcollective":
    ensure => running,
    enable => true,
    require => Package['mcollective'],
  }

  file {'/etc/mcollective':
    ensure => directory,
    source => "puppet:///modules/mcollective/pem",
    recurse => remote,
    notify => Service['mcollective'],
  }

  file{"/etc/mcollective/facts.yaml":
      owner    => root,
      group    => root,
      mode     => 400,
      loglevel => debug, # reduce noise in Puppet reports
      content  => inline_template("<%= scope.to_hash.reject { |k,v| k.to_s =~ /(uptime_seconds|timestamp|free)/ }.to_yaml

%>"), # exclude rapidly changing facts
  }


  file{"/etc/mcollective/server.cfg":
    ensure => file,
    content => tempalte("mcollective/server.cfg.erb"),
    notify => Service['mcollective'],
  }

}
3)创建server.cfg.erb
sudo vim /etc/puppet/modules/mcollective/templates/server.cfg.erb
  <% ssldir = '/var/lib/puppet/ssl' %>
    # /etc/mcollective/server.cfg

    # ActiveMQ connector settings:
    connector = activemq
    direct_addressing = 1
    plugin.activemq.pool.size = 1
    plugin.activemq.pool.1.host = <%= @activemq_server %>
    plugin.activemq.pool.1.port = 61614
    plugin.activemq.pool.1.user = mcollective
    plugin.activemq.pool.1.password = <%= @mcollective_password %>
    plugin.activemq.pool.1.ssl = 1
    plugin.activemq.pool.1.ssl.ca = <%= ssldir %>/certs/ca.pem
    plugin.activemq.pool.1.ssl.cert = <%= ssldir %>/certs/<%= scope.lookupvar('::clientcert') %>.pem
    plugin.activemq.pool.1.ssl.key = <%= ssldir %>/private_keys/<%= scope.lookupvar('::clientcert') %>.pem
    plugin.activemq.pool.1.ssl.fallback = 0

    # SSL security plugin settings:
    securityprovider = ssl
    plugin.ssl_client_cert_dir = /etc/mcollective/clients
    plugin.ssl_server_private = /etc/mcollective/server_private.pem
    plugin.ssl_server_public = /etc/mcollective/server_public.pem

    #
    plugin.puppet.resource_allow_managed_resources = true
    plugin.puppet.resource_type_whitelist = exec, file

    # Facts, identity, and classes:
    identity = <%= scope.lookupvar('::fqdn') %>
    factsource = yaml
    plugin.yaml = /etc/mcollective/facts.yaml
    classesfile = /var/lib/puppet/state/classes.txt

    # No additional subcollectives:
    collectives = mcollective
    main_collective = mcollective

    # Registration:
    # We don't configure a listener, and only send these messages to keep the
    # Stomp connection alive. This will use the default "agentlist" registration
    # plugin.
    registerinterval = 600

    # Auditing (optional):
    # If you turn this on, you must arrange to rotate the log file it creates.
    rpcaudit = 1
    rpcauditprovider = logfile
    plugin.rpcaudit.logfile = /var/log/mcollective-audit.log

    # Authorization:
    # If you turn this on now, you won't be able to issue most MCollective
    # commands, although `mco ping` will work. You should deploy the
    # ActionPolicy plugin before uncommenting this; see "Deploy Plugins" below.

    # rpcauthorization = 1
    # rpcauthprovider = action_policy
    # plugin.actionpolicy.allow_unconfigured = 1

    # Logging:
    logger_type = file
    loglevel = info
    logfile = /var/log/mcollective.log
    keeplogs = 5
    max_log_size = 2097152
    logfacility = user

    # Platform defaults:
    # These settings differ based on platform; the default config file created by
    # the package should include correct values. If you are managing settings as
    # resources, you can ignore them, but with a template you'll have to account
    # for the differences.
    <% if scope.lookupvar('::osfamily') == 'RedHat' -%>
    libdir = /usr/libexec/mcollective
    daemonize = 1
    <% elsif scope.lookupvar('::osfamily') == 'Debian' -%>
    libdir = /usr/share/mcollective/plugins
    daemonize = 1
    <% else -%>
    # INSERT PLATFORM-APPROPRIATE VALUES FOR LIBDIR AND DAEMONIZE
    <% end %>
(4)复制证书
cp /var/lib/puppet/ssl/private_keys/mcollective-servers.pem  /etc/puppet/modules/mcollective/files/pem/server_private.pem
cp /var/lib/puppet/ssl/public_keys/mcollective-server.pem  /etc/puppet/modules/mcollective/files/pem/server_public.pem

chmod 0644 /etc/puppet/modules/mcollective/files/pem/server_*
cp /var/lib/puppet/ssl/certs/mas2.domain.com.pem   /etc/puppet/modules/mcollective/files/pem/clients
chmod 0644 /etc/puppet/modules/mcollective/files/pem/clients
(5)配置节点
vim /etc/puppet/manifests/nodes/c5.domain.com.ppnode 'c6.domain.com' {
#include test
class {"mcollective":
activemq_server => "mas2.domain.com",
mcollective_password => "secret",
}
}
(6)应用puppet代码
puppet agent -t(7)验证
在puppet master 输入:
mco findmco ping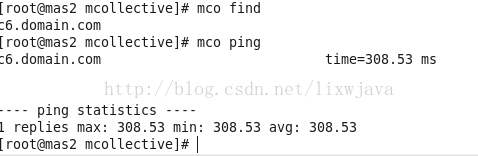
通过mcollectve 实现主动推送:
mco puppet runonce -v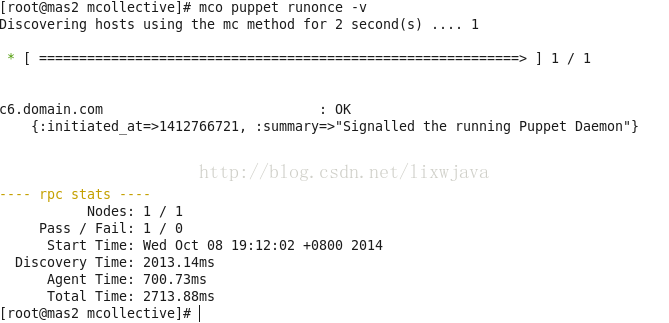


 173
173


 被折叠的 条评论
为什么被折叠?
被折叠的 条评论
为什么被折叠?
 到【灌水乐园】发言


