


全局引用
第一步 新建文件
在Xcode中新建文件
other-> PCH File
勾选Targets的第一个选项
注意是新建在工程里
第二步
设置文件的绝对路径
PCH不同于普通文件. 它识别的是绝对路径. 当工程放置于其他电脑上, 会导致本文件无法被正常识别
解决方法:
工程设置Build Settings -> All -> 查找到Prefix Header

在未设置路径时, 该选项后是空白的
双击右侧空白处
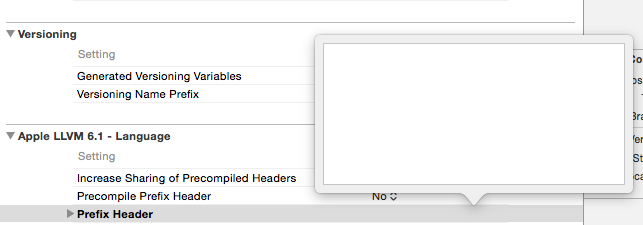
弹出输入框如图所示.
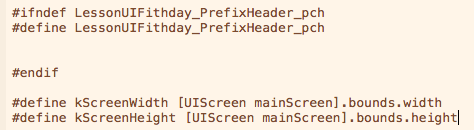
输入路径:$(SRCROOT)/你的工程名/你的prefix文件名.pch
如 $(SRCROOT)/myProject/PrefixHeader.pch
小博的工程名为myProject, prefix文件名为PerfixHeader.pch(默认生成的PCH文件名)
输入完毕后按下回车即可
此时空白处会被一串路径代替.
此时再在pch文件中写入需要全局引入的头文件名 或者 宏定义
此时就可以在全局默认使用了
解耦的两种方法
- target/action模式
- delegate代理模式
以一个例题来说明这两种模式的具体实现
在RootViewController中, 添入一个自定义视图LoginView, LoginView中填入一个自定义视图MyImageView
实现点击MyImageView, 可以变化MyImageView的颜色
// LoginView.h
@property (nonatomic, retain) MyImageView *imageView;
// LoginView.m
// 省略dealloc方法
// 重写初始化方法
#define kImageViewWidth  100
#define kImageViewHeight 100
- (instancetype)initWithFrame:(CGRect)frame {
    self = [super initWithFrame:frame];
    if (self) {
        // 将子试图添加步骤放置addSubviews方法中实现.
        [self addSubviews];
    }
    return self;
}
- (void)addSubviews {
    self.imageView = [[MyImageView alloc] initWithFrame:CGRectMake((kScreenWidth - kImageViewWidth) / 2, 100, kImageViewWidth, kImageViewHeight)];
    self.imageView.backgroundColor = [UIColor redColor];
    [self addSubview:self.imageView];
    [_imageView release];
}
为了实现点击MyImageView变化背景色的功能, 必需在MyImageView中响应touchBegan或者touchEnded方法.
但是为了体现解耦的目的, 将具体更换背景图片的逻辑放在RootViewController中实现
这两种模式 主要就是介绍如何将逻辑放在RootViewController中实现
target/action模式
将RootViewController中的两个对象: RootViewController的对象(target)和执行方法名(action)当成参数穿给MyImageView.
// MyImageView.h
@property (nonatomic, retain) id target;
@property (nonatomic, assign) SEL action;

// 自定义初始化方法
- (instancetype)initWithFrame:(CGRect)frame target:(id)target action:(SEL)action;
// MyImageView.m
// 实现自定义初始化方法
- (instancetype)initWithFrame:(CGRect)frame target:(id)target action:(SEL)action {
self = [super initWithFrame:frame];
if (self) {
// UIImageView的交互开关默认是关闭的, 手动打开
self.userInteractionEnabled = YES;
self.target = target;
self.action = action;
}
return self;
}
// 响应点击MyImageView事件
- (void)touchesEnded:(NSSet *)touches withEvent:(UIEvent *)event {
// 让传入的对象 调用起自身的方法名为clickMyImageView:的方法, 并将自身当成参数传给self.target对象
[self.target performSelector:self.action withObject:self];
}// 改写LoginView
// LoginView.h
// LoginView中也定义两个相同的属性作为过渡传导
@property (nonatomic, retain) id target;
@property (nonatomic, assign) SEL action;
@property (nonatomic, retain) MyImageView *imageView;
// 自定义初始化方法
- (instancetype)initWithFrame:(CGRect)frame target:(id)target action:(SEL)action;//LoginView.m
// 实现自定义初始化方法
- (instancetype)initWithFrame:(CGRect)frame target:(id)target action:(SEL)action {
self = [super initWithFrame:frame];
if (self) {
self.target = target;
self.action = action;
// 调用MyImageView的自定义初始化方法
self.imageView = [[MyImageView alloc] initWithFrame:CGRectMake((kScreenWidth - kImageViewWidth) / 2, 100, kImageViewWidth, kImageViewHeight) target:self action:@selector(clickMyImageView:)];
self.imageView.backgroundColor = [UIColor redColor];
[self addSubview:self.imageView];
[_imageView release];
}
return self;
}
// 实现clickMyImageView:方法
- (void)clickMyImageView:(MyImageView *)imageView {
[self.target performSelector:self.action withObject:imageView];
}// 然后在RootViewController.m的viewDidLoad方法中实现
LoginView *loginView = [[LoginView alloc] initWithFrame:self.view.bounds target:self action:@selector(click:)];
[self.view addSubview:loginView];
// 并实现click:方法
- (void)click:(MyImageView:)imageView {
imageView.backgroundColor = [UIColor colorWithRed:(arc4random() % (255 - 0 + 1) + 0) / 255.0 green:(arc4random() % (255 - 1 + 1) + 1) / 255.0 blue:(arc4random() % (255 - 1 + 1) + 1) / 255.0 alpha:1];
}或者不需要通过LoginView作为传递
// MyImageView.h
@property (nonatomic, retain) id target;
@property (nonatomic, assign) SEL action;

// 使用继承于UIImageView的初始化方法

// MyImageView.m中
// 重写初始化方法
- (instancetype)initWithFrame:(CGRect)frame {
    self = [super initWithFrame:frame];
    if (self) {
        self.userInteractionEnabled = YES;
    }
    return self;
}
- (void)touchesEnded:(NSSet *)touches withEvent:(UIEvent *)event {
    [self.target performSelector:self.action withObject:self];
}
// LoginView.h中
@property (nonatomic, retain) MyImageView *imageView;
// loginView.m中 正常重写自定义初始化方法
- (instancetype)initWithFrame:(CGRect)frame {
self = [super initWithFrame:frame];
if (self) {
self.imageView = [[MyImageView alloc] initWithFrame:CGRectMake((kScreenWidth - kImageViewWidth) / 2, 100, kImageViewWidth, kImageViewHeight)];
self.imageView.backgroundColor = [UIColor redColor];
[self addSubview:self.imageView];
[_imageView release];
}
return self;
}// RootViewController.m中 在viewDidLoad方法中实现
LoginView *loginView = [[LoginView alloc] initWithFrame:self.view.bounds];
loginView.imageView.target = self;
loginView.imageView.action = @selector(click:);
[self.view addSubview:loginView];
// click:方法不变两种写法各有优劣. 看个人的习惯而定.
delegate代理模式
// 在MyImageView.h中声明代理如下
@class MyImageView; // 因为此时MyImageView还未声明, 需要先声明MyImageView是一个类
@protocol MyImageViewDelegate <NSObject>
@optional
- (void)changeColor:(MyImageView *)imageView;
@end


@interface MyImageView : UIImageView
// 注意代理虽然也是id对象类型, 但是用assign来修饰 在文后会进行解释
@property (nonatomic, assign) id<MyImageViewDelegate> delegate;
@end
// MyImageView.m文件中实现
- (instancetype)initWithFrame:(CGRect)frame {
self = [super initWithFrame:frame];
if (self) {
self.userInteractionEnabled = YES;
}
return self;
}
- (void)touchesEnded:(NSSet *)touches withEvent:(UIEvent *)event {
// 安全判断, 若无, 在当代理人未实现本方法的时候 会崩溃.
if ([_delegate respondsToSelector:@selector(changeColor:)]) {
[self.delegate changeColor:self];
}
}跳过LoginView(需要将MyImageView对象声明成属性)
// 在RootViewController.m的viewDidLoad方法中实现:
LoginView *loginView = [[LoginView alloc] initWithFrame:self.view.bounds];
loginView.imageView.delegate = self;
[self.view addSubview:loginView];

// 实现代理方法
- (void)changeColor:(MyImageView *)imageView {
    imageView.backgroundColor = [UIColor colorWithRed:(arc4random() % (255 - 0 + 1) + 0) / 255.0 green:(arc4random() % (255 - 1 + 1) + 1) / 255.0 blue:(arc4random() % (255 - 1 + 1) + 1) / 255.0 alpha:1];
}
相比于target/action模式, 代理模式显得更加简明.
解耦的目的: 为了实现代码的复用.
关于为什么属性delegate明明是id类型却要声明成assign
举个例子:
有两个类A和B, 他们互相将对方作为各自的代理
// A.h
@property (nonatomic, retain) id delegate;
// B.h
@property (nonatomic, retain) id delegate;
各自的.m文件中均按要求书写了dealloc方法:
- (void)dealloc {
    [_delegate release];
    [super dealloc];
}
// 在main.m或者其他类中实现以下语句
    A *a = [[A alloc] init];    // 此时a.retainCount = 1
    B *b = [[B alloc] init];    // 此时b.retainCount = 1
    a.delegate = b;    // 由于类A中的delegate为retain 此时 b.retainCount = 2;
    b.delegate = a;    // 理由同上, a.retainCount = 2;
    // 按照书写要求, 一个alloc对应一个release
    [a release];       // a.retainCount = 1
    [b release];       // b.retainCount = 1
    // 此时就会发现, 按照规范的内存管理释放原则, 此时对象a和b均没有被释放. 他们的retainCount均不等于0, 于是他们的dealloc都不会被调用.这导致了内存泄漏
这也是为什么代理需要声明成assign
// 若A, B中delegate均是assign修饰的
A *a = [[A alloc] init];    // a.retainCount = 1
B *b = [[B alloc] init];    // b.retainCount = 1
a.delegate = b;             // 由于是assign b.retainCount = 1不增
b.delegate = a;             // 同上 a.retainCount = 1
[a release];                // a.retainCount = 0
[b release];                // b.retainCount = 0 两个对象都被完美释放
手势识别器
⼿势识别器是UIGestureRecognizer 是iOS中的⼀个抽象类,⽤于识别⼀个⼿势
所谓⼿势:有规律的触摸。
分别识别轻拍⼿势、平移⼿势、轻扫⼿势、缩放⼿势、旋转⼿势、 ⻓按⼿势以及屏幕边界平移⼿势 一共七种手势.
其中缩放手势也叫捏合手势
UIGestureRecognizer 类中
属性
view 手势添加所在的view.
state 手势状态
typedef NS_ENUM(NSInteger, UIGestureRecognizerState) {
UIGestureRecognizerStatePossible // 未知状态
UIGestureRecognizerStateBegan // 手势开启状态
UIGestureRecognizerStateChanged // 手势发生改变状态
UIGestureRecognizerStateEnded // 手势结束状态
UIGestureRecognizerStateCancelled // 手势取消状态
UIGestureRecognizerStateFailed // 手势失败状态
UIGestureRecognizerStateRecognized = UIGestureRecognizerStateEnded // 手势结束状态
};
方法:
- (instancetype)initWithTarget:(id)target action:(SEL)action;
七种手势
*1. 轻拍手势 能识别轻拍操作 (也就是点击)
UITapGestureRecognizer
属性:
numberOfTapsRequired
NSUInteger 默认为1 表示响应轻拍事件的拍击次数numberOfTouchesRequired
NSUInteger 默认为1 表示响应轻拍事件的手指操作数
实现步骤
// 新建手势类 设置响应方法名 和响应方法所在对象
UITapGestureRecognizer *tapGestureRecognizer = [[UITapGestureRecognizer alloc] initWithTarget:self action:@selector(tapAction:)];

// 新建一个UIView的子类, 用于添加手势操作
UIImageView *view = [[UIImageView alloc] initWithFrame:self.view.bounds];
// 打开交互
view.userInteractionEnabled = YES;
// 添加手势操作
[view addGestureRecognizer:tapGestureRecognizer];
[tapGestureRecognizer release];
[self.view addSubview:view];
[view release];

// 实现响应方法
- (void)tapAction:(UITapGestureRecognizer *)tap {
    NSLog(@"我是轻拍");
}
*2. 长按手势 能识别⻓按操作。
UILongPressGestureRecognizer
属性
- minimumPressDuration
CFTimeInterval(Double) 响应长按事件的最少按键时长 默认0.5秒 - allowableMovement
CGFloat 响应长按事件过程允许滑动的最大范围 默认10
实现方法参照拍击手势
不同的是, 响应状态方法中可以加入一句
if (longPress.state == UIGestureRecognizerStateBegan) {

}
// 由于长按事件是基于touchMoved, 会多次响应, 利用本句判断让响应只执行一次
3. 旋转手势 能识别旋转操作
UIRotationGestureRecognizer
属性
- rotation
CGFloat 旋转角度 - velocity
CGFloat 旋转速度
利用 .view.transform 属性进行设置图片的旋转形变方式
transform
struct CGAffineTransform {
CGFloat a, b, c, d;
CGFloat tx, ty;
用到的方法:
CGAffineTransform transform = CGAffineTransformRotate(<#CGAffineTransform t#>, <#CGFloat angle#>);
参数1: 要发生形变属性的视图
参数2: 根据弧度创建
使用方法:
在响应事件中:
CGAffineTransform transform = CGAffineTransformRotate(rotation.view.transform, rotation.rotation);
rotation.view.transform = transform;
// 每次转的时候 需要把旋转的角度重置为0
// 因为要接替上一次旋转的角度开始旋转
rotation.rotation = 0; // 本句很重要, 否则旋转会调整会非常鬼畜
4. 捏合手势
UIPinchGestureRecognizer
属性
- scale
CGFloat 捏合的比例 - velocity
CGFloat 捏合的速度
pinch.view.transform = CGAffineTransformScale(<#CGAffineTransform t#>, <#CGFloat sx#>, <#CGFloat sy#>)
参数1: 要发生形变属性的视图
参数2, 3: 捏合的比例
使用方法:
// 根据缩放的刻度改变形变的属性
pinch.view.transform = CGAffineTransformScale(pinch.view.transform, pinch.scale, pinch.scale);
// 重置捏合比例
pinch.scale = 1;
// 然而相册的捏合和这个一点关系没有
5. 平移手势
UIPanGestureRecognizer
属性
- minimumNumberOfTouches
NSUInteger 默认是1, 表示触发平移手势所需的手指数 - maximumNumberOfTouches
NSUInteger 默认是最大值, 表示触发平移手势所需最大操作手指头数
使用方法:
// 获取平移的点(相对于要平移的试图)
CGPoint p = [pan translationInView:pan.view];

// 根据这个点 改变形变属性
pan.view.transform = CGAffineTransformTranslate(pan.view.transform, p.x, p.y);
// 重置这个点
[pan setTranslation:CGPointMake(0, 0) inView:pan.view];
*6. 轻扫手势
UISwipeGestureRecognizer
属性
- numberOfTouchesRequired
NSUInteger 默认是1 识别轻扫手势的最小手指数 - direction
UISwipeGestureRecognizerDirection 默认是右, 识别轻扫手势的扫动放向
typedef NS_OPTIONS(NSUInteger, UISwipeGestureRecognizerDirection) {
    UISwipeGestureRecognizerDirectionRight = 1 << 0,     // 右扫
    UISwipeGestureRecognizerDirectionLeft  = 1 << 1,     // 左扫
    UISwipeGestureRecognizerDirectionUp    = 1 << 2,     // 上扫
    UISwipeGestureRecognizerDirectionDown  = 1 << 3      // 下扫
}
使用方法:
参照以上
7. 屏幕边缘平移手势 是iOS7中新增的⼿势。
UIScreenEdgePanGestureRecognizer
属性
- edges
UIRectEdge 触发边缘平移手势的边缘方位
 typedef NS_OPTIONS(NSUInteger, UIRectEdge) {
    UIRectEdgeNone   = 0,          // 无
    UIRectEdgeTop    = 1 << 0,     // 上
    UIRectEdgeLeft   = 1 << 1,     // 左
    UIRectEdgeBottom = 1 << 2,     // 下
    UIRectEdgeRight  = 1 << 3,     // 右
    UIRectEdgeAll    = UIRectEdgeTop | UIRectEdgeLeft | UIRectEdgeBottom | UIRectEdgeRight                    // 所有方向
};
使用方法
参照以上
tips:通常需要换图片的控件, 一般使用button 不用ImageView


 422
422


 被折叠的 条评论
为什么被折叠?
被折叠的 条评论
为什么被折叠?
 到【灌水乐园】发言


