


个人认为android的屏幕适配主要就从两点考虑:适配屏幕的大小与分辨率
最重要的一点就是,当我们准备开发一个项目的时候,就要考虑到自己要用哪种适配方式比较合适。从而达到在一开始的时候,就在不断的做着适配的工作,而不是到最后在不断的修改。今天说的主要是针对手机适配的一个自己的看法。如有不妥,还望大家多多指教,共同进步。
–自己觉得这个方案还不错,就拿过来当总结了。
下面的方案来自Android Day Day Up 一群的【blue-深圳】,谢谢他的分享精神。
附上个人认为不错的博客地址,作为参考
为什么要这样做的简述我就不过多的说明了,可以先去参考一下这个链接。
1.生成代码
import java.io.File;
import java.io.FileNotFoundException;
import java.io.FileOutputStream;
import java.io.PrintWriter;
public class MakeXml {
//layoutroot是在E盘自动创建的一个文件夹,也即是在androidstudio中运行之后代码生成的位置
private final static String rootPath = “E:\layoutroot\values-{0}x{1}\”;
private final static float dw = 320f;
private final static float dh = 480f;
private final static String WTemplate = "<dimen name=\"x{0}\">{1}px</dimen>\n";
private final static String HTemplate = "<dimen name=\"y{0}\">{1}px</dimen>\n";

public static void main(String[] args) {
    makeString(320, 480);
    makeString(480, 800);
    makeString(480, 854);
    makeString(540, 960);
    makeString(600, 1024);
    makeString(720, 1184);
    makeString(720, 1196);
    makeString(720, 1280);
    makeString(768, 1024);
    makeString(800, 1280);
    makeString(1080, 1812);
    makeString(1080, 1920);
    makeString(1440, 2560);
}

public static void makeString(int w, int h) {
    StringBuffer sb = new StringBuffer();
    sb.append("<?xml version=\"1.0\" encoding=\"utf-8\"?>\n");
    sb.append("<resources>");
    float cellw = w / dw;
    for (int i = 1; i < 320; i++) {
        sb.append(WTemplate.replace("{0}", i + "").replace("{1}",
                change(cellw * i) + ""));
    }
    sb.append(WTemplate.replace("{0}", "320").replace("{1}", w + ""));
    sb.append("</resources>");

    StringBuffer sb2 = new StringBuffer();
    sb2.append("<?xml version=\"1.0\" encoding=\"utf-8\"?>\n");
    sb2.append("<resources>");
    float cellh = h / dh;
    for (int i = 1; i < 480; i++) {
        sb2.append(HTemplate.replace("{0}", i + "").replace("{1}",
                change(cellh * i) + ""));
    }
    sb2.append(HTemplate.replace("{0}", "480").replace("{1}", h + ""));
    sb2.append("</resources>");

    String path = rootPath.replace("{0}", h + "").replace("{1}", w + "");
    File rootFile = new File(path);
    if (!rootFile.exists()) {
        rootFile.mkdirs();
    }
    File layxFile = new File(path + "lay_x.xml");
    File layyFile = new File(path + "lay_y.xml");
    try {
        PrintWriter pw = new PrintWriter(new FileOutputStream(layxFile));
        pw.print(sb.toString());
        pw.close();
        pw = new PrintWriter(new FileOutputStream(layyFile));
        pw.print(sb2.toString());
        pw.close();
    } catch (FileNotFoundException e) {
        e.printStackTrace();
    }

}
        public static float change(float a) {
            int temp = (int) (a * 100);
            return temp / 100f;
        }
}
在androidstudio中选中这个类,右键->run “MakeXml.main()”,运行结束之后会出现 Process finished with exit code 0代表成功了,可以去E盘查找。
因为生成的代码中并没有包含所有手机的尺寸,当找不到的时候会报错,所以我们还需在values文件夹下面再创建两个默认的lax.xml与lay.xml,不过单位要是dp哦。
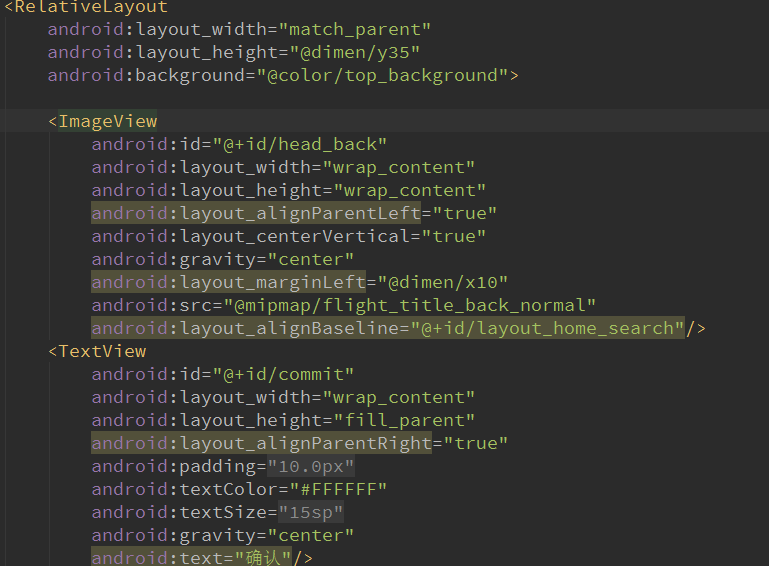
在布局中的引用:
需要知道的是不论是width、height、margin、left等等,都可以根据自己理解的x轴还是y轴的这样子来引用。自己当时纠结过这个问题,所有提出来而已。


 353
353


 被折叠的 条评论
为什么被折叠?
被折叠的 条评论
为什么被折叠?
 到【灌水乐园】发言


