


package com.training.core.aspect;

import org.apache.log4j.Logger;
import org.aspectj.lang.JoinPoint;
import org.aspectj.lang.annotation.AfterReturning;
import org.aspectj.lang.annotation.Aspect;
import org.aspectj.lang.annotation.Before;
import org.aspectj.lang.annotation.Pointcut;
import org.springframework.core.annotation.Order;
import org.springframework.stereotype.Component;
import org.springframework.web.context.request.RequestContextHolder;
import org.springframework.web.context.request.ServletRequestAttributes;

import javax.servlet.http.HttpServletRequest;
import java.util.Arrays;

/**
 * Web层日志切面
 */
@Aspect
@Order(5)
@Component
public class WebLogAspect {

    private Logger logger = Logger.getLogger(getClass());

    ThreadLocal<Long> startTime = new ThreadLocal<>();

    @Pointcut("execution(public * com.training..*.*Controller(..))")
    public void webLog(){}

    @Before("webLog()")
    public void doBefore(JoinPoint joinPoint) throws Throwable {
        startTime.set(System.currentTimeMillis());

        // 接收到请求,记录请求内容
        ServletRequestAttributes attributes = (ServletRequestAttributes) RequestContextHolder.getRequestAttributes();
        HttpServletRequest request = attributes.getRequest();

        // 记录下请求内容
        logger.info("URL : " + request.getRequestURL().toString());
        logger.info("HTTP_METHOD : " + request.getMethod());
        logger.info("IP : " + request.getRemoteAddr());
        logger.info("CLASS_METHOD : " + joinPoint.getSignature().getDeclaringTypeName() + "." + joinPoint.getSignature().getName());
        logger.info("ARGS : " + Arrays.toString(joinPoint.getArgs()));

    }

    @AfterReturning(returning = "ret", pointcut = "webLog()")
    public void doAfterReturning(Object ret) throws Throwable {
        // 处理完请求,返回内容
        logger.info("RESPONSE : " + ret);
        logger.info("SPEND TIME : " + (System.currentTimeMillis() - startTime.get()));
    }


}
spring主要是针对javaBean的生命周期进行管理的轻量级容器
Spring 模块
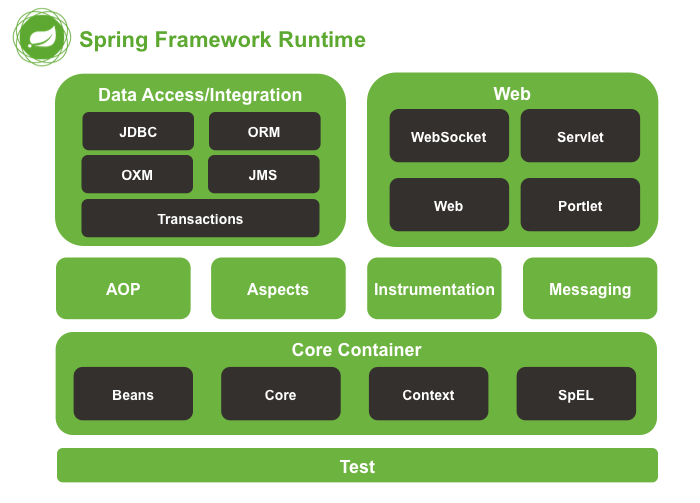
测试模块: 支持Spring 组件使用 JUnit 或 TestNG 框架的测试
核心容器: IOC,Beans,Context,SpringEL
AOP: 提供了面向方面编程实现,允许您定义方法拦截器和切入点,以干净解耦,实现的功能,应该分开的代码
Aspects: 提供与AspectJ的集成这又是一个功能强大且成熟的面向方面编程(AOP)框架
Instrumentation: 提供了一定的应用服务器中使用类工具的支持和类加载器实现。
Messaging: 对消息架构和协议的支持
数据访问/集成: JDBC,ORM,OXM,JMS和事务处理模块
Web: Web,WebSocket,Servlet和网络的Portlet 组件
Spring 生态(主要项目)
Spring Boot : 使用默认开发配置来实现快速开发。
Spring Batch: 简化对大量数量的批处理操作。
Spring Data: 提供对主流关系型和非关系型数据库的支持。
Spring Security: 提供用户认证、授权、安全服务等工具。
Spring AMQP: 提供对高级消息队列协议的支持。
Spring Web Flow: 提供Web工作流引擎。
Spring Android: 为Android终端开发应用提供Sring支持。
Spring Mobile: 为移动终端的服务器应用开发提供支持。
Spring Intergration: 为企业的数据集成提供了解决方案。
IOC(基于Java配置)
1.定义service(Bean)
public class UseFunctionService {
    FunctionService functionService;
    public void setFunctionService(FunctionService functionService) {
        this.functionService = functionService;
    }
    public String sayHello(String word){
        return functionService.sayHello(word);
    }
}
2.定义调用service(Bean)
public class FunctionService {
    public String sayHello(String word){
        return "hello"+word;
    }
}
3.定义配置类
@Configuration
public class javaConfig {
    @Bean
    public  FunctionService functionService(){
        return new FunctionService();
    }
    @Bean
    public  UseFunctionService useFunctionService(){
        UseFunctionService useFunctionService=new UseFunctionService();
                            useFunctionService.setFunctionService(functionService());
        return useFunctionService;
    }
}
4.定义运行类
public class Main {
    public static void main(String[] args) {
        AnnotationConfigApplicationContext ct=new AnnotationConfigApplicationContext(javaConfig.class);
        UseFunctionService useFunctionService=ct.getBean(UseFunctionService.class);
        System.out.println(useFunctionService.sayHello("ioc"));
        ct.close();
    }
}
- 1
- 2
- 3
- 4
- 5
- 6
- 7
- 8
- 9
- 10
- 11
- 12
- 13
- 14
- 15
- 16
- 17
- 18
- 19
- 20
- 21
- 22
- 23
- 24
- 25
- 26
- 27
- 28
- 29
- 30
- 31
- 32
- 33
- 34
- 35
- 36
- 37
- 38
- 39

- 1
- 2
- 3
- 4
- 5
- 6
- 7
- 8
- 9
- 10
- 11
- 12
- 13
- 14
- 15
- 16
- 17
- 18
- 19
- 20
- 21
- 22
- 23
- 24
- 25
- 26
- 27
- 28
- 29
- 30
- 31
- 32
- 33
- 34
- 35
- 36
- 37
- 38
- 39
AOP(基于注解配置)
1.定义拦截规则的注解
@Target(ElementType.METHOD)
@Retention(RetentionPolicy.RUNTIME)
@Documented
public @interface Action {
    String name();
}
2.定义使用注解被拦截的类
@Service
public class DemoAnnotationService {
    @Action(name="add")
    public void add(){};
}
3.定义使用方法被拦截的类
@Service
public class DemoMethodService {
    public void add(){};
}
4.定义切面
@Aspect
@Component
public class LogAspect {
    @Pointcut("@annotation(com.aop.Action)")
    public void annocationPointCut(){};

    @After("annocationPointCut()")
    public void after(JoinPoint joinPoint){
        MethodSignature sig= (MethodSignature)joinPoint.getSignature();
        Method method=sig.getMethod();
        Action action=method.getAnnotation(Action.class);
        System.out.println(action.name());
    }
    @Before("execution(* com.aop.DemoMethodService.*(..))")
    public void before(JoinPoint joinPoint){
        MethodSignature sig= (MethodSignature)joinPoint.getSignature();
        Method method=sig.getMethod();
        System.out.println(method.getName());
    }
}
5.定义配置类
@Configuration
@ComponentScan("com.aop")
@EnableAspectJAutoProxy
public class AopConfig {}
6.定义运行类
public class Main {
    public static void main(String[] args) {
        AnnotationConfigApplicationContext context=new AnnotationConfigApplicationContext(AopConfig.class);
        DemoAnnotationService s1=context.getBean(DemoAnnotationService.class);
        DemoMethodService s2=context.getBean(DemoMethodService.class);
        s1.add();
        s2.add();
        context.close();
    }
}
- 1
- 2
- 3
- 4
- 5
- 6
- 7
- 8
- 9
- 10
- 11
- 12
- 13
- 14
- 15
- 16
- 17
- 18
- 19
- 20
- 21
- 22
- 23
- 24
- 25
- 26
- 27
- 28
- 29
- 30
- 31
- 32
- 33
- 34
- 35
- 36
- 37
- 38
- 39
- 40
- 41
- 42
- 43
- 44
- 45
- 46
- 47
- 48
- 49
- 50
- 51
- 52
- 53
- 54
- 55
- 1
- 2
- 3
- 4
- 5
- 6
- 7
- 8
- 9
- 10
- 11
- 12
- 13
- 14
- 15
- 16
- 17
- 18
- 19
- 20
- 21
- 22
- 23
- 24
- 25
- 26
- 27
- 28
- 29
- 30
- 31
- 32
- 33
- 34
- 35
- 36
- 37
- 38
- 39
- 40
- 41
- 42
- 43
- 44
- 45
- 46
- 47
- 48
- 49
- 50
- 51
- 52
- 53
- 54
- 55
Spring EL
1.定义被注入的Bean
@Service
public class Demo {
    @Value("作者")
    private String anothor;
    public String getAnothor() {
        return anothor;
    }
    public void setAnothor(String anothor) {
        this.anothor = anothor;
    }
}
test.txt/test.properties
book.author=lzy
book.name=spring boot
2.定义配置类
@Configuration
@ComponentScan("com.el")
@PropertySource("classpath:com/el/test.properties")
public class ElConfig {
    @Value("haha")
    private String normal;
    @Value("#{systemProperties['os.name']}")
    private String osName;
    @Value("#{ T(java.lang.Math).random()*100.0}")
    private double number;
    @Value("#{demo.anothor}")
    private String fromAnthor;
    @Value("classpath:com/el/test.txt")
    private Resource testFile;
    @Value("http://www.baidu.com")
    private Resource testUrl;
    @Value("${book.name}")
    private String bookname;
    @Autowired
    private Environment environment;
    @Bean
    public static PropertySourcesPlaceholderConfigurer propertyConfigInDev() {
        return new PropertySourcesPlaceholderConfigurer();
    }
    public void outputResource() throws IOException{
        System.out.println(normal);
        System.out.println(osName);
        System.out.println(number);
        System.out.println(fromAnthor);
            System.out.println(IOUtils.toString(testFile.getInputStream()));
        System.out.println(bookname);
            System.out.println(environment.getProperty("book.author"
    System.out.println(IOUtils.toString(testUrl.getInputStream()));
    }
}
3.定义运行类
public class Main {
    public static void main(String[] args) throws IOException {
        AnnotationConfigApplicationContext context=new AnnotationConfigApplicationContext(ElConfig.class);
        ElConfig s1=context.getBean(ElConfig.class);
        s1.outputResource();
        context.close();
    }
}
- 1
- 2
- 3
- 4
- 5
- 6
- 7
- 8
- 9
- 10
- 11
- 12
- 13
- 14
- 15
- 16
- 17
- 18
- 19
- 20
- 21
- 22
- 23
- 24
- 25
- 26
- 27
- 28
- 29
- 30
- 31
- 32
- 33
- 34
- 35
- 36
- 37
- 38
- 39
- 40
- 41
- 42
- 43
- 44
- 45
- 46
- 47
- 48
- 49
- 50
- 51
- 52
- 53
- 54
- 55
- 56
- 57
- 58
- 59
- 60
- 1
- 2
- 3
- 4
- 5
- 6
- 7
- 8
- 9
- 10
- 11
- 12
- 13
- 14
- 15
- 16
- 17
- 18
- 19
- 20
- 21
- 22
- 23
- 24
- 25
- 26
- 27
- 28
- 29
- 30
- 31
- 32
- 33
- 34
- 35
- 36
- 37
- 38
- 39
- 40
- 41
- 42
- 43
- 44
- 45
- 46
- 47
- 48
- 49
- 50
- 51
- 52
- 53
- 54
- 55
- 56
- 57
- 58
- 59
- 60
其它:Bean[Scope、初始化、销毁]、Profile、Event、Aware、多线程、任务、Conditional、组合注解与元注解、Enable、测试。
代码下载地址:http://download.csdn.net/detail/qq_30364013/9615477
Spring MVC
注解:
@Controller: 声明为控制器,与@Service 、 @Repository 和 @Component 注解的作用是等价的。
@RestController: 返回数据时不需要@ResponseBody,返回数据的媒体类型为json/xml对象会自动转换成json/xml。
@RequestMapping:一个用来处理请求地址映射的注解,可用于类或方法上。用于类上,表示类中的所有响应请求的方法都是以该地址作为父路径。
value:    指定请求的实际地址。
method:   指定请求的method类型。
consumes: 指定处理请求的提交内容类型(Content-Type)。
produces:  指定返回的内容类型,仅当request请求头中的(Accept)类型
           中包含该指定类型才返回;
params:   指定request中必须包含某些参数值是,才让该方法处理。
headers:  指定request中必须包含某些指定的header值,才能让该方法处理。
consumes="application/json"--仅处理Content-Type为“application/json”类型的请求。
produces="application/json"--仅处理Accept头中包含"application/json"的请求,同时暗示了返回的内容类型为application/json。
params="Param=xxx"--仅处理请求中包含了名为“Param”,值为“xxx”的请求。
headers="Referer=xxx"--仅处理Refer为“xxx”的请求。
- 1
- 2
- 3
- 4
- 5
- 6
- 7
- 8
- 9
- 10
- 11
- 1
- 2
- 3
- 4
- 5
- 6
- 7
- 8
- 9
- 10
- 11
@RequestBody:该注解用于读取Request请求的body部分数据,使用系统默认配置的HttpMessageConverter进行解析,然后把相应的数据绑定到要返回的对象上;再把HttpMessageConverter返回的对象数据绑定到 controller中方法的参数上。
@ResponseBody: 该注解用于将Controller的方法返回的对象,通过适当的HttpMessageConverter转换为指定格式后,写入到Response对象的body数据区。和response.getWriter().print(“str”)效果类似。
@PathVariable: 用来获得动态的URL请求参数,适用于REST风格。
url:http://localhost:8080/Springmvc/user/pageNum/1
@RequestMapping(value=”/page/{pageNum}”)
public String page(@PathVariable int pageNum){}
@RequestParam: 用来获得静态的URL请求参数。
url:http://localhost:8080/Springmvc/user/page.do?pageNum=1
@RequestMapping(value=”/page.do”)
public String page(@RequestParam int pageNum){}
HttpMessageConverter实现类
StringHttpMessageConverter:将请求信息转换为字符串。
ByteArrayHttpMessageConverter:读写二进制数据,响应信息媒体类型为application/octer-stream。
Jaxb2RootElementHttpMessageConverter:通过JAXB2读写XML信息,响应信息的媒体类型为text/xml或application/xml。
MappingJackson2HttpMessageConverter:利用jackson的ObjectMapper读写Json数据,响应媒体类型为application/json。
InternalResourceViewResolver视图解析器
MultipartResolver处理器:SpringMVC上传文件时,需要配置。
@ControllerAdvice: 将作用在所有注解了@RequestMapping的控制器的方法上。
@ExceptionHandler:用于全局处理控制器里的异常。
@InitBinder:用来设置WebDataBinder【一个把字符串形式的参数转换成服务端真正需要的类型的转换工具】。
@ModelAttribute:本来作用是绑定键值对到Model中,此处让全局的@RequestMapping都能获得在此处设置的键值对。
在spring-mvc配置文件将@ControllerAdvice包含进来。
@ControllerAdvice
public class DemoHandlerAdvice {
@InitBinder
    protected void initBinder(WebDataBinder binder) {
        binder.registerCustomEditor(String.class, new PropertyEditorSupport() {
            @Override
            public void setAsText(String text) {
                setValue(text == null ? null : StringEscapeUtils.escapeHtml4(text.trim()));
            }
            @Override
            public String getAsText() {
                Object value = getValue();
                return value != null ? value.toString() : "";
            }
        });
    }
    @ExceptionHandler({AuthenticationException.class})
    public String authenticationException() {
        return "error/403";
    }
    @ModelAttribute
    public void addAttributes(Model model){
        model.addAttribute("msg","额外的信息");
    }
}
- 1
- 2
- 3
- 4
- 5
- 6
- 7
- 8
- 9
- 10
- 11
- 12
- 13
- 14
- 15
- 16
- 17
- 18
- 19
- 20
- 21
- 22
- 23
- 24
- 25
- 26
- 1
- 2
- 3
- 4
- 5
- 6
- 7
- 8
- 9
- 10
- 11
- 12
- 13
- 14
- 15
- 16
- 17
- 18
- 19
- 20
- 21
- 22
- 23
- 24
- 25
- 26
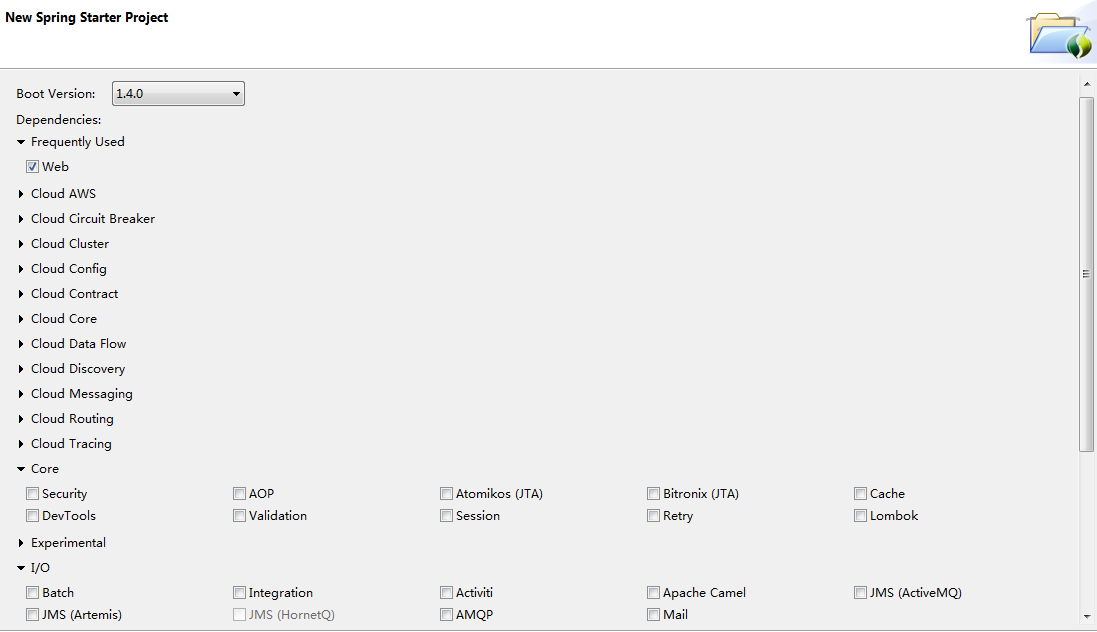
Spring Boot
1.习惯由于配置。提倡零配置。
2.可以独立运行。只需通过Java -jar xx.jar来运行。
3.内嵌servlet容器。
4.简化Maven的依赖加载。
5.尽可能的根据项目依赖来自动配置 Spring 框架。
6.提供可以直接在生产环境中使用的功能,如性能指标、应用信息和应用健康检查。
7.没有代码生成,也没有 XML 配置文件。
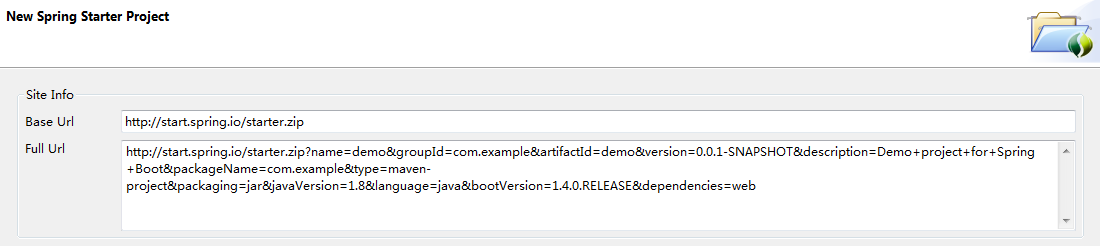
<dependency>
            <groupId>org.springframework.boot</groupId>
            <artifactId>spring-boot-starter-web</artifactId>
</dependency>
- 1
- 2
- 3
- 4
- 1
- 2
- 3
- 4
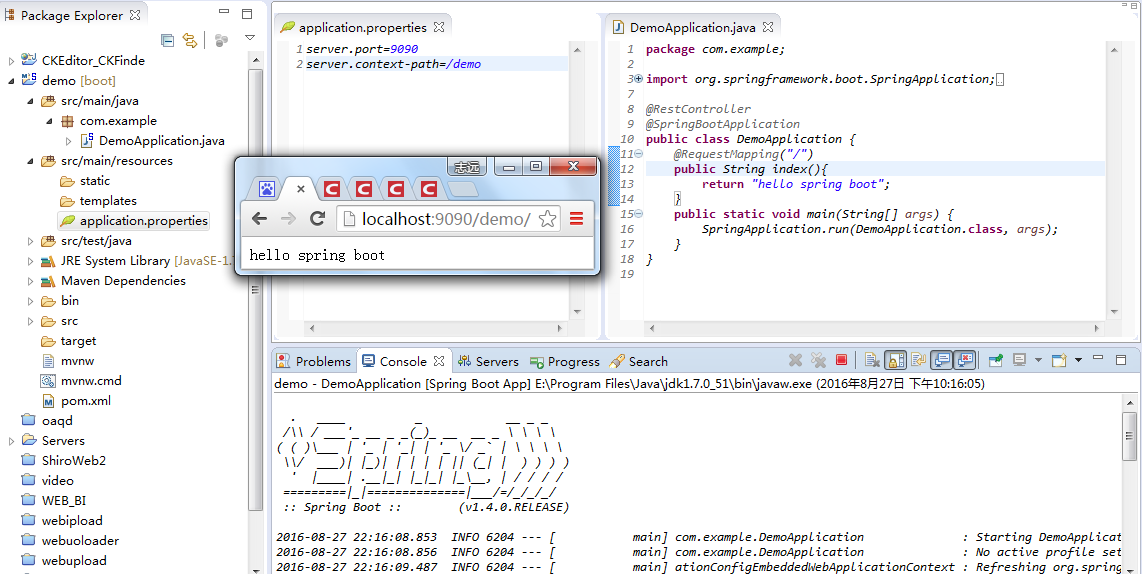
@SpringBootApplication :是Spring Boot的核心注解,它本身是一个的注解组合,包含了启动配置的一系列功能。其中,@Configuration是一个配置,@EnableAutoConfiguration让Spring Boot根据类路径中的jar包依赖为当前项目进行自动配置。@ComponentScan自动bean扫描注入。
默认配置:spring.boot.autoconfigure.web包下。
自定义配置:application.properties【servlet容器、日志、数据源…】可能会和自带的配置或第三方配置冲突。
starter pom官方
spring-boot-starter 核心Spring Boot starter,包括自动配置支持,日志和YAML
spring-boot-starter-actuator 生产准备的特性,用于帮你监控和管理应用
spring-boot-starter-amqp 对高级消息队列协议的支持,通过spring-rabbit实现
spring-boot-starter-aop 对面向切面编程的支持,包括spring-aop和AspectJ
spring-boot-starter-batch 对Spring Batch的支持,包括HSQLDB数据库
spring-boot-starter-data-jpa 对Java持久化API的支持,包括spring-data-jpa,spring-orm和hibernate
spring-boot-starter-data-MongoDB 对MongoDB NOSQL数据库的支持,包括spring-data-mongodb
spring-boot-starter-data-rest 对通过REST暴露Spring Data仓库的支持,通过spring-data-rest-webmvc实现
spring-boot-starter-data-solr 对Apache Solr搜索平台的支持,包括spring-data-solr
spring-boot-starter-freemarker 对FreeMarker模板引擎的支持
spring-boot-starter-groovy-templates 对Groovy模板引擎的支持
spring-boot-starter-hateoas 对基于HATEOAS的RESTful服务的支持,通过spring-hateoas实现
spring-boot-starter-hornetq 对”Java消息服务API”的支持,通过HornetQ实现
spring-boot-starter-integration 对普通spring-integration模块的支持
spring-boot-starter-jdbc 对JDBC数据库的支持
spring-boot-starter-jersey 对Jersey RESTful Web服务框架的支持
spring-boot-starter-jta-atomikos 对JTA分布式事务的支持,通过Atomikos实现
spring-boot-starter-jta-bitronix 对JTA分布式事务的支持,通过Bitronix实现
spring-boot-starter-mail 对javax.mail的支持
spring-boot-starter-mobile 对spring-mobile的支持
spring-boot-starter-mustache 对Mustache模板引擎的支持
spring-boot-starter-Redis 对REDIS键值数据存储的支持,包括spring-redis
spring-boot-starter-security 对spring-security的支持
spring-boot-starter-social-facebook 对spring-social-facebook的支持
spring-boot-starter-social-linkedin 对spring-social-linkedin的支持
spring-boot-starter-social-twitter 对spring-social-twitter的支持
spring-boot-starter-test 对常用测试依赖的支持,包括JUnit, Hamcrest和Mockito,还有spring-test模块
spring-boot-starter-thymeleaf 对Thymeleaf模板引擎的支持,包括和Spring的集成
spring-boot-starter-velocity 对Velocity模板引擎的支持
spring-boot-starter-web 对全栈web开发的支持,包括Tomcat和spring-webmvc
spring-boot-starter-websocket 对WebSocket开发的支持
spring-boot-starter-ws 对Spring Web服务的支持


 3075
3075


 被折叠的 条评论
为什么被折叠?
被折叠的 条评论
为什么被折叠?
 到【灌水乐园】发言


